이 문서에서는 Xamarin.tvOS 앱 내에서 테이블 뷰 및 테이블 뷰 컨트롤러를 디자인하고 사용하는 것에 대해 설명합니다.
tvOS에서 테이블 뷰는 선택적으로 그룹 또는 섹션으로 구성할 수 있는 스크롤 행의 단일 열로 표시됩니다. 테이블 뷰는 사용자에게 많은 양의 데이터를 효율적으로 표시해야 하는 경우 명확하게 이해할 수 있도록 사용해야 합니다.
테이블 뷰는 일반적으로 분할 보기의 한쪽에 탐색으로 표시되며 선택한 항목의 세부 정보는 반대쪽에 표시됩니다.

테이블 뷰 정보
스크롤 UITableView 가능한 행의 단일 열을 선택적으로 그룹 또는 섹션으로 구성할 수 있는 계층적 정보 목록으로 표시합니다.

Apple에는 테이블 작업에 대한 다음과 같은 제안이 있습니다.
- 너비 에 주의 - 테이블 너비에서 올바른 균형을 맞추십시오. 테이블이 너무 넓으면 멀리서 스캔하기 어려울 수 있으며 사용 가능한 콘텐츠 영역에서 벗어날 수 있습니다. 테이블이 너무 좁으면 정보가 잘리거나 줄 바꿈될 수 있습니다. 다시 사용자가 방 전체에서 읽기 어려울 수 있습니다.
- 신속하게 테이블 내용 표시 - 큰 데이터 목록의 경우 콘텐츠를 지연 로드하고 테이블이 사용자에게 표시되는 즉시 정보를 표시하기 시작합니다. 테이블을 로드하는 데 시간이 오래 걸리면 사용자가 앱에 대한 관심을 잃거나 잠긴 것으로 생각할 수 있습니다.
- 긴 콘텐츠 로드 정보 - 긴 테이블 로드 시간이 불가피한 경우 앱이 잠기지 않았음을 알 수 있도록 진행률 표시줄 또는 활동 표시기를 표시합니다.
테이블 뷰 셀 형식
A UITableViewCell 는 테이블 뷰의 개별 데이터 행을 나타내는 데 사용됩니다. Apple은 다음과 같은 몇 가지 기본 표 셀 형식을 정의했습니다.
- 기본값 - 이 형식은 셀의 왼쪽에 이미지 옵션을 표시하고 오른쪽에는 왼쪽 맞춤 제목을 표시합니다.
- 부제목 - 이 형식은 첫 번째 줄에 왼쪽 맞춤 제목을 표시하고 다음 줄에는 더 작은 왼쪽 맞춤 부제목을 표시합니다.
- 값 1 - 이 형식은 같은 줄에 더 밝은 색의 오른쪽 맞춤 부제목이 있는 왼쪽 맞춤 제목을 표시합니다.
- 값 2 - 이 형식은 같은 줄에 더 밝은 색의 왼쪽 맞춤 부제목이 있는 오른쪽 맞춤 제목을 표시합니다.
모든 기본 테이블 뷰 셀 형식은 노출 표시기 또는 확인 표시와 같은 그래픽 요소도 지원합니다.
또한 사용자 지정 테이블 뷰 셀 형식을 정의하고 인터페이스 디자이너에서 또는 코드를 통해 만드는 프로토타입 셀을 표시할 수 있습니다.
Apple에는 테이블 뷰 셀을 사용하기 위한 다음과 같은 제안이 있습니다.
- 텍스트 클리핑 방지 - 텍스트가 잘리지 않도록 텍스트의 개별 줄을 짧게 유지합니다. 잘린 단어나 구는 사용자가 방 전체에서 구문 분석하기가 어렵습니다.
- 포커스가 있는 행 상태를 고려합니다. 포커스가 있을 때 더 둥근 모서리가 있는 행이 커지므로 모든 상태에서 셀의 모양을 테스트해야 합니다. 이미지 또는 텍스트가 잘리거나 포커스가 있는 상태에서 잘못 표시될 수 있습니다.
- 편집 가능한 테이블 사용 - 테이블 행 이동 또는 삭제는 iOS보다 tvOS에서 더 많은 시간이 소요됩니다. 이 기능이 tvOS 앱을 추가하거나 방해하지 않는지 신중하게 결정해야 합니다.
- 적절한 경우 사용자 지정 셀 형식 만들기 - 기본 제공 테이블 뷰 셀 형식은 많은 경우에 적합하지만, 비표준 정보에 대한 사용자 지정 셀 형식을 만들어 더 효율적으로 제어하고 사용자에게 정보를 제공하는 것이 좋습니다.
테이블 뷰 작업
Xamarin.tvOS 앱에서 테이블 뷰를 사용하는 가장 쉬운 방법은 인터페이스 디자이너에서 모양을 만들고 수정하는 것입니다.
시작하려면 다음을 수행합니다.
Mac용 Visual Studio 새 tvOS 앱 프로젝트를 시작하고 tvOS>앱 단일 보기 앱을> 선택하고 다음 단추를 클릭합니다.

앱의 이름을 입력하고 다음을 클릭합니다.

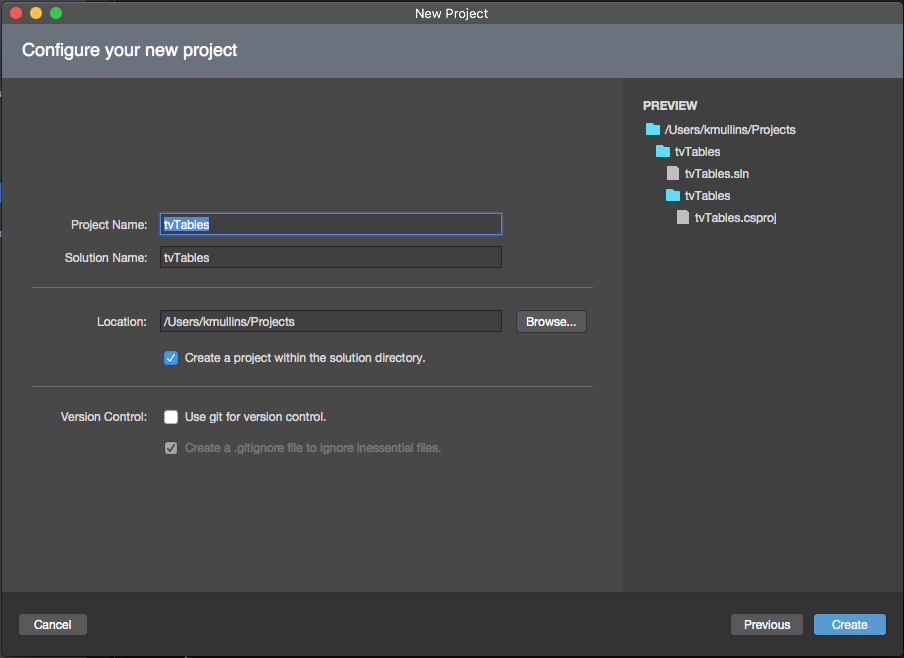
프로젝트 이름 및 솔루션 이름을 조정하거나 기본값을 적용하고 만들기 단추를 클릭하여 새 솔루션을 만듭니다.
Solution Pad에서 파일을 두 번 클릭하여
Main.storyboardiOS 디자이너에서 엽니다.
기본 보기 컨트롤러를 선택하고 삭제합니다.

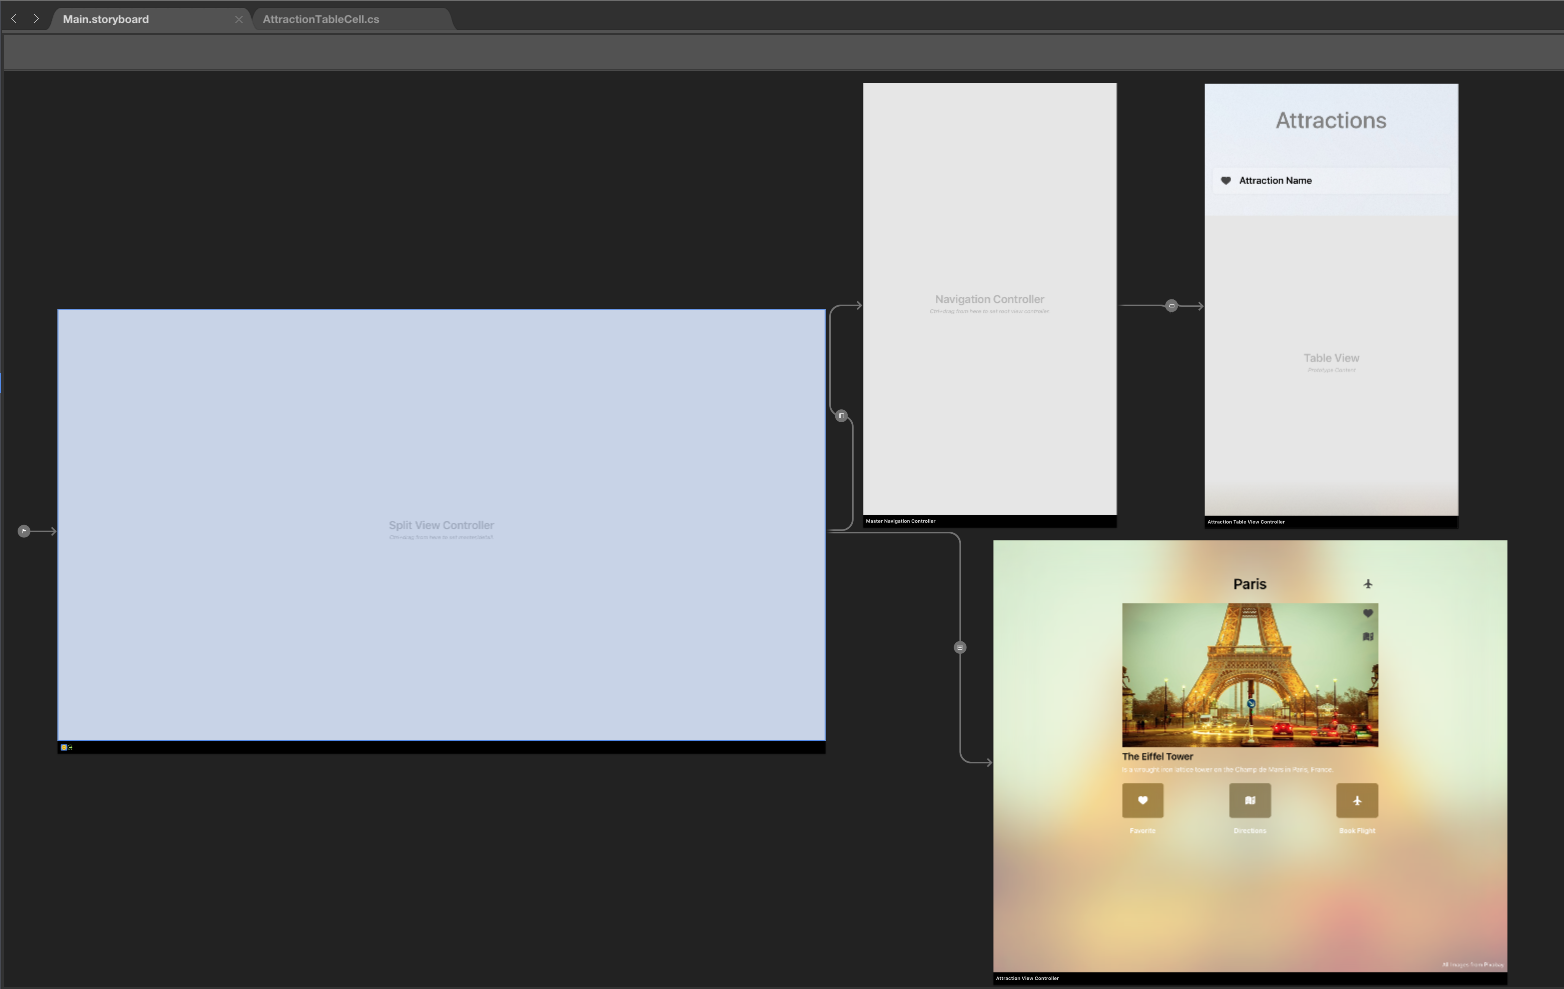
도구 상자에서 분할 보기 컨트롤러를 선택하고 디자인 화면으로 끕니다.
기본적으로 왼쪽에는 탐색 보기 컨트롤러와 테이블 뷰 컨트롤러가 있고 오른쪽에는 뷰 컨트롤러가 있는 분할 보기가 표시됩니다. 이것은 tvOS에서 테이블 뷰의 애플의 제안 된 사용:
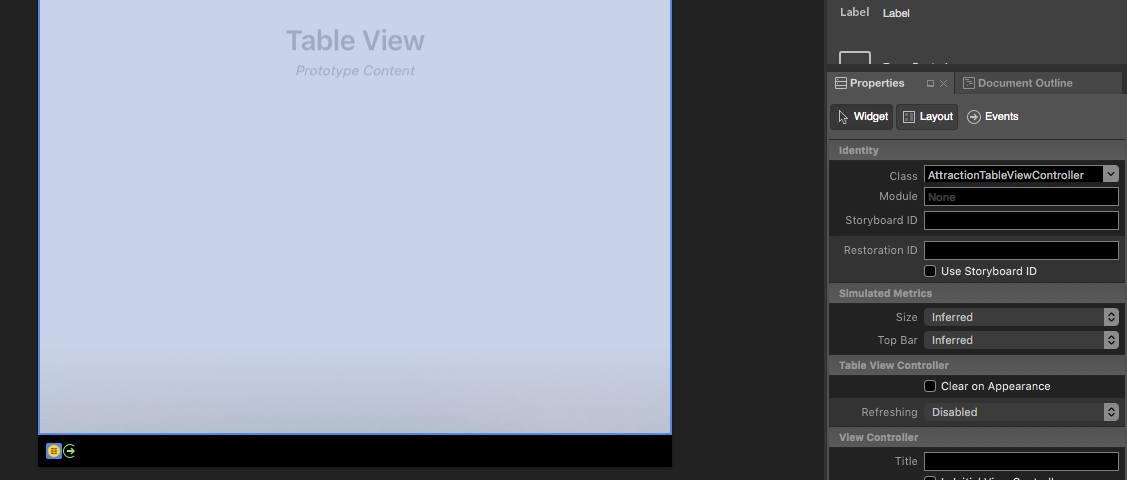
테이블 뷰의 모든 부분을 선택하고 나중에 C# 코드에서 액세스할 수 있도록 속성 탐색기의 위젯 탭에서 사용자 지정 클래스 이름을 할당해야 합니다. 예를 들어 테이블 뷰 컨트롤러는 다음과 같습니다.
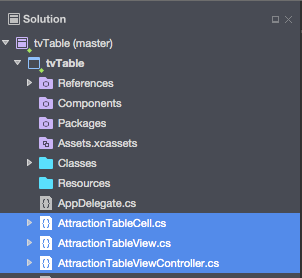
테이블 뷰 컨트롤러, 테이블 뷰 및 프로토타입 셀에 대한 사용자 지정 클래스를 만들어야 합니다. Mac용 Visual Studio 생성될 때 사용자 지정 클래스를 프로젝트 트리에 추가합니다.
다음으로 디자인 화면에서 테이블 뷰를 선택하고 필요에 따라 해당 속성을 조정합니다. 프로토타입 셀 수 및 스타일(일반 또는 그룹화됨)과 같은 경우:
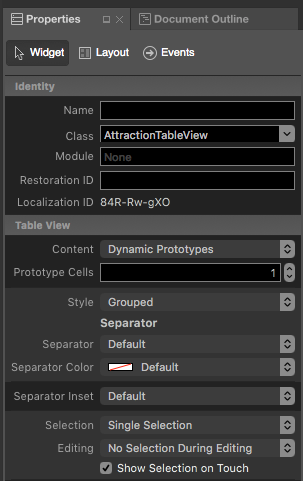
각 프로토타입 셀에 대해 해당 셀을 선택하고 속성 탐색기의 위젯 탭에서 고유 식별자를 할당합니다. 이 단계는 나중에 테이블을 채울 때 이 식별자가 필요하기 때문에 매우 중요 합니다. 예를 들면 다음과 같습니다.
AttrCell
스타일 드롭다운을 통해 셀을 기본 테이블 뷰 셀 형식 중 하나로 표시하거나 사용자 지정으로 설정하고 디자인 화면을 사용하여 도구 상자에서 다른 UI 위젯을 끌어 셀 레이아웃을 지정할 수도 있습니다.

나중에 C# 코드에서 액세스할 수 있도록 속성 탐색기의 위젯 탭에 있는 프로토타입 셀 디자인의 각 UI 요소에 고유한 이름을 할당합니다.

테이블 뷰의 모든 프로토타입 셀에 대해 위의 단계를 반복합니다.
다음으로, UI 디자인의 나머지 부분에 사용자 지정 클래스를 할당하고, 세부 정보 보기를 레이아웃하고, C#에서 액세스할 수 있도록 세부 정보 보기의 각 UI 요소에 고유한 이름을 할당합니다. 예를 들면 다음과 같습니다.
Storyboard에 변경 내용을 저장합니다.


데이터 모델 디자인
테이블 뷰가 더 쉽게 표시할 정보를 사용하고 세부 정보를 쉽게 표시하도록 하려면(사용자가 테이블 뷰에서 행을 선택하거나 강조 표시할 때) 제시된 정보에 대한 데이터 모델 역할을 할 사용자 지정 클래스 또는 클래스를 만듭니다.
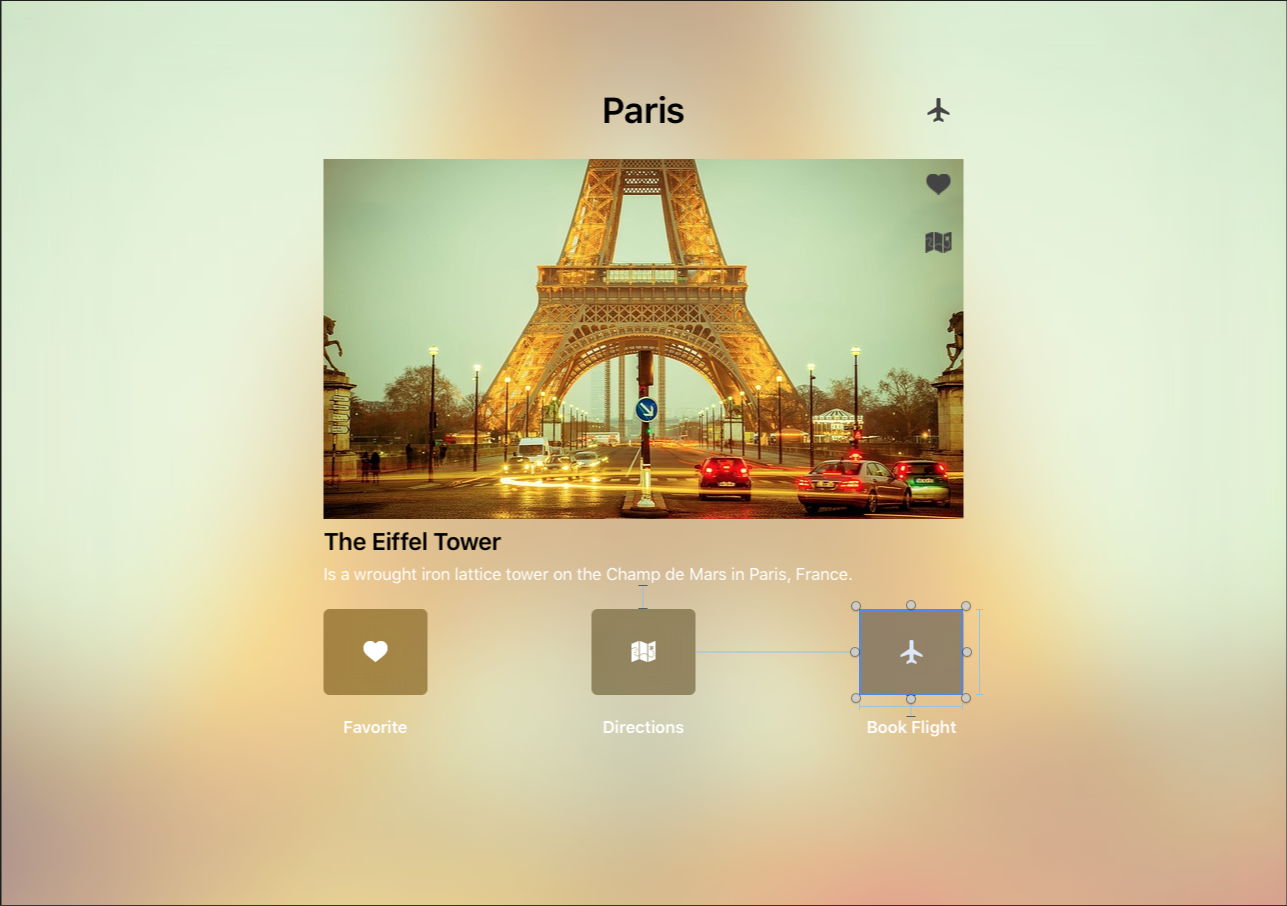
사용자가 선택할 수 있는 고유한 관광명소 목록이 포함된 도시 목록이 포함된 여행 예약 앱의 예를 들어보세요. 사용자는 어트랙션을 즐겨찾기로 표시하고, 어트랙션에 대한 길 찾기를 선택하고, 지정된 도시로 항공편을 예약할 수 있습니다.
어트랙션에 대한 데이터 모델을 만들려면 솔루션 패드에서 프로젝트 이름을 마우스 오른쪽 단추로 클릭하고 새 파일 추가>...를 선택합니다. 이름을 입력 AttractionInformation 하고 새로 만들기 단추를 클릭합니다.


AttractionInformation.cs 파일을 편집하고 다음과 같이 표시합니다.
using System;
using Foundation;

namespace tvTable
{
    public class AttractionInformation : NSObject
    {
        #region Computed Properties
        public CityInformation City { get; set;}
        public string Name { get; set;}
        public string Description { get; set;}
        public string ImageName { get; set;}
        public bool IsFavorite { get; set;}
        public bool AddDirections { get; set;}
        #endregion

        #region Constructors
        public AttractionInformation (string name, string description, string imageName)
        {
            // Initialize
            this.Name = name;
            this.Description = description;
            this.ImageName = imageName;
        }
        #endregion
    }
}
이 클래스는 지정된 어트랙션에 대한 정보를 저장하는 속성을 제공합니다.
그런 다음 솔루션 패드에서 프로젝트 이름을 다시 마우스 오른쪽 단추로 클릭하고 새 파일 추가>...를 선택합니다. 이름을 입력 CityInformation 하고 새로 만들기 단추를 클릭합니다.


CityInformation.cs 파일을 편집하고 다음과 같이 표시합니다.
using System;
using System.Collections.Generic;
using Foundation;

namespace tvTable
{
    public class CityInformation : NSObject
    {
        #region Computed Properties
        public string Name { get; set; }
        public List<AttractionInformation> Attractions { get; set;}
        public bool FlightBooked { get; set;}
        #endregion

        #region Constructors
        public CityInformation (string name)
        {
            // Initialize
            this.Name = name;
            this.Attractions = new List<AttractionInformation> ();
        }
        #endregion

        #region Public Methods
        public void AddAttraction (AttractionInformation attraction)
        {
            // Mark as belonging to this city
            attraction.City = this;

            // Add to collection
            Attractions.Add (attraction);
        }

        public void AddAttraction (string name, string description, string imageName)
        {
            // Create attraction
            var attraction = new AttractionInformation (name, description, imageName);

            // Mark as belonging to this city
            attraction.City = this;

            // Add to collection
            Attractions.Add (attraction);
        }
        #endregion
    }
}
이 클래스는 목적지 도시에 대한 모든 정보를 보유하고, 그 도시에 대한 관광 명소의 컬렉션과 쉽게 도시에 관광 명소를 추가 할 수 있도록 두 가지 도우미 방법 (AddAttraction)을 제공합니다.
테이블 뷰 데이터 원본
각 테이블 뷰에는 테이블에 대한 데이터를 제공하고 테이블 뷰에 필요한 대로 필요한 행을 생성하기 위한 데이터 원본(UITableViewDataSource)이 필요합니다.
위에 제공된 예제의 경우 솔루션 탐색기 프로젝트 이름을 마우스 오른쪽 단추로 클릭하고 새 파일 추가>를 선택하고 호출 AttractionTableDatasource 한 다음 새로 만들기 단추를 클릭합니다. 다음으로 파일을 편집 AttractionTableDatasource.cs 하고 다음과 같이 표시합니다.
using System;
using System.Collections.Generic;
using UIKit;

namespace tvTable
{
    public class AttractionTableDatasource : UITableViewDataSource
    {
        #region Constants
        const string CellID = "AttrCell";
        #endregion

        #region Computed Properties
        public AttractionTableViewController Controller { get; set;}
        public List<CityInformation> Cities { get; set;}
        #endregion

        #region Constructors
        public AttractionTableDatasource (AttractionTableViewController controller)
        {
            // Initialize
            this.Controller = controller;
            this.Cities = new List<CityInformation> ();
            PopulateCities ();
        }
        #endregion

        #region Public Methods
        public void PopulateCities ()
        {
            // Clear existing
            Cities.Clear ();

            // Define cities and attractions
            var Paris = new CityInformation ("Paris");
            Paris.AddAttraction ("Eiffel Tower", "Is a wrought iron lattice tower on the Champ de Mars in Paris, France.", "EiffelTower");
            Paris.AddAttraction ("Musée du Louvre", "is one of the world's largest museums and a historic monument in Paris, France.", "Louvre");
            Paris.AddAttraction ("Moulin Rouge", "French for 'Red Mill', is a cabaret in Paris, France.", "MoulinRouge");
            Paris.AddAttraction ("La Seine", "Is a 777-kilometre long river and an important commercial waterway within the Paris Basin.", "RiverSeine");
            Cities.Add (Paris);

            var SanFran = new CityInformation ("San Francisco");
            SanFran.AddAttraction ("Alcatraz Island", "Is located in the San Francisco Bay, 1.25 miles (2.01 km) offshore from San Francisco.", "Alcatraz");
            SanFran.AddAttraction ("Golden Gate Bridge", "Is a suspension bridge spanning the Golden Gate strait between San Francisco Bay and the Pacific Ocean", "GoldenGateBridge");
            SanFran.AddAttraction ("San Francisco", "Is the cultural, commercial, and financial center of Northern California.", "SanFrancisco");
            SanFran.AddAttraction ("Telegraph Hill", "Is primarily a residential area, much quieter than adjoining North Beach.", "TelegraphHill");
            Cities.Add (SanFran);

            var Houston = new CityInformation ("Houston");
            Houston.AddAttraction ("City Hall", "It was constructed in 1938-1939, and is located in Downtown Houston.", "CityHall");
            Houston.AddAttraction ("Houston", "Is the most populous city in Texas and the fourth most populous city in the US.", "Houston");
            Houston.AddAttraction ("Texas Longhorn", "Is a breed of cattle known for its characteristic horns, which can extend to over 6 ft.", "LonghornCattle");
            Houston.AddAttraction ("Saturn V Rocket", "was an American human-rated expendable rocket used by NASA between 1966 and 1973.", "Rocket");
            Cities.Add (Houston);
        }
        #endregion

        #region Override Methods
        public override UITableViewCell GetCell (UITableView tableView, Foundation.NSIndexPath indexPath)
        {
            // Get cell
            var cell = tableView.DequeueReusableCell (CellID) as AttractionTableCell;

            // Populate cell
            cell.Attraction = Cities [indexPath.Section].Attractions [indexPath.Row];

            // Return new cell
            return cell;
        }

        public override nint NumberOfSections (UITableView tableView)
        {
            // Return number of cities
            return Cities.Count;
        }

        public override nint RowsInSection (UITableView tableView, nint section)
        {
            // Return the number of attractions in the given city
            return Cities [(int)section].Attractions.Count;
        }

        public override string TitleForHeader (UITableView tableView, nint section)
        {
            // Get the name of the current city
            return Cities [(int)section].Name;
        }
        #endregion
    }
}
클래스의 몇 가지 섹션을 자세히 살펴보겠습니다.
먼저 프로토타입 셀의 고유 식별자를 보유하도록 상수(위의 인터페이스 디자이너에 할당된 것과 동일한 식별자)를 정의하고 테이블 뷰 컨트롤러에 바로 가기를 추가하고 데이터에 대한 스토리지를 만들었습니다.
const string CellID = "AttrCell";
public AttractionTableViewController Controller { get; set;}
public List<CityInformation> Cities { get; set;}
다음으로 테이블 뷰 컨트롤러를 저장한 다음, 클래스를 만들 때 데이터 원본을 빌드하고 채웁니다(위에 정의된 데이터 모델 사용).
public AttractionTableDatasource (AttractionTableViewController controller)
{
    // Initialize
    this.Controller = controller;
    this.Cities = new List<CityInformation> ();
    PopulateCities ();
}
예를 들어 메서드는 PopulateCities 단순히 메모리에 데이터 모델 개체를 만들면 되지만 실제 앱의 데이터베이스 또는 웹 서비스에서 쉽게 읽을 수 있습니다.
public void PopulateCities ()
{
    // Clear existing
    Cities.Clear ();

    // Define cities and attractions
    var Paris = new CityInformation ("Paris");
    Paris.AddAttraction ("Eiffel Tower", "Is a wrought iron lattice tower on the Champ de Mars in Paris, France.", "EiffelTower");
    ...
}
이 메서드는 NumberOfSections 테이블의 섹션 수를 반환합니다.
public override nint NumberOfSections (UITableView tableView)
{
    // Return number of cities
    return Cities.Count;
}
일반 스타일 테이블 뷰의 경우 항상 1을 반환합니다.
이 메서드는 RowsInSection 현재 섹션의 행 수를 반환합니다.
public override nint RowsInSection (UITableView tableView, nint section)
{
    // Return the number of attractions in the given city
    return Cities [(int)section].Attractions.Count;
}
일반 테이블 뷰의 경우 데이터 원본의 총 항목 수를 반환합니다.
이 메서드는 TitleForHeader 지정된 섹션에 대한 제목을 반환합니다.
public override string TitleForHeader (UITableView tableView, nint section)
{
    // Get the name of the current city
    return Cities [(int)section].Name;
}
일반 테이블 뷰 형식의 경우 제목을 비워 둡니다("").
마지막으로 테이블 뷰에서 요청하는 경우 메서드를 사용하여 GetCell 프로토타입 셀을 만들고 채웁니다.
public override UITableViewCell GetCell (UITableView tableView, Foundation.NSIndexPath indexPath)
{
    // Get cell
    var cell = tableView.DequeueReusableCell (CellID) as AttractionTableCell;

    // Populate cell
    cell.Attraction = Cities [indexPath.Section].Attractions [indexPath.Row];

    // Return new cell
    return cell;
}
작업에 UITableViewDatasource대한 자세한 내용은 Apple의 UITableViewDatasource 설명서를 참조하세요.
테이블 뷰 대리자
각 테이블 뷰에는 테이블의 사용자 상호 작용 또는 기타 시스템 이벤트에 응답하는 대리자(UITableViewDelegate)가 필요합니다.
위에 제공된 예제의 경우 솔루션 탐색기 프로젝트 이름을 마우스 오른쪽 단추로 클릭하고 새 파일 추가>를 선택하고 호출 AttractionTableDelegate 한 다음 새로 만들기 단추를 클릭합니다. 다음으로 파일을 편집 AttractionTableDelegate.cs 하고 다음과 같이 표시합니다.
using System;
using System.Collections.Generic;
using UIKit;

namespace tvTable
{
    public class AttractionTableDelegate : UITableViewDelegate
    {
        #region Computed Properties
        public AttractionTableViewController Controller { get; set;}
        #endregion

        #region Constructors
        public AttractionTableDelegate (AttractionTableViewController controller)
        {
            // Initializw
            this.Controller = controller;
        }
        #endregion

        #region Override Methods
        public override void RowSelected (UITableView tableView, Foundation.NSIndexPath indexPath)
        {
            var attraction = Controller.Datasource.Cities [indexPath.Section].Attractions [indexPath.Row];
            attraction.IsFavorite = (!attraction.IsFavorite);

            // Update UI
            Controller.TableView.ReloadData ();
        }

        public override bool CanFocusRow (UITableView tableView, Foundation.NSIndexPath indexPath)
        {
            // Inform caller of highlight change
            RaiseAttractionHighlighted (Controller.Datasource.Cities [indexPath.Section].Attractions [indexPath.Row]);
            return true;
        }
        #endregion

        #region Events
        public delegate void AttractionHighlightedDelegate (AttractionInformation attraction);
        public event AttractionHighlightedDelegate AttractionHighlighted;

        internal void RaiseAttractionHighlighted (AttractionInformation attraction)
        {
            // Inform caller
            if (this.AttractionHighlighted != null) this.AttractionHighlighted (attraction);
        }
        #endregion
    }
}
이 클래스의 여러 섹션을 자세히 살펴보겠습니다.
먼저 클래스를 만들 때 테이블 뷰 컨트롤러에 대한 바로 가기를 만듭니다.
public AttractionTableViewController Controller { get; set;}
...

public AttractionTableDelegate (AttractionTableViewController controller)
{
    // Initialize
    this.Controller = controller;
}
그런 다음 행이 선택되면(사용자가 Apple Remote의 터치 표면을 클릭하면) 선택한 행이 나타내는 어트랙션을 즐겨찾기로 표시하려고 합니다.
public override void RowSelected (UITableView tableView, Foundation.NSIndexPath indexPath)
{
    var attraction = Controller.Datasource.Cities [indexPath.Section].Attractions [indexPath.Row];
    attraction.IsFavorite = (!attraction.IsFavorite);

    // Update UI
    Controller.TableView.ReloadData ();
}
다음으로, 사용자가 행을 강조 표시할 때(Apple Remote Touch Surface를 사용하여 포커스를 지정하여) 분할 보기 컨트롤러의 세부 정보 섹션에서 해당 행이 나타내는 어트랙션 의 세부 정보를 표시하려고 합니다.
public override bool CanFocusRow (UITableView tableView, Foundation.NSIndexPath indexPath)
{
    // Inform caller of highlight change
    RaiseAttractionHighlighted (Controller.Datasource.Cities [indexPath.Section].Attractions [indexPath.Row]);
    return true;
}
...

public delegate void AttractionHighlightedDelegate (AttractionInformation attraction);
public event AttractionHighlightedDelegate AttractionHighlighted;

internal void RaiseAttractionHighlighted (AttractionInformation attraction)
{
    // Inform caller
    if (this.AttractionHighlighted != null) this.AttractionHighlighted (attraction);
}
테이블 CanFocusRow 뷰에서 포커스를 가져올 각 행에 대해 메서드가 호출됩니다. 행이 포커스를 가져올 수 있으면 반환 true 하고, 그렇지 않으면 반환합니다 false. 이 예제의 경우 포커스를 받을 때 각 행에서 발생하는 사용자 지정 AttractionHighlighted 이벤트를 만들었습니다.
작업에 UITableViewDelegate대한 자세한 내용은 Apple의 UITableViewDelegate 설명서를 참조하세요.
테이블 뷰 셀
인터페이스 디자이너에서 테이블 뷰에 추가한 각 프로토타입 셀에 대해 새 셀(행)을 만들 때 채울 수 있도록 테이블 뷰 셀(UITableViewCell)의 사용자 지정 인스턴스도 만들었습니다.
예제 앱의 경우 파일을 두 번 클릭하여 AttractionTableCell.cs 편집용으로 열고 다음과 같이 표시합니다.
using System;
using Foundation;
using UIKit;

namespace tvTable
{
    public partial class AttractionTableCell : UITableViewCell
    {
        #region Private Variables
        private AttractionInformation _attraction = null;
        #endregion

        #region Computed Properties
        public AttractionInformation Attraction {
            get { return _attraction; }
            set {
                _attraction = value;
                UpdateUI ();
            }
        }
        #endregion

        #region Constructors
        public AttractionTableCell (IntPtr handle) : base (handle)
        {
        }
        #endregion

        #region Private Methods
        private void UpdateUI ()
        {
            // Trap all errors
            try {
                Title.Text = Attraction.Name;
                Favorite.Hidden = (!Attraction.IsFavorite);
            } catch {
                // Since the UI might not be fully loaded, ignore
                // all errors at this point
            }
        }
        #endregion
    }
}
이 클래스는 지정된 행에 표시된 어트랙션 데이터 모델 개체(AttractionInformation 위에 정의된 대로)에 대한 스토리지를 제공합니다.
private AttractionInformation _attraction = null;
...

public AttractionInformation Attraction {
    get { return _attraction; }
    set {
        _attraction = value;
        UpdateUI ();
    }
}
메서드는 UpdateUI 필요에 따라 UI 위젯(인터페이스 디자이너에서 셀의 프로토타입에 추가됨)을 채웁니다.
private void UpdateUI ()
{
    // Trap all errors
    try {
        Title.Text = Attraction.Name;
        Favorite.Hidden = (!Attraction.IsFavorite);
    } catch {
        // Since the UI might not be fully loaded, ignore
        // all errors at this point
    }
}
작업에 UITableViewCell대한 자세한 내용은 Apple의 UITableViewCell 설명서를 참조하세요.
테이블 뷰 컨트롤러
테이블 뷰 컨트롤러(UITableViewController)는 인터페이스 디자이너를 통해 스토리보드에 추가된 테이블 뷰를 관리합니다.
예제 앱의 경우 파일을 두 번 클릭하여 AttractionTableViewController.cs 편집용으로 열고 다음과 같이 표시합니다.
using System;
using Foundation;
using UIKit;

namespace tvTable
{
    public partial class AttractionTableViewController : UITableViewController
    {
        #region Computed Properties
        public AttractionTableDatasource Datasource {
            get { return TableView.DataSource as AttractionTableDatasource; }
        }

        public AttractionTableDelegate TableDelegate {
            get { return TableView.Delegate as AttractionTableDelegate; }
        }
        #endregion

        #region Constructors
        public AttractionTableViewController (IntPtr handle) : base (handle)
        {
        }
        #endregion

        #region Override Methods
        public override void ViewDidLoad ()
        {
            base.ViewDidLoad ();

            // Setup table
            TableView.DataSource = new AttractionTableDatasource (this);
            TableView.Delegate = new AttractionTableDelegate (this);
            TableView.ReloadData ();
        }
        #endregion
    }
}
이 클래스를 좀 더 자세히 살펴보겠습니다. 먼저 테이블 뷰 DataSource 및 TableDelegate에 더 쉽게 액세스할 수 있도록 바로 가기를 만들었습니다. 나중에 분할 보기의 왼쪽에 있는 테이블 뷰와 오른쪽의 세부 정보 보기 간에 통신하는 데 사용합니다.
마지막으로, 테이블 뷰가 메모리에 로드되면 위에서 만든 및(둘 다) 인스턴스 AttractionTableDatasource AttractionTableDelegate 를 만들어 테이블 뷰에 연결합니다.
작업에 UITableViewController대한 자세한 내용은 Apple의 UITableViewController 설명서를 참조하세요.
모두 함께 당기기
이 문서의 시작 부분에 설명된 것처럼 테이블 뷰는 일반적으로 분할 보기의 한쪽에 탐색으로 표시되며 선택한 항목의 세부 정보가 반대쪽에 표시됩니다. 예시:
tvOS의 표준 패턴이므로 모든 항목을 통합하고 분할 보기의 왼쪽과 오른쪽이 서로 상호 작용하도록 하는 마지막 단계를 살펴보겠습니다.
세부 정보 보기
위에 표시된 여행 앱의 예제에서는 분할 보기의 오른쪽에 세부 정보 보기로 표시되는 표준 뷰 컨트롤러에 대해 사용자 지정 클래스(AttractionViewController)가 정의됩니다.
using System;
using Foundation;
using UIKit;

namespace tvTable
{
    public partial class AttractionViewController : UIViewController
    {
        #region Private Variables
        private AttractionInformation _attraction = null;
        #endregion

        #region Computed Properties
        public AttractionInformation Attraction {
            get { return _attraction; }
            set {
                _attraction = value;
                UpdateUI ();
            }
        }

        public MasterSplitView SplitView { get; set;}
        #endregion

        #region Constructors
        public AttractionViewController (IntPtr handle) : base (handle)
        {
        }
        #endregion

        #region Public Methods
        public void UpdateUI ()
        {
            // Trap all errors
            try {
                City.Text = Attraction.City.Name;
                Title.Text = Attraction.Name;
                SubTitle.Text = Attraction.Description;

                IsFlighBooked.Hidden = (!Attraction.City.FlightBooked);
                IsFavorite.Hidden = (!Attraction.IsFavorite);
                IsDirections.Hidden = (!Attraction.AddDirections);
                BackgroundImage.Image = UIImage.FromBundle (Attraction.ImageName);
                AttractionImage.Image = BackgroundImage.Image;
            } catch {
                // Since the UI might not be fully loaded, ignore
                // all errors at this point
            }
        }
        #endregion

        #region Override Methods
        public override void ViewWillAppear (bool animated)
        {
            base.ViewWillAppear (animated);

            // Ensure the UI Updates
            UpdateUI ();
        }
        #endregion

        #region Actions
        partial void BookFlight (NSObject sender)
        {
            // Ask user to book flight
            AlertViewController.PresentOKCancelAlert ("Book Flight",
                                                      string.Format ("Would you like to book a flight to {0}?", Attraction.City.Name),
                                                      this,
                                                      (ok) => {
                Attraction.City.FlightBooked = ok;
                IsFlighBooked.Hidden = (!Attraction.City.FlightBooked);
            });
        }

        partial void GetDirections (NSObject sender)
        {
            // Ask user to add directions
            AlertViewController.PresentOKCancelAlert ("Add Directions",
                                                     string.Format ("Would you like to add directions to {0} to you itinerary?", Attraction.Name),
                                                     this,
                                                     (ok) => {
                                                         Attraction.AddDirections = ok;
                                                         IsDirections.Hidden = (!Attraction.AddDirections);
                                                     });
        }

        partial void MarkFavorite (NSObject sender)
        {
            // Flip favorite state
            Attraction.IsFavorite = (!Attraction.IsFavorite);
            IsFavorite.Hidden = (!Attraction.IsFavorite);

            // Reload table
            SplitView.Master.TableController.TableView.ReloadData ();
        }
        #endregion
    }
}
여기서는 속성으로 표시되는 어트랙션()을 제공하고 인터페이스 디자이너의 보기에 추가된 UI 위젯을 채우는 메서드를 만들었습니다UpdateUIAttractionInformation.
또한 변경 내용을 테이블 뷰()로 다시 전달하는 데 사용할 분할 뷰 컨트롤러(SplitViewAcctractionTableView)로의 바로 가기를 정의했습니다.
마지막으로 사용자가 어트랙션을 즐겨찾기로 표시하고, 어트랙션에 대한 길 찾기 를 얻고, 지정된 도시로 항공편을 예약할 수 있도록 인터페이스 디자이너에서 만든 세 UIButton 개의 인스턴스에 사용자 지정 작업(이벤트)이 추가되었습니다.
탐색 보기 컨트롤러
테이블 뷰 컨트롤러는 분할 보기의 왼쪽에 있는 탐색 보기 컨트롤러에 중첩되므로 탐색 뷰 컨트롤러는 인터페이스 디자이너에서 사용자 지정 클래스(MasterNavigationController)를 할당하고 다음과 같이 정의했습니다.
using System;
using Foundation;
using UIKit;

namespace tvTable
{
    public partial class MasterNavigationController : UINavigationController
    {
        #region Computed Properties
        public MasterSplitView SplitView { get; set;}
        public AttractionTableViewController TableController {
            get { return TopViewController as AttractionTableViewController; }
        }
        #endregion

        #region Constructors
        public MasterNavigationController (IntPtr handle) : base (handle)
        {
        }
        #endregion
    }
}
다시 말하지만, 이 클래스는 분할 보기 컨트롤러의 양쪽에서 보다 쉽게 통신할 수 있도록 몇 가지 바로 가기를 정의합니다.
SplitView- 탐색 뷰 컨트롤러가 속한 분할 보기 컨트롤러(MainSpiltViewController)에 대한 링크입니다.TableController- 탐색 뷰 컨트롤러에서 위쪽 보기로 표시되는 테이블 뷰 컨트롤러(AttractionTableViewController)를 가져옵니다.
분할 보기 컨트롤러
분할 뷰 컨트롤러는 애플리케이션의 기반이므로 인터페이스 디자이너에서 사용자 지정 클래스(MasterSplitViewController)를 만들고 다음과 같이 정의했습니다.
using System;
using Foundation;
using UIKit;

namespace tvTable
{
    public partial class MasterSplitView : UISplitViewController
    {
        #region Computed Properties
        public AttractionViewController Details {
            get { return ViewControllers [1] as AttractionViewController; }
        }

        public MasterNavigationController Master {
            get { return ViewControllers [0] as MasterNavigationController; }
        }
        #endregion

        #region Constructors
        public MasterSplitView (IntPtr handle) : base (handle)
        {
        }
        #endregion

        #region Override Methods
        public override void ViewDidLoad ()
        {
            base.ViewDidLoad ();

            // Initialize
            Master.SplitView = this;
            Details.SplitView = this;

            // Wire-up events
            Master.TableController.TableDelegate.AttractionHighlighted += (attraction) => {
                // Display new attraction
                Details.Attraction = attraction;
            };
        }
        #endregion
    }
}
먼저 분할 보기()의 세부 정보 쪽과 마스터 쪽(AttractionViewControllerMasterNavigationController)에 대한 바로 가기를 만듭니다. 다시 말하지만, 이것은 나중에 양측 간에 의사 소통을 더 쉽게 할 수 있게 해줍니다.
다음으로 분할 보기가 메모리에 로드되면 분할 보기의 양쪽에 분할 보기 컨트롤러를 연결하고 분할 보기의 세부 정보 쪽에 새 어트랙션을 표시하여 테이블 뷰(AttractionHighlighted)에서 어트랙션을 강조 표시하는 사용자에게 응답합니다.
테이블 뷰 세부 정보
tvOS는 iOS를 기반으로 하므로 테이블 뷰 및 테이블 뷰 컨트롤러는 비슷한 방식으로 설계되고 동작합니다. Xamarin 앱에서 테이블 뷰를 사용하는 방법에 대한 자세한 내용은 테이블 및 셀로 작업하는 iOS 설명서를 참조하세요.
요약
이 문서에서는 Xamarin.tvOS 앱 내에서 테이블 뷰를 디자인하고 사용하는 작업을 설명했습니다. 또한 tvOS 앱에서 테이블 뷰의 일반적인 사용법인 분할 보기 내에서 테이블 뷰를 사용하는 예를 보여 줍니다.