Xamarin.Forms 컨트롤 템플릿
Xamarin.Forms 컨트롤 템플릿을 사용하면 ContentView 파생 사용자 지정 컨트롤 및 ContentPage 파생 페이지의 시각적 구조를 정의할 수 있습니다. 컨트롤 템플릿은 사용자 지정 컨트롤 또는 페이지에 대한 UI(사용자 인터페이스)를 컨트롤 또는 페이지를 구현하는 논리와 구분합니다. 또한 템플릿 기반 사용자 지정 컨트롤 또는 템플릿 기반 페이지의 미리 정의된 위치에 추가 콘텐츠를 삽입할 수 있습니다.
예를 들어 사용자 지정 컨트롤에서 제공하는 UI를 다시 정의하는 컨트롤 템플릿을 만들 수 있습니다. 그런 다음 필요한 사용자 지정 컨트롤 인스턴스에서 컨트롤 템플릿을 사용할 수 있습니다. 또는 애플리케이션의 여러 페이지에서 사용할 공용 UI를 정의하는 컨트롤 템플릿을 만들 수 있습니다. 그러면 여러 페이지에서 컨트롤 템플릿을 사용할 수 있고 각 페이지에는 고유한 콘텐츠가 계속 표시됩니다.
ControlTemplate 만들기
다음 예제에서는 CardView 사용자 지정 컨트롤의 코드를 보여 줍니다.
public class CardView : ContentView
{
    public static readonly BindableProperty CardTitleProperty = BindableProperty.Create(nameof(CardTitle), typeof(string), typeof(CardView), string.Empty);
    public static readonly BindableProperty CardDescriptionProperty = BindableProperty.Create(nameof(CardDescription), typeof(string), typeof(CardView), string.Empty);
    // ...

    public string CardTitle
    {
        get => (string)GetValue(CardTitleProperty);
        set => SetValue(CardTitleProperty, value);
    }

    public string CardDescription
    {
        get => (string)GetValue(CardDescriptionProperty);
        set => SetValue(CardDescriptionProperty, value);
    }
    // ...
}
ContentView 클래스에서 파생되는 CardView 클래스는 카드와 같은 레이아웃의 데이터를 표시하는 사용자 지정 컨트롤을 나타냅니다. 이 클래스에는 표시되는 데이터에 대해 바인딩 가능한 속성으로 지원되는 속성이 포함되어 있습니다. 그러나 CardView 클래스는 UI를 정의하지 않습니다. 대신 UI는 컨트롤 템플릿을 사용하여 정의됩니다. ContentView 파생 사용자 지정 컨트롤을 만드는 방법에 대한 자세한 내용은 Xamarin.Forms ContentView를 참조하세요.
컨트롤 템플릿은 ControlTemplate 형식으로 만들어집니다. ControlTemplate을 만들 때 View 개체를 결합하여 사용자 지정 컨트롤 또는 페이지에 대한 UI를 작성합니다. ControlTemplate에는 루트 요소로 View가 하나만 있어야 합니다. 그러나 루트 요소는 일반적으로 다른 View 개체를 포함합니다. 개체가 조합되면 컨트롤의 시각적 구조가 만들어집니다.
ControlTemplate을 인라인으로 정의할 수 있지만 ControlTemplate을 선언하는 일반적인 방법은 리소스 사전의 리소스로 사용하는 것입니다. 컨트롤 템플릿은 리소스이므로 모든 리소스에 적용되는 동일한 범위 지정 규칙을 따릅니다. 예를 들어 애플리케이션 정의 XAML 파일의 루트 요소에서 컨트롤 템플릿을 선언하는 경우 애플리케이션의 모든 위치에서 템플릿을 사용할 수 있습니다. 페이지에서 템플릿을 정의하는 경우 해당 페이지에서만 컨트롤 템플릿을 사용할 수 있습니다. 리소스에 대한 자세한 내용은 Xamarin.Forms 리소스 사전을 참조하세요.
다음 XAML 예제에서는 CardView 개체에 대한 ControlTemplate을 보여 줍니다.
<ContentPage xmlns="http://xamarin.com/schemas/2014/forms"
             xmlns:x="http://schemas.microsoft.com/winfx/2009/xaml"
             ...>
    <ContentPage.Resources>
      <ControlTemplate x:Key="CardViewControlTemplate">
          <Frame BindingContext="{Binding Source={RelativeSource TemplatedParent}}"
                 BackgroundColor="{Binding CardColor}"
                 BorderColor="{Binding BorderColor}"
                 CornerRadius="5"
                 HasShadow="True"
                 Padding="8"
                 HorizontalOptions="Center"
                 VerticalOptions="Center">
              <Grid>
                  <Grid.RowDefinitions>
                      <RowDefinition Height="75" />
                      <RowDefinition Height="4" />
                      <RowDefinition Height="Auto" />
                  </Grid.RowDefinitions>
                  <Grid.ColumnDefinitions>
                      <ColumnDefinition Width="75" />
                      <ColumnDefinition Width="200" />
                  </Grid.ColumnDefinitions>
                  <Frame IsClippedToBounds="True"
                         BorderColor="{Binding BorderColor}"
                         BackgroundColor="{Binding IconBackgroundColor}"
                         CornerRadius="38"
                         HeightRequest="60"
                         WidthRequest="60"
                         HorizontalOptions="Center"
                         VerticalOptions="Center">
                      <Image Source="{Binding IconImageSource}"
                             Margin="-20"
                             WidthRequest="100"
                             HeightRequest="100"
                             Aspect="AspectFill" />
                  </Frame>
                  <Label Grid.Column="1"
                         Text="{Binding CardTitle}"
                         FontAttributes="Bold"
                         FontSize="Large"
                         VerticalTextAlignment="Center"
                         HorizontalTextAlignment="Start" />
                  <BoxView Grid.Row="1"
                           Grid.ColumnSpan="2"
                           BackgroundColor="{Binding BorderColor}"
                           HeightRequest="2"
                           HorizontalOptions="Fill" />
                  <Label Grid.Row="2"
                         Grid.ColumnSpan="2"
                         Text="{Binding CardDescription}"
                         VerticalTextAlignment="Start"
                         VerticalOptions="Fill"
                         HorizontalOptions="Fill" />
              </Grid>
          </Frame>
      </ControlTemplate>
    </ContentPage.Resources>
    ...
</ContentPage>
ControlTemplate이 리소스로 선언된 경우 리소스 사전에서 식별할 수 있도록 x:Key 특성으로 지정된 키가 있어야 합니다. 이 예제에서 CardViewControlTemplate의 루트 요소는 Frame 개체입니다. Frame 개체는 RelativeSource 태그 확장을 사용하여 BindingContext를 템플릿이 적용되는 런타임 개체 인스턴스로 설정합니다. 이를 템플릿 기반 부모라고 합니다. Frame 개체는 CardView 개체의 시각적 구조를 정의하기 위해 Grid, Frame, Image, Label 및 BoxView 개체의 조합을 사용합니다. 이러한 개체의 바인딩 식은 루트 Frame 요소의 BindingContext를 상속하기 때문에 CardView 속성을 기준으로 확인됩니다. RelativeSource 태그 확장에 대한 자세한 내용은 Xamarin.Forms 상대 바인딩을 참조하세요.
ControlTemplate 사용
ControlTemplate 속성을 컨트롤 템플릿 개체로 설정하여 ContentView 파생 사용자 지정 컨트롤에 ControlTemplate을 적용할 수 있습니다. 마찬가지로, ControlTemplate 속성을 컨트롤 템플릿 개체로 설정하여 ContentPage 파생 페이지에 ControlTemplate을 적용할 수 있습니다. 런타임에서 ControlTemplate을 적용하면 ControlTemplate에 정의된 모든 컨트롤이 템플릿 기반 사용자 지정 컨트롤 또는 템플릿 기반 페이지의 시각적 트리에 추가됩니다.
다음 예제에서는 각 CardView 개체의 ControlTemplate 속성에 할당되는 CardViewControlTemplate을 보여 줍니다.
<ContentPage xmlns="http://xamarin.com/schemas/2014/forms"
             xmlns:x="http://schemas.microsoft.com/winfx/2009/xaml"
             xmlns:controls="clr-namespace:ControlTemplateDemos.Controls"
             ...>
    <StackLayout Margin="30">
        <controls:CardView BorderColor="DarkGray"
                           CardTitle="John Doe"
                           CardDescription="Lorem ipsum dolor sit amet, consectetur adipiscing elit. Nulla elit dolor, convallis non interdum."
                           IconBackgroundColor="SlateGray"
                           IconImageSource="user.png"
                           ControlTemplate="{StaticResource CardViewControlTemplate}" />
        <controls:CardView BorderColor="DarkGray"
                           CardTitle="Jane Doe"
                           CardDescription="Phasellus eu convallis mi. In tempus augue eu dignissim fermentum. Morbi ut lacus vitae eros lacinia."
                           IconBackgroundColor="SlateGray"
                           IconImageSource="user.png"
                           ControlTemplate="{StaticResource CardViewControlTemplate}" />
        <controls:CardView BorderColor="DarkGray"
                           CardTitle="Xamarin Monkey"
                           CardDescription="Aliquam sagittis, odio lacinia fermentum dictum, mi erat scelerisque erat, quis aliquet arcu."
                           IconBackgroundColor="SlateGray"
                           IconImageSource="user.png"
                           ControlTemplate="{StaticResource CardViewControlTemplate}" />
    </StackLayout>
</ContentPage>
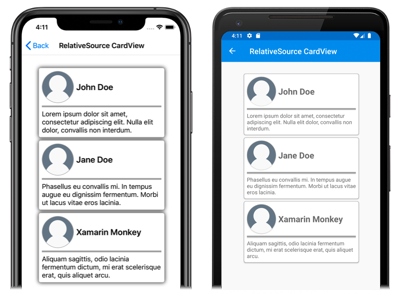
이 예제에서 CardViewControlTemplate의 컨트롤은 각 CardView 개체의 시각적 트리의 일부가 됩니다. 컨트롤 템플릿에 대한 루트 Frame 개체가 BindingContext를 템플릿 부모로 설정하므로 Frame 및 해당 자식은 각 CardView 개체의 속성에 대해 바인딩 식을 확인합니다.
다음 스크린샷에서는 세 개의 CardView 개체에 적용되는 CardViewControlTemplate을 보여 줍니다.
Important
템플릿 기반 사용자 지정 컨트롤 또는 템플릿 기반 페이지에서 OnApplyTemplate 메서드를 재정의하여 ControlTemplate이 컨트롤 인스턴스에 적용되는 시점을 검색할 수 있습니다. 자세한 내용은 템플릿에서 명명된 요소 가져오기를 참조하세요.
TemplateBinding을 사용하여 매개 변수 전달
TemplateBinding 태그 확장은 ControlTemplate에 있는 요소의 속성을 템플릿 기반 사용자 지정 컨트롤 또는 템플릿 기반 페이지에서 정의한 공용 속성에 바인딩합니다. TemplateBinding을 사용하면 컨트롤의 속성이 템플릿의 매개 변수로 작동됩니다. 따라서 템플릿 기반 사용자 지정 컨트롤 또는 템플릿 기반 페이지의 속성이 설정된 경우 해당 값은 TemplateBinding이 있는 요소로 전달됩니다.
Important
TemplateBinding 태그 식을 사용하면 이전 컨트롤 템플릿의 RelativeSource 바인딩을 제거할 수 있고 Binding 식으로 바꿉니다.
TemplateBinding 태그 확장은 다음 속성을 정의합니다.
Path(string형식) - 속성에 대한 경로입니다.Mode(BindingMode형식) - 원본과 대상 간에 변경 내용이 전파되는 방향입니다.Converter(IValueConverter형식) - 바인딩 값 변환기입니다.ConverterParameter(object, 형식) - 바인딩 값 변환기에 대한 매개 변수입니다.StringFormat(string형식) - 바인딩의 문자열 형식입니다.
TemplateBinding 태그 확장에 대한 ContentProperty는 Path입니다. 따라서 경로가 TemplateBinding 식의 첫 번째 항목인 경우 태그 확장의 "Path=" 부분을 생략할 수 있습니다. 바인딩 식에서 이러한 속성을 사용하는 방법에 대한 자세한 내용은 Xamarin.Forms 데이터 바인딩을 참조하세요.
Warning
TemplateBinding 태그 확장은 ControlTemplate에서만 사용해야 합니다. 그러나 ControlTemplate 외부에서 TemplateBinding 식을 사용하려고 하면 빌드 오류가 발생하거나 예외가 발생하지 않습니다.
다음 XAML 예제에서는 TemplateBinding 태그 확장을 사용하는 CardView 개체에 대한 ControlTemplate을 보여 줍니다.
<ContentPage xmlns="http://xamarin.com/schemas/2014/forms"
             xmlns:x="http://schemas.microsoft.com/winfx/2009/xaml"
             ...>
    <ContentPage.Resources>
        <ControlTemplate x:Key="CardViewControlTemplate">
            <Frame BackgroundColor="{TemplateBinding CardColor}"
                   BorderColor="{TemplateBinding BorderColor}"
                   CornerRadius="5"
                   HasShadow="True"
                   Padding="8"
                   HorizontalOptions="Center"
                   VerticalOptions="Center">
                <Grid>
                    <Grid.RowDefinitions>
                        <RowDefinition Height="75" />
                        <RowDefinition Height="4" />
                        <RowDefinition Height="Auto" />
                    </Grid.RowDefinitions>
                    <Grid.ColumnDefinitions>
                        <ColumnDefinition Width="75" />
                        <ColumnDefinition Width="200" />
                    </Grid.ColumnDefinitions>
                    <Frame IsClippedToBounds="True"
                           BorderColor="{TemplateBinding BorderColor}"
                           BackgroundColor="{TemplateBinding IconBackgroundColor}"
                           CornerRadius="38"
                           HeightRequest="60"
                           WidthRequest="60"
                           HorizontalOptions="Center"
                           VerticalOptions="Center">
                        <Image Source="{TemplateBinding IconImageSource}"
                               Margin="-20"
                               WidthRequest="100"
                               HeightRequest="100"
                               Aspect="AspectFill" />
                    </Frame>
                    <Label Grid.Column="1"
                           Text="{TemplateBinding CardTitle}"
                           FontAttributes="Bold"
                           FontSize="Large"
                           VerticalTextAlignment="Center"
                           HorizontalTextAlignment="Start" />
                    <BoxView Grid.Row="1"
                             Grid.ColumnSpan="2"
                             BackgroundColor="{TemplateBinding BorderColor}"
                             HeightRequest="2"
                             HorizontalOptions="Fill" />
                    <Label Grid.Row="2"
                           Grid.ColumnSpan="2"
                           Text="{TemplateBinding CardDescription}"
                           VerticalTextAlignment="Start"
                           VerticalOptions="Fill"
                           HorizontalOptions="Fill" />
                </Grid>
            </Frame>
        </ControlTemplate>
    </ContentPage.Resources>
    ...
</ContentPage>
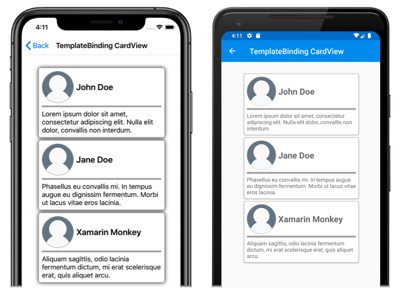
이 예제에서 TemplateBinding 태그 확장은 각 CardView 개체의 속성에 대해 바인딩 식을 확인합니다. 다음 스크린샷에서는 세 개의 CardView 개체에 적용되는 CardViewControlTemplate을 보여 줍니다.
Important
TemplateBinding 태그 확장을 사용하는 것은 RelativeSource 태그 확장을 사용하여 템플릿의 루트 요소의 BindingContext를 템플릿 기반 부모로 설정하고 Binding 태그 확장을 사용하여 자식 개체의 바인딩을 확인하는 것과 같습니다. 실제로 TemplateBinding 태그 확장은 Source가 RelativeBindingSource.TemplatedParent인 Binding을 만듭니다.
스타일을 사용하여 ControlTemplate 적용
컨트롤 템플릿은 스타일을 사용하여 적용할 수도 있습니다. 이렇게 하려면 ControlTemplate울 사용하는 암시적 또는 명시적 스타일을 만듭니다.
다음 XAML 예제에서는 CardViewControlTemplate을 사용하는 암시적 스타일을 보여 줍니다.
<ContentPage xmlns="http://xamarin.com/schemas/2014/forms"
             xmlns:x="http://schemas.microsoft.com/winfx/2009/xaml"
             xmlns:controls="clr-namespace:ControlTemplateDemos.Controls"
             ...>
    <ContentPage.Resources>
        <ControlTemplate x:Key="CardViewControlTemplate">
            ...
        </ControlTemplate>

        <Style TargetType="controls:CardView">
            <Setter Property="ControlTemplate"
                    Value="{StaticResource CardViewControlTemplate}" />
        </Style>
    </ContentPage.Resources>
    <StackLayout Margin="30">
        <controls:CardView BorderColor="DarkGray"
                           CardTitle="John Doe"
                           CardDescription="Lorem ipsum dolor sit amet, consectetur adipiscing elit. Nulla elit dolor, convallis non interdum."
                           IconBackgroundColor="SlateGray"
                           IconImageSource="user.png" />
        <controls:CardView BorderColor="DarkGray"
                           CardTitle="Jane Doe"
                           CardDescription="Phasellus eu convallis mi. In tempus augue eu dignissim fermentum. Morbi ut lacus vitae eros lacinia."
                           IconBackgroundColor="SlateGray"
                           IconImageSource="user.png"/>
        <controls:CardView BorderColor="DarkGray"
                           CardTitle="Xamarin Monkey"
                           CardDescription="Aliquam sagittis, odio lacinia fermentum dictum, mi erat scelerisque erat, quis aliquet arcu."
                           IconBackgroundColor="SlateGray"
                           IconImageSource="user.png" />
    </StackLayout>
</ContentPage>
이 예제에서는 암시적 Style이 각 CardView 개체에 자동으로 적용되며 각 CardView의 ControlTemplate 속성을 CardViewControlTemplate으로 설정합니다.
스타일에 대한 자세한 내용은 Xamarin.Forms 스타일을 참조하세요.
컨트롤의 UI 다시 정의
ControlTemplate이 ContentView 파생 사용자 지정 컨트롤 또는 ContentPage 파생 페이지 의 ControlTemplate 속성에 할당되면 사용자 지정 컨트롤 또는 페이지에 대해 정의된 시각적 구조가 ControlTemplate에 정의된 시각적 구조로 바뀝니다.
예를 들어 CardViewUI 사용자 지정 컨트롤은 다음 XAML을 사용하여 사용자 인터페이스를 정의합니다.
<ContentView xmlns="http://xamarin.com/schemas/2014/forms"
             xmlns:x="http://schemas.microsoft.com/winfx/2009/xaml"
             x:Class="ControlTemplateDemos.Controls.CardViewUI"
             x:Name="this">
    <Frame BindingContext="{x:Reference this}"
           BackgroundColor="{Binding CardColor}"
           BorderColor="{Binding BorderColor}"
           CornerRadius="5"
           HasShadow="True"
           Padding="8"
           HorizontalOptions="Center"
           VerticalOptions="Center">
        <Grid>
            <Grid.RowDefinitions>
                <RowDefinition Height="75" />
                <RowDefinition Height="4" />
                <RowDefinition Height="Auto" />
            </Grid.RowDefinitions>
            <Grid.ColumnDefinitions>
                <ColumnDefinition Width="75" />
                <ColumnDefinition Width="200" />
            </Grid.ColumnDefinitions>
            <Frame IsClippedToBounds="True"
                   BorderColor="{Binding BorderColor, FallbackValue='Black'}"
                   BackgroundColor="{Binding IconBackgroundColor, FallbackValue='Gray'}"
                   CornerRadius="38"
                   HeightRequest="60"
                   WidthRequest="60"
                   HorizontalOptions="Center"
                   VerticalOptions="Center">
                <Image Source="{Binding IconImageSource}"
                       Margin="-20"
                       WidthRequest="100"
                       HeightRequest="100"
                       Aspect="AspectFill" />
            </Frame>
            <Label Grid.Column="1"
                   Text="{Binding CardTitle, FallbackValue='Card title'}"
                   FontAttributes="Bold"
                   FontSize="Large"
                   VerticalTextAlignment="Center"
                   HorizontalTextAlignment="Start" />
            <BoxView Grid.Row="1"
                     Grid.ColumnSpan="2"
                     BackgroundColor="{Binding BorderColor, FallbackValue='Black'}"
                     HeightRequest="2"
                     HorizontalOptions="Fill" />
            <Label Grid.Row="2"
                   Grid.ColumnSpan="2"
                   Text="{Binding CardDescription, FallbackValue='Card description'}"
                   VerticalTextAlignment="Start"
                   VerticalOptions="Fill"
                   HorizontalOptions="Fill" />
        </Grid>
    </Frame>
</ContentView>
그러나 이 UI를 구성하는 컨트롤은 ControlTemplate에서 새 시각적 구조를 정의하고 CardViewUI 개체의 ControlTemplate 속성에 할당하여 바꿀 수 있습니다.
<ContentPage xmlns="http://xamarin.com/schemas/2014/forms"
             xmlns:x="http://schemas.microsoft.com/winfx/2009/xaml"
             ...>
    <ContentPage.Resources>
        <ControlTemplate x:Key="CardViewCompressed">
            <Grid>
                <Grid.RowDefinitions>
                    <RowDefinition Height="100" />
                </Grid.RowDefinitions>
                <Grid.ColumnDefinitions>
                    <ColumnDefinition Width="100" />
                    <ColumnDefinition Width="*" />
                </Grid.ColumnDefinitions>
                <Image Source="{TemplateBinding IconImageSource}"
                        BackgroundColor="{TemplateBinding IconBackgroundColor}"
                        WidthRequest="100"
                        HeightRequest="100"
                        Aspect="AspectFill"
                        HorizontalOptions="Center"
                        VerticalOptions="Center" />
                <StackLayout Grid.Column="1">
                    <Label Text="{TemplateBinding CardTitle}"
                           FontAttributes="Bold" />
                    <Label Text="{TemplateBinding CardDescription}" />
                </StackLayout>
            </Grid>
        </ControlTemplate>
    </ContentPage.Resources>
    <StackLayout Margin="30">
        <controls:CardViewUI BorderColor="DarkGray"
                             CardTitle="John Doe"
                             CardDescription="Lorem ipsum dolor sit amet, consectetur adipiscing elit. Nulla elit dolor, convallis non interdum."
                             IconBackgroundColor="SlateGray"
                             IconImageSource="user.png"
                             ControlTemplate="{StaticResource CardViewCompressed}" />
        <controls:CardViewUI BorderColor="DarkGray"
                             CardTitle="Jane Doe"
                             CardDescription="Phasellus eu convallis mi. In tempus augue eu dignissim fermentum. Morbi ut lacus vitae eros lacinia."
                             IconBackgroundColor="SlateGray"
                             IconImageSource="user.png"
                             ControlTemplate="{StaticResource CardViewCompressed}" />
        <controls:CardViewUI BorderColor="DarkGray"
                             CardTitle="Xamarin Monkey"
                             CardDescription="Aliquam sagittis, odio lacinia fermentum dictum, mi erat scelerisque erat, quis aliquet arcu."
                             IconBackgroundColor="SlateGray"
                             IconImageSource="user.png"
                             ControlTemplate="{StaticResource CardViewCompressed}" />
    </StackLayout>
</ContentPage>
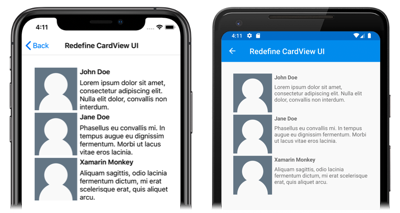
이 예제에서 CardViewUI 개체의 시각적 구조는 압축된 목록에 적합한 보다 간결한 시각적 구조를 제공하는 ControlTemplate에서 다시 정의됩니다.
콘텐츠를 ContentPresenter로 대체
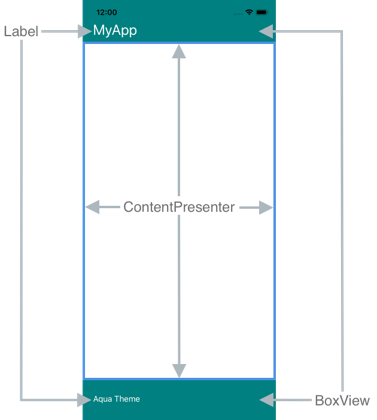
컨트롤 템플릿에 ContentPresenter을 배치하여 템플릿 사용자 지정 컨트롤 또는 템플릿 기반 페이지에 의해 콘텐츠가 표시될 위치를 표시할 수 있습니다. 그러면 컨트롤 템플릿을 사용하는 사용자 지정 컨트롤 또는 페이지가 ContentPresenter에 의해 표시될 콘텐츠를 정의합니다. 다음 다이어그램은 파란색 직사각형으로 표시된 ContentPresenter를 비롯하여 여러 컨트롤이 포함된 페이지의 ControlTemplate을 보여 줍니다.
다음 XAML에서는 시각적 구조에 ContentPresenter를 포함하는 TealTemplate이라는 컨트롤 템플릿을 보여 줍니다.
<ControlTemplate x:Key="TealTemplate">
    <Grid>
        <Grid.RowDefinitions>
            <RowDefinition Height="0.1*" />
            <RowDefinition Height="0.8*" />
            <RowDefinition Height="0.1*" />
        </Grid.RowDefinitions>
        <BoxView Color="Teal" />
        <Label Margin="20,0,0,0"
               Text="{TemplateBinding HeaderText}"
               TextColor="White"
               FontSize="Title"
               VerticalOptions="Center" />
        <ContentPresenter Grid.Row="1" />
        <BoxView Grid.Row="2"
                 Color="Teal" />
        <Label x:Name="changeThemeLabel"
               Grid.Row="2"
               Margin="20,0,0,0"
               Text="Change Theme"
               TextColor="White"
               HorizontalOptions="Start"
               VerticalOptions="Center">
            <Label.GestureRecognizers>
                <TapGestureRecognizer Tapped="OnChangeThemeLabelTapped" />
            </Label.GestureRecognizers>
        </Label>
        <controls:HyperlinkLabel Grid.Row="2"
                                 Margin="0,0,20,0"
                                 Text="Help"
                                 TextColor="White"
                                 Url="https://learn.microsoft.com/xamarin/xamarin-forms/"
                                 HorizontalOptions="End"
                                 VerticalOptions="Center" />
    </Grid>
</ControlTemplate>
다음 예제에서는 ContentPage 파생 페이지의 ControlTemplate 속성에 할당된 TealTemplate를 보여 줍니다.
<controls:HeaderFooterPage xmlns="http://xamarin.com/schemas/2014/forms"
                           xmlns:x="http://schemas.microsoft.com/winfx/2009/xaml"
                           xmlns:controls="clr-namespace:ControlTemplateDemos.Controls"
                           ControlTemplate="{StaticResource TealTemplate}"
                           HeaderText="MyApp"
                           ...>
    <StackLayout Margin="10">
        <Entry Placeholder="Enter username" />
        <Entry Placeholder="Enter password"
               IsPassword="True" />
        <Button Text="Login" />
    </StackLayout>
</controls:HeaderFooterPage>
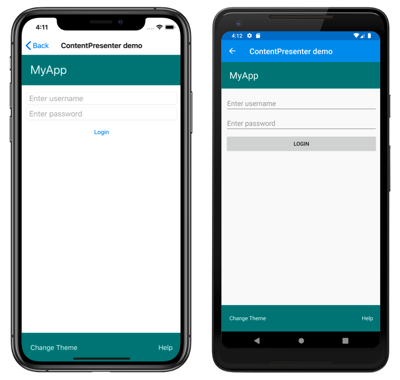
런타임에서 TealTemplate이 페이지에 적용되면 페이지 콘텐츠가 컨트롤 템플릿에 정의된 ContentPresenter로 대체됩니다.
템플릿에서 명명된 요소를 가져옵니다.
컨트롤 템플릿 내의 명명된 요소는 템플릿 사용자 지정 컨트롤 또는 템플릿 기반 페이지에서 검색할 수 있습니다. 이것은 인스턴스화된 ControlTemplate 시각적 트리에서 명명된 요소를 반환(검색된 경우)하는 GetTemplateChild 메서드를 사용하면 가능합니다. 그 외의 경우 null를 반환합니다.
컨트롤 템플릿이 인스턴스화된 후 템플릿의 OnApplyTemplate 메서드가 호출됩니다. 따라서 GetTemplateChild 메서드는 템플릿 컨트롤 또는 템플릿 기반 페이지의 OnApplyTemplate 재정의에서 호출해야 합니다.
Important
GetTemplateChild 메서드는 OnApplyTemplate 메서드가 호출된 후에 호출되어야 합니다.
다음 XAML에서는 ContentPage 파생 페이지에 적용할 수 있는 TealTemplate이라는 컨트롤 템플릿을 보여 줍니다.
<ControlTemplate x:Key="TealTemplate">
    <Grid>
        ...
        <Label x:Name="changeThemeLabel"
               Grid.Row="2"
               Margin="20,0,0,0"
               Text="Change Theme"
               TextColor="White"
               HorizontalOptions="Start"
               VerticalOptions="Center">
            <Label.GestureRecognizers>
                <TapGestureRecognizer Tapped="OnChangeThemeLabelTapped" />
            </Label.GestureRecognizers>
        </Label>
        ...
    </Grid>
</ControlTemplate>
이 예제에서 Label 요소는 이름이 지정되고 템플릿 기반 페이지의 코드에서 검색할 수 있습니다. 이렇게 하려면 템플릿 기반 페이지에 대한 OnApplyTemplate 재정의에서 GetTemplateChild 메서드를 호출하면 됩니다.
public partial class AccessTemplateElementPage : HeaderFooterPage
{
    Label themeLabel;

    public AccessTemplateElementPage()
    {
        InitializeComponent();
    }

    protected override void OnApplyTemplate()
    {
        base.OnApplyTemplate();
        themeLabel = (Label)GetTemplateChild("changeThemeLabel");
        themeLabel.Text = OriginalTemplate ? "Aqua Theme" : "Teal Theme";
    }
}
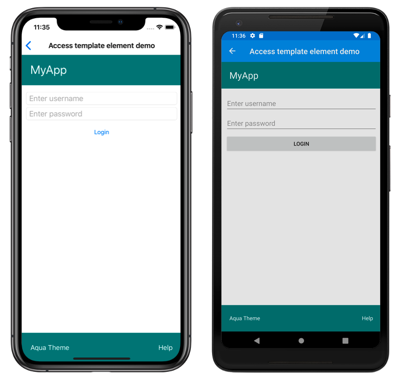
이 예제에서는 ControlTemplate가 인스턴스화된 후 changeThemeLabel이라는 Label 개체를 검색합니다. 그런 다음 changeThemeLabel에 액세스하여 AccessTemplateElementPage 클래스로 조작할 수 있습니다. 다음 스크린샷에서는 Label에 의해 표시되는 텍스트가 변경되었음을 보여 줍니다.
viewmodel에 바인딩
ControlTemplate이 템플릿 기반 부모(템플릿이 적용되는 런타임 개체 인스턴스)에 바인딩되는 경우에도 ControlTemplate에 데이터를 바인딩할 수 있습니다.
다음 XAML 예제에서는 PeopleViewModel이라는 viewmodel을 사용하는 페이지를 보여 줍니다.
<ContentPage xmlns="http://xamarin.com/schemas/2014/forms"
             xmlns:x="http://schemas.microsoft.com/winfx/2009/xaml"
             xmlns:local="clr-namespace:ControlTemplateDemos"
             xmlns:controls="clr-namespace:ControlTemplateDemos.Controls"
             ...>
    <ContentPage.BindingContext>
        <local:PeopleViewModel />
    </ContentPage.BindingContext>

    <ContentPage.Resources>
        <DataTemplate x:Key="PersonTemplate">
            <controls:CardView BorderColor="DarkGray"
                               CardTitle="{Binding Name}"
                               CardDescription="{Binding Description}"
                               ControlTemplate="{StaticResource CardViewControlTemplate}" />
        </DataTemplate>
    </ContentPage.Resources>

    <StackLayout Margin="10"
                 BindableLayout.ItemsSource="{Binding People}"
                 BindableLayout.ItemTemplate="{StaticResource PersonTemplate}" />
</ContentPage>
이 예제에서 페이지의 BindingContext는 PeopleViewModel 인스턴스로 설정됩니다. 이 viewmodel은 People 컬렉션과 DeletePersonCommand이라는 ICommand를 노출합니다. 페이지의 StackLayout는 바인딩 가능한 레이아웃을 사용하여 People 컬렉션에 데이터를 바인딩하고, 바인딩 가능한 레이아웃의 ItemTemplate은 PersonTemplate 리소스로 설정됩니다. 이 DataTemplate은 CardView 개체를 사용하여 People 컬렉션의 각 항목을 표시하도록 지정합니다. CardView 개체의 시각적 구조는 CardViewControlTemplate이라는 ControlTemplate을 사용하여 정의됩니다.
<ControlTemplate x:Key="CardViewControlTemplate">
    <Frame BindingContext="{Binding Source={RelativeSource TemplatedParent}}"
           BackgroundColor="{Binding CardColor}"
           BorderColor="{Binding BorderColor}"
           CornerRadius="5"
           HasShadow="True"
           Padding="8"
           HorizontalOptions="Center"
           VerticalOptions="Center">
        <Grid>
            <Grid.RowDefinitions>
                <RowDefinition Height="75" />
                <RowDefinition Height="4" />
                <RowDefinition Height="Auto" />
            </Grid.RowDefinitions>
            <Label Text="{Binding CardTitle}"
                   FontAttributes="Bold"
                   FontSize="Large"
                   VerticalTextAlignment="Center"
                   HorizontalTextAlignment="Start" />
            <BoxView Grid.Row="1"
                     BackgroundColor="{Binding BorderColor}"
                     HeightRequest="2"
                     HorizontalOptions="Fill" />
            <Label Grid.Row="2"
                   Text="{Binding CardDescription}"
                   VerticalTextAlignment="Start"
                   VerticalOptions="Fill"
                   HorizontalOptions="Fill" />
            <Button Text="Delete"
                    Command="{Binding Source={RelativeSource AncestorType={x:Type local:PeopleViewModel}}, Path=DeletePersonCommand}"
                    CommandParameter="{Binding CardTitle}"
                    HorizontalOptions="End" />
        </Grid>
    </Frame>
</ControlTemplate>
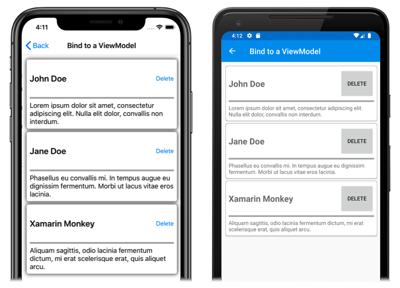
이 예제에서 ControlTemplate의 루트 요소는 Frame 개체입니다. Frame 개체는 RelativeSource 태그 확장을 사용하여 해당 BindingContext를 템플릿 기반 부모로 설정합니다. Frame 개체 및 해당 자식의 바인딩 식은 루트 Frame 요소의 BindingContext를 상속하기 때문에 CardView 속성을 기준으로 확인됩니다. 다음 스크린샷에서는 다음 세 항목으로 구성된 People 컬렉션을 표시하는 페이지를 보여 줍니다.
ControlTemplate의 개체는 템플릿 기반 부모의 속성에 바인딩할 수 있지만, 컨트롤 템플릿 내의 Button은 해당 템플릿 기반 부모와 viewmodel의 DeletePersonCommand에 모두 바인딩됩니다. 이는 Button.Command 속성이 바인딩 소스를 바인딩 컨텍스트 형식이 PeopleViewModel인 상위 항목, 즉 StackLayout으로 다시 정의하기 때문입니다. 그러면 바인딩 식의 Path 부분이 DeletePersonCommand 속성을 확인할 수 있습니다. 그러나 Button.CommandParameter 속성은 바인딩 소스를 변경하지 않고 ControlTemplate의 부모에서 상속합니다. 따라서 CommandParameter 속성은 CardView의 CardTitle 속성에 바인딩됩니다.
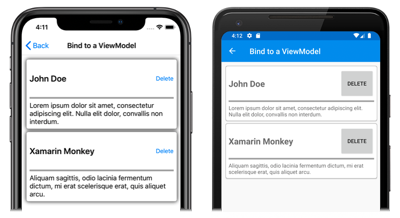
Button 바인딩의 전반적인 효과는 Button을 누를 때 PeopleViewModel 클래스의 DeletePersonCommand로 CardName 속성의 값이 전달되어 DeletePersonCommand가 실행된다는 것입니다. 그러면 지정된 CardView가 바인딩 가능한 레이아웃에서 제거됩니다.
상대 바인딩에 대한 자세한 내용은 Xamarin.Forms 상대 바인딩을 참조하세요.
