경로 및 지역 클리핑
경로를 사용하여 그래픽을 특정 영역으로 잘라내고 영역을 만듭니다.
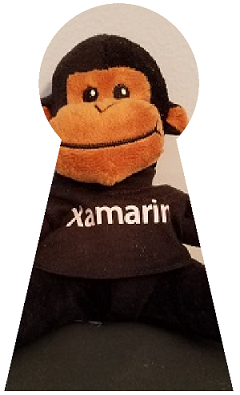
그래픽 렌더링을 특정 영역으로 제한해야 하는 경우도 있습니다. 이를 클리핑이라고합니다. 키홀을 통해 본 원숭이의 이미지와 같은 특수 효과에 클리핑을 사용할 수 있습니다.
클리핑 영역은 그래픽이 렌더링되는 화면 영역입니다. 클리핑 영역 외부에 표시되는 모든 항목은 렌더링되지 않습니다. 클리핑 영역은 일반적으로 사각형 또는 SKPath 개체에 의해 정의되지만 개체를 사용하여 SKRegion 클리핑 영역을 정의할 수도 있습니다. 경로에서 영역을 만들 수 있으므로 이러한 두 가지 유형의 개체는 처음에는 관련이 있는 것처럼 보입니다. 그러나 영역에서 경로를 만들 수 없으며 내부적으로는 매우 다릅니다. 경로는 일련의 선과 곡선으로 구성되고 영역은 일련의 가로 검색 선으로 정의됩니다.
위의 이미지는 키홀 페이지를 통해 원숭이에 의해 만들어졌습니다. 클래스는 MonkeyThroughKeyholePage SVG 데이터를 사용하여 경로를 정의하고 생성자를 사용하여 프로그램 리소스에서 비트맵을 로드합니다.
public class MonkeyThroughKeyholePage : ContentPage
{
    SKBitmap bitmap;
    SKPath keyholePath = SKPath.ParseSvgPathData(
        "M 300 130 L 250 350 L 450 350 L 400 130 A 70 70 0 1 0 300 130 Z");

    public MonkeyThroughKeyholePage()
    {
        Title = "Monkey through Keyhole";

        SKCanvasView canvasView = new SKCanvasView();
        canvasView.PaintSurface += OnCanvasViewPaintSurface;
        Content = canvasView;

        string resourceID = "SkiaSharpFormsDemos.Media.SeatedMonkey.jpg";
        Assembly assembly = GetType().GetTypeInfo().Assembly;

        using (Stream stream = assembly.GetManifestResourceStream(resourceID))
        {
            bitmap = SKBitmap.Decode(stream);
        }
    }
    ...
}
개체는 keyholePath 키홀의 윤곽선을 설명하지만 좌표는 완전히 임의이며 경로 데이터를 고안할 때 편리한 것을 반영합니다. 이러한 이유로 PaintSurface 처리기는 이 경로와 호출 Translate 의 범위를 가져오고 Scale 경로를 화면 가운데로 이동하고 화면과 거의 같은 높이로 만듭니다.
public class MonkeyThroughKeyholePage : ContentPage
{
    ...
    void OnCanvasViewPaintSurface(object sender, SKPaintSurfaceEventArgs args)
    {
        SKImageInfo info = args.Info;
        SKSurface surface = args.Surface;
        SKCanvas canvas = surface.Canvas;

        canvas.Clear();

        // Set transform to center and enlarge clip path to window height
        SKRect bounds;
        keyholePath.GetTightBounds(out bounds);

        canvas.Translate(info.Width / 2, info.Height / 2);
        canvas.Scale(0.98f * info.Height / bounds.Height);
        canvas.Translate(-bounds.MidX, -bounds.MidY);

        // Set the clip path
        canvas.ClipPath(keyholePath);

        // Reset transforms
        canvas.ResetMatrix();

        // Display monkey to fill height of window but maintain aspect ratio
        canvas.DrawBitmap(bitmap,
            new SKRect((info.Width - info.Height) / 2, 0,
                       (info.Width + info.Height) / 2, info.Height));
    }
}
그러나 경로는 렌더링되지 않습니다. 대신 변환 후에 이 문을 사용하여 클리핑 영역을 설정하는 데 경로가 사용됩니다.
canvas.ClipPath(keyholePath);
PaintSurface 그런 다음 처리기는 호출을 사용하여 변환을 ResetMatrix 다시 시작하고 비트맵을 그려 화면의 전체 높이로 확장합니다. 이 코드는 비트맵이 이 특정 비트맵인 정사각형이라고 가정합니다. 비트맵은 클리핑 경로로 정의된 영역 내에서만 렌더링됩니다.

클리핑 경로는 메서드가 호출될 때 ClipPath 적용되는 변환의 적용을 받으며, 그래픽 개체(예: 비트맵)가 표시될 때 적용되는 변환에는 적용되지 않습니다. 클리핑 경로는 메서드와 함께 저장되고 메서드를 Save 사용하여 복원되는 캔버스 상태의 Restore 일부입니다.
클리핑 경로 결합
엄밀히 말해, 클리핑 영역은 메서드에 ClipPath 의해 "설정"되지 않습니다. 대신 캔버스와 크기가 같은 사각형으로 시작하는 기존 클리핑 경로와 결합됩니다. 속성 또는 DeviceClipBounds 속성을 사용하여 LocalClipBounds 클리핑 영역의 사각형 범위를 가져올 수 있습니다. 이 속성은 LocalClipBounds 적용할 수 있는 모든 변환을 반영하는 값을 반환 SKRect 합니다. 이 속성은 DeviceClipBounds 값을 반환 RectI 합니다. 정수 차원이 있는 사각형이며 실제 픽셀 차원의 클리핑 영역을 설명합니다.
모든 호출은 ClipPath 클리핑 영역을 새 영역과 결합하여 클리핑 영역을 줄입니다. 클리핑 영역을 사각형과 결합하는 메서드의 ClipPath 전체 구문입니다.
public Void ClipRect(SKRect rect, SKClipOperation operation = SKClipOperation.Intersect, Boolean antialias = false);
기본적으로 결과 클리핑 영역은 기존 클리핑 영역과 SKPathSKRect 또는 메서드 ClipRect 에 ClipPath 지정된 영역의 교집합입니다. 이 내용은 네 개의 원 교차 클립 페이지에서 보여 줍니다. PaintSurface 클래스의 FourCircleInteresectClipPage 처리기는 동일한 SKPath 개체를 다시 사용하여 겹치는 4개의 원을 만듭니다. 각각은 다음에 대한 연속 호출ClipPath을 통해 클리핑 영역을 줄입니다.
void OnCanvasViewPaintSurface(object sender, SKPaintSurfaceEventArgs args)
{
    SKImageInfo info = args.Info;
    SKSurface surface = args.Surface;
    SKCanvas canvas = surface.Canvas;

    canvas.Clear();

    float size = Math.Min(info.Width, info.Height);
    float radius = 0.4f * size;
    float offset = size / 2 - radius;

    // Translate to center
    canvas.Translate(info.Width / 2, info.Height / 2);

    using (SKPath path = new SKPath())
    {
        path.AddCircle(-offset, -offset, radius);
        canvas.ClipPath(path, SKClipOperation.Intersect);

        path.Reset();
        path.AddCircle(-offset, offset, radius);
        canvas.ClipPath(path, SKClipOperation.Intersect);

        path.Reset();
        path.AddCircle(offset, -offset, radius);
        canvas.ClipPath(path, SKClipOperation.Intersect);

        path.Reset();
        path.AddCircle(offset, offset, radius);
        canvas.ClipPath(path, SKClipOperation.Intersect);

        using (SKPaint paint = new SKPaint())
        {
            paint.Style = SKPaintStyle.Fill;
            paint.Color = SKColors.Blue;
            canvas.DrawPaint(paint);
        }
    }
}
남은 것은 다음 네 개의 원의 교차점입니다.

열거형에는 SKClipOperation 다음 두 개의 멤버만 있습니다.
Difference기존 클리핑 영역에서 지정된 경로 또는 사각형을 제거합니다.Intersect지정된 경로 또는 사각형을 기존 클리핑 영역과 교차합니다.
클래스SKClipOperation.Difference의 네 SKClipOperation.Intersect 인수를 FourCircleIntersectClipPage 대체하면 다음이 표시됩니다.

겹치는 4개의 원이 클리핑 영역에서 제거되었습니다.
클립 작업 페이지에서는 한 쌍의 원만 사용하여 이러한 두 작업의 차이점을 보여 줍니다. 왼쪽의 첫 번째 원은 기본 클립 연산을 사용하여 클리핑 영역에 추가되고 오른쪽의 Intersect두 번째 원은 텍스트 레이블로 표시된 클립 작업을 사용하여 클리핑 영역에 추가됩니다.

클래스는 ClipOperationsPage 두 SKPaint 개체를 필드로 정의한 다음 화면을 두 개의 사각형 영역으로 나눕니다. 이러한 영역은 휴대폰이 세로 모드인지 가로 모드인지에 따라 다릅니다. 그런 다음 클래스는 DisplayClipOp 각 클립 작업을 설명하기 위해 두 개의 원 경로를 사용하여 텍스트와 호출 ClipPath 을 표시합니다.
void OnCanvasViewPaintSurface(object sender, SKPaintSurfaceEventArgs args)
{
    SKImageInfo info = args.Info;
    SKSurface surface = args.Surface;
    SKCanvas canvas = surface.Canvas;

    canvas.Clear();

    float x = 0;
    float y = 0;

    foreach (SKClipOperation clipOp in Enum.GetValues(typeof(SKClipOperation)))
    {
        // Portrait mode
        if (info.Height > info.Width)
        {
            DisplayClipOp(canvas, new SKRect(x, y, x + info.Width, y + info.Height / 2), clipOp);
            y += info.Height / 2;
        }
        // Landscape mode
        else
        {
            DisplayClipOp(canvas, new SKRect(x, y, x + info.Width / 2, y + info.Height), clipOp);
            x += info.Width / 2;
        }
    }
}

void DisplayClipOp(SKCanvas canvas, SKRect rect, SKClipOperation clipOp)
{
    float textSize = textPaint.TextSize;
    canvas.DrawText(clipOp.ToString(), rect.MidX, rect.Top + textSize, textPaint);
    rect.Top += textSize;

    float radius = 0.9f * Math.Min(rect.Width / 3, rect.Height / 2);
    float xCenter = rect.MidX;
    float yCenter = rect.MidY;

    canvas.Save();

    using (SKPath path1 = new SKPath())
    {
        path1.AddCircle(xCenter - radius / 2, yCenter, radius);
        canvas.ClipPath(path1);

        using (SKPath path2 = new SKPath())
        {
            path2.AddCircle(xCenter + radius / 2, yCenter, radius);
            canvas.ClipPath(path2, clipOp);

            canvas.DrawPaint(fillPaint);
        }
    }

    canvas.Restore();
}
일반적으로 호출 DrawPaint 하면 전체 캔버스가 해당 SKPaint 개체로 채워지지만, 이 경우 메서드는 클리핑 영역 내에서만 그립니다.
지역 탐색
개체를 기준으로 클리핑 영역을 정의할 수도 있습니다 SKRegion .
새로 만든 SKRegion 개체는 빈 영역을 설명합니다. 일반적으로 개체에 대한 첫 번째 호출은 SetRect 영역이 사각형 영역을 설명하도록 하는 것입니다. 매개 변수 SetRect 는 SKRectI 픽셀 단위로 사각형을 지정하기 때문에 정수 좌표가 있는 사각형인 값입니다. 그런 다음 개체를 사용하여 호출 SetPath 할 SKPath 수 있습니다. 이렇게 하면 경로의 내부와 동일하지만 초기 사각형 영역으로 잘린 영역이 만들어집니다.
다음과 같은 메서드 오버로드 중 Op 하나를 호출하여 지역을 수정할 수도 있습니다.
public Boolean Op(SKRegion region, SKRegionOperation op)
SKRegionOperation 열거형은 비슷하 SKClipOperation 지만 더 많은 멤버가 있습니다.
DifferenceIntersectUnionXORReverseDifferenceReplace
호출하는 Op 지역은 멤버를 기반으로 SKRegionOperation 매개 변수로 지정된 지역과 결합됩니다. 마지막으로 클리핑에 적합한 영역을 얻게 되면 다음 메서드SKCanvas를 사용하여 ClipRegion 캔버스의 클리핑 영역으로 설정할 수 있습니다.
public void ClipRegion(SKRegion region, SKClipOperation operation = SKClipOperation.Intersect)
다음 스크린샷은 6개 지역 작업을 기반으로 영역을 클리핑하는 방법을 보여 줍니다. 왼쪽 원은 메서드가 호출되는 Op 영역이고 오른쪽 원은 메서드에 Op 전달된 영역입니다.

이 두 원을 결합할 수 있는 모든 가능성인가요? 결과 이미지를 세 가지 구성 요소의 조합으로 간주합니다. 이 구성 요소는 그 자체로 , Intersect및 ReverseDifference 작업에서 Difference볼 수 있습니다. 총 조합 수는 세 번째 전원에 2개 또는 8개입니다. 누락된 두 영역은 원래 지역(전혀 호출 Op 되지 않음으로 인해 발생)과 완전히 빈 지역입니다.
먼저 경로를 만든 다음 해당 경로에서 영역을 만든 다음 여러 지역을 결합해야 하므로 영역을 클리핑에 사용하기가 더 어렵습니다. 지역 작업 페이지의 전체 구조는 클립 작업과 매우 유사하지만 RegionOperationsPage 클래스는 화면을 6개 영역으로 나누고 이 작업에 지역을 사용하는 데 필요한 추가 작업을 보여 줍니다.
void OnCanvasViewPaintSurface(object sender, SKPaintSurfaceEventArgs args)
{
    SKImageInfo info = args.Info;
    SKSurface surface = args.Surface;
    SKCanvas canvas = surface.Canvas;

    canvas.Clear();

    float x = 0;
    float y = 0;
    float width = info.Height > info.Width ? info.Width / 2 : info.Width / 3;
    float height = info.Height > info.Width ? info.Height / 3 : info.Height / 2;

    foreach (SKRegionOperation regionOp in Enum.GetValues(typeof(SKRegionOperation)))
    {
        DisplayClipOp(canvas, new SKRect(x, y, x + width, y + height), regionOp);

        if ((x += width) >= info.Width)
        {
            x = 0;
            y += height;
        }
    }
}

void DisplayClipOp(SKCanvas canvas, SKRect rect, SKRegionOperation regionOp)
{
    float textSize = textPaint.TextSize;
    canvas.DrawText(regionOp.ToString(), rect.MidX, rect.Top + textSize, textPaint);
    rect.Top += textSize;

    float radius = 0.9f * Math.Min(rect.Width / 3, rect.Height / 2);
    float xCenter = rect.MidX;
    float yCenter = rect.MidY;

    SKRectI recti = new SKRectI((int)rect.Left, (int)rect.Top,
                                (int)rect.Right, (int)rect.Bottom);

    using (SKRegion wholeRectRegion = new SKRegion())
    {
        wholeRectRegion.SetRect(recti);

        using (SKRegion region1 = new SKRegion(wholeRectRegion))
        using (SKRegion region2 = new SKRegion(wholeRectRegion))
        {
            using (SKPath path1 = new SKPath())
            {
                path1.AddCircle(xCenter - radius / 2, yCenter, radius);
                region1.SetPath(path1);
            }

            using (SKPath path2 = new SKPath())
            {
                path2.AddCircle(xCenter + radius / 2, yCenter, radius);
                region2.SetPath(path2);
            }

            region1.Op(region2, regionOp);

            canvas.Save();
            canvas.ClipRegion(region1);
            canvas.DrawPaint(fillPaint);
            canvas.Restore();
        }
    }
}
메서드와 ClipRegion 메서드 간의 ClipPath 큰 차이점은 다음과 같습니다.
Important
메서드와 ClipPath 달리 메서드는 변환의 ClipRegion 영향을 받지 않습니다.
이러한 차이의 근거를 이해하려면 지역이 무엇인지 이해하는 것이 유용합니다. 클립 작업 또는 지역 작업을 내부적으로 구현하는 방법에 대해 생각해 본 적이 있다면 매우 복잡한 것 같습니다. 잠재적으로 매우 복잡한 몇 가지 경로가 결합되고 있으며 결과 경로의 윤곽선은 알고리즘의 악몽일 수 있습니다.
이 작업은 각 경로가 구식 진공 튜브 TV와 같은 일련의 수평 스캔 라인으로 축소되는 경우 상당히 간소화됩니다. 각 검사 선은 시작점과 끝점이 있는 가로선일 뿐입니다. 예를 들어 반지름이 10픽셀인 원은 각각 원의 왼쪽 부분에서 시작하여 오른쪽 부분에서 끝나는 20개의 가로 스캔 선으로 분해할 수 있습니다. 두 원을 모든 영역 작업과 결합하는 것은 해당 검사 줄의 각 쌍의 시작 및 끝 좌표를 검사하는 것일 뿐이므로 매우 간단합니다.
영역이란 영역을 정의하는 일련의 가로 스캔 선입니다.
그러나 영역이 일련의 스캔 선으로 축소되면 이러한 검색 줄은 특정 픽셀 차원을 기반으로 합니다. 엄밀히 말해 이 지역은 벡터 그래픽 개체가 아닙니다. 본질적으로 경로보다 압축된 단색 비트맵에 더 가깝습니다. 따라서 충실도를 잃지 않고 영역의 크기를 조정하거나 회전할 수 없으므로 클리핑 영역에 사용할 때는 변환되지 않습니다.
그러나 그리기 목적으로 영역에 변환을 적용할 수 있습니다. 지역 그림판 프로그램은 지역의 내부 특성을 생생하게 보여줍니다. 클래스는 RegionPaintPage 10단위 반경 원을 기반으로 SKPath 개체를 만듭니다SKRegion. 그런 다음 변환이 해당 원을 확장하여 페이지를 채웁니다.
void OnCanvasViewPaintSurface(object sender, SKPaintSurfaceEventArgs args)
{
    SKImageInfo info = args.Info;
    SKSurface surface = args.Surface;
    SKCanvas canvas = surface.Canvas;

    canvas.Clear();

    int radius = 10;

    // Create circular path
    using (SKPath circlePath = new SKPath())
    {
        circlePath.AddCircle(0, 0, radius);

        // Create circular region
        using (SKRegion circleRegion = new SKRegion())
        {
            circleRegion.SetRect(new SKRectI(-radius, -radius, radius, radius));
            circleRegion.SetPath(circlePath);

            // Set transform to move it to center and scale up
            canvas.Translate(info.Width / 2, info.Height / 2);
            canvas.Scale(Math.Min(info.Width / 2, info.Height / 2) / radius);

            // Fill region
            using (SKPaint fillPaint = new SKPaint())
            {
                fillPaint.Style = SKPaintStyle.Fill;
                fillPaint.Color = SKColors.Orange;

                canvas.DrawRegion(circleRegion, fillPaint);
            }

            // Stroke path for comparison
            using (SKPaint strokePaint = new SKPaint())
            {
                strokePaint.Style = SKPaintStyle.Stroke;
                strokePaint.Color = SKColors.Blue;
                strokePaint.StrokeWidth = 0.1f;

                canvas.DrawPath(circlePath, strokePaint);
            }
        }
    }
}
호출은 DrawRegion 영역을 주황색으로 채우고, 호출은 DrawPath 비교를 위해 원래 경로를 파란색으로 스트로크합니다.

영역은 분명히 일련의 불연속 좌표입니다.
클리핑 영역과 관련하여 변환을 사용할 필요가 없는 경우 4-리프 클로버 페이지에서 볼 수 있듯이 클리핑에 영역을 사용할 수 있습니다. 클래스는 FourLeafCloverPage 4개의 원형 영역에서 복합 영역을 생성하고, 해당 복합 영역을 클리핑 영역으로 설정한 다음, 페이지 가운데에서 나오는 일련의 360개의 직선을 그립니다.
void OnCanvasViewPaintSurface(object sender, SKPaintSurfaceEventArgs args)
{
    SKImageInfo info = args.Info;
    SKSurface surface = args.Surface;
    SKCanvas canvas = surface.Canvas;

    canvas.Clear();

    float xCenter = info.Width / 2;
    float yCenter = info.Height / 2;
    float radius = 0.24f * Math.Min(info.Width, info.Height);

    using (SKRegion wholeScreenRegion = new SKRegion())
    {
        wholeScreenRegion.SetRect(new SKRectI(0, 0, info.Width, info.Height));

        using (SKRegion leftRegion = new SKRegion(wholeScreenRegion))
        using (SKRegion rightRegion = new SKRegion(wholeScreenRegion))
        using (SKRegion topRegion = new SKRegion(wholeScreenRegion))
        using (SKRegion bottomRegion = new SKRegion(wholeScreenRegion))
        {
            using (SKPath circlePath = new SKPath())
            {
                // Make basic circle path
                circlePath.AddCircle(xCenter, yCenter, radius);

                // Left leaf
                circlePath.Transform(SKMatrix.MakeTranslation(-radius, 0));
                leftRegion.SetPath(circlePath);

                // Right leaf
                circlePath.Transform(SKMatrix.MakeTranslation(2 * radius, 0));
                rightRegion.SetPath(circlePath);

                // Make union of right with left
                leftRegion.Op(rightRegion, SKRegionOperation.Union);

                // Top leaf
                circlePath.Transform(SKMatrix.MakeTranslation(-radius, -radius));
                topRegion.SetPath(circlePath);

                // Combine with bottom leaf
                circlePath.Transform(SKMatrix.MakeTranslation(0, 2 * radius));
                bottomRegion.SetPath(circlePath);

                // Make union of top with bottom
                bottomRegion.Op(topRegion, SKRegionOperation.Union);

                // Exclusive-OR left and right with top and bottom
                leftRegion.Op(bottomRegion, SKRegionOperation.XOR);

                // Set that as clip region
                canvas.ClipRegion(leftRegion);

                // Set transform for drawing lines from center
                canvas.Translate(xCenter, yCenter);

                // Draw 360 lines
                for (double angle = 0; angle < 360; angle++)
                {
                    float x = 2 * radius * (float)Math.Cos(Math.PI * angle / 180);
                    float y = 2 * radius * (float)Math.Sin(Math.PI * angle / 180);

                    using (SKPaint strokePaint = new SKPaint())
                    {
                        strokePaint.Color = SKColors.Green;
                        strokePaint.StrokeWidth = 2;

                        canvas.DrawLine(0, 0, x, y, strokePaint);
                    }
                }
            }
        }
    }
}
실제로 네 잎 클로버처럼 보이지는 않지만 클리핑하지 않고 렌더링하기 어려울 수 있는 이미지입니다.
