경로를 쓰다듬고 채우는 데 사용할 수 있는 다양한 경로 효과 검색
경로 효과는 클래스에서 정의한 8개의 정적 생성 메서드 중 하나를 사용하여 만든 클래스의 인스턴스 SKPathEffect 입니다. 그런 다음 개체가 SKPathEffect 개체의 SKPaint 속성으로 PathEffect 설정되어 다양한 흥미로운 효과를 줍니다. 예를 들어 작은 복제본(replica)ted 경로로 선을 쓰다듬습니다.
경로 효과를 사용하면 다음을 수행할 수 있습니다.
- 점과 대시가 있는 선 스트로크
- 채워진 경로가 있는 선 스트로크
- 빗살 무늬 선으로 영역 채우기
- 타일식 경로로 영역 채우기
- 날카로운 모서리를 둥글게 만드십시오.
- 선 및 곡선에 임의의 "지터" 추가
또한 두 개 이상의 경로 효과를 결합할 수 있습니다.
이 문서에서는 포함 및 PathEffect의 속성을 SKPaintStrokeWidth 적용하여 한 경로를 다른 경로로 변환하는 방법을 SKPaint 사용하는 GetFillPath 방법도 보여 줍니다. 이렇게 하면 다른 경로의 윤곽선인 경로를 가져오는 것과 같은 몇 가지 흥미로운 기술이 생성됩니다. GetFillPath 는 경로 효과와 관련하여도 유용합니다.
점 및 대시
메서드의 PathEffect.CreateDash 사용은 점 및 대시 문서에 설명되어 있습니다. 메서드의 첫 번째 인수는 대시 길이와 대시 사이의 간격 길이를 번갈아 가며 짝수 이상의 값을 포함하는 배열입니다.
public static SKPathEffect CreateDash (Single[] intervals, Single phase)
이러한 값은 스트로크 너비를 기준으로 하지 않습니다 . 예를 들어 스트로크 너비가 10이고 사각형 대시와 정사각형 간격으로 구성된 선을 원하는 경우 배열을 { 10, 10 }으로 설정합니다 intervals . 인수는 phase 대시 패턴 내에서 선이 시작되는 위치를 나타냅니다. 이 예제에서는 선이 정사각형 간격으로 시작하려면 10으로 설정합니다 phase .
대시의 끝은 의 속성SKPaint에 StrokeCap 의해 영향을 받습니다. 넓은 스트로크 너비의 경우 대시의 끝을 반올림하도록 SKStrokeCap.Round 이 속성을 설정하는 것이 매우 일반적입니다. 이 경우 배열의 intervals 값에는 반올림으로 인한 추가 길이가 포함되지 않습니다. 즉, 원형 점을 사용하려면 너비를 0으로 지정해야 합니다. 스트로크 너비가 10인 경우 같은 지름의 점 사이에 원형 점과 간격이 있는 선을 만들려면 { 0, 20 }의 배열을 intervals 사용합니다.
애니메이션 점선 텍스트 페이지는 개체SKPaintStyle.Stroke의SKPaint 속성을 설정하여 텍스트와 그래픽을 통합하는 문서에 설명된 개요 텍스트 Style 페이지와 비슷합니다. 또한 애니메이션 점선 텍스트는 이 윤곽선에 점선 모양을 지정하는 데 사용 SKPathEffect.CreateDash 하며, 프로그램에서는 메서드의 SKPathEffect.CreateDash 인수에 애니메이션 phase 효과를 주어 점이 텍스트 문자 주위를 이동하는 것처럼 보이게 합니다. 가로 모드의 페이지는 다음과 같습니다.

클래스는 AnimatedDottedTextPage 일부 상수 정의로 시작하며 애니메이션에 대한 메서드 및 OnDisappearing 메서드도 재정의 OnAppearing 합니다.
public class AnimatedDottedTextPage : ContentPage
{
    const string text = "DOTTED";
    const float strokeWidth = 10;
    static readonly float[] dashArray = { 0, 2 * strokeWidth };

    SKCanvasView canvasView;
    bool pageIsActive;

    public AnimatedDottedTextPage()
    {
        Title = "Animated Dotted Text";

        canvasView = new SKCanvasView();
        canvasView.PaintSurface += OnCanvasViewPaintSurface;
        Content = canvasView;
    }

    protected override void OnAppearing()
    {
        base.OnAppearing();
        pageIsActive = true;

        Device.StartTimer(TimeSpan.FromSeconds(1f / 60), () =>
        {
            canvasView.InvalidateSurface();
            return pageIsActive;
        });
    }

    protected override void OnDisappearing()
    {
        base.OnDisappearing();
        pageIsActive = false;
    }
    ...
}
PaintSurface 처리기는 텍스트를 표시하는 개체를 SKPaint 만들어 시작합니다. TextSize 화면 너비에 따라 속성이 조정됩니다.
public class AnimatedDottedTextPage : ContentPage
{
    ...
    void OnCanvasViewPaintSurface(object sender, SKPaintSurfaceEventArgs args)
    {
        SKImageInfo info = args.Info;
        SKSurface surface = args.Surface;
        SKCanvas canvas = surface.Canvas;

        canvas.Clear();

        // Create an SKPaint object to display the text
        using (SKPaint textPaint = new SKPaint
            {
                Style = SKPaintStyle.Stroke,
                StrokeWidth = strokeWidth,
                StrokeCap = SKStrokeCap.Round,
                Color = SKColors.Blue,
            })
        {
            // Adjust TextSize property so text is 95% of screen width
            float textWidth = textPaint.MeasureText(text);
            textPaint.TextSize *= 0.95f * info.Width / textWidth;

            // Find the text bounds
            SKRect textBounds = new SKRect();
            textPaint.MeasureText(text, ref textBounds);

            // Calculate offsets to center the text on the screen
            float xText = info.Width / 2 - textBounds.MidX;
            float yText = info.Height / 2 - textBounds.MidY;

            // Animate the phase; t is 0 to 1 every second
            TimeSpan timeSpan = new TimeSpan(DateTime.Now.Ticks);
            float t = (float)(timeSpan.TotalSeconds % 1 / 1);
            float phase = -t * 2 * strokeWidth;

            // Create dotted line effect based on dash array and phase
            using (SKPathEffect dashEffect = SKPathEffect.CreateDash(dashArray, phase))
            {
                // Set it to the paint object
                textPaint.PathEffect = dashEffect;

                // And draw the text
                canvas.DrawText(text, xText, yText, textPaint);
            }
        }
    }
}
메서드 SKPathEffect.CreateDash 의 끝 부분에 필드 및 애니메이션 phase 된 값을 사용 하 여 dashArray 메서드를 호출 합니다. SKPathEffect 인스턴스는 텍스트를 표시할 PathEffect 개체의 SKPaint 속성으로 설정됩니다.
또는 텍스트를 측정하고 페이지의 가운데에 배치하기 전에 개체 SKPaint 를 개체로 설정할 SKPathEffect 수 있습니다. 그러나 이 경우 애니메이션된 점과 대시로 인해 렌더링된 텍스트의 크기가 약간 변형되고 텍스트가 약간 진동하는 경향이 있습니다. (사용해 보세요!)
또한 애니메이션된 점이 텍스트 문자 주위에 원을 그리면 각 닫힌 곡선에 점이 있는 것처럼 보이는 특정 지점이 있음을 알 수 있습니다. 여기서 문자 윤곽선을 정의하는 경로가 시작되고 끝납니다. 경로 길이가 대시 패턴 길이(이 경우 20픽셀)의 정수 배수가 아닌 경우 해당 패턴의 일부만 경로 끝에 맞을 수 있습니다.
경로의 길이에 맞게 대시 패턴의 길이를 조정할 수 있지만 경로의 길이를 결정해야 합니다. 경로 정보 및 열거형 문서에서 다루는 기술입니다.
점/대시 모핑 프로그램은 대시가 점으로 분할되어 대시를 다시 형성하도록 대시 패턴 자체에 애니메이션 효과를 줍니다.

클래스는 DotDashMorphPage 이전 프로그램과 마찬가지로 메서드와 OnDisappearing 메서드를 재정 OnAppearing 의하지만 클래스는 개체를 SKPaint 필드로 정의합니다.
public class DotDashMorphPage : ContentPage
{
    const float strokeWidth = 30;
    static readonly float[] dashArray = new float[4];

    SKCanvasView canvasView;
    bool pageIsActive = false;

    SKPaint ellipsePaint = new SKPaint
    {
        Style = SKPaintStyle.Stroke,
        StrokeWidth = strokeWidth,
        StrokeCap = SKStrokeCap.Round,
        Color = SKColors.Blue
    };
    ...
    void OnCanvasViewPaintSurface(object sender, SKPaintSurfaceEventArgs args)
    {
        SKImageInfo info = args.Info;
        SKSurface surface = args.Surface;
        SKCanvas canvas = surface.Canvas;

        canvas.Clear();

        // Create elliptical path
        using (SKPath ellipsePath = new SKPath())
        {
            ellipsePath.AddOval(new SKRect(50, 50, info.Width - 50, info.Height - 50));

            // Create animated path effect
            TimeSpan timeSpan = new TimeSpan(DateTime.Now.Ticks);
            float t = (float)(timeSpan.TotalSeconds % 3 / 3);
            float phase = 0;

            if (t < 0.25f)  // 1, 0, 1, 2 --> 0, 2, 0, 2
            {
                float tsub = 4 * t;
                dashArray[0] = strokeWidth * (1 - tsub);
                dashArray[1] = strokeWidth * 2 * tsub;
                dashArray[2] = strokeWidth * (1 - tsub);
                dashArray[3] = strokeWidth * 2;
            }
            else if (t < 0.5f)  // 0, 2, 0, 2 --> 1, 2, 1, 0
            {
                float tsub = 4 * (t - 0.25f);
                dashArray[0] = strokeWidth * tsub;
                dashArray[1] = strokeWidth * 2;
                dashArray[2] = strokeWidth * tsub;
                dashArray[3] = strokeWidth * 2 * (1 - tsub);
                phase = strokeWidth * tsub;
            }
            else if (t < 0.75f) // 1, 2, 1, 0 --> 0, 2, 0, 2
            {
                float tsub = 4 * (t - 0.5f);
                dashArray[0] = strokeWidth * (1 - tsub);
                dashArray[1] = strokeWidth * 2;
                dashArray[2] = strokeWidth * (1 - tsub);
                dashArray[3] = strokeWidth * 2 * tsub;
                phase = strokeWidth * (1 - tsub);
            }
            else               // 0, 2, 0, 2 --> 1, 0, 1, 2
            {
                float tsub = 4 * (t - 0.75f);
                dashArray[0] = strokeWidth * tsub;
                dashArray[1] = strokeWidth * 2 * (1 - tsub);
                dashArray[2] = strokeWidth * tsub;
                dashArray[3] = strokeWidth * 2;
            }

            using (SKPathEffect pathEffect = SKPathEffect.CreateDash(dashArray, phase))
            {
                ellipsePaint.PathEffect = pathEffect;
                canvas.DrawPath(ellipsePath, ellipsePaint);
            }
        }
    }
}
PaintSurface 처리기는 페이지의 크기에 따라 타원형 경로를 만들고 변수 및 phase 변수를 설정하는 코드의 긴 섹션을 dashArray 실행합니다. 애니메이션 변수 t 범위가 0에서 1까지인 경우 블록은 if 해당 시간을 4쿼터로 나누고 각 분기에서 0에서 1까지의 범위로 구분합니다 tsub . 마지막에 프로그램은 해당 개체를 SKPathEffect 만들어 그리기 위한 개체로 SKPaint 설정합니다.
경로에서 경로로
메서드는 GetFillPath 개체의 SKPaint 설정 SKPaint 에 따라 한 경로를 다른 경로로 바꿉니다. 작동 방식을 확인하려면 이전 프로그램의 호출을 다음 코드로 바꿉 canvas.DrawPath 다.
SKPath newPath = new SKPath();
bool fill = ellipsePaint.GetFillPath(ellipsePath, newPath);
SKPaint newPaint = new SKPaint
{
    Style = fill ? SKPaintStyle.Fill : SKPaintStyle.Stroke
};
canvas.DrawPath(newPath, newPaint);
이 새 코드에서 호출 ellipsePath 은 GetFillPath (타원일 뿐)을 newPath변환한 다음 ,와 함께 newPaint표시됩니다. 개체는 newPaint 부울 반환 값GetFillPath에 따라 설정된다는 점을 Style 제외하고 모든 기본 속성 설정을 사용하여 만들어집니다.
시각적 개체는 색을 제외하고 동일하지만 설정 ellipsePaint 되지는 않습니다 newPaint. 에 정의된 ellipsePathnewPath 간단한 줄임표 대신 일련의 점과 대시를 정의하는 수많은 경로 윤곽선이 포함되어 있습니다. 이는 (특히, , 및)ellipsePath의 ellipsePaint 다양한 속성을 적용하고 PathEffect결과 경로를 배치한 결과입니다newPath. StrokeCapStrokeWidth 이 메서드는 GetFillPath 대상 경로를 채울지 여부를 나타내는 부울 값을 반환합니다. 이 예제에서 반환 값은 true 경로를 채우는 것입니다.
설정을 newPaintSKPaintStyle.Stroke 변경 Style 하면 1픽셀 너비 선으로 윤곽선이 표시된 개별 경로 윤곽선이 표시됩니다.
경로를 사용하여 쓰다듬기
이 SKPathEffect.Create1DPath 메서드는 대시와 간격 패턴이 아닌 경로를 지정한다는 점을 제외하고 개념적으로 비슷합니다 SKPathEffect.CreateDash . 이 경로는 선이나 곡선을 스트로크하기 위해 여러 번 복제본(replica).
구문은 다음과 같습니다.
public static SKPathEffect Create1DPath (SKPath path, Single advance,
                                         Single phase, SKPath1DPathEffectStyle style)
일반적으로 전달하는 Create1DPath 경로는 작고 점(0, 0)을 중심으로 합니다. 이 매개 변수는 advance 경로가 줄에 복제본(replica) 때 경로의 중심 사이의 거리를 나타냅니다. 일반적으로 이 인수를 경로의 대략적인 너비로 설정합니다. 인수는 phase 메서드에서 CreateDash 와 동일한 역할을 수행합니다.
세 멤버가 SKPath1DPathEffectStyle 있습니다.
TranslateRotateMorph
멤버는 Translate 선이나 곡선을 따라 복제본(replica) 경로가 기본 동일한 방향으로 다시 설정됩니다. 의 경우 Rotate경로는 곡선에 대한 탄젠트를 기반으로 회전됩니다. 경로는 가로선에 대한 일반 방향을 가합니다. Morph 는 경로 자체가 스트로크되는 선의 곡률과 일치하도록 곡선으로 되어 있다는 점을 제외하면 유사 Rotate 합니다.
1D 경로 효과 페이지에서는 이러한 세 가지 옵션을 보여 줍니다. OneDimensionalPathEffectPage.xaml 파일은 열거형의 세 멤버에 해당하는 세 개의 항목을 포함하는 선택기를 정의합니다.
<?xml version="1.0" encoding="utf-8" ?>
<ContentPage xmlns="http://xamarin.com/schemas/2014/forms"
             xmlns:x="http://schemas.microsoft.com/winfx/2009/xaml"
             xmlns:skia="clr-namespace:SkiaSharp.Views.Forms;assembly=SkiaSharp.Views.Forms"
             x:Class="SkiaSharpFormsDemos.Curves.OneDimensionalPathEffectPage"
             Title="1D Path Effect">
    <Grid>
        <Grid.RowDefinitions>
            <RowDefinition Height="Auto" />
            <RowDefinition Height="*" />
        </Grid.RowDefinitions>

        <Picker x:Name="effectStylePicker"
                Title="Effect Style"
                Grid.Row="0"
                SelectedIndexChanged="OnPickerSelectedIndexChanged">
            <Picker.ItemsSource>
                <x:Array Type="{x:Type x:String}">
                    <x:String>Translate</x:String>
                    <x:String>Rotate</x:String>
                    <x:String>Morph</x:String>
                </x:Array>
            </Picker.ItemsSource>
            <Picker.SelectedIndex>
                0
            </Picker.SelectedIndex>
        </Picker>

        <skia:SKCanvasView x:Name="canvasView"
                           PaintSurface="OnCanvasViewPaintSurface"
                           Grid.Row="1" />
    </Grid>
</ContentPage>
OneDimensionalPathEffectPage.xaml.cs 코드 숨김 파일은 세 SKPathEffect 개의 개체를 필드로 정의합니다. 이러한 개체는 모두 .를 사용하여 SKPathEffect.Create1DPath 만든 개체와 함께 SKPath 만들어 SKPath.ParseSvgPathData집니다. 첫 번째는 간단한 상자이고, 두 번째는 다이아몬드 모양이고, 세 번째는 사각형입니다. 세 가지 효과 스타일을 보여 주는 데 사용됩니다.
public partial class OneDimensionalPathEffectPage : ContentPage
{
    SKPathEffect translatePathEffect =
        SKPathEffect.Create1DPath(SKPath.ParseSvgPathData("M -10 -10 L 10 -10, 10 10, -10 10 Z"),
                                  24, 0, SKPath1DPathEffectStyle.Translate);

    SKPathEffect rotatePathEffect =
        SKPathEffect.Create1DPath(SKPath.ParseSvgPathData("M -10 0 L 0 -10, 10 0, 0 10 Z"),
                                  20, 0, SKPath1DPathEffectStyle.Rotate);

    SKPathEffect morphPathEffect =
        SKPathEffect.Create1DPath(SKPath.ParseSvgPathData("M -25 -10 L 25 -10, 25 10, -25 10 Z"),
                                  55, 0, SKPath1DPathEffectStyle.Morph);

    SKPaint pathPaint = new SKPaint
    {
        Color = SKColors.Blue
    };

    public OneDimensionalPathEffectPage()
    {
        InitializeComponent();
    }

    void OnPickerSelectedIndexChanged(object sender, EventArgs args)
    {
        if (canvasView != null)
        {
            canvasView.InvalidateSurface();
        }
    }

    void OnCanvasViewPaintSurface(object sender, SKPaintSurfaceEventArgs args)
    {
        SKImageInfo info = args.Info;
        SKSurface surface = args.Surface;
        SKCanvas canvas = surface.Canvas;

        canvas.Clear();

        using (SKPath path = new SKPath())
        {
            path.MoveTo(new SKPoint(0, 0));
            path.CubicTo(new SKPoint(2 * info.Width, info.Height),
                         new SKPoint(-info.Width, info.Height),
                         new SKPoint(info.Width, 0));

            switch ((string)effectStylePicker.SelectedItem))
            {
                case "Translate":
                    pathPaint.PathEffect = translatePathEffect;
                    break;

                case "Rotate":
                    pathPaint.PathEffect = rotatePathEffect;
                    break;

                case "Morph":
                    pathPaint.PathEffect = morphPathEffect;
                    break;
            }

            canvas.DrawPath(path, pathPaint);
        }
    }
}
PaintSurface 처리기는 자체 주위를 반복하는 Bézier 곡선을 만들고 선택기에 액세스하여 스트로크에 사용해야 하는 곡선을 PathEffect 결정합니다. 세 가지 옵션( Translate즉, Rotate및 Morph )이 왼쪽에서 오른쪽으로 표시됩니다.

메서드에 SKPathEffect.Create1DPath 지정된 경로는 항상 채워집니다. 개체의 DrawPath 속성이 1D 경로 효과로 설정된 경우 SKPaint 메서드에 지정된 경로는 PathEffect 항상 스트로크됩니다. 개체에는 pathPaint 설정이 없으며 Style , 이는 일반적으로 기본값 Fill이지만 경로에 관계없이 스트로크됩니다.
예제에서 Translate 사용되는 상자는 20픽셀 정사각형이며 advance 인수는 24로 설정됩니다. 이러한 차이로 인해 선이 대략 가로 또는 세로인 경우 상자 사이의 간격이 발생하지만 상자의 대각선이 28.3픽셀이므로 선이 대각선일 때 상자가 약간 겹칩니다.
예제의 Rotate 다이아몬드 모양도 너비가 20픽셀입니다. advance 다이아몬드가 선의 곡률과 함께 회전할 때 점이 계속 닿도록 20으로 설정됩니다.
예제의 Morph 직사각형 모양은 너비 advance 가 50픽셀이고 설정이 55이므로 베지어 곡선을 중심으로 구부러질 때 사각형 사이에 작은 간격을 만듭니다.
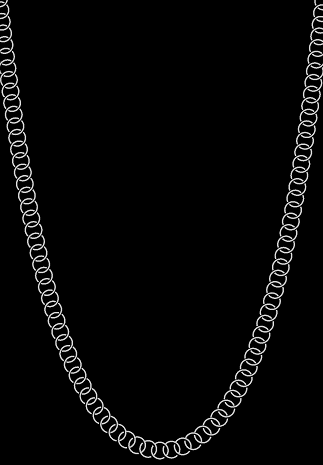
인수가 advance 경로 크기보다 작으면 복제본(replica)ted 경로가 겹칠 수 있습니다. 이로 인해 몇 가지 흥미로운 효과가 발생할 수 있습니다. 연결된 체인 페이지에는 연결된 체인과 비슷한 일련의 겹치는 원이 표시되며, 이 원은 범주의 고유한 모양에 매달려 있습니다.

아주 가까이 보면 실제로 동그라미가 아니라는 것을 알 수 있습니다. 체인의 각 링크는 두 개의 호로, 크기가 조정되고 위치하므로 인접 링크와 연결되는 것처럼 보입니다.
균일한 중량 분포의 체인 또는 케이블은 촉매 형태로 중단됩니다. 반전된 백주형의 형태로 지어진 아치는 아치의 무게에서 압력의 동등한 분포로부터 이점을 누릴 수 있습니다. 범주에는 겉보기에 간단한 수학 설명이 있습니다.
y = a · cosh(x / a)
코시는 하이퍼볼릭 코사인 함수입니다. x가 0인 경우 cosh는 0이고 y는 a입니다. 이것이 촉매의 중심입니다. 코사인 함수와 마찬가지로 cosh는 짝수라고 합니다. 즉, cosh(–x)가 cosh(x)와 같고 양수 또는 음수 인수를 늘리기 위해 값이 증가합니다. 이러한 값은 범주의 측면을 형성하는 곡선을 설명합니다.
휴대폰 페이지의 크기에 맞게 적절한 값을 찾는 것은 직접적인 계산이 아닙니다. w와 h가 사각형의 너비와 높이인 경우 최적의 값은 다음 수식을 충족합니다.
cosh(w / 2 / a) = 1 + h / a
클래스의 LinkedChainPage 다음 메서드는 등호와 같은 기호 left 의 왼쪽과 오른쪽에 있는 두 식을 참조하여 해당 같음을 통합합니다 right. 작은 값의 경우 aleft보다 right크며, 큰 값의 경우 aleft보다 작right습니다. 루프는 while 다음과 같은 최적 값 으로 좁혀집니다.
float FindOptimumA(float width, float height)
{
    Func<float, float> left = (float a) => (float)Math.Cosh(width / 2 / a);
    Func<float, float> right = (float a) => 1 + height / a;

    float gtA = 1;         // starting value for left > right
    float ltA = 10000;     // starting value for left < right

    while (Math.Abs(gtA - ltA) > 0.1f)
    {
        float avgA = (gtA + ltA) / 2;

        if (left(avgA) < right(avgA))
        {
            ltA = avgA;
        }
        else
        {
            gtA = avgA;
        }
    }

    return (gtA + ltA) / 2;
}
SKPath 링크에 대한 개체는 클래스의 생성자에 만들어지고 결과 SKPathEffect 개체는 필드로 저장된 개체의 SKPaint 속성으로 설정 PathEffect 됩니다.
public class LinkedChainPage : ContentPage
{
    const float linkRadius = 30;
    const float linkThickness = 5;

    Func<float, float, float> catenary = (float a, float x) => (float)(a * Math.Cosh(x / a));

    SKPaint linksPaint = new SKPaint
    {
        Color = SKColors.Silver
    };

    public LinkedChainPage()
    {
        Title = "Linked Chain";

        SKCanvasView canvasView = new SKCanvasView();
        canvasView.PaintSurface += OnCanvasViewPaintSurface;
        Content = canvasView;

        // Create the path for the individual links
        SKRect outer = new SKRect(-linkRadius, -linkRadius, linkRadius, linkRadius);
        SKRect inner = outer;
        inner.Inflate(-linkThickness, -linkThickness);

        using (SKPath linkPath = new SKPath())
        {
            linkPath.AddArc(outer, 55, 160);
            linkPath.ArcTo(inner, 215, -160, false);
            linkPath.Close();

            linkPath.AddArc(outer, 235, 160);
            linkPath.ArcTo(inner, 395, -160, false);
            linkPath.Close();

            // Set that path as the 1D path effect for linksPaint
            linksPaint.PathEffect =
                SKPathEffect.Create1DPath(linkPath, 1.3f * linkRadius, 0,
                                          SKPath1DPathEffectStyle.Rotate);
        }
    }
    ...
}
처리기의 PaintSurface 기본 작업은 범주 자체에 대한 경로를 만드는 것입니다. 최적의 a 를 결정하고 변수에 optA 저장한 후에는 창 위쪽에서 오프셋을 계산해야 합니다. 그런 다음, 범주에 대한 값 컬렉션을 SKPoint 누적하고, 경로로 전환하고, 이전에 만든 SKPaint 개체를 사용하여 경로를 그릴 수 있습니다.
public class LinkedChainPage : ContentPage
{
    ...
    void OnCanvasViewPaintSurface(object sender, SKPaintSurfaceEventArgs args)
    {
        SKImageInfo info = args.Info;
        SKSurface surface = args.Surface;
        SKCanvas canvas = surface.Canvas;

        canvas.Clear(SKColors.Black);

        // Width and height of catenary
        int width = info.Width;
        float height = info.Height - linkRadius;

        // Find the optimum 'a' for this width and height
        float optA = FindOptimumA(width, height);

        // Calculate the vertical offset for that value of 'a'
        float yOffset = catenary(optA, -width / 2);

        // Create a path for the catenary
        SKPoint[] points = new SKPoint[width];

        for (int x = 0; x < width; x++)
        {
            points[x] = new SKPoint(x, yOffset - catenary(optA, x - width / 2));
        }

        using (SKPath path = new SKPath())
        {
            path.AddPoly(points, false);

            // And render that path with the linksPaint object
            canvas.DrawPath(path, linksPaint);
        }
    }
    ...
}
이 프로그램은 해당 (0, 0) 지점을 가운데에 Create1DPath 두는 데 사용되는 경로를 정의합니다. 이는 경로의 (0, 0) 점이 표시 중인 선 또는 곡선에 맞춰져 있기 때문에 합리적입니다. 그러나 일부 특수 효과에는 비중심(0, 0) 지점을 사용할 수 있습니다.
컨베이어 벨트 페이지는 창의 크기에 맞게 크기가 조정된 곡선 상단과 아래쪽이 있는 직사각형 컨베이어 벨트를 닮은 경로를 만듭니다. 이 경로는 너비가 20픽셀이고 회색인 간단한 SKPaint 개체로 스트로크된 다음, 작은 버킷을 닮은 경로를 참조하는 개체가 있는 다른 SKPaint 개체로 SKPathEffect 다시 스트로크됩니다.

버킷 경로의 (0, 0) 지점은 핸들이므로 인수에 phase 애니메이션이 적용되면 버킷이 컨베이어 벨트를 중심으로 회전하는 것처럼 보이며 아마도 바닥에 물을 떠서 맨 위에 버릴 수 있습니다.
클래스는 ConveyorBeltPage 재정의 및 OnDisappearing 메서드를 사용하여 애니메이션을 OnAppearing 구현합니다. 버킷의 경로는 페이지의 생성자에 정의됩니다.
public class ConveyorBeltPage : ContentPage
{
    SKCanvasView canvasView;
    bool pageIsActive = false;

    SKPaint conveyerPaint = new SKPaint
    {
        Style = SKPaintStyle.Stroke,
        StrokeWidth = 20,
        Color = SKColors.DarkGray
    };

    SKPath bucketPath = new SKPath();

    SKPaint bucketsPaint = new SKPaint
    {
        Color = SKColors.BurlyWood,
    };

    public ConveyorBeltPage()
    {
        Title = "Conveyor Belt";

        canvasView = new SKCanvasView();
        canvasView.PaintSurface += OnCanvasViewPaintSurface;
        Content = canvasView;

        // Create the path for the bucket starting with the handle
        bucketPath.AddRect(new SKRect(-5, -3, 25, 3));

        // Sides
        bucketPath.AddRoundedRect(new SKRect(25, -19, 27, 18), 10, 10,
                                  SKPathDirection.CounterClockwise);
        bucketPath.AddRoundedRect(new SKRect(63, -19, 65, 18), 10, 10,
                                  SKPathDirection.CounterClockwise);

        // Five slats
        for (int i = 0; i < 5; i++)
        {
            bucketPath.MoveTo(25, -19 + 8 * i);
            bucketPath.LineTo(25, -13 + 8 * i);
            bucketPath.ArcTo(50, 50, 0, SKPathArcSize.Small,
                             SKPathDirection.CounterClockwise, 65, -13 + 8 * i);
            bucketPath.LineTo(65, -19 + 8 * i);
            bucketPath.ArcTo(50, 50, 0, SKPathArcSize.Small,
                             SKPathDirection.Clockwise, 25, -19 + 8 * i);
            bucketPath.Close();
        }

        // Arc to suggest the hidden side
        bucketPath.MoveTo(25, -17);
        bucketPath.ArcTo(50, 50, 0, SKPathArcSize.Small,
                         SKPathDirection.Clockwise, 65, -17);
        bucketPath.LineTo(65, -19);
        bucketPath.ArcTo(50, 50, 0, SKPathArcSize.Small,
                         SKPathDirection.CounterClockwise, 25, -19);
        bucketPath.Close();

        // Make it a little bigger and correct the orientation
        bucketPath.Transform(SKMatrix.MakeScale(-2, 2));
        bucketPath.Transform(SKMatrix.MakeRotationDegrees(90));
    }
    ...
버킷 만들기 코드는 버킷을 조금 더 크게 만들고 옆으로 돌리는 두 가지 변환으로 완료됩니다. 이러한 변환을 적용하는 것이 이전 코드의 모든 좌표를 조정하는 것보다 더 쉬웠습니다.
PaintSurface 처리기는 컨베이어 벨트 자체의 경로를 정의하여 시작합니다. 이것은 단순히 한 쌍의 선과 20 픽셀 너비의 진한 회색 선으로 그려진 반원 쌍입니다.
public class ConveyorBeltPage : ContentPage
{
    ...
    void OnCanvasViewPaintSurface(object sender, SKPaintSurfaceEventArgs args)
    {
        SKImageInfo info = args.Info;
        SKSurface surface = args.Surface;
        SKCanvas canvas = surface.Canvas;

        canvas.Clear();

        float width = info.Width / 3;
        float verticalMargin = width / 2 + 150;

        using (SKPath conveyerPath = new SKPath())
        {
            // Straight verticals capped by semicircles on top and bottom
            conveyerPath.MoveTo(width, verticalMargin);
            conveyerPath.ArcTo(width / 2, width / 2, 0, SKPathArcSize.Large,
                               SKPathDirection.Clockwise, 2 * width, verticalMargin);
            conveyerPath.LineTo(2 * width, info.Height - verticalMargin);
            conveyerPath.ArcTo(width / 2, width / 2, 0, SKPathArcSize.Large,
                               SKPathDirection.Clockwise, width, info.Height - verticalMargin);
            conveyerPath.Close();

            // Draw the conveyor belt itself
            canvas.DrawPath(conveyerPath, conveyerPaint);

            // Calculate spacing based on length of conveyer path
            float length = 2 * (info.Height - 2 * verticalMargin) +
                           2 * ((float)Math.PI * width / 2);

            // Value will be somewhere around 200
            float spacing = length / (float)Math.Round(length / 200);

            // Now animate the phase; t is 0 to 1 every 2 seconds
            TimeSpan timeSpan = new TimeSpan(DateTime.Now.Ticks);
            float t = (float)(timeSpan.TotalSeconds % 2 / 2);
            float phase = -t * spacing;

            // Create the buckets PathEffect
            using (SKPathEffect bucketsPathEffect =
                        SKPathEffect.Create1DPath(bucketPath, spacing, phase,
                                                  SKPath1DPathEffectStyle.Rotate))
            {
                // Set it to the Paint object and draw the path again
                bucketsPaint.PathEffect = bucketsPathEffect;
                canvas.DrawPath(conveyerPath, bucketsPaint);
            }
        }
    }
}
컨베이어 벨트를 그리는 논리는 가로 모드에서 작동하지 않습니다.
버킷은 컨베이어 벨트에서 약 200픽셀 간격으로 지정해야 합니다. 그러나 컨베이어 벨트는 길이가 200픽셀의 배수가 아닐 수 있습니다. 즉, 인수에 SKPathEffect.Create1DPath 애니메이션이 적용되면 버킷이 들어오고 나가는 것을 의미 phase 합니다.
이러한 이유로 프로그램은 먼저 컨베이어 벨트의 길이인 값을 length 계산합니다. 컨베이어 벨트는 직선과 반원으로 구성되므로 간단한 계산입니다. 다음으로 버킷 수는 200으로 나누어 length 계산됩니다. 이 값은 가장 가까운 정수로 반올림되고 해당 숫자는 .로 length나뉩니다. 결과는 정수 버킷의 간격입니다. 인수는 phase 단순히 그 중 일부입니다.
경로에서 경로로 다시
컨베이어 벨트의 DrawSurface 처리기 맨 아래에서 호출을 canvas.DrawPath 주석 처리하고 다음 코드로 바꿉다.
SKPath newPath = new SKPath();
bool fill = bucketsPaint.GetFillPath(conveyerPath, newPath);
SKPaint newPaint = new SKPaint
{
    Style = fill ? SKPaintStyle.Fill : SKPaintStyle.Stroke
};
canvas.DrawPath(newPath, newPaint);
이전 예제 GetFillPath와 마찬가지로 색을 제외하고 결과가 동일하다는 것을 알 수 있습니다. 실행 GetFillPathnewPath 후 개체에는 버킷 경로의 여러 복사본이 포함되며, 각 복사본은 호출 시 애니메이션이 배치한 위치와 동일한 위치에 배치됩니다.
영역 부화
메서드는 SKPathEffect.Create2DLines 종종 빗살 무늬 선이라고 하는 병렬 선으로 영역을 채웁니다. 메서드의 구문은 다음과 같습니다.
public static SKPathEffect Create2DLine (Single width, SKMatrix matrix)
인수는 width 빗살 무늬 선의 스트로크 너비를 지정합니다. matrix 매개 변수는 크기 조정과 선택적 회전의 조합입니다. 배율 인수는 Skia가 해치 선의 간격을 지정하는 데 사용하는 픽셀 증분을 나타냅니다. 선 간의 구분은 배율 인수에서 인수를 width 뺀 값입니다. 배율 인수가 값보다 작거나 같 width 으면 빗살 무늬 선 사이에 공백이 없고 영역이 채워진 것처럼 보입니다. 가로 및 세로 배율에 대해 동일한 값을 지정합니다.
기본적으로 빗살 무늬 선은 가로입니다. 매개 변수에 matrix 회전이 포함되어 있으면 빗살 무늬 선이 시계 방향으로 회전됩니다.
빗살 무늬 채우기 페이지에서는 이 경로 효과를 보여 줍니다. 클래스는 HatchFillPage 세 가지 경로 효과를 필드로 정의합니다. 첫 번째는 너비가 3픽셀인 가로 해치 선에 대한 것이며, 배율 인수는 간격이 6픽셀 떨어져 있음을 나타냅니다. 따라서 선 간의 구분은 3픽셀입니다. 두 번째 경로 효과는 너비가 6픽셀 간격이 24픽셀인 세로 빗살 무늬 선(분리는 18픽셀)이며, 세 번째는 너비가 36픽셀인 대각선 12픽셀에 대한 것입니다.
public class HatchFillPage : ContentPage
{
    SKPaint fillPaint = new SKPaint();

    SKPathEffect horzLinesPath = SKPathEffect.Create2DLine(3, SKMatrix.MakeScale(6, 6));

    SKPathEffect vertLinesPath = SKPathEffect.Create2DLine(6,
        Multiply(SKMatrix.MakeRotationDegrees(90), SKMatrix.MakeScale(24, 24)));

    SKPathEffect diagLinesPath = SKPathEffect.Create2DLine(12,
        Multiply(SKMatrix.MakeScale(36, 36), SKMatrix.MakeRotationDegrees(45)));

    SKPaint strokePaint = new SKPaint
    {
        Style = SKPaintStyle.Stroke,
        StrokeWidth = 3,
        Color = SKColors.Black
    };
    ...
    static SKMatrix Multiply(SKMatrix first, SKMatrix second)
    {
        SKMatrix target = SKMatrix.MakeIdentity();
        SKMatrix.Concat(ref target, first, second);
        return target;
    }
}
행렬 Multiply 메서드를 확인합니다. 가로 및 세로 배율 인수는 동일하기 때문에 배율 및 회전 행렬을 곱하는 순서는 중요하지 않습니다.
PaintSurface 처리기는 이 세 가지 경로 효과를 세 가지 다른 색과 함께 fillPaint 사용하여 페이지에 맞게 크기가 조정된 둥근 사각형을 채웁니다. 설정된 속성은 Style 무시됩니다. 개체에 SKPaint 생성된 SKPathEffect.Create2DLine경로 효과가 포함되어 있으면 다음과 관계없이 영역이 채워 fillPaint 집니다.
public class HatchFillPage : ContentPage
{
    ...
    void OnCanvasViewPaintSurface(object sender, SKPaintSurfaceEventArgs args)
    {
        SKImageInfo info = args.Info;
        SKSurface surface = args.Surface;
        SKCanvas canvas = surface.Canvas;

        canvas.Clear();

        using (SKPath roundRectPath = new SKPath())
        {
            // Create a path
            roundRectPath.AddRoundedRect(
                new SKRect(50, 50, info.Width - 50, info.Height - 50), 100, 100);

            // Horizontal hatch marks
            fillPaint.PathEffect = horzLinesPath;
            fillPaint.Color = SKColors.Red;
            canvas.DrawPath(roundRectPath, fillPaint);

            // Vertical hatch marks
            fillPaint.PathEffect = vertLinesPath;
            fillPaint.Color = SKColors.Blue;
            canvas.DrawPath(roundRectPath, fillPaint);

            // Diagonal hatch marks -- use clipping
            fillPaint.PathEffect = diagLinesPath;
            fillPaint.Color = SKColors.Green;

            canvas.Save();
            canvas.ClipPath(roundRectPath);
            canvas.DrawRect(new SKRect(0, 0, info.Width, info.Height), fillPaint);
            canvas.Restore();

            // Outline the path
            canvas.DrawPath(roundRectPath, strokePaint);
        }
    }
    ...
}
결과를 주의 깊게 살펴보면 빨간색 및 파란색 해치 선이 둥근 사각형으로 정확하게 제한되지 않는 것을 볼 수 있습니다. (이것은 분명히 기본 Skia 코드의 특징입니다.) 만족스럽지 않은 경우 녹색의 대각선 빗살 무늬 선에 대한 대체 방법이 표시됩니다. 둥근 사각형은 클리핑 경로로 사용되고 해치 선은 전체 페이지에 그려집니다.
PaintSurface 처리기는 단순히 둥근 사각형을 스트로크하는 호출로 마무리, 그래서 당신은 빨간색과 파란색 해치 선과 불일치를 볼 수 있습니다 :

Android 화면은 실제로 그렇게 보이지 않습니다. 스크린샷의 크기 조정으로 인해 얇은 빨간색 선과 얇은 공간이 겉보기에 더 넓은 빨간색 선과 넓은 공간으로 통합되었습니다.
경로로 채우기
이렇게 SKPathEffect.Create2DPath 하면 가로 및 세로로 복제본(replica) 경로로 영역을 채울 수 있습니다. 실제로 영역을 바둑판식으로 바꿉니다.
public static SKPathEffect Create2DPath (SKMatrix matrix, SKPath path)
배율 인수는 SKMatrix 복제본(replica)ted 경로의 가로 및 세로 간격을 나타냅니다. 그러나 이 matrix 인수를 사용하여 경로를 회전할 수는 없습니다. 경로를 회전하려면 정의된 메서드SKPath를 사용하여 Transform 경로 자체를 회전합니다.
복제본(replica)ted 경로는 일반적으로 채워지는 영역이 아니라 화면의 왼쪽 및 위쪽 가장자리에 맞춰집니다. 0과 배율 인수 사이의 변환 요소를 제공하여 왼쪽 및 위쪽에서 가로 및 세로 오프셋을 지정하여 이 동작을 재정의할 수 있습니다.
경로 타일 채우기 페이지에서는 이 경로 효과를 보여 줍니다. 영역을 바둑판식으로 배열하는 데 사용되는 경로는 클래스의 PathTileFillPage 필드로 정의됩니다. 가로 및 세로 좌표의 범위는 –40에서 40까지입니다. 즉, 이 경로는 80픽셀 정사각형입니다.
public class PathTileFillPage : ContentPage
{
    SKPath tilePath = SKPath.ParseSvgPathData(
        "M -20 -20 L 2 -20, 2 -40, 18 -40, 18 -20, 40 -20, " +
        "40 -12, 20 -12, 20 12, 40 12, 40 40, 22 40, 22 20, " +
        "-2 20, -2 40, -20 40, -20 8, -40 8, -40 -8, -20 -8 Z");
    ...
    void OnCanvasViewPaintSurface(object sender, SKPaintSurfaceEventArgs args)
    {
        SKImageInfo info = args.Info;
        SKSurface surface = args.Surface;
        SKCanvas canvas = surface.Canvas;

        canvas.Clear();

        using (SKPaint paint = new SKPaint())
        {
            paint.Color = SKColors.Red;

            using (SKPathEffect pathEffect =
                   SKPathEffect.Create2DPath(SKMatrix.MakeScale(64, 64), tilePath))
            {
                paint.PathEffect = pathEffect;

                canvas.DrawRoundRect(
                    new SKRect(50, 50, info.Width - 50, info.Height - 50),
                    100, 100, paint);
            }
        }
    }
}
PaintSurface 처리기에서 호출은 SKPathEffect.Create2DPath 가로 및 세로 간격을 64로 설정하여 80픽셀 정사각형 타일이 겹치도록 합니다. 다행히 경로는 인접한 타일로 멋지게 메시되는 퍼즐 조각과 유사합니다.

원래 스크린샷에서 크기를 조정하면 특히 Android 화면에서 약간의 왜곡이 발생합니다.
이러한 타일은 항상 전체로 표시되며 잘리지 않습니다. 처음 두 스크린샷에서는 채워지는 영역이 둥근 사각형이라는 사실조차 분명하지 않습니다. 이러한 타일을 특정 영역으로 자르려면 클리핑 경로를 사용합니다.
개체Stroke의 Style 속성을 SKPaint로 설정하면 채워지지 않고 윤곽선이 표시된 개별 타일이 표시됩니다.
SkiaSharp 비트맵 타일링 문서에 표시된 것처럼 타일식 비트맵으로 영역을 채울 수도 있습니다.
날카로운 모서리 반올림
원호를 그리는 세 가지 방법으로 제시된 둥근 헵타곤 프로그램은 탄젠트 호를 사용하여 7면 그림의 점을 구부렸습니다. 또 다른 둥근 Heptagon 페이지는 메서드에서 SKPathEffect.CreateCorner 만든 경로 효과를 사용하는 훨씬 더 쉬운 방법을 보여 줍니다.
public static SKPathEffect CreateCorner (Single radius)
단일 인수의 이름은 지정 radius되지만 원하는 모퉁이 반경의 절반으로 설정해야 합니다. 기본 Skia 코드의 특징입니다.
클래스의 PaintSurface 처리기는 AnotherRoundedHeptagonPage 다음과 같습니다.
void OnCanvasViewPaintSurface(object sender, SKPaintSurfaceEventArgs args)
{
    SKImageInfo info = args.Info;
    SKSurface surface = args.Surface;
    SKCanvas canvas = surface.Canvas;

    canvas.Clear();

    int numVertices = 7;
    float radius = 0.45f * Math.Min(info.Width, info.Height);
    SKPoint[] vertices = new SKPoint[numVertices];
    double vertexAngle = -0.5f * Math.PI;       // straight up

    // Coordinates of the vertices of the polygon
    for (int vertex = 0; vertex < numVertices; vertex++)
    {
        vertices[vertex] = new SKPoint(radius * (float)Math.Cos(vertexAngle),
                                       radius * (float)Math.Sin(vertexAngle));
        vertexAngle += 2 * Math.PI / numVertices;
    }

    float cornerRadius = 100;

    // Create the path
    using (SKPath path = new SKPath())
    {
        path.AddPoly(vertices, true);

        // Render the path in the center of the screen
        using (SKPaint paint = new SKPaint())
        {
            paint.Style = SKPaintStyle.Stroke;
            paint.Color = SKColors.Blue;
            paint.StrokeWidth = 10;

            // Set argument to half the desired corner radius!
            paint.PathEffect = SKPathEffect.CreateCorner(cornerRadius / 2);

            canvas.Translate(info.Width / 2, info.Height / 2);
            canvas.DrawPath(path, paint);

            // Uncomment DrawCircle call to verify corner radius
            float offset = cornerRadius / (float)Math.Sin(Math.PI * (numVertices - 2) / numVertices / 2);
            paint.Color = SKColors.Green;
            // canvas.DrawCircle(vertices[0].X, vertices[0].Y + offset, cornerRadius, paint);
        }
    }
}
개체의 SKPaint 속성에 Style 따라 쓰다듬거나 채우는 데 이 효과를 사용할 수 있습니다. 여기서 실행 중입니다.

이 둥근 육각형은 이전 프로그램과 동일하다는 것을 알 수 있습니다. 호출에 지정된 SKPathEffect.CreateCorner 50이 아닌 모퉁이 반경이 실제로 100임을 더 확신해야 하는 경우 프로그램의 최종 문에 주석 처리를 제거하고 모서리에 겹쳐진 100 반지름 원을 볼 수 있습니다.
임의 지터
경우에 따라 컴퓨터 그래픽의 완벽한 직선이 원하는 것이 아니며 약간의 임의성이 필요한 경우가 있습니다. 이 경우 다음 메서드를 사용해 볼 수 있습니다.SKPathEffect.CreateDiscrete
public static SKPathEffect CreateDiscrete (Single segLength, Single deviation, UInt32 seedAssist)
쓰다듬거나 채우는 데 이 경로 효과를 사용할 수 있습니다. 선은 연결된 세그먼트(대략적인 길이로 지정됨)로 segLength 구분되고 서로 다른 방향으로 확장됩니다. 원래 줄의 편차 범위는 .에 의해 deviation지정됩니다.
마지막 인수는 효과에 사용되는 의사 임의 시퀀스를 생성하는 데 사용되는 시드입니다. 지터 효과는 다른 씨앗에 대해 조금 다르게 보일 것입니다. 인수의 기본값은 0입니다. 즉, 프로그램을 실행할 때마다 효과가 동일합니다. 화면이 다시 그려질 때마다 다른 지터를 원하는 경우 시드 Millisecond 를 값의 속성(예: )으로 DataTime.Now 설정할 수 있습니다.
지터 실험 페이지에서 사각형을 쓰다듬을 때 다른 값을 실험할 수 있습니다.

이 프로그램은 간단합니다. JitterExperimentPage.xaml 파일은 두 요소와 다음SKCanvasView을 Slider 인스턴스화합니다.
<ContentPage xmlns="http://xamarin.com/schemas/2014/forms"
             xmlns:x="http://schemas.microsoft.com/winfx/2009/xaml"
             xmlns:skia="clr-namespace:SkiaSharp.Views.Forms;assembly=SkiaSharp.Views.Forms"
             x:Class="SkiaSharpFormsDemos.Curves.JitterExperimentPage"
             Title="Jitter Experiment">
    <Grid>
        <Grid.RowDefinitions>
            <RowDefinition Height="Auto" />
            <RowDefinition Height="Auto" />
            <RowDefinition Height="Auto" />
            <RowDefinition Height="Auto" />
            <RowDefinition Height="*" />
        </Grid.RowDefinitions>

        <Grid.Resources>
            <ResourceDictionary>
                <Style TargetType="Label">
                    <Setter Property="HorizontalTextAlignment" Value="Center" />
                </Style>

                <Style TargetType="Slider">
                    <Setter Property="Margin" Value="20, 0" />
                    <Setter Property="Minimum" Value="0" />
                    <Setter Property="Maximum" Value="100" />
                </Style>
            </ResourceDictionary>
        </Grid.Resources>

        <Slider x:Name="segLengthSlider"
                Grid.Row="0"
                ValueChanged="sliderValueChanged" />

        <Label Text="{Binding Source={x:Reference segLengthSlider},
                              Path=Value,
                              StringFormat='Segment Length = {0:F0}'}"
               Grid.Row="1" />

        <Slider x:Name="deviationSlider"
                Grid.Row="2"
                ValueChanged="sliderValueChanged" />

        <Label Text="{Binding Source={x:Reference deviationSlider},
                              Path=Value,
                              StringFormat='Deviation = {0:F0}'}"
               Grid.Row="3" />

        <skia:SKCanvasView x:Name="canvasView"
                           Grid.Row="4"
                           PaintSurface="OnCanvasViewPaintSurface" />
    </Grid>
</ContentPage>
PaintSurface JitterExperimentPage.xaml.cs 코드 숨김 파일의 처리기는 값이 변경 될 때마다 Slider 호출됩니다. 두 Slider 값을 사용하여 호출 SKPathEffect.CreateDiscrete 하고 이를 사용하여 사각형을 스트로크합니다.
void OnCanvasViewPaintSurface(object sender, SKPaintSurfaceEventArgs args)
{
    SKImageInfo info = args.Info;
    SKSurface surface = args.Surface;
    SKCanvas canvas = surface.Canvas;

    canvas.Clear();

    float segLength = (float)segLengthSlider.Value;
    float deviation = (float)deviationSlider.Value;

    using (SKPaint paint = new SKPaint())
    {
        paint.Style = SKPaintStyle.Stroke;
        paint.StrokeWidth = 5;
        paint.Color = SKColors.Blue;

        using (SKPathEffect pathEffect = SKPathEffect.CreateDiscrete(segLength, deviation))
        {
            paint.PathEffect = pathEffect;

            SKRect rect = new SKRect(100, 100, info.Width - 100, info.Height - 100);
            canvas.DrawRect(rect, paint);
        }
    }
}
채우기에도 이 효과를 사용할 수 있습니다. 이 경우 채워진 영역의 윤곽선에 이러한 임의 편차가 적용됩니다. 지터 텍스트 페이지에서는 이 경로 효과를 사용하여 텍스트를 표시하는 방법을 보여 줍니다. 클래스의 JitterTextPage 처리기에 있는 PaintSurface 대부분의 코드는 텍스트의 크기 조정 및 가운데 맞춤에만 적용됩니다.
void OnCanvasViewPaintSurface(object sender, SKPaintSurfaceEventArgs args)
{
    SKImageInfo info = args.Info;
    SKSurface surface = args.Surface;
    SKCanvas canvas = surface.Canvas;

    canvas.Clear();

    string text = "FUZZY";

    using (SKPaint textPaint = new SKPaint())
    {
        textPaint.Color = SKColors.Purple;
        textPaint.PathEffect = SKPathEffect.CreateDiscrete(3f, 10f);

        // Adjust TextSize property so text is 95% of screen width
        float textWidth = textPaint.MeasureText(text);
        textPaint.TextSize *= 0.95f * info.Width / textWidth;

        // Find the text bounds
        SKRect textBounds = new SKRect();
        textPaint.MeasureText(text, ref textBounds);

        // Calculate offsets to center the text on the screen
        float xText = info.Width / 2 - textBounds.MidX;
        float yText = info.Height / 2 - textBounds.MidY;

        canvas.DrawText(text, xText, yText, textPaint);
    }
}
여기서는 가로 모드로 실행됩니다.

경로 개요
두 가지 버전이 있는 메서드의 GetFillPathSKPaint두 가지 작은 예제가 이미 있습니다.
public Boolean GetFillPath (SKPath src, SKPath dst, Single resScale = 1)

public Boolean GetFillPath (SKPath src, SKPath dst, SKRect cullRect, Single resScale = 1)
처음 두 인수만 필요합니다. 메서드는 인수에서 참조하는 경로에 src 액세스하고 개체의 스트로크 속성(속성 포함PathEffect)에 SKPaint 따라 경로 데이터를 수정한 다음, 결과를 경로에 dst 씁니다. 매개 resScale 변수를 사용하면 정밀도를 줄여 더 작은 대상 경로를 만들 수 있으며 인수는 cullRect 사각형 외부의 윤곽을 제거할 수 있습니다.
이 메서드의 한 가지 기본적인 사용은 경로 효과를 전혀 포함하지 않습니다. 개체의 SKPaintStyle 속성이 설정된 SKPaintStyle.Stroke경우 해당 집합 GetFillPath 이 없는PathEffect 경우 페인트 속성에 의해 스트로크된 것처럼 소스 경로의 윤곽선을 나타내는 경로를 만듭니다.
예를 들어 경로가 반경 500의 단순 원이고 SKPaint 개체가 스트로크 너비 100을 지정하는 경우 src 경로는 반경이 450 dst 이고 반경이 550인 두 개의 동심원이 됩니다. 이 dst 경로를 채우는 것은 경로를 쓰다듬는 것과 동일하기 때문에 메서드가 src 호출 GetFillPath 됩니다. 그러나 경로를 스트로크 dst 하여 경로 윤곽선을 볼 수도 있습니다.
경로를 개요로 탭하면 이를 보여 줍니다. 이 SKCanvasView 값 TapGestureRecognizer 은 TapToOutlineThePathPage.xaml 파일에서 인스턴스화됩니다. TapToOutlineThePathPage.xaml.cs 코드 숨김 파일은 세 SKPaint 개의 개체를 필드로 정의하고, 2개는 스트로크 너비가 100과 20이고, 세 번째 개체는 채우기로 정의합니다.
public partial class TapToOutlineThePathPage : ContentPage
{
    bool outlineThePath = false;

    SKPaint redThickStroke = new SKPaint
    {
        Style = SKPaintStyle.Stroke,
        Color = SKColors.Red,
        StrokeWidth = 100
    };

    SKPaint redThinStroke = new SKPaint
    {
        Style = SKPaintStyle.Stroke,
        Color = SKColors.Red,
        StrokeWidth = 20
    };

    SKPaint blueFill = new SKPaint
    {
        Style = SKPaintStyle.Fill,
        Color = SKColors.Blue
    };

    public TapToOutlineThePathPage()
    {
        InitializeComponent();
    }

    void OnCanvasViewTapped(object sender, EventArgs args)
    {
        outlineThePath ^= true;
        (sender as SKCanvasView).InvalidateSurface();
    }
    ...
}
화면을 탭 PaintSurface 하지 않은 경우 처리기는 개체 및 redThickStroke 페인트 개체를 사용하여 blueFill 원형 경로를 렌더링합니다.
public partial class TapToOutlineThePathPage : ContentPage
{
    ...
    void OnCanvasViewPaintSurface(object sender, SKPaintSurfaceEventArgs args)
    {
        SKImageInfo info = args.Info;
        SKSurface surface = args.Surface;
        SKCanvas canvas = surface.Canvas;

        canvas.Clear();

        using (SKPath circlePath = new SKPath())
        {
            circlePath.AddCircle(info.Width / 2, info.Height / 2,
                                 Math.Min(info.Width / 2, info.Height / 2) -
                                 redThickStroke.StrokeWidth);

            if (!outlineThePath)
            {
                canvas.DrawPath(circlePath, blueFill);
                canvas.DrawPath(circlePath, redThickStroke);
            }
            else
            {
                using (SKPath outlinePath = new SKPath())
                {
                    redThickStroke.GetFillPath(circlePath, outlinePath);

                    canvas.DrawPath(outlinePath, blueFill);
                    canvas.DrawPath(outlinePath, redThinStroke);
                }
            }
        }
    }
}
원은 예상대로 채워지고 스트로크됩니다.

화면을 outlineThePath 탭하면 새 개체가 true만들어 SKPath 지고 PaintSurface 페인트 개체에 대한 redThickStroke 호출 GetFillPath 에서 해당 개체를 대상 경로로 사용합니다. 그런 다음 대상 경로가 채워지고 스트로크되어 redThinStroke다음이 발생합니다.

두 개의 빨간색 원은 원래 원형 경로가 두 개의 원형 윤곽선으로 변환되었음을 명확하게 나타냅니다.
이 메서드는 메서드에 사용할 SKPathEffect.Create1DPath 경로를 개발하는 데 매우 유용할 수 있습니다. 이러한 메서드에서 지정하는 경로는 경로가 복제본(replica) 때 항상 채워집니다. 전체 경로를 채울 수 없도록 하려면 개요를 신중하게 정의해야 합니다.
예를 들어 연결된 체인 샘플에서 링크는 4개의 호로 정의되었으며, 각 쌍은 채울 경로의 영역을 간략하게 설명하기 위해 2개의 반지름을 기반으로 했습니다. 클래스의 코드를 LinkedChainPage 약간 다르게 바꿀 수 있습니다.
먼저 상수의 재정의를 수행합니다.linkRadius
const float linkRadius = 27.5f;
const float linkThickness = 5;
linkPath 이제 원하는 시작 각도와 스윕 각도를 사용하여 단일 반경을 기준으로 두 개의 호만 있습니다.
using (SKPath linkPath = new SKPath())
{
    SKRect rect = new SKRect(-linkRadius, -linkRadius, linkRadius, linkRadius);
    linkPath.AddArc(rect, 55, 160);
    linkPath.AddArc(rect, 235, 160);

    using (SKPaint strokePaint = new SKPaint())
    {
        strokePaint.Style = SKPaintStyle.Stroke;
        strokePaint.StrokeWidth = linkThickness;

        using (SKPath outlinePath = new SKPath())
        {
            strokePaint.GetFillPath(linkPath, outlinePath);

            // Set that path as the 1D path effect for linksPaint
            linksPaint.PathEffect =
                SKPathEffect.Create1DPath(outlinePath, 1.3f * linkRadius, 0,
                                          SKPath1DPathEffectStyle.Rotate);

        }

    }
}
outlinePath 그런 다음 개체가 지정한 속성을 strokePaint사용하여 스트로크될 때의 linkPath 윤곽선을 받는 사람입니다.
이 기술을 사용하는 또 다른 예제는 메서드에 사용되는 경로 다음에 나오는 것입니다.
경로 효과 결합
두 가지 최종 정적 생성 메서드 SKPathEffect 는 다음과 같습니다 SKPathEffect.CreateSumSKPathEffect.CreateCompose.
public static SKPathEffect CreateSum (SKPathEffect first, SKPathEffect second)

public static SKPathEffect CreateCompose (SKPathEffect outer, SKPathEffect inner)
이러한 두 메서드는 두 경로 효과를 결합하여 복합 경로 효과를 만듭니다. 이 메서드는 CreateSum 개별적으로 CreateCompose 적용된 두 경로 효과와 유사한 경로 효과를 만들고, 한 경로 효과(the inner)를 적용한 다음, 해당 효과에 적용합니다 outer .
메서드 SKPaint 가 속성(포함PathEffect)을 기반으로 한 경로를 다른 경로로 변환하는 방법을 GetFillPath 이미 살펴보았으므로 개체가 또는 CreateCompose 메서드에 SKPaint 지정된 CreateSum 두 개의 경로 효과로 해당 작업을 두 번 수행하는 방법을 SKPaint 너무 신비하지 않아야 합니다.
한 가지 분명한 용도 CreateSum 는 경로를 한 경로 효과로 채우고 경로를 다른 경로 효과로 스트로크하는 개체를 정의하는 SKPaint 것입니다. 이것은 가리비 가장자리가있는 프레임 내에서 고양이의 배열을 표시하는 프레임의 고양이 샘플에서 설명됩니다.

클래스는 CatsInFramePage 여러 필드를 정의하여 시작합니다. SVG 경로 데이터 문서에서 클래스의 PathDataCatPage 첫 번째 필드를 인식할 수 있습니다. 두 번째 경로는 프레임의 가리비 패턴에 대한 선과 호를 기반으로 합니다.
public class CatsInFramePage : ContentPage
{
    // From PathDataCatPage.cs
    SKPath catPath = SKPath.ParseSvgPathData(
        "M 160 140 L 150 50 220 103" +              // Left ear
        "M 320 140 L 330 50 260 103" +              // Right ear
        "M 215 230 L 40 200" +                      // Left whiskers
        "M 215 240 L 40 240" +
        "M 215 250 L 40 280" +
        "M 265 230 L 440 200" +                     // Right whiskers
        "M 265 240 L 440 240" +
        "M 265 250 L 440 280" +
        "M 240 100" +                               // Head
        "A 100 100 0 0 1 240 300" +
        "A 100 100 0 0 1 240 100 Z" +
        "M 180 170" +                               // Left eye
        "A 40 40 0 0 1 220 170" +
        "A 40 40 0 0 1 180 170 Z" +
        "M 300 170" +                               // Right eye
        "A 40 40 0 0 1 260 170" +
        "A 40 40 0 0 1 300 170 Z");

    SKPaint catStroke = new SKPaint
    {
        Style = SKPaintStyle.Stroke,
        StrokeWidth = 5
    };

    SKPath scallopPath =
        SKPath.ParseSvgPathData("M 0 0 L 50 0 A 60 60 0 0 1 -50 0 Z");

    SKPaint framePaint = new SKPaint
    {
        Color = SKColors.Black
    };
    ...
}
catPath 개체 Style 속성이 SKPathEffect.Create2DPath .로 설정된 Stroke경우 메서드에서 SKPaint 사용할 수 있습니다. 그러나 이 프로그램에서 직접 사용하는 경우 catPath 고양이의 머리 전체가 채워지고 수염도 보이지 않습니다. (사용해 보세요!) 해당 경로의 개요를 가져오고 메서드에서 해당 개요를 SKPathEffect.Create2DPath 사용해야 합니다.
생성자가 이 작업을 수행합니다. 먼저 두 개의 변환을 적용하여 catPath (0, 0) 점을 가운데로 이동하고 크기가 축소됩니다. GetFillPath 는 에 있는 outlinedCatPath윤곽선의 모든 윤곽선을 가져오고 해당 개체는 호출에 SKPathEffect.Create2DPath 사용됩니다. 값의 SKMatrix 배율 인수는 타일 사이에 약간의 버퍼를 제공하기 위해 고양이의 가로 및 세로 크기보다 약간 크며, 변환 요소는 프레임의 왼쪽 위 모서리에 전체 고양이가 표시되도록 다소 경험적으로 파생되었습니다.
public class CatsInFramePage : ContentPage
{
    ...
    public CatsInFramePage()
    {
        Title = "Cats in Frame";

        SKCanvasView canvasView = new SKCanvasView();
        canvasView.PaintSurface += OnCanvasViewPaintSurface;
        Content = canvasView;

        // Move (0, 0) point to center of cat path
        catPath.Transform(SKMatrix.MakeTranslation(-240, -175));

        // Now catPath is 400 by 250
        // Scale it down to 160 by 100
        catPath.Transform(SKMatrix.MakeScale(0.40f, 0.40f));

        // Get the outlines of the contours of the cat path
        SKPath outlinedCatPath = new SKPath();
        catStroke.GetFillPath(catPath, outlinedCatPath);

        // Create a 2D path effect from those outlines
        SKPathEffect fillEffect = SKPathEffect.Create2DPath(
            new SKMatrix { ScaleX = 170, ScaleY = 110,
                           TransX = 75, TransY = 80,
                           Persp2 = 1 },
            outlinedCatPath);

        // Create a 1D path effect from the scallop path
        SKPathEffect strokeEffect =
            SKPathEffect.Create1DPath(scallopPath, 75, 0, SKPath1DPathEffectStyle.Rotate);

        // Set the sum the effects to frame paint
        framePaint.PathEffect = SKPathEffect.CreateSum(fillEffect, strokeEffect);
    }
    ...
}
그런 다음 생성자는 가리비 프레임을 호출 SKPathEffect.Create1DPath 합니다. 경로의 너비는 100픽셀이지만 복제본(replica)ted 경로가 프레임 주위에 겹치도록 75픽셀입니다. 생성자의 마지막 문은 두 경로 효과를 결합하고 결과를 개체로 설정하기 위해 SKPaint 호출 SKPathEffect.CreateSum 합니다.
이 모든 작업을 통해 처리기는 PaintSurface 매우 간단할 수 있습니다. 직사각형을 정의하고 다음을 사용하여 framePaint그리기만 하면 됩니다.
public class CatsInFramePage : ContentPage
{
    ...
    void OnCanvasViewPaintSurface(object sender, SKPaintSurfaceEventArgs args)
    {
        SKImageInfo info = args.Info;
        SKSurface surface = args.Surface;
        SKCanvas canvas = surface.Canvas;

        canvas.Clear();

        SKRect rect = new SKRect(50, 50, info.Width - 50, info.Height - 50);
        canvas.ClipRect(rect);
        canvas.DrawRect(rect, framePaint);
    }
}
경로 효과 뒤에 있는 알고리즘은 항상 쓰다듬거나 채우는 데 사용되는 전체 경로를 표시하므로 일부 시각적 개체가 사각형 외부에 표시될 수 있습니다. ClipRect 호출 전에 DrawRect 호출하면 시각적 개체가 상당히 클린er가 될 수 있습니다. (클리핑하지 않고 사용해 보세요!)
다른 경로 효과에 일부 지터를 추가하는 데 사용하는 SKPathEffect.CreateCompose 것이 일반적입니다. 직접 실험해 볼 수 있지만, 다음은 약간 다른 예입니다.
파선 해치 선은 타원을 파선으로 채웁니다. 클래스의 대부분의 작업은 DashedHatchLinesPage 필드 정의에서 올바르게 수행됩니다. 이러한 필드는 대시 효과와 빗살 무늬 효과를 정의합니다. 정의의 호출 SKPaint 에서 SKPathEffect.CreateCompose 참조되기 때문에 다음과 같이 static 정의됩니다.
public class DashedHatchLinesPage : ContentPage
{
    static SKPathEffect dashEffect =
        SKPathEffect.CreateDash(new float[] { 30, 30 }, 0);

    static SKPathEffect hatchEffect = SKPathEffect.Create2DLine(20,
        Multiply(SKMatrix.MakeScale(60, 60),
                 SKMatrix.MakeRotationDegrees(45)));

    SKPaint paint = new SKPaint()
    {
        PathEffect = SKPathEffect.CreateCompose(dashEffect, hatchEffect),
        StrokeCap = SKStrokeCap.Round,
        Color = SKColors.Blue
    };
    ...
    static SKMatrix Multiply(SKMatrix first, SKMatrix second)
    {
        SKMatrix target = SKMatrix.MakeIdentity();
        SKMatrix.Concat(ref target, first, second);
        return target;
    }
}
PaintSurface 처리기는 표준 오버헤드와 다음을 한 번 호출하는 것만 포함해야 합니다DrawOval.
public class DashedHatchLinesPage : ContentPage
{
    ...
    void OnCanvasViewPaintSurface(object sender, SKPaintSurfaceEventArgs args)
    {
        SKImageInfo info = args.Info;
        SKSurface surface = args.Surface;
        SKCanvas canvas = surface.Canvas;

        canvas.Clear();

        canvas.DrawOval(info.Width / 2, info.Height / 2,
                        0.45f * info.Width, 0.45f * info.Height,
                        paint);
    }
    ...
}
이미 발견한 것처럼 해치 선은 영역 내부로 정확하게 제한되지 않으며, 이 예제에서는 항상 전체 대시로 왼쪽에서 시작합니다.

간단한 점과 대시에서 이상한 조합에 이르기까지 다양한 경로 효과를 살펴보았으므로 상상력을 사용하고 만들 수 있는 것을 확인하세요.