Visual Studio에 .NET MAUI 프로젝트 만들기
.NET MAUI 도구를 설치 및 구성하고 나면 Visual Studio를 사용하여 .NET MAUI 앱을 빌드할 수 있습니다.
이 단원에서는 Visual Studio에서 .NET MAUI 템플릿의 구조를 알아봅니다. 플랫폼 간 모바일과 데스크톱 앱을 만드는 데 이 템플릿을 사용합니다.
시작하는 방법
Visual Studio를 사용하여 새 .NET MAUI 프로젝트를 만들려면 [새 프로젝트 만들기] 대화 상자에서 .NET MAUI 프로젝트 형식을 선택한 다음, .NET MAUI 앱 템플릿을 선택합니다.
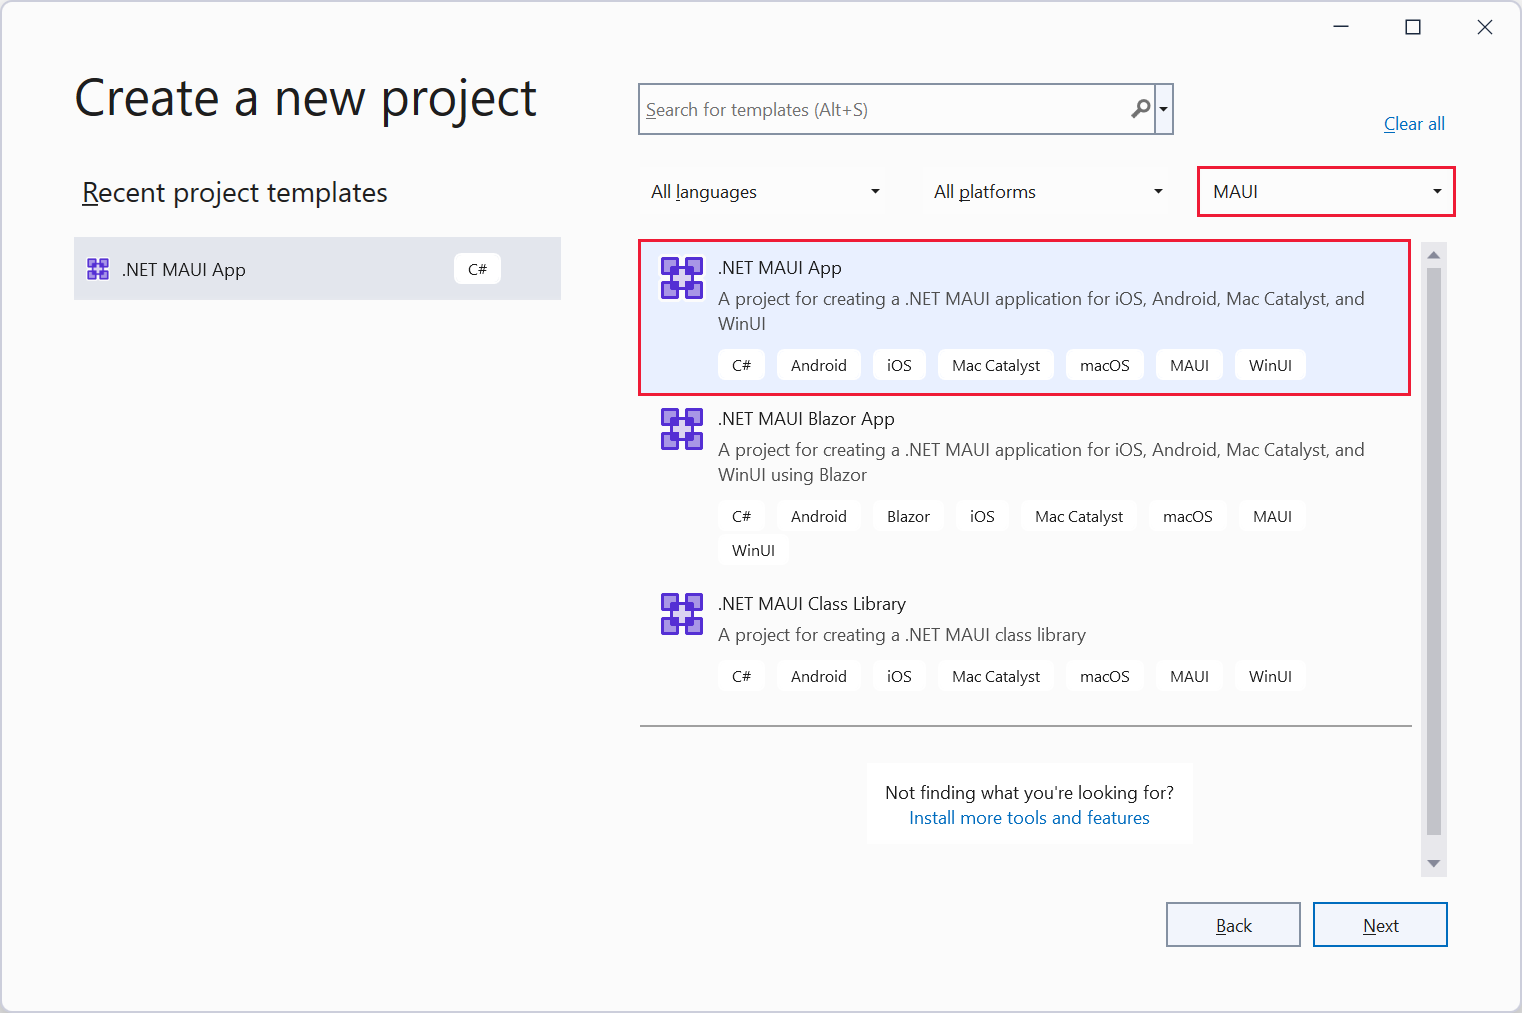
마법사의 단계를 수행하여 프로젝트 이름을 지정하고 위치를 지정합니다.
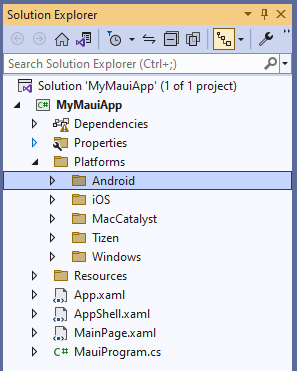
새로 만든 .NET MAUI 프로젝트에는 다음과 같은 항목이 포함됩니다.
.NET MAUI 프로젝트 구조 및 애플리케이션 시작
프로젝트 콘텐츠에는 다음 항목이 포함됩니다.
App.xaml. 이 파일은 앱이 XAML 레이아웃에서 사용할 애플리케이션 리소스를 정의합니다. 기본 리소스는
Resources폴더에 있으며 앱 전체 색과 .NET MAUI의 모든 기본 제공 컨트롤의 기본 스타일을 정의합니다. 여기서는 리소스 사전 두 개가 병합됩니다.<?xml version = "1.0" encoding = "UTF-8" ?> <Application xmlns="http://schemas.microsoft.com/dotnet/2021/maui" xmlns:x="http://schemas.microsoft.com/winfx/2009/xaml" xmlns:local="clr-namespace:MyMauiApp" x:Class="MyMauiApp.App"> <Application.Resources> <ResourceDictionary> <ResourceDictionary.MergedDictionaries> <ResourceDictionary Source="Resources/Colors.xaml" /> <ResourceDictionary Source="Resources/Styles.xaml" /> </ResourceDictionary.MergedDictionaries> </ResourceDictionary> </Application.Resources> </Application>App.xaml.cs. App.xaml 파일의 코드 숨김입니다. 이 파일은 앱 클래스를 정의합니다. 이 클래스는 런타임 시 애플리케이션을 나타냅니다. 이 클래스의 생성자는 초기 창을 만들고
MainPage속성에 할당합니다. 이 속성은 애플리케이션이 실행될 때 표시되는 페이지를 결정합니다. 또한 이 클래스를 사용하면 일반적인 플랫폼 중립 애플리케이션 수명 주기 이벤트 처리기를 재정의할 수 있습니다. 이벤트에는OnStart,OnResume및OnSleep이 포함됩니다. 이러한 처리기는Application기본 클래스의 구성원으로 정의됩니다. 다음 코드는 예제를 보여 줍니다.참고 항목
앱이 처음 실행될 때 플랫폼별 수명 주기 이벤트를 재정의할 수도 있습니다. 나중에 설명합니다.
namespace MyMauiApp; public partial class App : Application { public App() { InitializeComponent(); MainPage = new AppShell(); } protected override void OnStart() { base.OnStart(); } protected override void OnResume() { base.OnResume(); } protected override void OnSleep() { base.OnSleep(); } }AppShell.xaml. 이 파일은 .NET MAUI 애플리케이션의 기본 구조입니다. .NET MAUI
Shell에서는 애플리케이션 루트에 대한 플라이아웃 탐색 및 탭 등 앱 스타일, URI 기반 탐색 및 레이아웃 옵션을 포함하여 다중 플랫폼 앱에 유익한 많은 기능을 제공합니다. 기본 템플릿에서는 앱이 시작할 때 확장되는 단일 페이지(또는ShellContent)를 제공합니다.<?xml version="1.0" encoding="UTF-8" ?> <Shell x:Class="MyMauiApp.AppShell" xmlns="http://schemas.microsoft.com/dotnet/2021/maui" xmlns:x="http://schemas.microsoft.com/winfx/2009/xaml" xmlns:local="clr-namespace:MyMauiApp" Shell.FlyoutBehavior="Disabled"> <ShellContent Title="Home" ContentTemplate="{DataTemplate local:MainPage}" Route="MainPage" /> </Shell>MainPage.xaml. 이 파일에는 사용자 인터페이스 정의가 포함되어 있습니다. MAUI 앱 템플릿에서 생성된 샘플 앱에는 레이블 2개, 버튼 및 이미지가 있습니다. 컨트롤은
ScrollView로 묶인VerticalStackLayout을 통해 정렬됩니다.VerticalStackLayout컨트롤은 컨트롤을 스택에서 세로로(스택으로) 정렬하고 보기가 디바이스에 표시하기에 너무 크면ScrollView에서 스크롤 막대를 제공합니다. 이 파일의 내용을 사용자 고유의 UI 레이아웃으로 바꾸고자 합니다. 여러 페이지 앱이 있으면 더 많은 XAML 페이지를 정의할 수도 있습니다.<?xml version="1.0" encoding="utf-8" ?> <ContentPage xmlns="http://schemas.microsoft.com/dotnet/2021/maui" xmlns:x="http://schemas.microsoft.com/winfx/2009/xaml" x:Class="MyMauiApp.MainPage"> <ScrollView> <VerticalStackLayout Spacing="25" Padding="30,0" VerticalOptions="Center"> <Image Source="dotnet_bot.png" SemanticProperties.Description="Cute dot net bot waving hi to you!" HeightRequest="200" HorizontalOptions="Center" /> <Label Text="Hello, World!" SemanticProperties.HeadingLevel="Level1" FontSize="32" HorizontalOptions="Center" /> <Label Text="Welcome to .NET Multi-platform App UI" SemanticProperties.HeadingLevel="Level2" SemanticProperties.Description="Welcome to dot net Multi platform App U I" FontSize="18" HorizontalOptions="Center" /> <Button x:Name="CounterBtn" Text="Click me" SemanticProperties.Hint="Counts the number of times you click" Clicked="OnCounterClicked" HorizontalOptions="Center" /> </VerticalStackLayout> </ScrollView> </ContentPage>MainPage.xaml.cs. 페이지의 코드 숨김입니다. 이 파일에서 페이지의 컨트롤에 의해 트리거되는 다양한 이벤트 처리기와 기타 작업에 대한 논리를 정의합니다. 예 코드에서는 페이지의 단추에 대한
Clicked이벤트 처리기를 구현합니다. 코드는 단순히 카운터 변수를 증가시키고 결과를 페이지에 레이블로 표시합니다. MAUI Essentials 라이브러리의 일부로 제공되는 의미 체계 서비스에서는 접근성을 지원합니다.SemanticScreenReader클래스의 정적Announce메서드는 사용자가 단추를 선택할 때 화면 읽기 프로그램에서 발표한 텍스트를 지정합니다.namespace MyMauiApp; public partial class MainPage : ContentPage { int count = 0; public MainPage() { InitializeComponent(); } private void OnCounterClicked(object sender, EventArgs e) { count++; if (count == 1) CounterBtn.Text = $"Clicked {count} time"; else CounterBtn.Text = $"Clicked {count} times"; SemanticScreenReader.Announce(CounterBtn.Text); } }MauiProgram.cs. 네이티브 플랫폼마다 애플리케이션을 만들고 초기화하는 다른 시작점이 있습니다. 프로젝트의 Platforms 폴더에서 이 코드를 찾을 수 있습니다. 이 코드는 플랫폼별 코드이지만 결국에는 정적
MauiProgram클래스의CreateMauiApp메서드를 호출합니다.CreateMauiApp메서드를 사용하여 앱 작성기 개체를 만들어 애플리케이션을 구성합니다. 최소한 애플리케이션을 설명하는 클래스를 지정해야 합니다. 앱 작성기 개체의UseMauiApp제네릭 메서드를 사용하여 이 작업을 수행합니다. 형식 매개 변수에서 애플리케이션 클래스를 지정합니다. 또한 앱 작성기는 글꼴 등록, 종속성 주입에 사용되는 서비스 구성, 컨트롤의 사용자 지정 처리기 등록 등과 같은 작업에 사용되는 메서드를 제공합니다. 다음 코드에서는 앱 작성기를 사용하여 글꼴을 등록하는 예를 보여줍니다.namespace MyMauiApp; public static class MauiProgram { public static MauiApp CreateMauiApp() { var builder = MauiApp.CreateBuilder(); builder .UseMauiApp<App>() .ConfigureFonts(fonts => { fonts.AddFont("OpenSans-Regular.ttf", "OpenSansRegular"); fonts.AddFont("OpenSans-Semibold.ttf", "OpenSansSemibold"); }); return builder.Build(); } }Platforms. 이 폴더에는 플랫폼별 초기화 코드 파일과 리소스가 포함되어 있습니다. Android, iOS, MacCatalyst, Tizen 및 Windows에 대한 폴더가 있습니다. 런타임 시 앱은 플랫폼별 방식으로 시작합니다. 대부분의 시작 프로세스는 MAUI 라이브러리 내부에서 추상화되지만 이러한 폴더의 코드 파일에서는 고유한 사용자 지정 초기화를 연결하는 메커니즘을 제공합니다. 중요한 점은 초기화가 완료되면 플랫폼별 코드가 앞에서 설명한 대로
App개체를 만들고 실행하는MauiProgram.CreateMauiApp메서드를 호출한다는 점입니다. 예를 들어 Android 폴더의 MainApplication.cs 파일, iOS 및 MacCatalyst 폴더의 AppDelegate.cs 파일, Windows 폴더의 App.xaml.cs 파일 모두에 재정의가 포함됩니다.protected override MauiApp CreateMauiApp() => MauiProgram.CreateMauiApp();
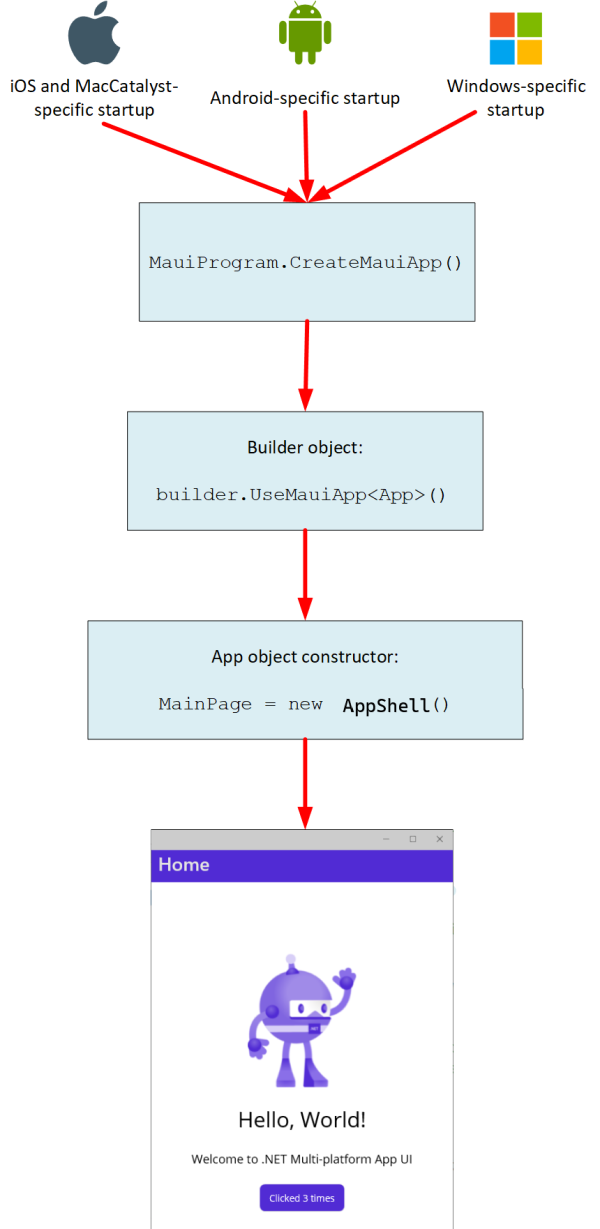
다음 이미지에서는 .NET MAUI 앱이 시작할 때의 제어 흐름을 보여줍니다.
프로젝트 리소스
주 프로젝트의 .csproj 파일에는 몇 가지 중요한 섹션이 포함되어 있습니다. 초기 PropertyGroup은 프로젝트에서 대상으로 지정하는 플랫폼 프레임워크뿐만 아니라 애플리케이션 제목, ID, 버전, 표시 버전 및 지원되는 운영 체제와 같은 항목을 지정합니다. 필요에 따라 이러한 속성을 수정할 수 있습니다.
<Project Sdk="Microsoft.NET.Sdk">

    <PropertyGroup>
        <TargetFrameworks>net6.0-android;net6.0-ios;net6.0-maccatalyst</TargetFrameworks>
        <TargetFrameworks Condition="$([MSBuild]::IsOSPlatform('windows'))">$(TargetFrameworks);net6.0-windows10.0.19041.0</TargetFrameworks>
        <!-- Uncomment to also build the tizen app. You will need to install tizen by following this: https://github.com/Samsung/Tizen.NET -->
        <!-- <TargetFrameworks>$(TargetFrameworks);net6.0-tizen</TargetFrameworks> -->
        <OutputType>Exe</OutputType>
        <RootNamespace>MyMauiApp</RootNamespace>
        <UseMaui>true</UseMaui>
        <SingleProject>true</SingleProject>
        <ImplicitUsings>enable</ImplicitUsings>

        <!-- Display name -->
        <ApplicationTitle>MyMauiApp</ApplicationTitle>

        <!-- App Identifier -->
        <ApplicationId>com.companyname.mymauiapp</ApplicationId>
        <ApplicationIdGuid>272B9ECE-E038-4E53-8553-E3C9EA05A5B2</ApplicationIdGuid>

        <!-- Versions -->
        <ApplicationDisplayVersion>1.0</ApplicationDisplayVersion>
        <ApplicationVersion>1</ApplicationVersion>

        <SupportedOSPlatformVersion Condition="$([MSBuild]::GetTargetPlatformIdentifier('$(TargetFramework)')) == 'ios'">14.2</SupportedOSPlatformVersion>
        <SupportedOSPlatformVersion Condition="$([MSBuild]::GetTargetPlatformIdentifier('$(TargetFramework)')) == 'maccatalyst'">14.0</SupportedOSPlatformVersion>
        <SupportedOSPlatformVersion Condition="$([MSBuild]::GetTargetPlatformIdentifier('$(TargetFramework)')) == 'android'">21.0</SupportedOSPlatformVersion>
        <SupportedOSPlatformVersion Condition="$([MSBuild]::GetTargetPlatformIdentifier('$(TargetFramework)')) == 'windows'">10.0.17763.0</SupportedOSPlatformVersion>
        <TargetPlatformMinVersion Condition="$([MSBuild]::GetTargetPlatformIdentifier('$(TargetFramework)')) == 'windows'">10.0.17763.0</TargetPlatformMinVersion>
        <SupportedOSPlatformVersion Condition="$([MSBuild]::GetTargetPlatformIdentifier('$(TargetFramework)')) == 'tizen'">6.5</SupportedOSPlatformVersion>
    </PropertyGroup>
    ...

</Project>
초기 속성 그룹 아래의 ItemGroup 섹션을 사용하면 첫 번째 창이 나타나기 전에 앱이 로드되는 동안 표시되는 시작 화면의 이미지와 색을 지정할 수 있습니다. 앱에서 사용하는 글꼴, 이미지 및 자산의 기본 위치를 설정할 수도 있습니다.
<Project Sdk="Microsoft.NET.Sdk">

    ...

   <ItemGroup>
        <!-- App Icon -->
        <MauiIcon Include="Resources\appicon.svg"
                  ForegroundFile="Resources\appiconfg.svg"
                  Color="#512BD4" />

        <!-- Splash Screen -->
        <MauiSplashScreen Include="Resources\appiconfg.svg"
                          Color="#512BD4"
                          BaseSize="128,128" />

        <!-- Images -->
        <MauiImage Include="Resources\Images\*" />
        <MauiImage Update="Resources\Images\dotnet_bot.svg"
                   BaseSize="168,208" />

        <!-- Custom Fonts -->
        <MauiFont Include="Resources\Fonts\*" />

        <!-- Raw Assets (also remove the "Resources\Raw" prefix) -->
        <MauiAsset Include="Resources\Raw\**"
                   LogicalName="%(RecursiveDir)%(Filename)%(Extension)" />
    </ItemGroup>

    ...

</Project>
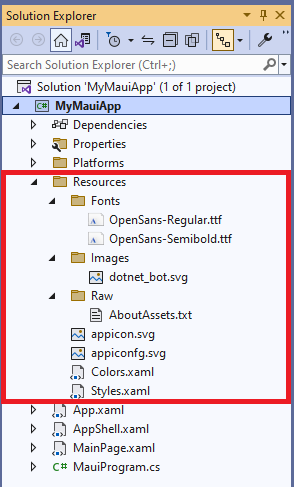
Visual Studio의 솔루션 탐색기 창에서 Resources 폴더를 확장하면 이러한 항목이 표시됩니다. 애플리케이션에 필요한 다른 글꼴, 이미지 및 기타 그래픽 리소스를 이 폴더와 하위 폴더에 추가할 수 있습니다.
앱이 실행될 때 글꼴 폴더에 추가된 모든 글꼴을 앱 작성기 개체에 등록해야 합니다. MauiProgram 클래스의 CreateMauiApp 메서드는 ConfigureFonts 메서드를 사용하여 이 작업을 수행합니다.
public static class MauiProgram
{
    public static MauiApp CreateMauiApp()
    {
        var builder = MauiApp.CreateBuilder();
        builder
            ...
            .ConfigureFonts(fonts =>
            {
                fonts.AddFont("OpenSans-Regular.ttf", "OpenSansRegular");
            });

        ...
    }
}
이 예에서 AddFont 메서드는 글꼴을 OpenSansRegular 이름과 연결합니다. 페이지의 XAML 설명이나 애플리케이션 리소스 사전에서 항목 서식을 지정할 때 이 글꼴을 지정할 수 있습니다.
<Application ...">
    <Application.Resources>
        <ResourceDictionary>
            ...
            <Style TargetType="Button">
                ...
                <Setter Property="FontFamily" Value="OpenSansRegular" />
                ...
            </Style>

        </ResourceDictionary>
    </Application.Resources>
</Application>
Android 및 iOS 플랫폼별 리소스의 Platforms 폴더 아래에 있는 Android 및 iOS 폴더의 Resources 폴더를 사용합니다.