사용자 지정 Azure Stack Hub Marketplace 항목 만들기
Azure Stack Hub Marketplace에 게시된 모든 항목은 Azure 갤러리 패키지(.azpkg) 형식을 사용합니다. Azure Gallery Packager 도구를 사용하면 사용자가 다운로드할 수 있도록 Azure Stack Hub Marketplace에 업로드할 수 있는 사용자 지정 Azure 갤러리 패키지를 만들 수 있습니다. 배포 프로세스에서는 Azure Resource Manager 템플릿을 사용합니다.
Marketplace 항목 만들기
사용자 지정 Marketplace 항목을 만들려면 다음을 수행합니다.
Azure Gallery Packager 도구 및 샘플 Azure Stack Hub 갤러리 패키지를 다운로드합니다. 이 다운로드에는 사용자 지정 가상 머신 템플릿이 포함되어 있습니다. .zip 파일의 압축을 풀고, Custom virtual machines 폴더 아래에서 Linux 또는 사용 가능한 Windows 템플릿을 사용할 수 있습니다. 미리 작성된 템플릿을 다시 사용하고 해당 매개 변수를 Azure Stack Hub 포털에 표시할 항목의 제품 정보로 수정할 수 있습니다.
Azure Resource Manager 템플릿을 만들거나 Windows/Linux에 대한 샘플 템플릿을 사용합니다. 이러한 샘플 템플릿은 1단계에서 다운로드한 패키지 작성 도구 .zip 파일에 제공됩니다.
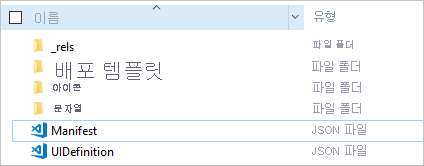
갤러리 패키지는 다음과 같은 구조를 포함해야 합니다.

Manifest.json 템플릿에서 강조 표시된 다음 값(숫자 포함)을 사용자 지정 이미지를 업로드할 때 제공한 값으로 바꿉니다.
사용자 지정 템플릿을 게시하기 전에 샘플을 있는 그대로 게시하고 사용자 환경에서 작동하는지 확인하는 것이 좋습니다. 이 단계가 작동하는지 확인한 후 갤러리에서 샘플을 삭제하고 결과에 만족할 때까지 반복해서 변경합니다.
다음 템플릿은 Manifest.json 파일의 샘플입니다.
{
  "$schema": "https://gallery.azure.com/schemas/2015-10-01/manifest.json#",
  "name": "Test", (1)
  "publisher": "<Publisher name>", (2)
  "version": "<Version number>", (3)
  "displayName": "ms-resource:displayName", (4)
  "publisherDisplayName": "ms-resource:publisherDisplayName", (5)
  "publisherLegalName": "ms-resource:publisherDisplayName", (6)
  "summary": "ms-resource:summary",
  "longSummary": "ms-resource:longSummary",
  "description": "ms-resource:description",
  "longDescription": "ms-resource:description",
  "links": [
    { "displayName": "ms-resource:documentationLink", "uri": "http://go.microsoft.com/fwlink/?LinkId=532898" }
    ],
  "artifacts": [
      {
        "isDefault": true
      }
  ],
  "images": [{
      "context": "ibiza",
      "items": [{
        "id": "small",
        "path": "icons\\Small.png", (7)
        "type": "icon"
        },
        {
            "id": "medium",
            "path": "icons\\Medium.png",
            "type": "icon"
        },
        {
            "id": "large",
            "path": "icons\\Large.png",
            "type": "icon"
        },
        {
            "id": "wide",
            "path": "icons\\Wide.png",
            "type": "icon"
        }]
    }]
}
다음 목록에서는 예제 템플릿에서 번호가 매겨진 이전 값을 설명합니다.
The name of the offerThe version of your template, without a spaceThe name that customers seeThe publisher name that customers seeThe name of the publisher, without a spaceThe publisher legal nameThe path and name for each icon
- ms-resource를 참조하는 모든 필드의 경우 strings/resources.json 파일 내에서 적절한 값을 변경해야 합니다.
{
"displayName": "<OfferName.PublisherName.Version>",
"publisherDisplayName": "<Publisher name>",
"summary": "Create a VM",
"longSummary": "Create a virtual machine and use it",
"description": "<p>This is just a sample of the type of description you could create for your gallery item!</p><p>This is a second paragraph.</p>",
"documentationLink": "Documentation"
}
- 리소스를 성공적으로 배포할 수 있도록 하려면 Azure Stack Hub API를 사용하여 템플릿을 테스트합니다.
- 템플릿이 가상 머신 이미지를 사용하는 경우 지침에 따라 가상 머신 이미지를 Azure Stack Hub에 추가합니다.
- /Contoso.TodoList/DeploymentTemplates/ 폴더에 Azure Resource Manager 템플릿을 저장합니다.
- 아이콘 및 텍스트를 선택 합니다. Icons 폴더에 아이콘을 추가하고 Strings 폴더의 리소스 파일에 텍스트를 추가합니다. 아이콘에 대해 작게, 보통, 크게 및 넓게의 명명 규칙을 사용합니다.
- 파일 수정을 완료하면 파일을 .azpkg 파일로 변환합니다. 이전에 다운로드한 AzureGallery.exe 도구 및 샘플 갤러리 패키지를 사용하여 변환을 수행합니다. 다음 명령을 실행합니다.
.\AzureGallery.exe package -m c:\<path>\<gallery package name>\manifest.json -o c:\Temp