연습 - 환경 설정
중요
이 연습을 수행하려면 사용자의 Azure 구독이 필요하며 요금이 발생할 수 있습니다. Azure 구독이 아직 없는 경우 시작하기 전에 체험 계정을 만듭니다.
장난감 회사의 웹 사이트 워크플로 작업을 시작하려면 먼저 환경을 구성해야 합니다. 이 단원에서는 이 모듈의 나머지 부분을 완료하도록 Azure 및 GitHub 환경을 설정해야 합니다.
목표를 달성하기 위해 다음을 수행합니다.
- 이 모듈에 대한 GitHub 리포지토리를 설정합니다.
- 프로젝트의 리포지토리를 컴퓨터에 복제합니다.
- Microsoft Entra ID에서 두 개의 워크로드 ID를 만듭니다.
- Azure에서 두 개의 리소스 그룹을 만듭니다.
- GitHub에서 비밀과 환경을 만듭니다.
GitHub 리포지토리 가져오기
여기서 GitHub 리포지토리가 이 모듈의 나머지 부분을 완료하도록 설정되었는지 확인합니다. 템플릿 리포지토리를 기준으로 새 리포지토리를 만들어 설정합니다. 템플릿 리포지토리에는 이 모듈을 시작하는 데 필요한 파일이 포함되어 있습니다.
이 학습 경로의 모듈은 진행 과정을 구성합니다. 학습을 위해 각 모듈에는 연결된 GitHub 템플릿 리포지토리가 있습니다.
팁
학습 경로에서 이전 모듈을 완료했더라도 다음 지침에 따라 새 리포지토리를 만들고 새 이름을 지정하세요.
템플릿 리포지토리에서 시작
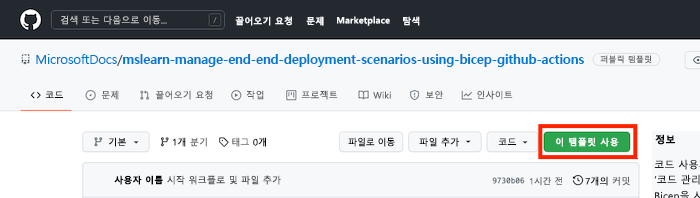
GitHub 리포지토리를 설정하는 템플릿을 실행합니다.
GitHub 사이트에서 다음 단계를 수행하여 템플릿에서 리포지토리를 만듭니다.
이 템플릿 사용>새 리포지토리 만들기를 선택합니다.
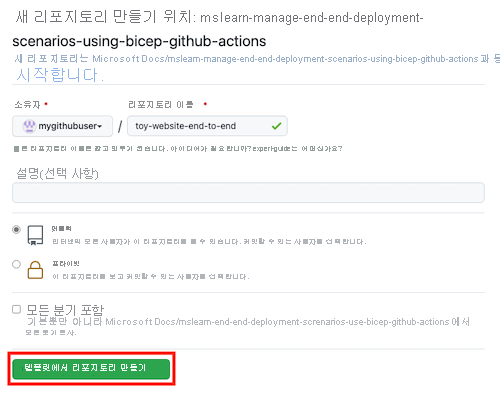
소유자 드롭다운 목록에서 GitHub 사용자 이름을 선택합니다.
새 프로젝트의 리포지토리 이름(예: toy-website-end-to-end)을 입력합니다.
퍼블릭 옵션을 선택합니다.
사용자 고유의 리포지토리를 만들 때 프라이빗으로 설정할 수 있습니다. 이 모듈에서는 퍼블릭 리포지토리와 GitHub Enterprise 계정에서만 작동하는 GitHub의 일부 기능을 사용합니다.
템플릿에서 리포지토리 만들기를 선택합니다.
Important
이 모듈의 마지막 연습에는 중요한 정리 단계가 포함되어 있습니다. 이 모듈을 완료하지 않더라도 정리 단계를 수행해야 합니다.
리포지토리 복제
이제 사용자 계정에 템플릿 리포지토리의 복사본이 있습니다. 이제 작업을 시작할 수 있도록 이 리포지토리를 로컬로 복제합니다.
코드를 선택하고 복사 아이콘을 선택합니다.

Visual Studio Code를 엽니다.
터미널>새 터미널을 선택하여 Visual Studio Code 터미널 창을 엽니다. 이 창은 일반적으로 화면 하단에 열립니다.
터미널에서 로컬 컴퓨터의 GitHub 리포지토리를 복제하려는 디렉터리로 이동합니다. 예를 들어 toy-website-environments 폴더에 리포지토리를 복제하려면 다음 명령을 실행합니다.
cd toy-website-end-to-endgit clone을 입력한 다음 이전에 복사한 다음과 같은 URL을 붙여넣습니다.git clone https://github.com/mygithubuser/toy-website-end-to-end.gitVisual Studio Code 터미널에서 다음 명령을 실행하여 리포지토리 폴더에서 Visual Studio Code를 다시 엽니다.
code -r toy-website-end-to-end
Azure에 로그인
Azure에서 리소스 그룹을 작업하려면 Visual Studio Code 터미널에서 Azure 계정에 로그인합니다. Azure CLI 도구를 설치했는지 확인하세요.
터미널 메뉴에서 새 터미널을 선택합니다. 터미널 창은 일반적으로 화면의 아래쪽 절반에서 열립니다.
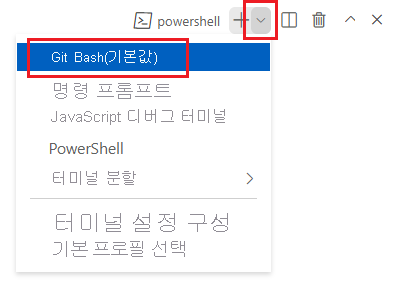
기본 셸은 일반적으로 터미널 창의 오른쪽에 표시된 대로 pwsh입니다.

셸 드롭다운을 선택한 다음, Azure Cloud Shell(bash)을 선택합니다.
새 셸이 열립니다.
Azure CLI를 사용하여 Azure에 로그인
Visual Studio Code 터미널에서 다음 명령을 실행하여 Azure에 로그인합니다.
az login열리는 브라우저에서 Azure 계정에 로그인합니다.
Azure에서 리소스 그룹을 작업하려면 Visual Studio Code 터미널에서 Azure 계정에 로그인합니다. Azure PowerShell을 설치했는지 확인합니다.
터미널 메뉴에서 새 터미널을 선택합니다. 터미널 창은 일반적으로 화면의 아래쪽 절반에서 열립니다.
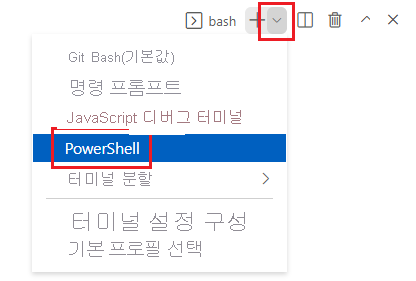
기본 셸은 일반적으로 터미널 창의 오른쪽에 표시된 대로 pwsh입니다.
셸 드롭다운을 선택한 다음, Azure Cloud Shell(PowerShell)을 선택합니다.
새 셸이 열립니다.
Azure PowerShell을 사용하여 Azure에 로그인
Visual Studio Code 터미널에서 다음 명령을 실행하여 Azure에 로그인합니다.
Connect-AzAccount열리는 브라우저에서 Azure 계정에 로그인합니다.
두 개의 워크로드 ID 만들기
그런 다음 Microsoft Entra ID에서 두 개의 워크로드 ID를 만듭니다. 하나는 테스트 환경용이고 다른 하나는 프로덕션 환경용입니다.
다음 코드를 실행하여 GitHub 사용자 이름 및 리포지토리 이름에 대한 변수를 정의합니다.
mygithubuser를 이전 연습 단원에서 적어 둔 GitHub 사용자 이름으로 바꿔야 합니다. 또한 올바른 GitHub 리포지토리 이름을 지정했는지 확인합니다.githubOrganizationName='mygithubuser' githubRepositoryName='toy-website-end-to-end'테스트 환경에 배포하기 위한 워크로드 ID를 만듭니다. 워크로드 ID에는 두 개의 페더레이션 자격 증명이 필요합니다. 하나는 워크플로가 유효성 검사 작업을 실행할 때 사용되는데, 이 작업은 GitHub 환경과 연결되지 않기 때문입니다. 두 번째는 워크플로가 테스트 GitHub 환경에 대해 실행되는 배포 작업을 실행할 때 사용됩니다.
testApplicationRegistrationDetails=$(az ad app create --display-name 'toy-website-end-to-end-test')
testApplicationRegistrationObjectId=$(echo $testApplicationRegistrationDetails | jq -r '.id')
testApplicationRegistrationAppId=$(echo $testApplicationRegistrationDetails | jq -r '.appId')

az ad app federated-credential create \
   --id $testApplicationRegistrationObjectId \
   --parameters "{\"name\":\"toy-website-end-to-end-test\",\"issuer\":\"https://token.actions.githubusercontent.com\",\"subject\":\"repo:${githubOrganizationName}/${githubRepositoryName}:environment:Test\",\"audiences\":[\"api://AzureADTokenExchange\"]}"

az ad app federated-credential create \
   --id $testApplicationRegistrationObjectId \
   --parameters "{\"name\":\"toy-website-end-to-end-test-branch\",\"issuer\":\"https://token.actions.githubusercontent.com\",\"subject\":\"repo:${githubOrganizationName}/${githubRepositoryName}:ref:refs/heads/main\",\"audiences\":[\"api://AzureADTokenExchange\"]}"
다음 코드를 실행하여 프로덕션 환경에 대해 유사한 워크로드 ID 및 페더레이션 자격 증명을 만듭니다.
productionApplicationRegistrationDetails=$(az ad app create --display-name 'toy-website-end-to-end-production')
productionApplicationRegistrationObjectId=$(echo $productionApplicationRegistrationDetails | jq -r '.id')
productionApplicationRegistrationAppId=$(echo $productionApplicationRegistrationDetails | jq -r '.appId')

az ad app federated-credential create \
   --id $productionApplicationRegistrationObjectId \
   --parameters "{\"name\":\"toy-website-end-to-end-production\",\"issuer\":\"https://token.actions.githubusercontent.com\",\"subject\":\"repo:${githubOrganizationName}/${githubRepositoryName}:environment:Production\",\"audiences\":[\"api://AzureADTokenExchange\"]}"

az ad app federated-credential create \
   --id $productionApplicationRegistrationObjectId \
   --parameters "{\"name\":\"toy-website-end-to-end-production-branch\",\"issuer\":\"https://token.actions.githubusercontent.com\",\"subject\":\"repo:${githubOrganizationName}/${githubRepositoryName}:ref:refs/heads/main\",\"audiences\":[\"api://AzureADTokenExchange\"]}"
다음 코드를 실행하여 GitHub 사용자 이름 및 리포지토리 이름에 대한 변수를 정의합니다.
mygithubuser를 이전 연습 단원에서 적어 둔 GitHub 사용자 이름으로 바꿔야 합니다. 또한 올바른 GitHub 리포지토리 이름을 지정했는지 확인합니다.$githubOrganizationName = 'mygithubuser' $githubRepositoryName = 'toy-website-end-to-end'다음 코드를 실행하여 테스트 환경을 위한 워크로드 ID를 만들고 GitHub 리포지토리와 연결합니다.
$testApplicationRegistration = New-AzADApplication -DisplayName 'toy-website-end-to-end-test'
New-AzADAppFederatedCredential `
   -Name 'toy-website-end-to-end-test' `
   -ApplicationObjectId $testApplicationRegistration.Id `
   -Issuer 'https://token.actions.githubusercontent.com' `
   -Audience 'api://AzureADTokenExchange' `
   -Subject "repo:$($githubOrganizationName)/$($githubRepositoryName):environment:Test"
New-AzADAppFederatedCredential `
   -Name 'toy-website-end-to-end-test-branch' `
   -ApplicationObjectId $testApplicationRegistration.Id `
   -Issuer 'https://token.actions.githubusercontent.com' `
   -Audience 'api://AzureADTokenExchange' `
   -Subject "repo:$($githubOrganizationName)/$($githubRepositoryName):ref:refs/heads/main"
다음 코드를 실행하여 프로덕션 환경에 대해 유사한 프로세스를 따릅니다.
$productionApplicationRegistration = New-AzADApplication -DisplayName 'toy-website-end-to-end-production'
New-AzADAppFederatedCredential `
   -Name 'toy-website-end-to-end-production' `
   -ApplicationObjectId $productionApplicationRegistration.Id `
   -Issuer 'https://token.actions.githubusercontent.com' `
   -Audience 'api://AzureADTokenExchange' `
   -Subject "repo:$($githubOrganizationName)/$($githubRepositoryName):environment:Production"
New-AzADAppFederatedCredential `
   -Name 'toy-website-end-to-end-production-branch' `
   -ApplicationObjectId $productionApplicationRegistration.Id `
   -Issuer 'https://token.actions.githubusercontent.com' `
   -Audience 'api://AzureADTokenExchange' `
   -Subject "repo:$($githubOrganizationName)/$($githubRepositoryName):ref:refs/heads/main"
Azure에서 리소스 그룹 만들기 및 워크로드 ID 액세스 권한 부여
다음으로, 각 환경에 대한 리소스 그룹을 만듭니다. 또한 이 프로세스는 워크플로가 리소스 그룹에 배포할 수 있도록 각 워크로드 ID에 리소스 그룹에 대한 참가자 역할을 부여합니다.
테스트 환경의 리소스 그룹을 만들고 워크로드 ID에 대한 액세스 권한을 부여하려면 Visual Studio Code 터미널에서 다음 Azure CLI 명령을 실행합니다.
testResourceGroupResourceId=$(az group create --name ToyWebsiteTest --location westus3 --query id --output tsv)

az ad sp create --id $testApplicationRegistrationObjectId
az role assignment create \
   --assignee $testApplicationRegistrationAppId \
   --role Contributor \
   --scope $testResourceGroupResourceId
유사한 프로세스를 실행하여 프로덕션 환경의 리소스 그룹을 만듭니다.
productionResourceGroupResourceId=$(az group create --name ToyWebsiteProduction --location westus3 --query id --output tsv)

az ad sp create --id $productionApplicationRegistrationObjectId
az role assignment create \
   --assignee $productionApplicationRegistrationAppId \
   --role Contributor \
   --scope $productionResourceGroupResourceId
테스트 환경의 리소스 그룹을 만들고 워크로드 ID에 대한 액세스 권한을 부여하려면 Visual Studio Code 터미널에서 다음 Azure PowerShell 명령을 실행합니다.
$testResourceGroup = New-AzResourceGroup -Name ToyWebsiteTest -Location westus3

New-AzADServicePrincipal -AppId $($testApplicationRegistration.AppId)
New-AzRoleAssignment `
   -ApplicationId $($testApplicationRegistration.AppId) `
   -RoleDefinitionName Contributor `
   -Scope $($testResourceGroup.ResourceId)
유사한 프로세스를 실행하여 프로덕션 환경의 리소스 그룹을 만듭니다.
$productionResourceGroup = New-AzResourceGroup -Name ToyWebsiteProduction -Location westus3

New-AzADServicePrincipal -AppId $($productionApplicationRegistration.AppId)
New-AzRoleAssignment `
   -ApplicationId $($productionApplicationRegistration.AppId) `
   -RoleDefinitionName Contributor `
   -Scope $($productionResourceGroup.ResourceId)
GitHub 비밀 준비
다음 코드를 실행하여 GitHub 비밀로 만드는 데 필요한 값을 출력합니다.
echo "AZURE_CLIENT_ID_TEST: $testApplicationRegistrationAppId"
echo "AZURE_CLIENT_ID_PRODUCTION: $productionApplicationRegistrationAppId"
echo "AZURE_TENANT_ID: $(az account show --query tenantId --output tsv)"
echo "AZURE_SUBSCRIPTION_ID: $(az account show --query id --output tsv)"
$azureContext = Get-AzContext
Write-Host "AZURE_CLIENT_ID_TEST: $($testApplicationRegistration.AppId)"
Write-Host "AZURE_CLIENT_ID_PRODUCTION: $($productionApplicationRegistration.AppId)"
Write-Host "AZURE_TENANT_ID: $($azureContext.Tenant.Id)"
Write-Host "AZURE_SUBSCRIPTION_ID: $($azureContext.Subscription.Id)"
GitHub 비밀 만들기
두 개의 워크로드 ID와 배포할 수 있는 리소스 그룹을 만들었습니다. 다음으로, GitHub Actions에서 비밀을 만듭니다.
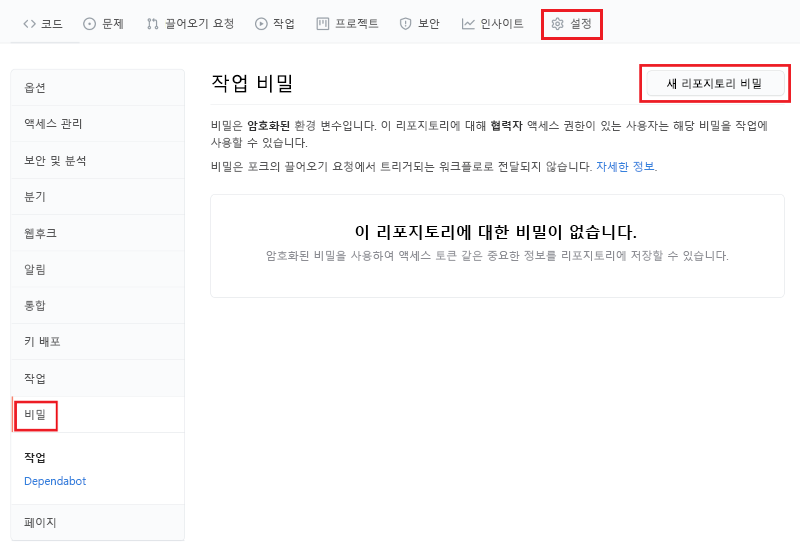
브라우저에서 GitHub 리포지토리로 이동합니다.
설정>비밀>작업을 선택합니다.
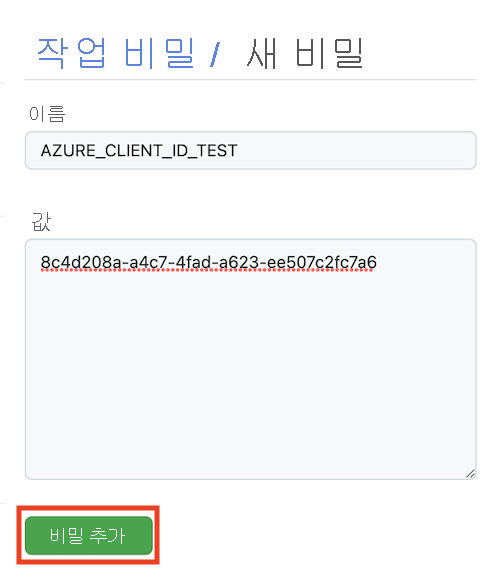
새 리포지토리 비밀을 선택합니다.
비밀의 이름을 AZURE_CLIENT_ID_TEST로 지정합니다.
값 필드에 터미널 출력의 첫 번째 줄의 GUID를 붙여넣습니다. 값에
AZURE_CLIENT_ID_TEST, 콜론 또는 공백을 포함하지 마세요.비밀 추가를 선택합니다.
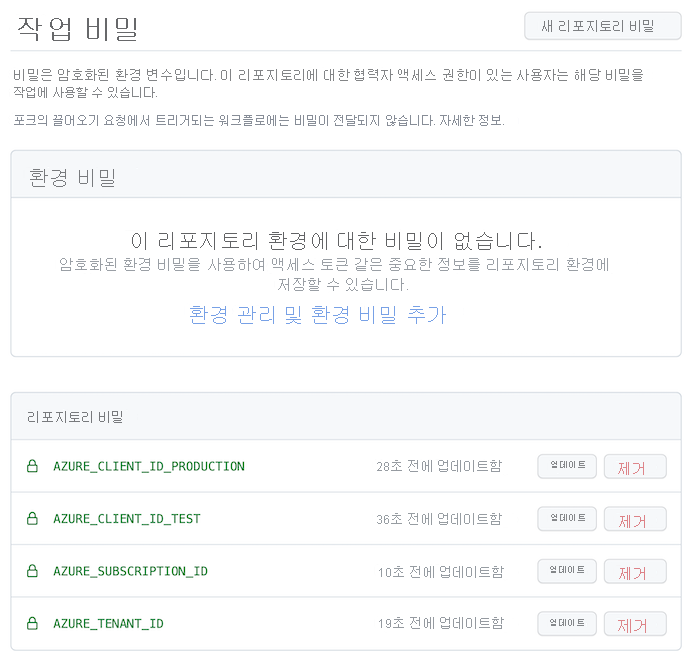
이 프로세스를 반복하여 터미널 출력의 해당 필드에서 값을 복사해 AZURE_CLIENT_ID_PRODUCTION, AZURE_TENANT_ID, AZURE_SUBSCRIPTION_ID에 대한 비밀을 만듭니다.
이제 비밀 목록에 네 비밀이 모두 표시되는지 확인합니다.
GitHub에서 환경 만들기
브라우저에서 설정>환경으로 이동합니다.
새 환경을 선택합니다.
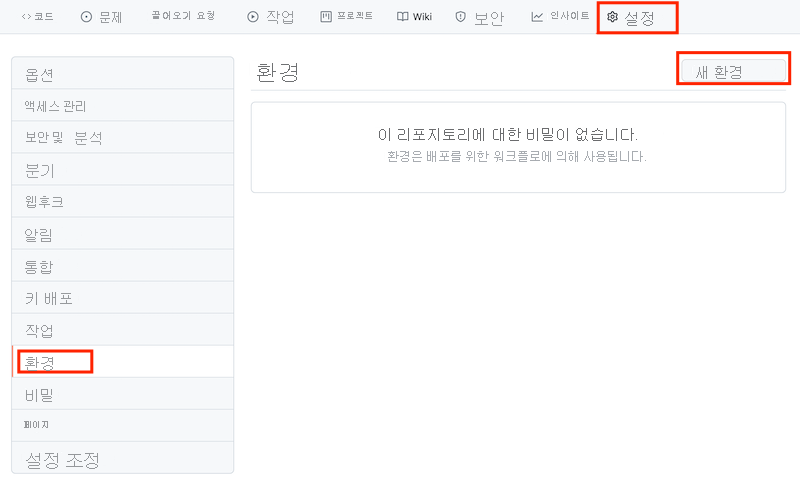
환경 이름으로 Test를 입력합니다.
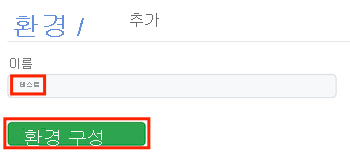
환경 구성을 선택합니다.
환경을 선택하여 환경 목록으로 돌아갑니다.
프로세스를 반복하여 Production이라는 또 다른 환경을 만듭니다.
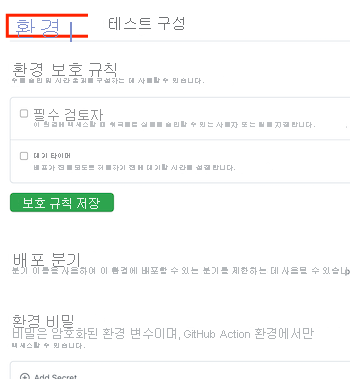
참고
본 학습 경로의 이전 모듈에서는 프로덕션 환경에 보호 규칙을 추가했습니다. 본 모듈에서는 편의를 위해 보호 규칙을 건너뛰겠습니다. 하지만 원하는 경우 보호 규칙을 직접 추가할 수 있습니다.