Use the Patch function to update a Gallery
This hands-on lab shows you how to use the Patch function in a gallery.
Sign in to Power Apps.
From the Home screen select + Create from the left-hand navigation panel, then select Blank app and then Create under Blank canvas app.
Name your app "Patch Exercise" or another appropriate title of your choice and select Create.
Select the Insert button and add a Button control, and set its OnSelect property to this formula:
ClearCollect(CityPopulations,
{City:"London", Country:"United Kingdom", Population:8615000},
{City:"Berlin", Country:"Germany", Population:3562000},
{City:"Madrid", Country:"Spain", Population:3165000},
{City:"Rome", Country:"Italy", Population:2874000},
{City:"Paris", Country:"France", Population:2273000},
{City:"Hamburg", Country:"Germany", Population:1760000},
{City:"Barcelona", Country:"Spain", Population:1602000},
{City:"Munich", Country:"Germany", Population:1494000},
{City:"Milan", Country:"Italy", Population:1344000})
Set the button's Text property to "Collect". Then press and hold Alt Key, and select the button. (This action creates the CityPopulations collection and stores the data.)
Insert a Vertical gallery control and choose CityPopulations from the data source.
With the gallery selected, in the right side Properties panel, change the layout from blank to Title, subtitle, and body.
Also in the Properties panel, select Fields and update the Body field in the data to display Population.
Insert a Text input control. From the Properties panel, set the Accessible label property to "Country," and in the Tree view, right-click and select Rename to rename the text-input to "tiCountry."
Again, insert a Text input control. From the Properties panel, set the Accessible label property to "text input," and in the Tree view, right-click and rename the text-input to tiCity.
Repeat the previous step with a third Text input, naming it tiPopulation and set the Accessible label property to "Population."
Select the Insert tab add a button control, set its Text property to "Patch Country" and set its OnSelect property to this formula:
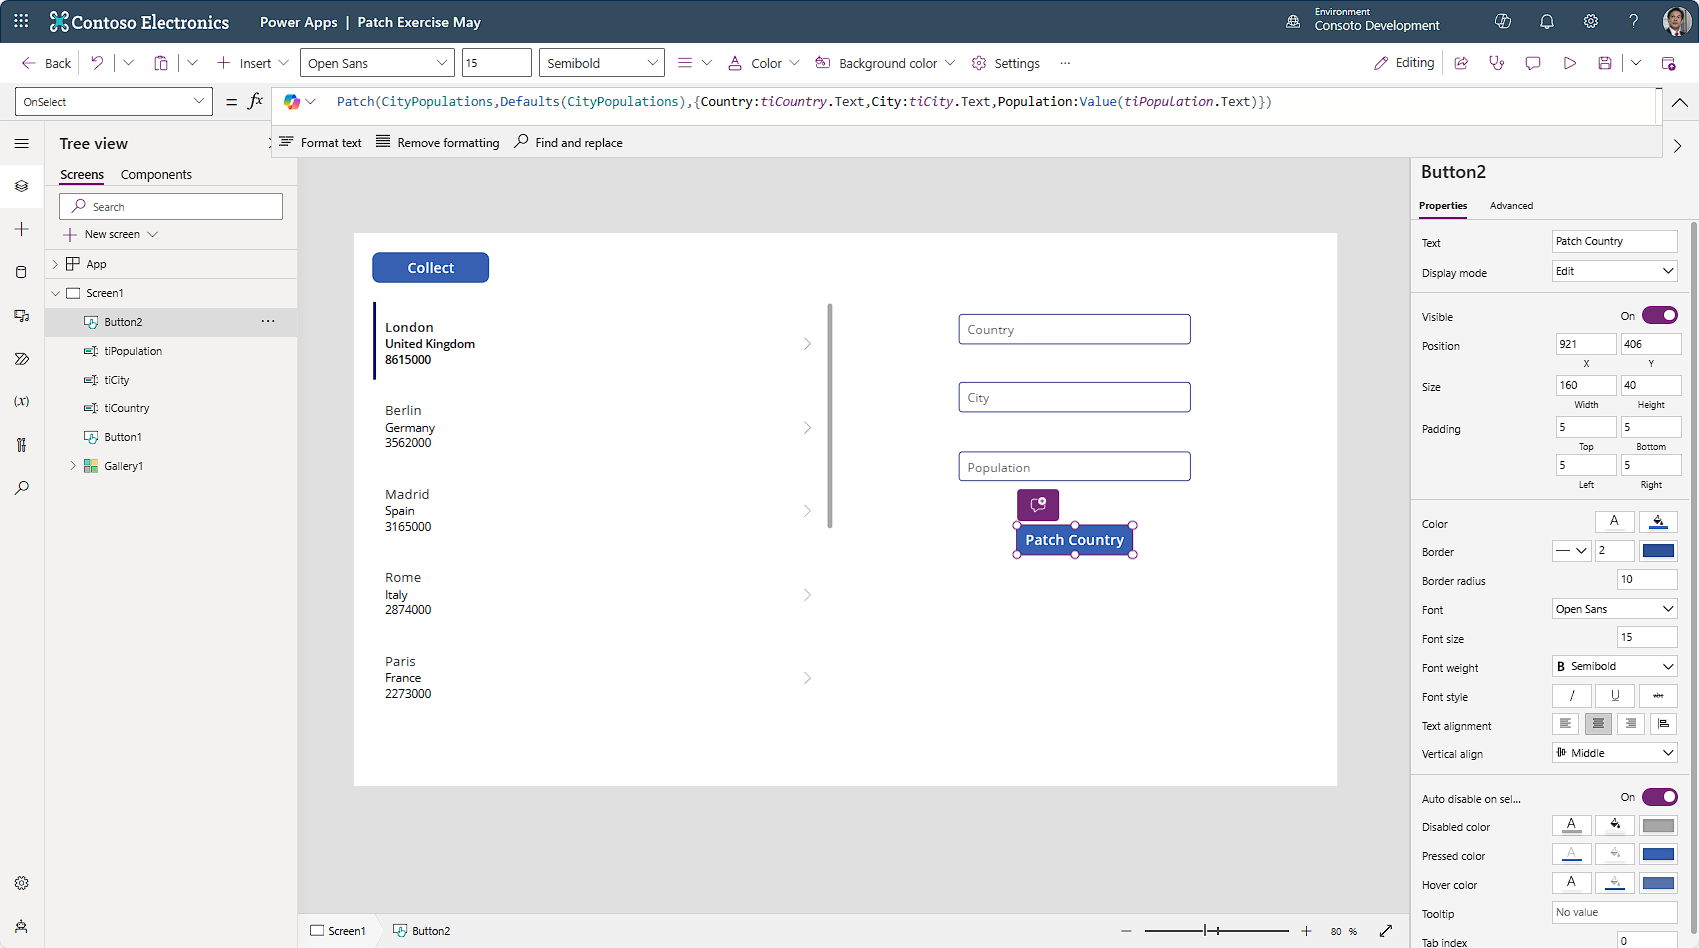
Patch(CityPopulations,Defaults(CityPopulations),{Country:tiCountry.Text,City:tiCity.Text,Population:Value(tiPopulation.Text)})Align your controls like the image below:

Before we move on, notice that the formula bar has a Copilot icon on the left side. If you're relatively new to Power Apps, or you're trying to figure out what the code in a formula means, you can select the Copilot icon and ask it to "Explain this formula." When you do, you should see something similar to the image below.

The explanation has a Copy button where you can copy the text of this answer and then add it to your code as a remark. Add the double forward "//" slashes to add comments to your code like this:
//This expression is used to patch a new record to the 'CityPopulations' data source. It takes the default values from the data source, and updates the 'Country', 'City', and 'Population' fields with the values entered in the 'tiCountry', 'tiCity', and 'tiPopulation' controls respectively.Now let's add more Countries to our Gallery. Put the app in Preview mode.
In the Country text input, enter USA. In the City text input, enter Orlando. In the Population text input, enter 280832.
Now press your Patch Country button and scroll down to the bottom of your gallery; you should see the new record you just added by using the Patch function formula from the OnSelect property of the button.
Congratulations, you used the Patch function to add new records to a Gallery!