ADO.NET을 사용하여 간단한 데이터 애플리케이션 만들기
참고 항목
데이터 집합 및 관련 클래스는 2000년대 초반에 적용된 레거시 .NET Framework 기술로, 응용 프로그램이 데이터베이스에서 연결이 끊어진 동안 응용 프로그램이 메모리의 데이터로 작업할 수 있도록 합니다. 사용자가 데이터를 수정하고 변경 내용을 다시 데이터베이스에 유지할 수 있도록 하는 애플리케이션에 특히 유용합니다. 데이터 세트는 매우 성공적인 기술로 입증되었지만 새 .NET 애플리케이션은 Entity Framework Core를 사용하는 것이 좋습니다. Entity Framework는 표 형식 데이터를 개체 모델로 사용하는 더 자연스러운 방법을 제공하며 더 단순한 프로그래밍 인터페이스를 제공합니다.
데이터베이스의 데이터를 조작하는 애플리케이션을 만들면 연결 문자열 정의, 데이터 삽입 및 저장 프로시저 실행과 같은 기본 작업을 수행합니다. 이 항목에서는 Visual C# 또는 Visual Basic 및 ADO.NET을 사용하여 간단한 Windows Forms "forms over data" 애플리케이션에서 데이터베이스와 상호 작용하는 방법을 배울 수 있습니다. 데이터 세트, LINQ to SQL 및 Entity Framework를 비롯한 모든 .NET 데이터 기술은 이 문서에 표시된 것과 매우 유사한 단계를 수행합니다.
이 문서에서는 데이터베이스에서 데이터를 얻을 수 있는 간단한 방법을 보여 줍니다. 응용 프로그램에서 중요한 방법으로 데이터를 수정하고 데이터베이스를 업데이트해야 하는 경우 Entity Framework를 사용하고 데이터 바인딩을 사용하여 사용자 인터페이스 컨트롤을 기본 데이터의 변경 내용에 자동으로 동기화하는 것이 좋습니다.
Important
코드를 간단히 유지하기 위해 프로덕션에 사용하는 예외 처리는 포함되어 있지 않습니다.
참고 항목
이 자습서의 전체 코드는 C# 및 Visual Basic의 Visual Studio 문서 GitHub 리포지토리에서 액세스할 수 있습니다.
필수 조건
애플리케이션을 만들려면 다음이 필요 합니다.
이 .NET 데스크톱 개발 및 데이터 저장소 및 처리 워크로드가 설치된 Visual Studio. 이를 설치하려면 Visual Studio 설치 관리자를 열고 수정하려는 Visual Studio 버전 옆에 있는 수정(또는 더 보기>수정)을 선택합니다.
SQL Server Express LocalDB. SQL Server Express LocalDB가 없는 경우 SQL Server 다운로드 페이지에서 설치할 수 있습니다.
이 항목에서는 사용자가 Visual Studio IDE의 기본 기능에 익숙하고 Windows Forms 애플리케이션 작성, 프로젝트에 폼 추가, 폼에 단추 및 기타 컨트롤 배치, 컨트롤의 속성 설정 및 간단한 이벤트 코드 작성을 수행할 수 있다고 가정합니다. 이러한 작업이 익숙하지 않은 경우 이 연습을 시작하기 전에 Visual Basic을 사용하여 Microsoft Visual Studio에서 Windows Forms 앱 만들기 자습서 또는 자습서를 참조하세요.
샘플 데이터베이스 설정
다음 단계에 따라 샘플 데이터베이스를 만듭니다.
Visual Studio에서 서버 탐색기 창을 엽니다.
데이터 연결을 마우스 오른쪽 단추로 클릭하고 새 SQL Server 데이터베이스 만들기를 선택합니다.
서버 이름 텍스트 상자에 (localdb)\mssqllocaldb를 입력합니다.
새 데이터베이스 이름 텍스트 상자에 Sales를 입력한 다음 확인을 선택합니다.
빈 Sales 데이터베이스가 생성되고 서버 탐색기의 Data Connections 노드에 추가됩니다.
Sales 데이터 연결을 마우스 오른쪽 단추로 클릭하고 새 쿼리를 선택합니다.
쿼리 편집기 창이 열립니다.
Sales Transact-SQL 스크립트를 클립보드에 복사합니다.
T-SQL 스크립트를 쿼리 편집기에 붙여넣은 다음, 실행 단추를 선택합니다.
잠시 후 쿼리 실행이 완료되고 데이터베이스 개체가 만들어집니다. 데이터베이스에는 Customer와 Orders라는 두 개의 테이블이 있습니다. 이 테이블에는 처음에 데이터가 없지만 사용자가 만드는 애플리케이션을 실행할 때 데이터가 추가할 수 있습니다. 또한 데이터베이스에는 간단한 저장 프로시저 4개가 포함되어 있습니다.
폼 만들기 및 컨트롤 추가
Windows Forms 앱(.NET Framework) 템플릿을 사용하여 C# 또는 Visual Basic 프로젝트를 만든 다음 이름을 SimpleDataApp으로 지정합니다.
Visual Studio에서는 프로젝트와 Form1이라는 빈 Windows 양식을 포함한 여러 파일을 만듭니다.
프로젝트에 두 개의 Windows 양식을 추가하여 총 세 개의 양식을 만든 다음, 다음 이름을 지정합니다.
탐색
NewCustomer
FillOrCancel
각 폼에 대해 다음 그림에 나오는 텍스트 상자, 단추 및 기타 컨트롤을 추가합니다. 각 컨트롤에 대해 테이블이 설명하는 속성을 설정합니다.
참고 항목
그룹 상자 및 레이블 컨트롤도 선명성을 더해 주지만 코드에서는 사용하지 않습니다.
탐색 양식
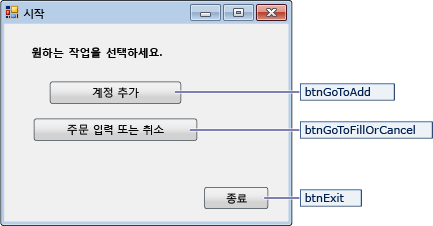
| Navigation 폼 컨트롤 | 속성 |
|---|---|
| 단추 | Name = btnGoToAdd |
| 단추 | Name = btnGoToFillOrCancel |
| 단추 | Name = btnExit |
NewCustomer 양식
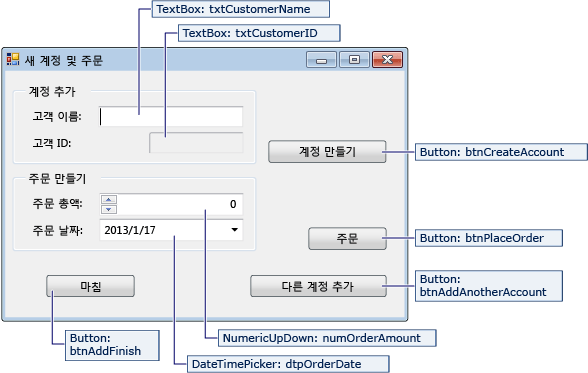
| NewCustomer 폼 컨트롤 | 속성 |
|---|---|
| TextBox | Name = txtCustomerName |
| TextBox | Name = txtCustomerID Readonly = True |
| 단추 | Name = btnCreateAccount |
| NumericUpdown | DecimalPlaces = 0 Maximum = 5000 Name = numOrderAmount |
| DateTimePicker | Format = Short Name = dtpOrderDate |
| 단추 | Name = btnPlaceOrder |
| 단추 | Name = btnAddAnotherAccount |
| 단추 | Name = btnAddFinish |
FillOrCancel 양식
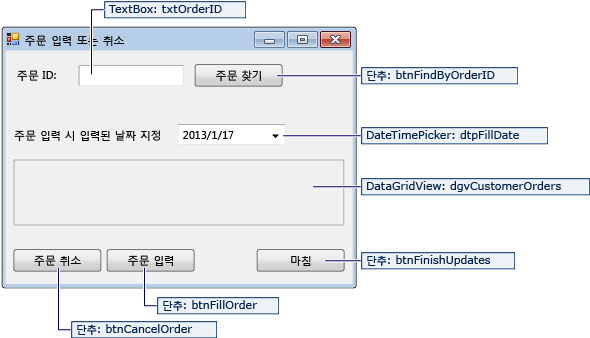
| FillOrCancel 폼 컨트롤 | 속성 |
|---|---|
| TextBox | Name = txtOrderID |
| 단추 | Name = btnFindByOrderID |
| DateTimePicker | Format = Short Name = dtpFillDate |
| DataGridView | Name = dgvCustomerOrders Readonly = True RowHeadersVisible = False |
| 단추 | Name = btnCancelOrder |
| 단추 | Name = btnFillOrder |
| 단추 | Name = btnFinishUpdates |
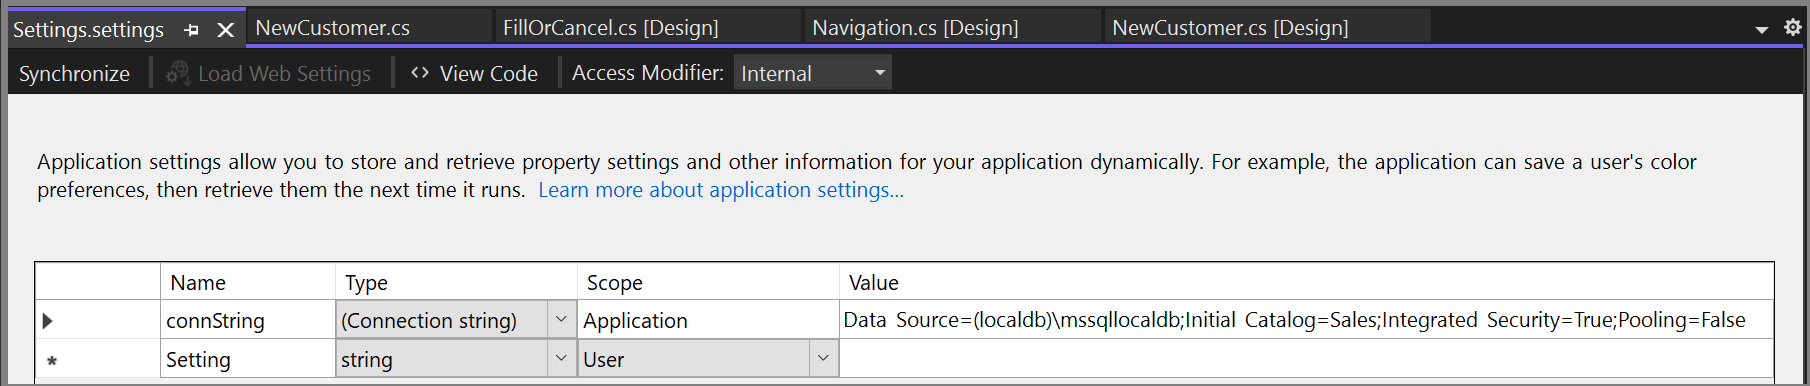
연결 문자열 저장
애플리케이션이 데이터베이스에 대한 연결을 열려면 애플리케이션에는 연결 문자열에 액세스할 수 있어야 합니다. 각 폼에 문자열을 수동으로 입력하지 못하도록 하려면 프로젝트의 App.config 파일에 문자열을 저장하고, 애플리케이션의 아무 폼에서 메서드가 호출될 때 이 문자열을 반환하는 메서드를 만듭니다.
서버 탐색기에서 Sales 데이터 연결을 마우스 오른쪽 단추로 클릭하고 속성을 선택하면 연결 문자열을 찾을 수 있습니다. ConnectionString 속성을 찾은 다음 Ctrl+A, Ctrl+C를 사용하여 문자열을 선택하고 클립보드에 복사합니다.
C#을 사용하는 경우에는 솔루션 탐색기에서 프로젝트의 Properties 노드를 확장한 다음 Settings.settings 파일을 엽니다. Visual Basic를 사용하는 경우에는 솔루션 탐색기에서 모든 파일 표시를 클릭하고 My Project 노드를 확장한 다음 Settings.settings 파일을 엽니다.
이름 열에
connString을 입력합니다.유형 목록에서 (연결 문자열)을 선택합니다.
범위 목록에서 애플리케이션을 선택합니다.
값 열에 (바깥쪽 따옴표 없이) 연결 문자열을 입력하고 변경 내용을 저장합니다.

참고 항목
실제 애플리케이션에서는 연결 문자열 및 구성 파일에서 설명하는 것처럼 연결 문자열을 안전하게 저장해야 합니다.
폼에 대한 코드 작성
이 섹션에서는 각 폼에서 수행하는 작업을 간략하게 설명합니다. 폼의 단추를 클릭하면 기본 논리를 정의하는 코드도 제공합니다.
Navigation 폼
애플리케이션을 실행하면 Navigation 폼이 열립니다. 계정 추가 단추는 NewCustomer 양식을 엽니다. 주문 이행 또는 취소 단추를 누르면 FillOrCancel 양식이 열립니다. 끝내기 단추를 클릭하면 애플리케이션이 닫힙니다.
Navigation 폼을 시작 폼으로 만들기
C#을 사용하는 경우 솔루션 탐색기에서 Program.cs를 연 다음, Application.Run 줄을 Application.Run(new Navigation());으로 변경합니다.
Visual Basic을 사용하는 경우 솔루션 탐색기에서 속성 창을 열고, 애플리케이션 탭을 선택한 후 시작 폼 목록에서 SimpleDataApp.Navigation을 선택합니다.
자동 생성된 이벤트 처리기 만들기
탐색 폼의 단추 3개를 두 번 클릭하여 빈 이벤트 처리기 메서드를 만듭니다. 단추를 두 번 클릭하면 단추를 클릭해도 이벤트가 발생할 수 있도록 하는 자동 생성 코드가 디자이너 코드 파일에 추가됩니다.
참고 항목
디자이너에서 두 번 클릭 작업을 건너뛰고 코드를 복사하여 코드 파일에 붙여넣는 경우 이벤트 처리기를 올바른 메서드로 설정해야 합니다. 이 작업은 속성 창에서 수행할 수 있습니다. 이벤트 탭(번개 모양 도구 모음 단추 사용)으로 전환하고 클릭 처리기를 찾습니다.
탐색 폼 논리용 코드 추가
탐색 폼의 코드 페이지에서 다음 코드에 나오는 것처럼 단추 3개 클릭 이벤트 처리기의 메서드 본문을 완성합니다.
/// <summary>
/// Opens the NewCustomer form as a dialog box,
/// which returns focus to the calling form when it is closed.
/// </summary>
private void btnGoToAdd_Click(object sender, EventArgs e)
{
    Form frm = new NewCustomer();
    frm.Show();
}

/// <summary>
/// Opens the FillorCancel form as a dialog box.
/// </summary>
private void btnGoToFillOrCancel_Click(object sender, EventArgs e)
{
    Form frm = new FillOrCancel();
    frm.ShowDialog();
}

/// <summary>
/// Closes the application (not just the Navigation form).
/// </summary>
private void btnExit_Click(object sender, EventArgs e)
{
    this.Close();
}
참고 항목
이 자습서의 코드는 C# 및 Visual Basic에서 사용할 수 있습니다. 이 페이지의 코드 언어를 C#과 Visual Basic 간에 전환하려면 각 코드 예제의 맨 위에 있는 코드 언어 전환기를 사용합니다.
NewCustomer 폼
고객 이름을 입력한 후 계정 만들기 단추를 선택하면 NewCustomer 폼은 고객 계정을 만들고 SQL Server는 IDENTITY 값을 새 고객 ID로 반환합니다. 이제 금액과 주문 날짜를 지정하고 주문 단추를 선택하여 새 계정에서 주문할 수 있습니다.
자동 생성된 이벤트 처리기 만들기
단추 4개를 각각 두 번 클릭하여 NewCustomer 폼의 각 단추를 위한 빈 Click 이벤트 처리기를 만듭니다. 단추를 두 번 클릭하면 단추를 클릭해도 이벤트가 발생할 수 있도록 하는 자동 생성 코드가 디자이너 코드 파일에 추가됩니다.
NewCustomer 폼 논리용 코드 추가
NewCustomer 폼 논리를 완료하려면 다음 단계를 수행합니다.
관련 멤버의 이름을 정규화할 필요가 없도록
System.Data.SqlClient네임스페이스를 범위로 가져옵니다.다음 코드에서처럼 일부 변수와 도우미 메서드를 클래스에 추가합니다.
// Storage for IDENTITY values returned from database. private int parsedCustomerID; private int orderID; /// <summary> /// Verifies that the customer name text box is not empty. /// </summary> private bool IsCustomerNameValid() { if (txtCustomerName.Text == "") { MessageBox.Show("Please enter a name."); return false; } else { return true; } } /// <summary> /// Verifies that a customer ID and order amount have been provided. /// </summary> private bool IsOrderDataValid() { // Verify that CustomerID is present. if (txtCustomerID.Text == "") { MessageBox.Show("Please create customer account before placing order."); return false; } // Verify that Amount isn't 0. else if ((numOrderAmount.Value < 1)) { MessageBox.Show("Please specify an order amount."); return false; } else { // Order can be submitted. return true; } } /// <summary> /// Clears the form data. /// </summary> private void ClearForm() { txtCustomerName.Clear(); txtCustomerID.Clear(); dtpOrderDate.Value = DateTime.Now; numOrderAmount.Value = 0; this.parsedCustomerID = 0; }다음 코드에서처럼 단추 4개 클릭 이벤트 처리기의 메서드 본문을 완성합니다.
/// <summary>
/// Creates a new customer by calling the Sales.uspNewCustomer stored procedure.
/// </summary>
private void btnCreateAccount_Click(object sender, EventArgs e)
{
    if (IsCustomerNameValid())
    {
        // Create the connection.
        using (SqlConnection connection = new SqlConnection(Properties.Settings.Default.connString))
        {
            // Create a SqlCommand, and identify it as a stored procedure.
            using (SqlCommand sqlCommand = new SqlCommand("Sales.uspNewCustomer", connection))
            {
                sqlCommand.CommandType = CommandType.StoredProcedure;

                // Add input parameter for the stored procedure and specify what to use as its value.
                sqlCommand.Parameters.Add(new SqlParameter("@CustomerName", SqlDbType.NVarChar, 40));
                sqlCommand.Parameters["@CustomerName"].Value = txtCustomerName.Text;

                // Add the output parameter.
                sqlCommand.Parameters.Add(new SqlParameter("@CustomerID", SqlDbType.Int));
                sqlCommand.Parameters["@CustomerID"].Direction = ParameterDirection.Output;

                try
                {
                    connection.Open();

                    // Run the stored procedure.
                    sqlCommand.ExecuteNonQuery();

                    // Customer ID is an IDENTITY value from the database.
                    this.parsedCustomerID = (int)sqlCommand.Parameters["@CustomerID"].Value;

                    // Put the Customer ID value into the read-only text box.
                    this.txtCustomerID.Text = Convert.ToString(parsedCustomerID);
                }
                catch
                {
                    MessageBox.Show("Customer ID was not returned. Account could not be created.");
                }
                finally
                {
                    connection.Close();
                }
            }
        }
    }
}

/// <summary>
/// Calls the Sales.uspPlaceNewOrder stored procedure to place an order.
/// </summary>
private void btnPlaceOrder_Click(object sender, EventArgs e)
{
    // Ensure the required input is present.
    if (IsOrderDataValid())
    {
        // Create the connection.
        using (SqlConnection connection = new SqlConnection(Properties.Settings.Default.connString))
        {
            // Create SqlCommand and identify it as a stored procedure.
            using (SqlCommand sqlCommand = new SqlCommand("Sales.uspPlaceNewOrder", connection))
            {
                sqlCommand.CommandType = CommandType.StoredProcedure;

                // Add the @CustomerID input parameter, which was obtained from uspNewCustomer.
                sqlCommand.Parameters.Add(new SqlParameter("@CustomerID", SqlDbType.Int));
                sqlCommand.Parameters["@CustomerID"].Value = this.parsedCustomerID;

                // Add the @OrderDate input parameter.
                sqlCommand.Parameters.Add(new SqlParameter("@OrderDate", SqlDbType.DateTime, 8));
                sqlCommand.Parameters["@OrderDate"].Value = dtpOrderDate.Value;

                // Add the @Amount order amount input parameter.
                sqlCommand.Parameters.Add(new SqlParameter("@Amount", SqlDbType.Int));
                sqlCommand.Parameters["@Amount"].Value = numOrderAmount.Value;

                // Add the @Status order status input parameter.
                // For a new order, the status is always O (open).
                sqlCommand.Parameters.Add(new SqlParameter("@Status", SqlDbType.Char, 1));
                sqlCommand.Parameters["@Status"].Value = "O";

                // Add the return value for the stored procedure, which is  the order ID.
                sqlCommand.Parameters.Add(new SqlParameter("@RC", SqlDbType.Int));
                sqlCommand.Parameters["@RC"].Direction = ParameterDirection.ReturnValue;

                try
                {
                    //Open connection.
                    connection.Open();

                    // Run the stored procedure.
                    sqlCommand.ExecuteNonQuery();

                    // Display the order number.
                    this.orderID = (int)sqlCommand.Parameters["@RC"].Value;
                    MessageBox.Show("Order number " + this.orderID + " has been submitted.");
                }
                catch
                {
                    MessageBox.Show("Order could not be placed.");
                }
                finally
                {
                    connection.Close();
                }
            }
        }
    }
}

/// <summary>
/// Clears the form data so another new account can be created.
/// </summary>
private void btnAddAnotherAccount_Click(object sender, EventArgs e)
{
    this.ClearForm();
}

/// <summary>
/// Closes the form/dialog box.
/// </summary>
private void btnAddFinish_Click(object sender, EventArgs e)
{
    this.Close();
}
FillOrCancel 폼
FillOrCancel 폼은 주문 ID를 입력하고 주문 찾기 단추를 선택하면 주문을 반환하는 쿼리를 실행합니다. 반환되는 행은 읽기 전용 데이터 표에 표시됩니다. 주문 취소 단추를 선택하고 주문을 취소됨(X)으로 표시하고, 주문 이행 단추를 선택하면 주문을 이행됨(F)으로 표시할 수 있습니다. 주문 이행 단추를 다시 선택하면 업데이트된 행이 나타납니다.
자동 생성된 이벤트 처리기 만들기
단추를 두 번 클릭하여 FillOrCancel 폼의 단추 4개에 대한 빈 Click 이벤트 처리기를 만듭니다. 단추를 두 번 클릭하면 단추를 클릭해도 이벤트가 발생할 수 있도록 하는 자동 생성 코드가 디자이너 코드 파일에 추가됩니다.
FillOrCancel 폼 논리용 코드 추가
FillOrCancel 폼 논리를 완료하려면 다음 단계를 수행합니다.
관련 멤버의 이름을 정규화할 필요가 없도록 다음 네임스페이스 2개를 범위로 가져옵니다.
다음 코드에서처럼 변수와 도우미 메서드를 클래스에 추가합니다.
// Storage for the order ID value. private int parsedOrderID; /// <summary> /// Verifies that an order ID is present and contains valid characters. /// </summary> private bool IsOrderIDValid() { // Check for input in the Order ID text box. if (txtOrderID.Text == "") { MessageBox.Show("Please specify the Order ID."); return false; } // Check for characters other than integers. else if (Regex.IsMatch(txtOrderID.Text, @"^\D*$")) { // Show message and clear input. MessageBox.Show("Customer ID must contain only numbers."); txtOrderID.Clear(); return false; } else { // Convert the text in the text box to an integer to send to the database. parsedOrderID = Int32.Parse(txtOrderID.Text); return true; } }다음 코드에서처럼 단추 4개 클릭 이벤트 처리기의 메서드 본문을 완성합니다.
/// <summary>
/// Executes a t-SQL SELECT statement to obtain order data for a specified
/// order ID, then displays it in the DataGridView on the form.
/// </summary>
private void btnFindByOrderID_Click(object sender, EventArgs e)
{
    if (IsOrderIDValid())
    {
        using (SqlConnection connection = new SqlConnection(Properties.Settings.Default.connString))
        {
            // Define a t-SQL query string that has a parameter for orderID.
            const string sql = "SELECT * FROM Sales.Orders WHERE orderID = @orderID";

            // Create a SqlCommand object.
            using (SqlCommand sqlCommand = new SqlCommand(sql, connection))
            {
                // Define the @orderID parameter and set its value.
                sqlCommand.Parameters.Add(new SqlParameter("@orderID", SqlDbType.Int));
                sqlCommand.Parameters["@orderID"].Value = parsedOrderID;

                try
                {
                    connection.Open();

                    // Run the query by calling ExecuteReader().
                    using (SqlDataReader dataReader = sqlCommand.ExecuteReader())
                    {
                        // Create a data table to hold the retrieved data.
                        DataTable dataTable = new DataTable();

                        // Load the data from SqlDataReader into the data table.
                        dataTable.Load(dataReader);

                        // Display the data from the data table in the data grid view.
                        this.dgvCustomerOrders.DataSource = dataTable;

                        // Close the SqlDataReader.
                        dataReader.Close();
                    }
                }
                catch
                {
                    MessageBox.Show("The requested order could not be loaded into the form.");
                }
                finally
                {
                    // Close the connection.
                    connection.Close();
                }
            }
        }
    }
}

/// <summary>
/// Cancels an order by calling the Sales.uspCancelOrder
/// stored procedure on the database.
/// </summary>
private void btnCancelOrder_Click(object sender, EventArgs e)
{
    if (IsOrderIDValid())
    {
        // Create the connection.
        using (SqlConnection connection = new SqlConnection(Properties.Settings.Default.connString))
        {
            // Create the SqlCommand object and identify it as a stored procedure.
            using (SqlCommand sqlCommand = new SqlCommand("Sales.uspCancelOrder", connection))
            {
                sqlCommand.CommandType = CommandType.StoredProcedure;

                // Add the order ID input parameter for the stored procedure.
                sqlCommand.Parameters.Add(new SqlParameter("@orderID", SqlDbType.Int));
                sqlCommand.Parameters["@orderID"].Value = parsedOrderID;

                try
                {
                    // Open the connection.
                    connection.Open();

                    // Run the command to execute the stored procedure.
                    sqlCommand.ExecuteNonQuery();
                }
                catch
                {
                    MessageBox.Show("The cancel operation was not completed.");
                }
                finally
                {
                    // Close connection.
                    connection.Close();
                }
            }
        }
    }
}

/// <summary>
/// Fills an order by calling the Sales.uspFillOrder stored
/// procedure on the database.
/// </summary>
private void btnFillOrder_Click(object sender, EventArgs e)
{
    if (IsOrderIDValid())
    {
        // Create the connection.
        using (SqlConnection connection = new SqlConnection(Properties.Settings.Default.connString))
        {
            // Create command and identify it as a stored procedure.
            using (SqlCommand sqlCommand = new SqlCommand("Sales.uspFillOrder", connection))
            {
                sqlCommand.CommandType = CommandType.StoredProcedure;

                // Add the order ID input parameter for the stored procedure.
                sqlCommand.Parameters.Add(new SqlParameter("@orderID", SqlDbType.Int));
                sqlCommand.Parameters["@orderID"].Value = parsedOrderID;

                // Add the filled date input parameter for the stored procedure.
                sqlCommand.Parameters.Add(new SqlParameter("@FilledDate", SqlDbType.DateTime, 8));
                sqlCommand.Parameters["@FilledDate"].Value = dtpFillDate.Value;

                try
                {
                    connection.Open();

                    // Execute the stored procedure.
                    sqlCommand.ExecuteNonQuery();
                }
                catch
                {
                    MessageBox.Show("The fill operation was not completed.");
                }
                finally
                {
                    // Close the connection.
                    connection.Close();
                }
            }
        }
    }
}

/// <summary>
/// Closes the form.
/// </summary>
private void btnFinishUpdates_Click(object sender, EventArgs e)
{
    this.Close();
}
애플리케이션 테스트
애플리케이션을 실행하고 몇 명의 고객과 주문을 만들어 모든 항목이 예상대로 작동하는지 확인합니다. 데이터베이스가 변경 내용으로 업데이트되었는지 확인하려면 서버 탐색기에서 테이블 노드를 열고 고객 및 주문 노드를 마우스 오른쪽 단추로 클릭한 후 테이블 데이터 표시를 선택합니다.
관련 콘텐츠
피드백
출시 예정: 2024년 내내 콘텐츠에 대한 피드백 메커니즘으로 GitHub 문제를 단계적으로 폐지하고 이를 새로운 피드백 시스템으로 바꿀 예정입니다. 자세한 내용은 다음을 참조하세요. https://aka.ms/ContentUserFeedback
다음에 대한 사용자 의견 제출 및 보기