Install Hyper-V
To create and run virtual machines, install the Hyper-V role on Windows Server by using Server Manager or the Install-WindowsFeature cmdlet in Windows PowerShell.
To learn more about Hyper-V, see the Hyper-V Technology Overview. To learn more about Hyper-V, see the Hyper-V Overview. To try out Windows Server 2025, you can download and install an evaluation copy. See the Evaluation Center.
Before you install Windows Server or add the Hyper-V role, make sure that:
Your computer hardware is compatible. For more information, see System Requirements for Windows Server and System requirements for Hyper-V on Windows Server.
You don't plan to use third-party virtualization apps that rely on the same processor features that Hyper-V requires. Examples include VMWare Workstation and VirtualBox. You can install Hyper-V without uninstalling these other apps. But, if you try to use them to manage virtual machines when the Hyper-V hypervisor is running, the virtual machines might not start or might run unreliably. For details and instructions for turning off the Hyper-V hypervisor if you need to use one of these apps, see Virtualization applications don't work together with Hyper-V, Device Guard, and Credential Guard.
If you want to install only the management tools, such as Hyper-V Manager, see Remotely manage Hyper-V hosts with Hyper-V Manager.
In Server Manager, on the Manage menu, select Add Roles and Features.
On the Before you begin page, verify that your destination server and network environment are prepared for the role and feature you want to install. Select Next.
On the Select installation type page, select Role-based or feature-based installation, and then select Next.
On the Select destination server page, select a server from the server pool, and then select Next.
On the Select server roles page, select Hyper-V. From the Add Roles and Features Wizard page, select Add Features, and then select Next.
On the Select features page, select Next, and then select Next again.
On the Create Virtual Switches page, Virtual Machine Migration page, and Default Stores page, select the options that suit your specific environment.
On the Confirm installation selections page, select Restart the destination server automatically if required, and then select Install.
When installation is finished, verify that Hyper-V installed correctly. Open the All Servers page in Server Manager and select a server on which you installed Hyper-V. Check the Roles and Features tile on the page for the selected server.
On the Windows desktop, select the Start button and type any part of the name Windows PowerShell.
Right-click Windows PowerShell and select Run as Administrator.
To install Hyper-V on a server you're connected to remotely, run the following command and replace
<computer_name>with the name of server.Install-WindowsFeature -Name Hyper-V -ComputerName <computer_name> -IncludeManagementTools -RestartIf you're connected locally to the server, run the command without
-ComputerName <computer_name>.After the server restarts, you can see that the Hyper-V role is installed and see what other roles and features are installed by running the following command:
Get-WindowsFeature -ComputerName <computer_name>If you're connected locally to the server, run the command without
-ComputerName <computer_name>.
참고
If you install this role on a server that runs the Server Core installation option of Windows Server 2016 and use the parameter -IncludeManagementTools, only the Hyper-V Module for Windows PowerShell is installed. You can use the GUI management tool, Hyper-V Manager, on another computer to remotely manage a Hyper-V host that runs on a Server Core installation. For instructions on connecting remotely, see Remotely manage Hyper-V hosts with Hyper-V Manager.
Enable Hyper-V to create virtual machines on Windows. Hyper-V can be enabled in many ways including using the Windows control panel, PowerShell or using the Deployment Imaging Servicing and Management tool (DISM). This document walks through each option.
참고
Hyper-V is built into Windows as an optional feature -- there's no Hyper-V download.
- Windows 10 (Pro or Enterprise), or Windows 11 (Pro or Enterprise)
- 64-bit Processor with Second Level Address Translation (SLAT).
- CPU support for VM Monitor Mode Extension (VT-c on Intel CPUs).
- Minimum of 4 GB memory.
참고
The Hyper-V role can't be installed on Windows 10 Home or Windows 11 Home.
For more information and troubleshooting, see Windows Hyper-V System Requirements.
Open a PowerShell console as Administrator.
Run the following command:
Enable-WindowsOptionalFeature -Online -FeatureName Microsoft-Hyper-V -All
If the command isn't found, make sure you're running PowerShell as Administrator.
- When the installation completes, reboot.
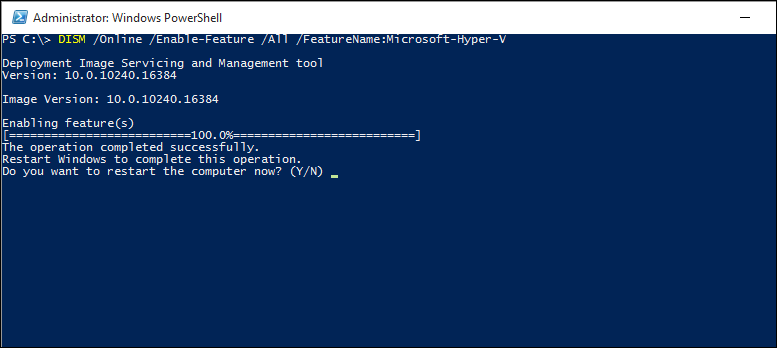
The Deployment Image Servicing and Management tool (DISM) helps configure Windows and Windows images. Among its many applications, DISM can enable Windows features while the operating system is running.
To enable the Hyper-V role using DISM:
Open up a PowerShell or CMD session as Administrator.
Type the following command:
DISM /Online /Enable-Feature /All /FeatureName:Microsoft-Hyper-V
For more information about DISM, see the DISM Technical Reference.
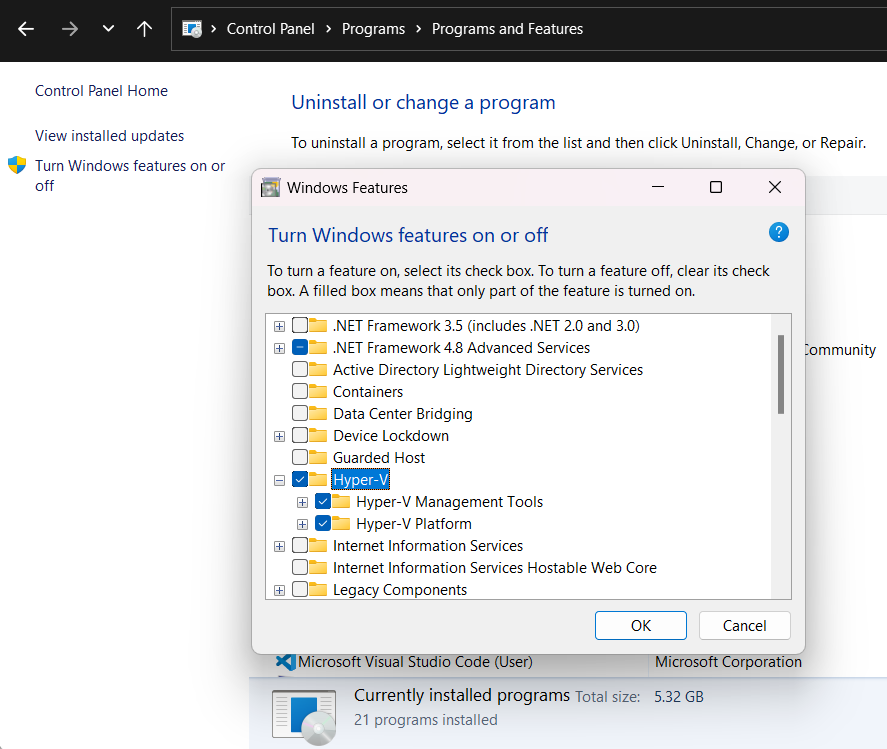
Navigate to the Control Panel.
Select Programs, then Programs and Features.
Select Turn Windows Features on or off.
Select Hyper-V and then select OK.
When the installation completes you're prompted to restart your computer.