운영 체제 지원, 모델 지원 등에 대한 정보를 포함하여 WebNN에 대한 소개는 WebNN 개요를 참조하세요.
이 자습서에서는 ONNX 런타임 웹에서 WebNN을 사용하여 온-디바이스 GPU를 사용하여 하드웨어가 가속화되는 웹에서 이미지 분류 시스템을 빌드하는 방법을 보여줍니다. 이미지를 분류하는 데 사용되는 Hugging Face의 오픈 소스 모델인 MobileNetV2 모델을 활용합니다.
이 자습서의 최종 코드를 보고 실행하려면 WebNN Developer Preview GitHub에서 찾을 수 있습니다.
비고
WebNN API는 W3C 후보 권장 사항이며 개발자 미리 보기의 초기 단계에 있습니다. 일부 기능은 제한됩니다. 현재 지원 및 구현 상태 목록이 있습니다.
요구 사항 및 설정:
Windows 설정
WebNN 요구 사항 섹션에 자세히 설명된 대로 올바른 버전의 Edge, Windows 및 하드웨어 드라이버가 있는지 확인합니다.
Edge 설정하기
Microsoft Edge Dev를 다운로드하여 설치합니다.
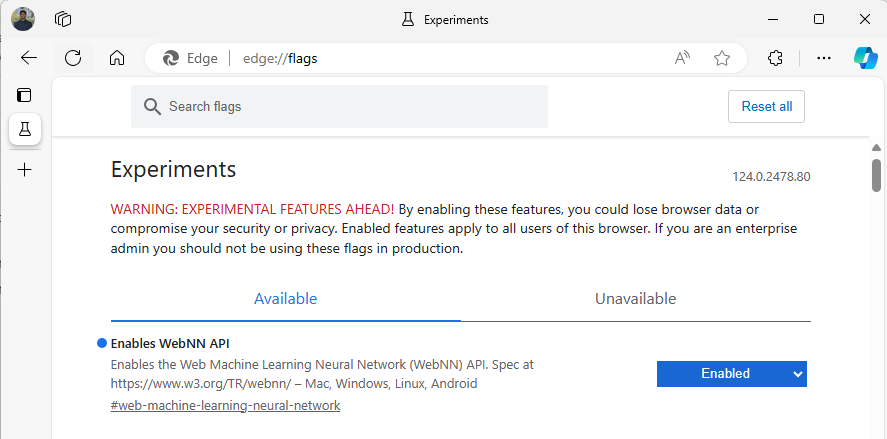
Edge 베타를 시작하고 주소 표시줄로 이동합니다
about:flags."WebNN API"를 검색하고 드롭다운을 클릭한 다음 '사용'으로 설정합니다.
메시지가 표시되면 Edge를 다시 시작합니다.
개발자 환경 설정
VSCode(Visual Studio Code)를 다운로드하여 설치합니다.
VSCode를 시작합니다.
VSCode 내에서 VSCode용 Live Server 확장을 다운로드하여 설치합니다.
를 선택하고
File --> Open Folder원하는 위치에 빈 폴더를 만듭니다.
1단계: 웹 앱 초기화
- 시작하려면 새
index.html페이지를 만듭니다. 새 페이지에 다음 상용구 코드를 추가합니다.
<!DOCTYPE html>
<html lang="en">
  <head>
    <meta charset="UTF-8">
    <meta name="viewport" content="width=device-width, initial-scale=1.0">
    <title>My Website</title>
  </head>
  <body>
    <main>
        <h1>Welcome to My Website</h1>
    </main>
  </body>
</html>
- VSCode의 오른쪽 아래에 있는 Go Live 단추를 선택하여 상용구 코드 및 개발자 설정이 작동하는지 확인합니다. 그러면 상용구 코드를 실행하는 Edge 베타에서 로컬 서버가 시작됩니다.
- 이제 .라는
main.js새 파일을 만듭니다. 앱에 대한 Javascript 코드가 포함됩니다. - 다음으로, 명명
images된 루트 디렉터리에서 하위 폴더를 만듭니다. 폴더 내에 이미지를 다운로드하고 저장합니다. 이 데모에서는 기본 이름을image.jpg사용합니다. - ONNX 모델 저장소에서mobilenet 모델을 다운로드하세요. 이 자습서에서는 mobilenet2-10.onnx 파일을 사용합니다. 이 모델을 웹앱의 루트 폴더에 저장합니다.
- 마지막으로, 이 이미지 클래스 파일을
imagenetClasses.js다운로드하고 저장합니다. 이렇게 하면 모델에서 사용할 1000개의 일반적인 이미지 분류가 제공됩니다.
2단계: UI 요소 및 부모 함수 추가
- 이전 단계에서 추가한
<main>html 태그의 본문 내에서 기존 코드를 다음 요소로 바꿉니다. 이렇게 하면 단추가 만들어지고 기본 이미지가 표시됩니다.
<h1>Image Classification Demo!</h1>
<div><img src="./images/image.jpg"></div>
<button onclick="classifyImage('./images/image.jpg')"  type="button">Click Me to Classify Image!</button>
<h1 id="outputText"> This image displayed is ... </h1>
- 이제 WebNN API에 액세스하는 데 사용할 JavaScript 라이브러리인 ONNX 런타임 웹을 페이지에 추가합니다. html 태그의
<head>본문 내에 다음 javascript 소스 링크를 추가합니다.
<script src="./main.js"></script>
<script src="imagenetClasses.js"></script>
<script src="https://cdn.jsdelivr.net/npm/onnxruntime-web@1.18.0-dev.20240311-5479124834/dist/ort.webgpu.min.js"></script>
- 파일을 열고 다음 코드 조각을 추가합니다
main.js.
async function classifyImage(pathToImage){
  var imageTensor = await getImageTensorFromPath(pathToImage); // Convert image to a tensor
  var predictions = await runModel(imageTensor); // Run inference on the tensor
  console.log(predictions); // Print predictions to console
  document.getElementById("outputText").innerHTML += predictions[0].name; // Display prediction in HTML
}
3단계: 데이터 사전 처리
- 방금 추가한 함수는 구현해야 하는 또 다른 함수인
getImageTensorFromPath를 호출합니다. 이미지 자체를 검색하기 위해 호출하는 다른 비동기 함수뿐만 아니라 아래에 추가합니다.
  async function getImageTensorFromPath(path, width = 224, height = 224) {
    var image = await loadImagefromPath(path, width, height); // 1. load the image
    var imageTensor = imageDataToTensor(image); // 2. convert to tensor
    return imageTensor; // 3. return the tensor
  }

  async function loadImagefromPath(path, resizedWidth, resizedHeight) {
    var imageData = await Jimp.read(path).then(imageBuffer => { // Use Jimp to load the image and resize it.
      return imageBuffer.resize(resizedWidth, resizedHeight);
    });

    return imageData.bitmap;
  }
- 또한 위에서 참조하는 함수를
imageDataToTensor추가해야 합니다. 그러면 로드된 이미지가 ONNX 모델에서 작동하는 텐서 형식으로 렌더링됩니다. 이전에 비슷한 이미지 분류 앱을 사용한 적이 있다면 친숙해 보일 수 있지만 더 관련된 함수입니다. 자세한 설명을 보려면 이 ONNX 자습서를 볼 수 있습니다.
  function imageDataToTensor(image) {
    var imageBufferData = image.data;
    let pixelCount = image.width * image.height;
    const float32Data = new Float32Array(3 * pixelCount); // Allocate enough space for red/green/blue channels.

    // Loop through the image buffer, extracting the (R, G, B) channels, rearranging from
    // packed channels to planar channels, and converting to floating point.
    for (let i = 0; i < pixelCount; i++) {
      float32Data[pixelCount * 0 + i] = imageBufferData[i * 4 + 0] / 255.0; // Red
      float32Data[pixelCount * 1 + i] = imageBufferData[i * 4 + 1] / 255.0; // Green
      float32Data[pixelCount * 2 + i] = imageBufferData[i * 4 + 2] / 255.0; // Blue
      // Skip the unused alpha channel: imageBufferData[i * 4 + 3].
    }
    let dimensions = [1, 3, image.height, image.width];
    const inputTensor = new ort.Tensor("float32", float32Data, dimensions);
    return inputTensor;
  }
4단계: ONNX 런타임 웹 호출
- 이제 이미지를 검색하고 텐서로 렌더링하는 데 필요한 모든 함수를 추가했습니다. 이제 위에서 로드한 ONNX 런타임 웹 라이브러리를 사용하여 모델을 실행합니다. 여기서 WebNN을 사용하려면 단순히
executionProvider = "webnn"를 지정하면 됩니다. ONNX 런타임의 지원으로 WebNN을 쉽게 활성화할 수 있습니다.
  async function runModel(preprocessedData) {
    // Set up environment.
    ort.env.wasm.numThreads = 1;
    ort.env.wasm.simd = true;
    // Uncomment for additional information in debug builds:
    // ort.env.wasm.proxy = true;
    // ort.env.logLevel = "verbose";
    // ort.env.debug = true;

    // Configure WebNN.
    const modelPath = "./mobilenetv2-10.onnx";
    const devicePreference = "gpu"; // Other options include "npu" and "cpu".
    const options = {
        executionProviders: [{ name: "webnn", deviceType: devicePreference, powerPreference: "default" }],
      freeDimensionOverrides: {"batch": 1, "channels": 3, "height": 224, "width": 224}
      // The key names in freeDimensionOverrides should map to the real input dim names in the model.
      // For example, if a model's only key is batch_size, you only need to set
      // freeDimensionOverrides: {"batch_size": 1}
    };
    modelSession = await ort.InferenceSession.create(modelPath, options);

    // Create feeds with the input name from model export and the preprocessed data.
    const feeds = {};
    feeds[modelSession.inputNames[0]] = preprocessedData;
    // Run the session inference.
    const outputData = await modelSession.run(feeds);
    // Get output results with the output name from the model export.
    const output = outputData[modelSession.outputNames[0]];
    // Get the softmax of the output data. The softmax transforms values to be between 0 and 1.
    var outputSoftmax = softmax(Array.prototype.slice.call(output.data));
    // Get the top 5 results.
    var results = imagenetClassesTopK(outputSoftmax, 5);

    return results;
  }
5단계: 사후 처리 데이터
- 마지막으로
softmax함수를 추가하고, 최종 함수를 추가하여 확률이 높은 이미지 분류를 반환합니다. 이softmax최종 분류에 필요한 확률 형식인 값을 0에서 1 사이로 변환합니다.
먼저 도우미 라이브러리 Jimp 및 Lodash 에 대한 다음 원본 파일을 헤드 태그에 main.js추가합니다.
<script src="https://cdnjs.cloudflare.com/ajax/libs/jimp/0.22.12/jimp.min.js" integrity="sha512-8xrUum7qKj8xbiUrOzDEJL5uLjpSIMxVevAM5pvBroaxJnxJGFsKaohQPmlzQP8rEoAxrAujWttTnx3AMgGIww==" crossorigin="anonymous" referrerpolicy="no-referrer"></script>
<script src="https://cdn.jsdelivr.net/npm/lodash@4.17.21/lodash.min.js"></script>
이제 다음 함수를 .에 main.js추가합니다.
// The softmax transforms values to be between 0 and 1.
function softmax(resultArray) {
  // Get the largest value in the array.
  const largestNumber = Math.max(...resultArray);
  // Apply the exponential function to each result item subtracted by the largest number, using reduction to get the
  // previous result number and the current number to sum all the exponentials results.
  const sumOfExp = resultArray
    .map(resultItem => Math.exp(resultItem - largestNumber))
    .reduce((prevNumber, currentNumber) => prevNumber + currentNumber);

  // Normalize the resultArray by dividing by the sum of all exponentials.
  // This normalization ensures that the sum of the components of the output vector is 1.
  return resultArray.map((resultValue, index) => {
    return Math.exp(resultValue - largestNumber) / sumOfExp
  });
}

function imagenetClassesTopK(classProbabilities, k = 5) {
  const probs = _.isTypedArray(classProbabilities)
    ? Array.prototype.slice.call(classProbabilities)
    : classProbabilities;

  const sorted = _.reverse(
    _.sortBy(
      probs.map((prob, index) => [prob, index]),
      probIndex => probIndex[0]
    )
  );

  const topK = _.take(sorted, k).map(probIndex => {
    const iClass = imagenetClasses[probIndex[1]]
    return {
      id: iClass[0],
      index: parseInt(probIndex[1].toString(), 10),
      name: iClass[1].replace(/_/g, " "),
      probability: probIndex[0]
    }
  });
  return topK;
}
- 이제 기본 웹앱에서 WebNN을 사용하여 이미지 분류를 실행하는 데 필요한 모든 스크립팅을 추가했습니다. VS Code용 Live Server 확장을 사용하여 이제 앱에서 기본 웹 페이지를 시작하여 분류 결과를 직접 확인할 수 있습니다.