연락처 카드
연락처 카드는 연락처(Windows가 사용자와 회사를 나타내기 위해 사용하는 메커니즘)에 이름, 전화 번호, 주소 등의 연락처 정보를 표시합니다. 또한 연락처 카드는 사용자가 연락처 정보를 편집할 수 있게 해줍니다. 간략한 연락처 카드를 표시할 것인지, 추가 정보가 포함된 전체 연락처 카드를 표시할 것인지 선택할 수 있습니다.
중요 API: ShowContactCard 메서드, ShowFullContactCard 메서드, IsShowContactCardSupported 메서드, 연락처 클래스
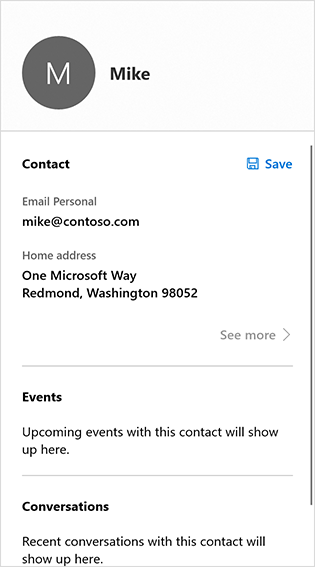
다음과 같은 두 가지 방법으로 연락처 카드를 표시할 수 있습니다.
- 가볍게 해제할 수 있는 플라이아웃에 표시되는 표준 연락처 카드로, 사용자가 외부를 클릭하면 대화 상대 카드가 사라집니다.
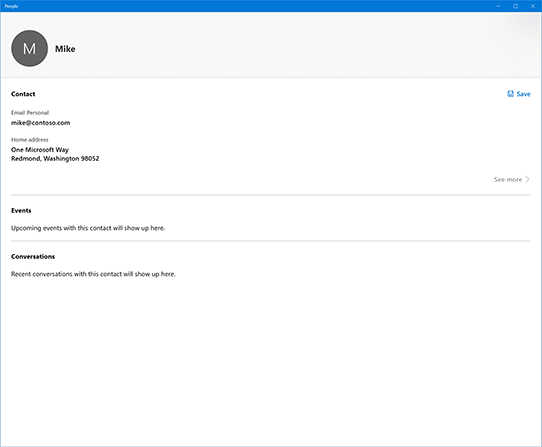
- 전체 연락처 카드는 더 많은 공간을 차지하고 신속 처리가 불가능하기 때문에 사용자가 닫기를 클릭해야만 닫을 수 있습니다.
올바른 컨트롤인가요?
연락을 위해 연락처 정보를 표시하고 싶을 때는 연락처 정보를 사용합니다. 연락처의 이름과 사진만 표시하고 싶으면 인물 사진 컨트롤을 사용합니다.
표준 연락처 카드 표시
일반적으로 사용자가 단추든 인물 사진 컨트롤이든 클릭하면 연락처 카드가 표시됩니다. 이 요소를 숨기고 싶지는 않을 것입니다. 요소가 숨겨지지 않게 하려면 요소의 위치와 크기를 설명하는 Rect를 만들어야 합니다.
나중에 사용할 수 있도록 여기에 필요한 유틸리티 기능을 만들어 보겠습니다.
// Gets the rectangle of the element
public static Rect GetElementRectHelper(FrameworkElement element)
{
    // Passing "null" means set to root element.
    GeneralTransform elementTransform = element.TransformToVisual(null);
    Rect rect = elementTransform.TransformBounds(new Rect(0, 0, element.ActualWidth, element.ActualHeight));
    return rect;
}
ContactManager.IsShowContactCardSupported 메서드를 호출하여 연락처 카드를 표시할 수 있는지 여부를 판단합니다. 지원되지 않는 경우에는 오류 메시지가 표시됩니다 (이 예제에서는 클릭 이벤트에 대한 응답으로 연락처 카드가 표시된다고 가정합니다.)
// Contact and Contact Managers are existing classes
private void OnUserClickShowContactCard(object sender, RoutedEventArgs e)
{
    if (ContactManager.IsShowContactCardSupported())
    {
1단계에서 생성한 유틸리티 기능을 사용하여 이벤트를 발생시킨 컨트롤의 경계를 가져옵니다(연락처 정보로는 해결할 수 없기 때문에).
Rect selectionRect = GetElementRect((FrameworkElement)sender);표시하고 싶은 연락처 개체를 다운로드합니다. 이 예제에서는 간단한 연락처를 만들어 보았지만, 코드로 실제 연락처를 검색해 봐야 합니다.
            // Retrieve the contact to display
            var contact = new Contact();
            var email = new ContactEmail();
            email.Address = "jsmith@contoso.com";
            contact.Emails.Add(email);
ShowContactCard 메서드를 호출하여 연락처 카드를 표시합니다.
        ContactManager.ShowFullContactCard(
            contact, selectionRect, Placement.Default);
    }
}
다음은 전체 코드 예제입니다.
// Gets the rectangle of the element
public static Rect GetElementRect(FrameworkElement element)
{
    // Passing "null" means set to root element.
    GeneralTransform elementTransform = element.TransformToVisual(null);
    Rect rect = elementTransform.TransformBounds(new Rect(0, 0, element.ActualWidth, element.ActualHeight));
    return rect;
}

// Display a contact in response to an event
private void OnUserClickShowContactCard(object sender, RoutedEventArgs e)
{
    if (ContactManager.IsShowContactCardSupported())
    {
        Rect selectionRect = GetElementRect((FrameworkElement)sender);

        // Retrieve the contact to display
        var contact = new Contact();
        var email = new ContactEmail();
        email.Address = "jsmith@contoso.com";
        contact.Emails.Add(email);

        ContactManager.ShowContactCard(
            contact, selectionRect, Placement.Default);
    }
}
전체 연락처 카드 표시
전체 연락처 카드를 표시하려면 ShowContactCard가 아닌 ShowFullContactCard 메서드를 호출합니다.
private void onUserClickShowContactCard()
{

    Contact contact = new Contact();
    ContactEmail email = new ContactEmail();
    email.Address = "jsmith@hotmail.com";
    contact.Emails.Add(email);


    // Setting up contact options.
    FullContactCardOptions fullContactCardOptions = new FullContactCardOptions();

    // Display full contact card on mouse click.
    // Launch the People’s App with full contact card
    fullContactCardOptions.DesiredRemainingView = ViewSizePreference.UseLess;


    // Shows the full contact card by launching the People App.
    ContactManager.ShowFullContactCard(contact, fullContactCardOptions);
}
"실제" 연락처 검색
이 문서의 예제에서는 간단한 연락처를 만들어 보았습니다. 실제 앱에서는 아마도 기존 연락처를 검색하고 싶을 것입니다. 이에 대한 지침은 연락처 및 일정 문서를 참조하세요.
관련된 문서

Windows developer
피드백
출시 예정: 2024년 내내 콘텐츠에 대한 피드백 메커니즘으로 GitHub 문제를 단계적으로 폐지하고 이를 새로운 피드백 시스템으로 바꿀 예정입니다. 자세한 내용은 다음을 참조하세요. https://aka.ms/ContentUserFeedback
다음에 대한 사용자 의견 제출 및 보기