AppWindow를 사용하여 여러 보기 표시
AppWindow 및 관련 API는 각 창에서 동일한 UI 스레드를 계속 사용하면서 앱 콘텐츠를 보조 창에 표시할 수 있게 하여 다중 창 앱을 만드는 작업을 간소화합니다.
참고 항목
AppWindow는 현재 미리 보기로 제공됩니다. 따라서 AppWindow를 사용하는 앱을 Microsoft Store에 제출할 수 있지만, 일부 플랫폼 및 프레임워크 구성 요소는 AppWindow에서 작동하지 않는 것으로 알려져 있습니다(제한 사항 참조).
여기서는 HelloAppWindow라는 샘플 앱을 사용하여 여러 창의 몇 가지 시나리오를 보여 줍니다. 샘플 앱은 다음과 같은 기능을 보여 줍니다.
- 주 페이지에서 컨트롤의 도킹을 해제하고 새 창에서 엽니다.
- 새 창에서 페이지의 새 인스턴스를 엽니다.
- 앱에서 프로그래밍 방식으로 새 창의 크기와 위치를 지정합니다.
- 콘텐츠 대화 상자를 앱의 적절한 창에 연결합니다.
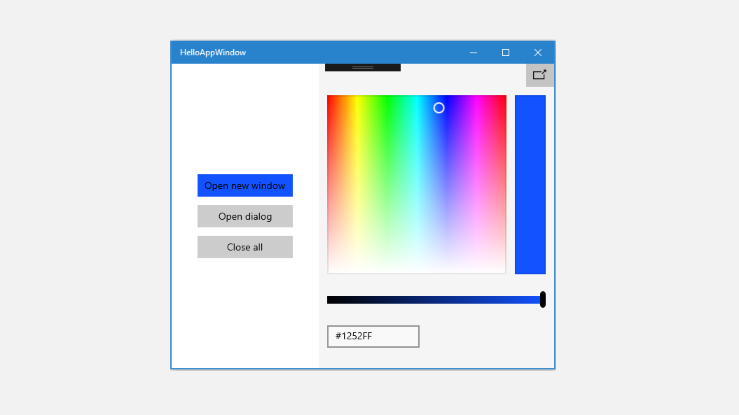
단일 창이 있는 샘플 앱
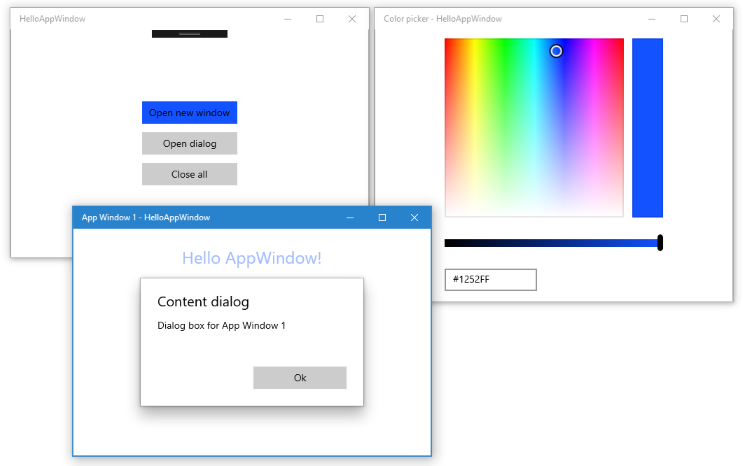
도킹되지 않은 색 선택 및 보조 창을 사용하는 샘플 앱
API 개요
AppWindow 클래스와 WindowManagement 네임스페이스의 기타 API는 Windows 10 버전 1903(SDK 18362)부터 사용할 수 있습니다. 앱이 이전 버전의 Windows 10을 대상으로 하는 경우에는 ApplicationView를 사용하여 보조 창을 만들어야 합니다. WindowManagement API는 아직 개발 중이며, API 참조 문서에 설명된 대로 제한 사항이 있습니다.
다음은 AppWindow에서 콘텐츠를 표시하는 데 사용하는 몇 가지 중요한 API입니다.
AppWindow
AppWindow 클래스를 사용하여 UWP 앱의 일부를 보조 창에 표시할 수 있습니다. ApplicationView와 비슷하지만 동작과 수명이 동일하지는 않습니다. AppWindow의 주요 기능은 각 인스턴스가 생성 시 사용된 것과 동일한 UI 처리 스레드(이벤트 디스패처 포함)를 공유하여 다중 창 앱을 간소화하는 것입니다.
AppWindow에만 XAML 콘텐츠를 연결할 수 있으며, 네이티브 DirectX 또는 Holographic 콘텐츠는 지원되지 않습니다. 그러나 DirectX 콘텐츠를 호스트하는 XAML SwapChainPanel을 표시할 수 있습니다.
WindowingEnvironment
WindowingEnvironment API를 사용하면 앱이 제공되는 환경을 파악하여 필요에 따라 앱을 조정할 수 있습니다. 환경에서 지원하는 창의 종류를 설명합니다. 예를 들어 앱이 PC에서 실행되는 경우 Overlapped이고, 앱이 Xbox에서 실행되는 경우 Tiled입니다. 또한 앱이 논리적으로 표시될 수 있는 영역을 설명하는 DisplayRegion 개체 세트를 제공합니다.
DisplayRegion
DisplayRegion API는 논리적 표시를 위해 뷰를 사용자에게 표시할 수 있는 영역을 설명합니다. 예를 들어 데스크톱 PC에서는 전체 화면 표시에서 작업 표시줄의 영역을 제외한 영역입니다. 지원 모니터의 물리적 표시 영역과 1:1 매핑이 반드시 필요하지는 않습니다. 동일한 모니터 내에 표시 영역이 여러 개 있을 수 있거나, 해당 모니터가 모든 측면에서 동일한 경우 여러 모니터에 걸쳐 있는 DisplayRegion을 구성할 수 있습니다.
AppWindowPresenter
AppWindowPresenter API를 사용하면 FullScreen 또는 CompactOverlay와 같은 미리 정의된 구성으로 창을 쉽게 전환할 수 있습니다. 이러한 구성은 해당 구성을 지원하는 모든 디바이스에서 사용자에게 일관된 환경을 제공합니다.
UIContext
UIContext는 앱 창이나 뷰의 고유 식별자입니다. 자동으로 만들어지므로 UIElement.UIContext 속성을 사용하여 UIContext를 검색할 수 있습니다. XAML 트리의 모든 UIElement에는 동일한 UIContext가 있습니다.
GetForCurrentView 패턴 및 Window.Current와 같은 API는 작업할 스레드별로 단일 XAML 트리가 있는 단일 ApplicationView/CoreWindow를 사용해야 하므로 UIContext가 중요합니다. AppWindow를 사용하는 경우에는 해당하지 않으므로 UIContext를 사용하여 특정 창을 대신 식별할 수 있습니다.
XamlRoot
XamlRoot 클래스는 XAML 요소 트리를 보유하고, 창 호스트 개체(예: AppWindow 또는 ApplicationView)에 트리를 연결하며, 크기 및 표시 유형과 같은 정보를 제공합니다. XamlRoot 개체는 직접 만들지 않습니다. 대신, XAML 요소를 AppWindow에 연결할 때 개체가 생성됩니다. UIElement.XamlRoot 속성을 사용하여 XamlRoot를 검색할 수 있습니다.
UIContext 및 XamlRoot에 대한 자세한 내용은 창 작업 호스트 간에 코드를 이식 가능하도록 설정을 참조하세요.
새 창 표시
새 AppWindow에 콘텐츠를 표시하는 단계를 살펴보겠습니다.
새 창을 표시하려면 다음을 수행합니다.
정적 AppWindow.TryCreateAsync 메서드를 호출하여 새 AppWindow를 만듭니다.
AppWindow appWindow = await AppWindow.TryCreateAsync();창 콘텐츠를 만듭니다.
일반적으로 XAML Frame을 만든 다음, 앱 콘텐츠를 정의한 XAML Page로 Frame을 이동합니다. 프레임과 페이지에 대한 자세한 내용은 두 페이지 간의 피어 투 피어 탐색을 참조하세요.
Frame appWindowContentFrame = new Frame();
appWindowContentFrame.Navigate(typeof(AppWindowMainPage));
그러나 프레임과 페이지뿐만 아니라 모든 XAML 콘텐츠를 AppWindow에 표시할 수 있습니다. 예를 들어 ColorPicker와 같은 단일 컨트롤을 표시하거나, DirectX 콘텐츠를 호스트하는 SwapChainPanel을 표시할 수 있습니다.
ElementCompositionPreview.SetAppWindowContent 메서드를 호출하여 XAML 콘텐츠를 AppWindow에 연결합니다.
ElementCompositionPreview.SetAppWindowContent(appWindow, appWindowContentFrame);이 메서드를 호출하면 XamlRoot 개체가 생성되고 지정한 UIElement의 XamlRoot 속성으로 설정됩니다.
이 메서드는 AppWindow 인스턴스당 한 번만 호출할 수 있습니다. 콘텐츠를 설정한 후 해당 AppWindow 인스턴스에 대해 SetAppWindowContent를 추가로 호출하면 실패합니다. 또한 null UIElement 개체를 전달하여 AppWindow 콘텐츠의 연결을 해제하려고 하면 호출이 실패합니다.
AppWindow.TryShowAsync 메서드를 호출하여 새 창을 표시합니다.
await appWindow.TryShowAsync();
창이 닫힐 때 리소스를 해제합니다.
항상 AppWindow.Closed 이벤트를 처리하여 XAML 리소스(AppWindow 콘텐츠)와 AppWindow 참조를 해제해야 합니다.
appWindow.Closed += delegate
{
    appWindowContentFrame.Content = null;
    appWindow = null;
};
팁
예기치 않은 문제를 방지하려면 Closed 이벤트 처리기의 코드 양을 가능한 최소 크기로 유지해야 합니다.
AppWindow 인스턴스 추적
앱에서 여러 창을 사용하는 방법에 따라 사용자가 만든 AppWindow 인스턴스를 추적해야 하는지 여부가 달라질 수 있습니다. HelloAppWindow 예제에서는 일반적으로 AppWindow를 사용할 수 있는 몇 가지 다른 방법을 보여 줍니다. 여기서는 창을 추적해야 하는 이유와 추적하는 방법을 살펴보겠습니다.
간단한 추적
색 선택 창은 단일 XAML 컨트롤을 호스트하며, 색 선택과 상호 작용하는 코드는 모두 MainPage.xaml.cs 파일에 있습니다. 색 선택 창은 단일 인스턴스만 허용하며, 기본적으로 MainWindow 확장입니다. 하나의 인스턴스만 생성되도록 하기 위해 페이지 수준 변수를 사용하여 색 선택 창을 추적합니다. 색 선택 창을 새로 만들기 전에 인스턴스가 있는지 여부를 확인한 다음, 인스턴스가 있을 경우 새 창을 만드는 단계를 건너뛰고 기존 창에 대해 TryShowAsync를 호출합니다.
AppWindow colorPickerAppWindow;

// ...

private async void DetachColorPickerButton_Click(object sender, RoutedEventArgs e)
{
    // Create the color picker window.
    if (colorPickerAppWindow == null)
    {
        // ...
        // Create a new window
        colorPickerAppWindow = await AppWindow.TryCreateAsync();
        // ...
    }
    // Show the window.
    await colorPickerAppWindow.TryShowAsync();
}
호스트된 콘텐츠에서 AppWindow 인스턴스 추적
AppWindowPage 창은 전체 XAML 페이지를 호스트하며, 페이지와 상호 작용하는 코드는 AppWindowPage.xaml.cs에 있습니다. 각각 독립적으로 작동하는 여러 인스턴스를 허용합니다.
페이지 기능은 창을 조작하여 FullScreen 또는 CompactOverlay로 설정할 수 있게 해주며, AppWindow.Changed 이벤트를 수신 대기하여 창 정보도 표시합니다. 해당 API를 호출하려면 AppWindowPage에 API를 호스트하는 AppWindow 인스턴스에 대한 참조가 필요합니다.
참조만 필요한 경우 AppWindowPage에서 속성을 만들 때 AppWindow 인스턴스를 속성에 할당할 수 있습니다.
AppWindowPage.xaml.cs
AppWindowPage에서 AppWindow 참조를 포함할 속성을 만듭니다.
public sealed partial class AppWindowPage : Page
{
    public AppWindow MyAppWindow { get; set; }

    // ...
}
MainPage.xaml.cs
MainPage에서 페이지 인스턴스에 대한 참조를 가져오고 새로 만든 AppWindow를 AppWindowPage의 속성에 할당합니다.
private async void ShowNewWindowButton_Click(object sender, RoutedEventArgs e)
{
    // Create a new window.
    AppWindow appWindow = await AppWindow.TryCreateAsync();

    // Create a Frame and navigate to the Page you want to show in the new window.
    Frame appWindowContentFrame = new Frame();
    appWindowContentFrame.Navigate(typeof(AppWindowPage));

    // Get a reference to the page instance and assign the
    // newly created AppWindow to the MyAppWindow property.
    AppWindowPage page = (AppWindowPage)appWindowContentFrame.Content;
    page.MyAppWindow = appWindow;

    // ...
}
UIContext를 사용하여 앱 창 추적
앱의 다른 부분에서 AppWindow 인스턴스에 액세스하려 할 수도 있습니다. 예를 들어 MainPage에 추적된 AppWindow 인스턴스를 모두 닫는 ‘모두 닫기’ 단추가 있을 수 있습니다.
이 경우 UIContext 고유 식별자를 사용하여 Dictionary에서 창 인스턴스를 추적해야 합니다.
MainPage.xaml.cs
MainPage에서 정적 속성으로 사전을 만듭니다. 그런 다음, 페이지를 만들 때 Dictionary에 추가하고 페이지가 닫히면 제거합니다. ElementCompositionPreview.SetAppWindowContent를 호출한 후에 Frame(appWindowContentFrame.UIContext)에서 UIContext를 가져올 수 있습니다.
public sealed partial class MainPage : Page
{
    // Track open app windows in a Dictionary.
    public static Dictionary<UIContext, AppWindow> AppWindows { get; set; }
        = new Dictionary<UIContext, AppWindow>();

    // ...

    private async void ShowNewWindowButton_Click(object sender, RoutedEventArgs e)
    {
        // Create a new window.
        AppWindow appWindow = await AppWindow.TryCreateAsync();

        // Create a Frame and navigate to the Page you want to show in the new window.
        Frame appWindowContentFrame = new Frame();
        appWindowContentFrame.Navigate(typeof(AppWindowPage));

        // Attach the XAML content to the window.
        ElementCompositionPreview.SetAppWindowContent(appWindow, appWindowContentFrame);

        // Add the new page to the Dictionary using the UIContext as the Key.
        AppWindows.Add(appWindowContentFrame.UIContext, appWindow);
        appWindow.Title = "App Window " + AppWindows.Count.ToString();

        // When the window is closed, be sure to release
        // XAML resources and the reference to the window.
        appWindow.Closed += delegate
        {
            MainPage.AppWindows.Remove(appWindowContentFrame.UIContext);
            appWindowContentFrame.Content = null;
            appWindow = null;
        };

        // Show the window.
        await appWindow.TryShowAsync();
    }

    private async void CloseAllButton_Click(object sender, RoutedEventArgs e)
    {
        while (AppWindows.Count > 0)
        {
            await AppWindows.Values.First().CloseAsync();
        }
    }
    // ...
}
AppWindowPage.xaml.cs
AppWindowPage 코드에서 AppWindow 인스턴스를 사용하려면 페이지의 UIContext를 사용하여 MainPage의 static Dictionary에서 검색합니다. UIContext가 null이 되지 않도록 생성자 대신 페이지의 Loaded 이벤트 처리기에서 이 작업을 수행해야 합니다. this.UIContext와 같이 페이지에서 UIContext를 가져올 수 있습니다.
public sealed partial class AppWindowPage : Page
{
    AppWindow window;

    // ...
    public AppWindowPage()
    {
        this.InitializeComponent();

        Loaded += AppWindowPage_Loaded;
    }

    private void AppWindowPage_Loaded(object sender, RoutedEventArgs e)
    {
        // Get the reference to this AppWindow that was stored when it was created.
        window = MainPage.AppWindows[this.UIContext];

        // Set up event handlers for the window.
        window.Changed += Window_Changed;
    }
    // ...
}
참고 항목
HelloAppWindow 예제는 AppWindowPage에서 창을 추적하는 두 가지 방법을 모두 보여 주지만, 일반적으로 두 가지 방법 중 하나만 사용합니다.
요청 창 크기 및 배치
AppWindow 클래스에는 창의 크기와 배치를 제어하는 데 사용할 수 있는 여러 메서드가 있습니다. 메서드 이름에서 알 수 있듯이, 환경 요인에 따라 요청된 변경 내용의 적용 여부가 달라질 수 있습니다.
RequestSize를 호출하여 다음과 같이 원하는 창 크기를 지정합니다.
colorPickerAppWindow.RequestSize(new Size(300, 428));
창 배치를 관리하는 메서드의 이름은 RequestMove*(RequestMoveAdjacentToCurrentView, RequestMoveAdjacentToWindow, RequestMoveRelativeToDisplayRegion, RequestMoveToDisplayRegion)입니다.
이 예제에서 다음 코드는 창 생성 시 사용된 주 뷰 옆으로 창을 이동합니다.
colorPickerAppWindow.RequestMoveAdjacentToCurrentView();
창의 현재 크기와 배치에 대한 정보를 가져오려면 GetPlacement를 호출합니다. 창의 현재 DisplayRegion, Offset 및 Size를 제공하는 AppWindowPlacement 개체가 반환됩니다.
예를 들어 다음 코드를 호출하여 창을 화면 표시의 오른쪽 위로 이동할 수 있습니다. 이 코드는 창이 표시된 후에 호출해야 합니다. 그러지 않으면 GetPlacement 호출에서 반환되는 창 크기가 0,0이 되며 오프셋이 올바르지 않습니다.
DisplayRegion displayRegion = window.GetPlacement().DisplayRegion;
double displayRegionWidth = displayRegion.WorkAreaSize.Width;
double windowWidth = window.GetPlacement().Size.Width;
int horizontalOffset = (int)(displayRegionWidth - windowWidth);
window.RequestMoveRelativeToDisplayRegion(displayRegion, new Point(horizontalOffset, 0));
프레젠테이션 구성 요청
AppWindowPresenter 클래스를 사용하면 창이 표시되는 디바이스에 적합한 미리 정의된 구성을 사용하여 AppWindow를 표시할 수 있습니다. AppWindowPresentationConfiguration 값을 사용하여 창을 FullScreen 또는 CompactOverlay 모드로 설정할 수 있습니다.
이 예제에서는 다음을 수행하는 방법을 보여 줍니다.
- AppWindow.Changed 이벤트를 사용하여 사용 가능한 창 프레젠테이션이 변경될 경우 알림이 표시되도록 합니다.
- AppWindow.Presenter 속성을 사용하여 현재 AppWindowPresenter를 가져옵니다.
- IsPresentationSupported를 호출하여 특정 AppWindowPresentationKind가 지원되는지 확인합니다.
- GetConfiguration을 호출하여 현재 사용 중인 구성 종류를 확인합니다.
- RequestPresentation을 호출하여 현재 구성을 변경합니다.
private void Window_Changed(AppWindow sender, AppWindowChangedEventArgs args)
{
    if (args.DidAvailableWindowPresentationsChange)
    {
        EnablePresentationButtons(sender);
    }

    if (args.DidWindowPresentationChange)
    {
        ConfigText.Text = window.Presenter.GetConfiguration().Kind.ToString();
    }

    if (args.DidSizeChange)
    {
        SizeText.Text = window.GetPlacement().Size.ToString();
    }
}

private void EnablePresentationButtons(AppWindow window)
{
    // Check whether the current AppWindowPresenter supports CompactOverlay.
    if (window.Presenter.IsPresentationSupported(AppWindowPresentationKind.CompactOverlay))
    {
        // Show the CompactOverlay button...
        compactOverlayButton.Visibility = Visibility.Visible;
    }
    else
    {
        // Hide the CompactOverlay button...
        compactOverlayButton.Visibility = Visibility.Collapsed;
    }

    // Check whether the current AppWindowPresenter supports FullScreen?
    if (window.Presenter.IsPresentationSupported(AppWindowPresentationKind.FullScreen))
    {
        // Show the FullScreen button...
        fullScreenButton.Visibility = Visibility.Visible;
    }
    else
    {
        // Hide the FullScreen button...
        fullScreenButton.Visibility = Visibility.Collapsed;
    }
}

private void CompactOverlayButton_Click(object sender, RoutedEventArgs e)
{
    if (window.Presenter.GetConfiguration().Kind != AppWindowPresentationKind.CompactOverlay)
    {
        window.Presenter.RequestPresentation(AppWindowPresentationKind.CompactOverlay);
        fullScreenButton.IsChecked = false;
    }
    else
    {
        window.Presenter.RequestPresentation(AppWindowPresentationKind.Default);
    }
}

private void FullScreenButton_Click(object sender, RoutedEventArgs e)
{
    if (window.Presenter.GetConfiguration().Kind != AppWindowPresentationKind.FullScreen)
    {
        window.Presenter.RequestPresentation(AppWindowPresentationKind.FullScreen);
        compactOverlayButton.IsChecked = false;
    }
    else
    {
        window.Presenter.RequestPresentation(AppWindowPresentationKind.Default);
    }
}
XAML 요소 재사용
AppWindow를 통해 동일한 UI 스레드가 있는 여러 XAML 트리를 사용할 수 있습니다. 그러나 XAML 요소는 XAML 트리에 한 번만 추가할 수 있습니다. UI의 일부를 한 창에서 다른 창으로 이동하려면 XAML 트리에서 UI의 배치를 관리해야 합니다.
이 예제에서는 주 창과 보조 창 간에 이동하는 동안 ColorPicker 컨트롤을 재사용하는 방법을 보여 줍니다.
색 선택은 MainPage XAML에서 선언되며, MainPage XAML 트리에 배치됩니다.
<StackPanel x:Name="colorPickerContainer" Grid.Column="1" Background="WhiteSmoke">
<Button Click="DetachColorPickerButton_Click" HorizontalAlignment="Right">
<FontIcon FontFamily="Segoe MDL2 Assets" Glyph="" />
</Button>
<ColorPicker x:Name="colorPicker" Margin="12" Width="288"
IsColorChannelTextInputVisible="False"
ColorChanged="ColorPicker_ColorChanged"/>
</StackPanel>
색 선택이 새 AppWindow에 배치되도록 분리한 경우, 먼저 부모 컨테이너에서 제거하여 MainPage XAML 트리에서 제거해야 합니다. 필수는 아니지만, 이 예제에서는 부모 컨테이너도 숨깁니다.
colorPickerContainer.Children.Remove(colorPicker);
colorPickerContainer.Visibility = Visibility.Collapsed;
그런 다음 새 XAML 트리에 추가할 수 있습니다. 여기서는 먼저 ColorPicker의 부모 컨테이너로 사용할 Grid를 만들고 Grid의 자식으로 ColorPicker를 추가합니다. (이렇게 하면 나중에 이 XAML 트리에서 ColorPicker를 쉽게 제거할 수 있습니다.) 그런 다음, 새 창에서 Grid를 XAML 트리의 루트로 설정합니다.
Grid appWindowRootGrid = new Grid();
appWindowRootGrid.Children.Add(colorPicker);

// Create a new window
colorPickerAppWindow = await AppWindow.TryCreateAsync();

// Attach the XAML content to our window
ElementCompositionPreview.SetAppWindowContent(colorPickerAppWindow, appWindowRootGrid);
AppWindow를 닫을 때는 프로세스를 반대로 합니다. 먼저 Grid에서 ColorPicker를 제거하고 MainPage에서 StackPanel의 자식으로 추가합니다.
// When the window is closed, be sure to release XAML resources
// and the reference to the window.
colorPickerAppWindow.Closed += delegate
{
    appWindowRootGrid.Children.Remove(colorPicker);
    appWindowRootGrid = null;
    colorPickerAppWindow = null;

    colorPickerContainer.Children.Add(colorPicker);
    colorPickerContainer.Visibility = Visibility.Visible;
};
private async void DetachColorPickerButton_Click(object sender, RoutedEventArgs e)
{
    ColorPickerContainer.Visibility = Visibility.Collapsed;

    // Create the color picker window.
    if (colorPickerAppWindow == null)
    {
        ColorPickerContainer.Children.Remove(colorPicker);

        Grid appWindowRootGrid = new Grid();
        appWindowRootGrid.Children.Add(colorPicker);

        // Create a new window
        colorPickerAppWindow = await AppWindow.TryCreateAsync();
        colorPickerAppWindow.RequestMoveAdjacentToCurrentView();
        colorPickerAppWindow.RequestSize(new Size(300, 428));
        colorPickerAppWindow.Title = "Color picker";

        // Attach the XAML content to our window
        ElementCompositionPreview.SetAppWindowContent(colorPickerAppWindow, appWindowRootGrid);

        // When the window is closed, be sure to release XAML resources
        // and the reference to the window.
        colorPickerAppWindow.Closed += delegate
        {
            appWindowRootGrid.Children.Remove(colorPicker);
            appWindowRootGrid = null;
            colorPickerAppWindow = null;

            ColorPickerContainer.Children.Add(colorPicker);
            ColorPickerContainer.Visibility = Visibility.Visible;
        };
    }
    // Show the window.
    await colorPickerAppWindow.TryShowAsync();
}
대화 상자 표시
기본적으로 콘텐츠 대화 상자는 루트 ApplicationView를 기준으로 모달 형식으로 표시됩니다. AppWindow 내에서 ContentDialog를 사용하는 경우, 수동으로 대화 상자의 XamlRoot를 XAML 호스트의 루트로 설정해야 합니다.
ContentDialog의 XamlRoot 속성을 AppWindow에 이미 있는 요소와 동일한 XamlRoot로 설정하면 됩니다. 여기서 다음 코드는 단추의 Click 이벤트 처리기 내부에 있으므로, sender(클릭한 단추)를 사용하여 XamlRoot를 가져올 수 있습니다.
if (ApiInformation.IsApiContractPresent("Windows.Foundation.UniversalApiContract", 8))
{
    simpleDialog.XamlRoot = ((Button)sender).XamlRoot;
}
주 창(ApplicationView) 외에 AppWindows가 하나 이상 열려 있는 경우, 모달 대화 상자는 기반으로 사용된 창만 차단하기 때문에 각 창에서 대화 상자를 열려고 시도할 수 있습니다. 하지만 스레드당 하나의 ContentDialog만 열어 둘 수 있습니다. 두 ContentDialog를 열려는 하면 별도의 AppWindow에서 열려고 하더라도 예외가 throw됩니다.
이 동작을 관리하려면, 다른 대화 상자가 이미 열려 있는 경우 예외를 catch하기 위해 최소한 try/catch 블록에서 대화 상자를 열어야 합니다.
try
{
    ContentDialogResult result = await simpleDialog.ShowAsync();
}
catch (Exception)
{
    // The dialog didn't open, probably because another dialog is already open.
}
대화 상자를 관리하는 또 다른 방법은 현재 열려 있는 대화 상자를 추적하고 새 대화 상자를 열기 전에 닫는 것입니다. 여기서는, 이 목적으로 MainPage에 CurrentDialog라는 정적 속성을 만듭니다.
public sealed partial class MainPage : Page
{
    // Track the last opened dialog so you can close it if another dialog tries to open.
    public static ContentDialog CurrentDialog { get; set; } = null;

   // ...
}
현재 열려 있는 대화 상자가 있는지 확인하고, 있을 경우 Hide 메서드를 호출하여 닫습니다. 마지막으로, CurrentDialog에 새 대화 상자를 할당하고 표시합니다.
private async void DialogButton_Click(object sender, RoutedEventArgs e)
{
    ContentDialog simpleDialog = new ContentDialog
    {
        Title = "Content dialog",
        Content = "Dialog box for " + window.Title,
        CloseButtonText = "Ok"
    };

    if (MainPage.CurrentDialog != null)
    {
        MainPage.CurrentDialog.Hide();
    }
    MainPage.CurrentDialog = simpleDialog;

    // Use this code to associate the dialog to the appropriate AppWindow by setting
    // the dialog's XamlRoot to the same XamlRoot as an element that is already
    // present in the AppWindow.
    if (ApiInformation.IsApiContractPresent("Windows.Foundation.UniversalApiContract", 8))
    {
        simpleDialog.XamlRoot = ((Button)sender).XamlRoot;
    }

    try
    {
        ContentDialogResult result = await simpleDialog.ShowAsync();
    }
    catch (Exception)
    {
        // The dialog didn't open, probably because another dialog is already open.
    }
}
프로그래밍 방식으로 대화 상자를 닫지 않으려는 경우 CurrentDialog로 할당하지 마세요. 여기서 MainPage는 사용자가 Ok를 클릭한 경우에만 해제되어야 하는 중요한 대화 상자를 표시합니다. CurrentDialog로 할당되지 않았기 때문에 프로그래밍 방식으로 닫지 않습니다.
public sealed partial class MainPage : Page
{
    // Track the last opened dialog so you can close it if another dialog tries to open.
    public static ContentDialog CurrentDialog { get; set; } = null;

    // ...
    private async void DialogButton_Click(object sender, RoutedEventArgs e)
    {
        ContentDialog importantDialog = new ContentDialog
        {
            Title = "Important dialog",
            Content = "This dialog can only be dismissed by clicking Ok.",
            CloseButtonText = "Ok"
        };

        if (MainPage.CurrentDialog != null)
        {
            MainPage.CurrentDialog.Hide();
        }
        // Do not track this dialog as the MainPage.CurrentDialog.
        // It should only be closed by clicking the Ok button.
        MainPage.CurrentDialog = null;

        try
        {
            ContentDialogResult result = await importantDialog.ShowAsync();
        }
        catch (Exception)
        {
            // The dialog didn't open, probably because another dialog is already open.
        }
    }
    // ...
}
전체 코드
MainPage.xaml
<Page
x:Class="HelloAppWindow.MainPage"
xmlns="http://schemas.microsoft.com/winfx/2006/xaml/presentation"
xmlns:x="http://schemas.microsoft.com/winfx/2006/xaml"
xmlns:local="using:HelloAppWindow"
xmlns:d="http://schemas.microsoft.com/expression/blend/2008"
xmlns:mc="http://schemas.openxmlformats.org/markup-compatibility/2006"
mc:Ignorable="d"
Background="{ThemeResource ApplicationPageBackgroundThemeBrush}">
<Grid>
<Grid.ColumnDefinitions>
<ColumnDefinition/>
<ColumnDefinition Width="Auto"/>
</Grid.ColumnDefinitions>
<StackPanel VerticalAlignment="Center" HorizontalAlignment="Center">
<Button x:Name="NewWindowButton" Content="Open new window"
Click="ShowNewWindowButton_Click" Margin="0,12"/>
<Button Content="Open dialog" Click="DialogButton_Click"
HorizontalAlignment="Stretch"/>
<Button Content="Close all" Click="CloseAllButton_Click"
Margin="0,12" HorizontalAlignment="Stretch"/>
</StackPanel>
<StackPanel x:Name="colorPickerContainer" Grid.Column="1" Background="WhiteSmoke">
<Button Click="DetachColorPickerButton_Click" HorizontalAlignment="Right">
<FontIcon FontFamily="Segoe MDL2 Assets" Glyph="" />
</Button>
<ColorPicker x:Name="colorPicker" Margin="12" Width="288"
IsColorChannelTextInputVisible="False"
ColorChanged="ColorPicker_ColorChanged"/>
</StackPanel>
</Grid>
</Page>
MainPage.xaml.cs
using System;
using System.Collections.Generic;
using System.Linq;
using Windows.Foundation;
using Windows.UI;
using Windows.UI.WindowManagement;
using Windows.UI.Xaml;
using Windows.UI.Xaml.Controls;
using Windows.UI.Xaml.Hosting;
using Windows.UI.Xaml.Media;

// The Blank Page item template is documented at https://go.microsoft.com/fwlink/?LinkId=402352&clcid=0x409

namespace HelloAppWindow
{
    /// <summary>
    /// An empty page that can be used on its own or navigated to within a Frame.
    /// </summary>
    public sealed partial class MainPage : Page
    {
        AppWindow colorPickerAppWindow;

        // Track open app windows in a Dictionary.
        public static Dictionary<UIContext, AppWindow> AppWindows { get; set; }
            = new Dictionary<UIContext, AppWindow>();

        // Track the last opened dialog so you can close it if another dialog tries to open.
        public static ContentDialog CurrentDialog { get; set; } = null;

        public MainPage()
        {
            this.InitializeComponent();
        }

        private async void ShowNewWindowButton_Click(object sender, RoutedEventArgs e)
        {
            // Create a new window.
            AppWindow appWindow = await AppWindow.TryCreateAsync();

            // Create a Frame and navigate to the Page you want to show in the new window.
            Frame appWindowContentFrame = new Frame();
            appWindowContentFrame.Navigate(typeof(AppWindowPage));

            // Get a reference to the page instance and assign the
            // newly created AppWindow to the MyAppWindow property.
            AppWindowPage page = (AppWindowPage)appWindowContentFrame.Content;
            page.MyAppWindow = appWindow;
            page.TextColorBrush = new SolidColorBrush(colorPicker.Color);

            // Attach the XAML content to the window.
            ElementCompositionPreview.SetAppWindowContent(appWindow, appWindowContentFrame);

            // Add the new page to the Dictionary using the UIContext as the Key.
            AppWindows.Add(appWindowContentFrame.UIContext, appWindow);
            appWindow.Title = "App Window " + AppWindows.Count.ToString();

            // When the window is closed, be sure to release XAML resources
            // and the reference to the window.
            appWindow.Closed += delegate
            {
                MainPage.AppWindows.Remove(appWindowContentFrame.UIContext);
                appWindowContentFrame.Content = null;
                appWindow = null;
            };

            // Show the window.
            await appWindow.TryShowAsync();
        }

        private async void DialogButton_Click(object sender, RoutedEventArgs e)
        {
            ContentDialog importantDialog = new ContentDialog
            {
                Title = "Important dialog",
                Content = "This dialog can only be dismissed by clicking Ok.",
                CloseButtonText = "Ok"
            };

            if (MainPage.CurrentDialog != null)
            {
                MainPage.CurrentDialog.Hide();
            }
            // Do not track this dialog as the MainPage.CurrentDialog.
            // It should only be closed by clicking the Ok button.
            MainPage.CurrentDialog = null;

            try
            {
                ContentDialogResult result = await importantDialog.ShowAsync();
            }
            catch (Exception)
            {
                // The dialog didn't open, probably because another dialog is already open.
            }
        }

        private async void DetachColorPickerButton_Click(object sender, RoutedEventArgs e)
        {
            // Create the color picker window.
            if (colorPickerAppWindow == null)
            {
                colorPickerContainer.Children.Remove(colorPicker);
                colorPickerContainer.Visibility = Visibility.Collapsed;

                Grid appWindowRootGrid = new Grid();
                appWindowRootGrid.Children.Add(colorPicker);

                // Create a new window
                colorPickerAppWindow = await AppWindow.TryCreateAsync();
                colorPickerAppWindow.RequestMoveAdjacentToCurrentView();
                colorPickerAppWindow.RequestSize(new Size(300, 428));
                colorPickerAppWindow.Title = "Color picker";

                // Attach the XAML content to our window
                ElementCompositionPreview.SetAppWindowContent(colorPickerAppWindow, appWindowRootGrid);

                // Make sure to release the reference to this window,
                // and release XAML resources, when it's closed
                colorPickerAppWindow.Closed += delegate
                {
                    appWindowRootGrid.Children.Remove(colorPicker);
                    appWindowRootGrid = null;
                    colorPickerAppWindow = null;

                    colorPickerContainer.Children.Add(colorPicker);
                    colorPickerContainer.Visibility = Visibility.Visible;
                };
            }
            // Show the window.
            await colorPickerAppWindow.TryShowAsync();
        }

        private void ColorPicker_ColorChanged(ColorPicker sender, ColorChangedEventArgs args)
        {
            NewWindowButton.Background = new SolidColorBrush(args.NewColor);
        }

        private async void CloseAllButton_Click(object sender, RoutedEventArgs e)
        {
            while (AppWindows.Count > 0)
            {
                await AppWindows.Values.First().CloseAsync();
            }
        }
    }
}
AppWindowPage.xaml
<Page
    x:Class="HelloAppWindow.AppWindowPage"
    xmlns="http://schemas.microsoft.com/winfx/2006/xaml/presentation"
    xmlns:x="http://schemas.microsoft.com/winfx/2006/xaml"
    xmlns:local="using:HelloAppWindow"
    xmlns:d="http://schemas.microsoft.com/expression/blend/2008"
    xmlns:mc="http://schemas.openxmlformats.org/markup-compatibility/2006"
    mc:Ignorable="d"
    Background="{ThemeResource ApplicationPageBackgroundThemeBrush}">

    <Grid>
        <TextBlock x:Name="TitleTextBlock" Text="Hello AppWindow!" FontSize="24" HorizontalAlignment="Center" Margin="24"/>

        <StackPanel VerticalAlignment="Center" HorizontalAlignment="Center">
            <Button Content="Open dialog" Click="DialogButton_Click"
                    Width="200" Margin="0,4"/>
            <Button Content="Move window" Click="MoveWindowButton_Click"
                    Width="200" Margin="0,4"/>
            <ToggleButton Content="Compact Overlay" x:Name="compactOverlayButton" Click="CompactOverlayButton_Click"
                          Width="200" Margin="0,4"/>
            <ToggleButton Content="Full Screen" x:Name="fullScreenButton" Click="FullScreenButton_Click"
                          Width="200" Margin="0,4"/>
            <Grid>
                <TextBlock Text="Size:"/>
                <TextBlock x:Name="SizeText" HorizontalAlignment="Right"/>
            </Grid>
            <Grid>
                <TextBlock Text="Presentation:"/>
                <TextBlock x:Name="ConfigText" HorizontalAlignment="Right"/>
            </Grid>
        </StackPanel>
    </Grid>
</Page>
AppWindowPage.xaml.cs
using System;
using Windows.Foundation;
using Windows.Foundation.Metadata;
using Windows.UI;
using Windows.UI.WindowManagement;
using Windows.UI.Xaml;
using Windows.UI.Xaml.Controls;
using Windows.UI.Xaml.Media;

// The Blank Page item template is documented at https://go.microsoft.com/fwlink/?LinkId=234238

namespace HelloAppWindow
{
    /// <summary>
    /// An empty page that can be used on its own or navigated to within a Frame.
    /// </summary>
    public sealed partial class AppWindowPage : Page
    {
        AppWindow window;

        public AppWindow MyAppWindow { get; set; }

        public SolidColorBrush TextColorBrush { get; set; } = new SolidColorBrush(Colors.Black);

        public AppWindowPage()
        {
            this.InitializeComponent();

            Loaded += AppWindowPage_Loaded;
        }

        private void AppWindowPage_Loaded(object sender, RoutedEventArgs e)
        {
            // Get the reference to this AppWindow that was stored when it was created.
            window = MainPage.AppWindows[this.UIContext];

            // Set up event handlers for the window.
            window.Changed += Window_Changed;

            TitleTextBlock.Foreground = TextColorBrush;
        }

        private async void DialogButton_Click(object sender, RoutedEventArgs e)
        {
            ContentDialog simpleDialog = new ContentDialog
            {
                Title = "Content dialog",
                Content = "Dialog box for " + window.Title,
                CloseButtonText = "Ok"
            };

            if (MainPage.CurrentDialog != null)
            {
                MainPage.CurrentDialog.Hide();
            }
            MainPage.CurrentDialog = simpleDialog;

            // Use this code to associate the dialog to the appropriate AppWindow by setting
            // the dialog's XamlRoot to the same XamlRoot as an element that is already
            // present in the AppWindow.
            if (ApiInformation.IsApiContractPresent("Windows.Foundation.UniversalApiContract", 8))
            {
                simpleDialog.XamlRoot = ((Button)sender).XamlRoot;
            }

            try
            {
                ContentDialogResult result = await simpleDialog.ShowAsync();
            }
            catch (Exception)
            {
                // The dialog didn't open, probably because another dialog is already open.
            }
        }

        private void Window_Changed(AppWindow sender, AppWindowChangedEventArgs args)
        {
            if (args.DidAvailableWindowPresentationsChange)
            {
                EnablePresentationButtons(sender);
            }

            if (args.DidWindowPresentationChange)
            {
                ConfigText.Text = window.Presenter.GetConfiguration().Kind.ToString();
            }

            if (args.DidSizeChange)
            {
                SizeText.Text = window.GetPlacement().Size.ToString();
            }
        }

        private void EnablePresentationButtons(AppWindow window)
        {
            // Check whether the current AppWindowPresenter supports CompactOverlay.
            if (window.Presenter.IsPresentationSupported(AppWindowPresentationKind.CompactOverlay))
            {
                // Show the CompactOverlay button...
                compactOverlayButton.Visibility = Visibility.Visible;
            }
            else
            {
                // Hide the CompactOverlay button...
                compactOverlayButton.Visibility = Visibility.Collapsed;
            }

            // Check whether the current AppWindowPresenter supports FullScreen?
            if (window.Presenter.IsPresentationSupported(AppWindowPresentationKind.FullScreen))
            {
                // Show the FullScreen button...
                fullScreenButton.Visibility = Visibility.Visible;
            }
            else
            {
                // Hide the FullScreen button...
                fullScreenButton.Visibility = Visibility.Collapsed;
            }
        }

        private void CompactOverlayButton_Click(object sender, RoutedEventArgs e)
        {
            if (window.Presenter.GetConfiguration().Kind != AppWindowPresentationKind.CompactOverlay)
            {
                window.Presenter.RequestPresentation(AppWindowPresentationKind.CompactOverlay);
                fullScreenButton.IsChecked = false;
            }
            else
            {
                window.Presenter.RequestPresentation(AppWindowPresentationKind.Default);
            }
        }

        private void FullScreenButton_Click(object sender, RoutedEventArgs e)
        {
            if (window.Presenter.GetConfiguration().Kind != AppWindowPresentationKind.FullScreen)
            {
                window.Presenter.RequestPresentation(AppWindowPresentationKind.FullScreen);
                compactOverlayButton.IsChecked = false;
            }
            else
            {
                window.Presenter.RequestPresentation(AppWindowPresentationKind.Default);
            }
        }

        private void MoveWindowButton_Click(object sender, RoutedEventArgs e)
        {
            DisplayRegion displayRegion = window.GetPlacement().DisplayRegion;
            double displayRegionWidth = displayRegion.WorkAreaSize.Width;
            double windowWidth = window.GetPlacement().Size.Width;
            int horizontalOffset = (int)(displayRegionWidth - windowWidth);
            window.RequestMoveRelativeToDisplayRegion(displayRegion, new Point(horizontalOffset, 0));
        }
    }
}
관련 항목

Windows developer