도구 모음에 논버튼 컨트롤을 포함하는 방법
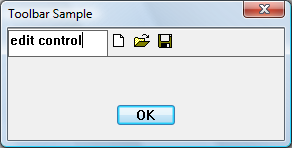
도구 모음은 단추만 지원합니다. 따라서 애플리케이션에 다른 종류의 컨트롤이 필요한 경우 자식 창을 만들어야 합니다. 다음 그림은 포함된 편집 컨트롤이 있는 도구 모음을 보여 줍니다.
참고
도구 모음에 컨트롤을 배치하는 대신 Rebar 컨트롤을 사용하는 것이 좋습니다.
모든 유형의 창을 도구 모음에 배치할 수 있습니다. 다음 예제 코드는 편집 컨트롤을 도구 모음 컨트롤 창의 자식으로 추가합니다. 도구 모음이 만들어지고 편집 컨트롤이 추가되므로 편집 컨트롤을 위한 공간을 제공해야 합니다. 이 작업을 수행하는 한 가지 방법은 도구 모음에서 구분 기호를 자리 표시자로 추가하여 구분 기호의 너비를 예약하려는 픽셀 수로 설정하는 것입니다.
알아야 하는 작업
기술
필수 구성 요소
- C/C++
- Windows 사용자 인터페이스 프로그래밍
지침
도구 모음에 논버튼 컨트롤 포함
다음 코드 조각은 앞의 그림에서 도구 모음을 만듭니다.
// IDM_NEW, IDM_OPEN, and IDM_SAVE are application-defined command constants.

HIMAGELIST g_hImageList = NULL;

HWND CreateToolbarWithEdit(HWND hWndParent)
{
    const int ImageListID = 0;    // Define some constants.
    const int bitmapSize  = 16;

    const int cx_edit = 100;      // Dimensions of edit control.
    const int cy_edit = 35;

    TBBUTTON tbButtons[] =        // Toolbar buttons.
    {
        // The separator is set to the width of the edit control.

        {cx_edit, 0, TBSTATE_ENABLED, BTNS_SEP, {0}, 0, -1},
        {STD_FILENEW, IDM_NEW, TBSTATE_ENABLED, BTNS_BUTTON, {0}, 0, 0},
        {STD_FILEOPEN, IDM_OPEN, TBSTATE_ENABLED, BTNS_BUTTON, {0}, 0, 0},
        {STD_FILESAVE, IDM_SAVE, TBSTATE_ENABLED, BTNS_BUTTON, {0}, 0, 0},
        {0, 0, TBSTATE_ENABLED, BTNS_SEP, {0}, 0, 0},
    };

    // Create the toolbar.
    HWND hWndToolbar = CreateWindowEx(0, TOOLBARCLASSNAME, L"Toolbar",
                                      WS_CHILD | WS_VISIBLE | WS_BORDER,
                                      0, 0, 0, 0,
                                      hWndParent, NULL, HINST_COMMCTRL, NULL);

    if (!hWndToolbar)
        return NULL;

    int numButtons = sizeof(tbButtons) / sizeof(TBBUTTON);

    // Create the image list.
    g_hImageList = ImageList_Create(bitmapSize, bitmapSize, // Dimensions of individual bitmaps.
                                    0,                      // Flags.
                                    numButtons, 0);

    // Set the image list.
    SendMessage(hWndToolbar, TB_SETIMAGELIST, (WPARAM)ImageListID, (LPARAM)g_hImageList);

    // Load the button images.
    SendMessage(hWndToolbar, TB_LOADIMAGES, (WPARAM)IDB_STD_SMALL_COLOR, (LPARAM)HINST_COMMCTRL);

    // Add buttons.
    SendMessage(hWndToolbar, TB_BUTTONSTRUCTSIZE, (WPARAM)sizeof(TBBUTTON), 0);
    SendMessage(hWndToolbar, TB_ADDBUTTONS,       (WPARAM)numButtons,       (LPARAM)&tbButtons);

    // Create the edit control child window.
    HWND hWndEdit = CreateWindowEx(0L, L"Edit", NULL,
                                   WS_CHILD | WS_BORDER | WS_VISIBLE | ES_LEFT | ES_AUTOVSCROLL | ES_MULTILINE,
                                   0, 0, cx_edit, cy_edit,
                                   hWndToolbar, (HMENU) IDM_EDIT, g_hInst, 0 );

    if (!hWndEdit)
    {
        DestroyWindow(hWndToolbar);
        ImageList_Destroy(g_hImageList);

        return NULL;
    }

    return hWndToolbar;    // Return the toolbar with the embedded edit control.
}
다음은 자식 창의 차원을 하드 코딩하는 예제입니다. 그러나 보다 강력한 애플리케이션을 만들려면 도구 모음의 크기를 확인하고 편집 컨트롤 창을 적합하게 만듭니다.
편집 컨트롤 알림이 도구 모음의 부모와 같은 다른 창으로 이동하도록 할 수 있습니다. 이렇게 하려면 도구 모음의 부모 창의 자식으로 편집 컨트롤을 생성합니다. 그런 다음 편집 컨트롤의 부모를 다음과 같이 도구 모음으로 변경합니다.
SetParent (hWndEdit, hWndToolbar);
알림은 원래 부모로 이동합니다. 따라서 편집 창이 도구 모음 창에 있는 경우에도 편집 컨트롤 메시지가 도구 모음의 부모로 이동합니다.
관련 항목
피드백
출시 예정: 2024년 내내 콘텐츠에 대한 피드백 메커니즘으로 GitHub 문제를 단계적으로 폐지하고 이를 새로운 피드백 시스템으로 바꿀 예정입니다. 자세한 내용은 다음을 참조하세요. https://aka.ms/ContentUserFeedback
다음에 대한 사용자 의견 제출 및 보기