그래픽 컨테이너
그래픽 상태(클리핑 영역, 변환 및 품질 설정)는 Graphics 개체에 저장됩니다. Windows GDI+를 사용하면 컨테이너를 사용하여 Graphics 개체에서 상태의 일부를 일시적으로 바꾸거나 보강할 수 있습니다. Graphics 개체의 Graphics::BeginContainer 메서드를 호출하여 컨테이너를 시작하고 Graphics::EndContainer 메서드를 호출하여 컨테이너를 종료합니다. Graphics::BeginContainer와 Graphics::EndContainer 사이에 Graphics 개체에 대한 모든 상태 변경 내용이 컨테이너에 속하며 Graphics 개체의 기존 상태를 덮어쓰지 않습니다.
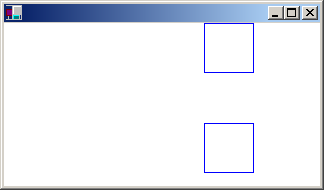
다음 예제에서는 Graphics 개체 내에 컨테이너를 만듭니다. Graphics 개체의 월드 변환은 오른쪽의 번역 200단위이고, 컨테이너의 월드 변환은 100단위 아래로 변환됩니다.
myGraphics.TranslateTransform(200.0f, 0.0f);

myGraphicsContainer = myGraphics.BeginContainer();
   myGraphics.TranslateTransform(0.0f, 100.0f);
   myGraphics.DrawRectangle(&myPen, 0, 0, 50, 50);
myGraphics.EndContainer(myGraphicsContainer);

myGraphics.DrawRectangle(&myPen, 0, 0, 50, 50);
이전 예제에서 Graphics::BeginContainer 및 Graphics::EndContainer 호출 사이에 수행된 문 myGraphics.DrawRectangle(&myPen, 0, 0, 50, 50) 은 Graphics::EndContainer를 호출한 후 수행한 것과 다른 사각형을 생성합니다. 수평 변환만 컨테이너 외부에서 이루어진 DrawRectangle 호출에 적용됩니다. 두 변환( 200 단위의 가로 변환 및 100단위의 수직 변환)은 컨테이너 내에서 수행된 Graphics::D rawRectangle 호출에 적용됩니다. 다음 그림에서는 두 사각형을 보여 줍니다.
컨테이너는 컨테이너 내에 중첩될 수 있습니다. 다음 예제에서는 Graphics 개체 내에 컨테이너를 만들고 첫 번째 컨테이너 내에 다른 컨테이너를 만듭니다. Graphics 개체의 월드 변환은 x 방향의 변환 100개 단위와 y 방향의 80개 단위입니다. 첫 번째 컨테이너의 월드 변환은 30도 회전입니다. 두 번째 컨테이너의 월드 변환은 x 방향에서 2의 배율로 크기 조정됩니다. 두 번째 컨테이너 내에서 Graphics::D rawEllipse 메서드를 호출합니다.
myGraphics.TranslateTransform(100.0f, 80.0f, MatrixOrderAppend);

container1 = myGraphics.BeginContainer();
   myGraphics.RotateTransform(30.0f, MatrixOrderAppend);

   container2 = myGraphics.BeginContainer();
      myGraphics.ScaleTransform(2.0f, 1.0f);
      myGraphics.DrawEllipse(&myPen, -30, -20, 60, 40);
   myGraphics.EndContainer(container2);

myGraphics.EndContainer(container1);
다음 그림에서는 줄임표를 보여 줍니다.
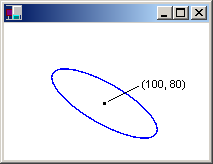
세 가지 변환은 모두 두 번째(가장 안쪽) 컨테이너에서 수행된 Graphics::D rawEllipse 호출에 적용됩니다. 또한 변환 순서를 적어 둡니다. 첫 번째 배율, 회전한 다음 변환합니다. 가장 안쪽 변환이 먼저 적용되고 가장 바깥쪽 변환이 마지막으로 적용됩니다.
Graphics 개체의 모든 속성은 컨테이너 내에서 설정할 수 있습니다(Graphics::BeginContainer 및 Graphics::EndContainer 호출 사이에 있음). 예를 들어 클리핑 영역은 컨테이너 내에서 설정할 수 있습니다. 컨테이너 내에서 수행된 모든 그리기는 해당 컨테이너의 클리핑 영역으로 제한되며 외부 컨테이너의 클리핑 영역과 Graphics 개체 자체의 클리핑 영역으로 제한됩니다.
지금까지 설명한 속성(월드 변환 및 클리핑 영역)은 중첩된 컨테이너에 의해 결합됩니다. 다른 속성은 일시적으로 중첩된 컨테이너로 대체됩니다. 예를 들어, 부드러운 모드를 컨테이너 내의 SmoothingModeAntiAlias로 설정하면 해당 컨테이너 내에서 호출된 모든 그리기 메서드는 앤티앨리어스 스무딩 모드를 사용하지만 Graphics::EndContainer 이후에 호출된 그리기 메서드는 Graphics::BeginContainer 호출 전에 배치된 스무딩 모드를 사용합니다.
Graphics 개체와 컨테이너의 월드 변환을 결합하는 또 다른 예는 눈을 그려 얼굴 시퀀스의 다양한 위치에 배치한다고 가정합니다. 다음 예제에서는 좌표계의 원점 가운데에 눈을 그립니다.
void DrawEye(Graphics* pGraphics)
{
   GraphicsContainer eyeContainer;

   eyeContainer = pGraphics->BeginContainer();

      Pen myBlackPen(Color(255, 0, 0, 0));
      SolidBrush myGreenBrush(Color(255, 0, 128, 0));
      SolidBrush myBlackBrush(Color(255, 0, 0, 0));

      GraphicsPath myTopPath;
      myTopPath.AddEllipse(-30, -50, 60, 60);

      GraphicsPath myBottomPath;
      myBottomPath.AddEllipse(-30, -10, 60, 60);

      Region myTopRegion(&myTopPath);
      Region myBottomRegion(&myBottomPath);

      // Draw the outline of the eye.
      // The outline of the eye consists of two ellipses.
      // The top ellipse is clipped by the bottom ellipse, and
      // the bottom ellipse is clipped by the top ellipse.
      pGraphics->SetClip(&myTopRegion);
      pGraphics->DrawPath(&myBlackPen, &myBottomPath);
      pGraphics->SetClip(&myBottomRegion);
      pGraphics->DrawPath(&myBlackPen, &myTopPath);

      // Fill the iris.
      // The iris is clipped by the bottom ellipse.
      pGraphics->FillEllipse(&myGreenBrush, -10, -15, 20, 22);

      // Fill the pupil.
      pGraphics->FillEllipse(&myBlackBrush, -3, -7, 6, 9);

   pGraphics->EndContainer(eyeContainer);
}
다음 그림에서는 눈과 좌표 축을 보여 줍니다.

이전 예제에 정의된 DrawEye 함수는 Graphics 개체의 주소를 수신하고 해당 Graphics 개체 내에 컨테이너를 즉시 만듭니다. 이 컨테이너는 DrawEye 함수를 실행하는 동안 만들어진 속성 설정에서 DrawEye 함수를 호출하는 모든 코드를 격리합니다. 예를 들어 DrawEye 함수의 코드는 Graphics 개체의 클리핑 영역을 설정하지만 DrawEye가 컨트롤을 호출 루틴으로 반환하면 클리핑 영역은 DrawEye 호출 이전과 같습니다.
다음 예제에서는 각 줄임표(얼굴)를 눈 안쪽으로 그립니다.
// Draw an ellipse with center at (100, 100).
myGraphics.TranslateTransform(100.0f, 100.0f);
myGraphics.DrawEllipse(&myBlackPen, -40, -60, 80, 120);

// Draw the eye at the center of the ellipse.
DrawEye(&myGraphics);

// Draw an ellipse with center at 200, 100.
myGraphics.TranslateTransform(100.0f, 0.0f, MatrixOrderAppend);
myGraphics.DrawEllipse(&myBlackPen, -40, -60, 80, 120);

// Rotate the eye 40 degrees, and draw it 30 units above
// the center of the ellipse.
myGraphicsContainer = myGraphics.BeginContainer();
   myGraphics.RotateTransform(-40.0f);
   myGraphics.TranslateTransform(0.0f, -30.0f, MatrixOrderAppend);
   DrawEye(&myGraphics);
myGraphics.EndContainer(myGraphicsContainer);

// Draw a ellipse with center at (300.0f, 100.0f).
myGraphics.TranslateTransform(100.0f, 0.0f, MatrixOrderAppend);
myGraphics.DrawEllipse(&myBlackPen, -40, -60, 80, 120);

// Stretch and rotate the eye, and draw it at the
// center of the ellipse.
myGraphicsContainer = myGraphics.BeginContainer();
   myGraphics.ScaleTransform(2.0f, 1.5f);
   myGraphics.RotateTransform(45.0f, MatrixOrderAppend);
   DrawEye(&myGraphics);
myGraphics.EndContainer(myGraphicsContainer);
다음 그림에서는 세 줄임표를 보여 줍니다.
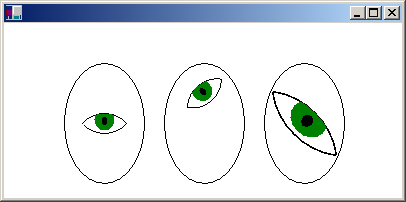
이전 예제에서 모든 줄임표는 좌표계의 원점 가운데에 있는 타원을 그리는 호출 DrawEllipse(&myBlackPen, -40, -60, 80, 120)로 그려집니다. 타원은 Graphics 개체의 월드 변환을 설정하여 클라이언트 영역의 왼쪽 위 모서리에서 멀리 이동합니다. 문을 사용하면 첫 번째 줄임표가 (100, 100) 가운데에 배치됩니다. 문을 사용하면 두 번째 줄임표의 중심이 첫 번째 타원의 가운데 오른쪽에 100 단위가 됩니다. 마찬가지로 세 번째 타원의 중심은 두 번째 타원의 가운데 오른쪽에 있는 100단위입니다.
이전 예제의 컨테이너는 지정된 타원의 중심을 기준으로 눈을 변환하는 데 사용됩니다. 첫 번째 눈은 변환 없이 타원의 중앙에 그려지므로 DrawEye 호출은 컨테이너 내에 없습니다. 두 번째 눈은 40도 회전하고 타원의 중심 위에 30 단위를 그려지므로 DrawEye 함수와 변환을 설정하는 메서드가 컨테이너 내에서 호출됩니다. 세 번째 눈은 늘어나고 회전하며 타원의 중앙에 그려집니다. 두 번째 눈과 마찬가지로 DrawEye 함수 및 변환을 설정하는 메서드가 컨테이너 내에서 호출됩니다.
피드백
출시 예정: 2024년 내내 콘텐츠에 대한 피드백 메커니즘으로 GitHub 문제를 단계적으로 폐지하고 이를 새로운 피드백 시스템으로 바꿀 예정입니다. 자세한 내용은 다음을 참조하세요. https://aka.ms/ContentUserFeedback
다음에 대한 사용자 의견 제출 및 보기