스크롤 막대를 사용하여 이동에 대한 레거시 지원
이 섹션에서는 Windows 기반 애플리케이션에서 스크롤 막대를 사용하여 이동에 대한 지원을 설명합니다.
Windows 7에서 이동 제스처는 WM_*SCROLL 메시지를 생성하여 레거시 이동 지원을 사용하도록 설정합니다. 애플리케이션에서 모든 WM_*SCROLL 메시지를 지원하지 않을 수 있으므로 이동이 제대로 작동하지 않을 수 있습니다. 이 항목에서는 애플리케이션의 레거시 이동 환경이 사용자가 예상한 대로 작동하도록 하기 위해 수행해야 하는 단계에 대해 설명합니다.
개요
다음 섹션에서는 레거시 이동 환경을 사용하도록 설정하는 방법을 설명합니다.
- 스크롤 막대를 사용하여 애플리케이션을 만듭니다.
- 영화를 사용하지 않도록 설정합니다.
- 이동 환경을 사용자 지정합니다.
스크롤 막대를 사용하여 애플리케이션 만들기
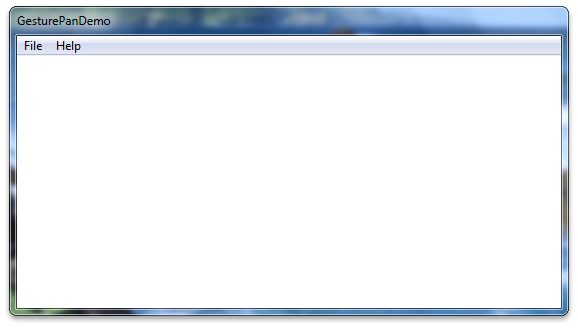
Microsoft Visual Studio 마법사를 사용하여 새 Win32 프로젝트를 시작합니다. 애플리케이션 유형이 Windows 애플리케이션으로 설정되어 있는지 확인합니다. ATL(활성 템플릿 라이브러리)에 대한 지원을 사용하도록 설정할 필요가 없습니다. 다음 이미지는 프로젝트를 시작한 후의 모양을 보여줍니다.
다음으로, 이미지에서 스크롤 막대를 사용하도록 설정합니다. CreateWindow 함수 호출이 스크롤 막대가 있는 창을 만들도록 InitInstance에서 창 만들기 코드를 변경합니다. 다음 코드에서는 이 작업을 수행하는 방법을 보여 줍니다.
   hWnd = CreateWindow(
      szWindowClass,
      szTitle,
      WS_OVERLAPPEDWINDOW | WS_VSCROLL,  // style
      200,                               // x
      200,                               // y
      550,                               // width
      300,                               // height
      NULL,
      NULL,
      hInstance,
      NULL
    );
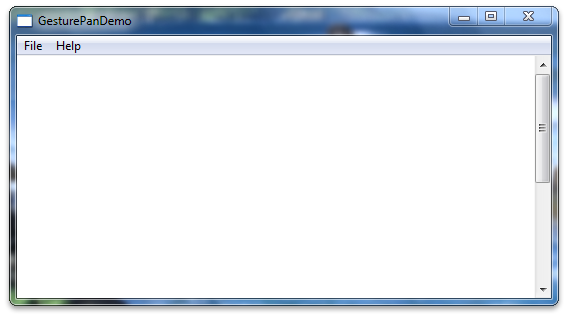
창 만들기 코드를 변경하면 애플리케이션에 스크롤 막대가 있습니다. 다음 이미지는 애플리케이션이 이 시점에서 어떻게 보이는지 보여줍니다.
창 만들기 코드를 변경한 후 애플리케이션에 스크롤 막대 개체를 추가하고 스크롤할 텍스트를 추가합니다. WndProc 메서드의 맨 위에 다음 코드를 배치합니다.
    TEXTMETRIC tm;
    SCROLLINFO si;

    // These variables are required to display text.
    static int xClient;     // width of client area
    static int yClient;     // height of client area
    static int xClientMax;  // maximum width of client area

    static int xChar;       // horizontal scrolling unit
    static int yChar;       // vertical scrolling unit
    static int xUpper;      // average width of uppercase letters

    static int xPos;        // current horizontal scrolling position
    static int yPos;        // current vertical scrolling position

    int i;                  // loop counter
    int x, y;               // horizontal and vertical coordinates

    int FirstLine;          // first line in the invalidated area
    int LastLine;           // last line in the invalidated area
    HRESULT hr;
    int abcLength = 0;  // length of an abc[] item

    int lines = 0;

    // Create an array of lines to display.
    static const int LINES=28;
    static LPCWSTR abc[] = {
       L"anteater",  L"bear",      L"cougar",
       L"dingo",     L"elephant",  L"falcon",
       L"gazelle",   L"hyena",     L"iguana",
       L"jackal",    L"kangaroo",  L"llama",
       L"moose",     L"newt",      L"octopus",
       L"penguin",   L"quail",     L"rat",
       L"squid",     L"tortoise",  L"urus",
       L"vole",      L"walrus",    L"xylophone",
       L"yak",       L"zebra",
       L"This line contains words, but no character. Go figure.",
       L""
     };
다음으로, 텍스트 메트릭에 대한 텍스트 계산을 구성하기 위한 애플리케이션 논리를 구현합니다. 다음 코드는 WndProc 함수의 기존 WM_CREATE 사례를 대체해야 합니다.
    case WM_CREATE :
        // Get the handle to the client area's device context.
        hdc = GetDC (hWnd);

        // Extract font dimensions from the text metrics.
        GetTextMetrics (hdc, &tm);
        xChar = tm.tmAveCharWidth;
        xUpper = (tm.tmPitchAndFamily & 1 ? 3 : 2) * xChar/2;
        yChar = tm.tmHeight + tm.tmExternalLeading;

        // Free the device context.
        ReleaseDC (hWnd, hdc);

        // Set an arbitrary maximum width for client area.
        // (xClientMax is the sum of the widths of 48 average
        // lowercase letters and 12 uppercase letters.)
        xClientMax = 48 * xChar + 12 * xUpper;

        return 0;
다음으로, 창 크기가 조정될 때 텍스트 블록의 다시 계산을 위한 애플리케이션 논리를 구현합니다. 다음 코드를 WndProc의 메시지 스위치에 배치해야 합니다.
    case WM_SIZE:

        // Retrieve the dimensions of the client area.
        yClient = HIWORD (lParam);
        xClient = LOWORD (lParam);

        // Set the vertical scrolling range and page size
        si.cbSize = sizeof(si);
        si.fMask  = SIF_RANGE | SIF_PAGE;
        si.nMin   = 0;
        si.nMax   = LINES - 1;
        si.nPage  = yClient / yChar;
        SetScrollInfo(hWnd, SB_VERT, &si, TRUE);

        // Set the horizontal scrolling range and page size.
        si.cbSize = sizeof(si);
        si.fMask  = SIF_RANGE | SIF_PAGE;
        si.nMin   = 0;
        si.nMax   = 2 + xClientMax / xChar;
        si.nPage  = xClient / xChar;
        SetScrollInfo(hWnd, SB_HORZ, &si, TRUE);
        return 0;
다음으로 세로 스크롤 메시지에 대한 애플리케이션 논리를 구현합니다. 다음 코드를 WndProc의 메시지 스위치에 배치해야 합니다.
        case WM_VSCROLL:
         // Get all the vertical scroll bar information
         si.cbSize = sizeof (si);
         si.fMask  = SIF_ALL;
         GetScrollInfo (hWnd, SB_VERT, &si);
         // Save the position for comparison later on
         yPos = si.nPos;
         switch (LOWORD (wParam))
         {
         // user clicked the HOME keyboard key
         case SB_TOP:
             si.nPos = si.nMin;
             break;

         // user clicked the END keyboard key
         case SB_BOTTOM:
             si.nPos = si.nMax;
             break;

         // user clicked the top arrow
         case SB_LINEUP:
             si.nPos -= 1;
             break;

         // user clicked the bottom arrow
         case SB_LINEDOWN:
             si.nPos += 1;
             break;

         // user clicked the scroll bar shaft above the scroll box
         case SB_PAGEUP:
             si.nPos -= si.nPage;
             break;

         // user clicked the scroll bar shaft below the scroll box
         case SB_PAGEDOWN:
             si.nPos += si.nPage;
             break;

         // user dragged the scroll box
         case SB_THUMBTRACK:
             si.nPos = si.nTrackPos;
             break;

         // user positioned the scroll box
         // This message is the one used by Windows Touch
         case SB_THUMBPOSITION:
             si.nPos = HIWORD(wParam);
             break;

         default:
              break;
         }
         // Set the position and then retrieve it.  Due to adjustments
         //   by Windows it may not be the same as the value set.
         si.fMask = SIF_POS;
         SetScrollInfo (hWnd, SB_VERT, &si, TRUE);
         GetScrollInfo (hWnd, SB_VERT, &si);
         // If the position has changed, scroll window and update it
         if (si.nPos != yPos)
         {
          ScrollWindow(hWnd, 0, yChar * (yPos - si.nPos), NULL, NULL);
          UpdateWindow (hWnd);
         }
         break;
다음으로, 창을 다시 그리도록 코드를 업데이트합니다. 다음 코드는 WndProc의 기본 WM_PAINT 대/소문자를 바꿔야 합니다.
    case WM_PAINT:
         // Prepare the window for painting
         hdc = BeginPaint (hWnd, &ps);
         // Get vertical scroll bar position
         si.cbSize = sizeof (si);
         si.fMask  = SIF_POS;
         GetScrollInfo (hWnd, SB_VERT, &si);
         yPos = si.nPos;
         // Get horizontal scroll bar position
         GetScrollInfo (hWnd, SB_HORZ, &si);
         xPos = si.nPos;
         // Find painting limits
         FirstLine = max (0, yPos + ps.rcPaint.top / yChar);
         LastLine = min (LINES - 1, yPos + ps.rcPaint.bottom / yChar);


         for (i = FirstLine; i <= LastLine; i++)
         {
              x = xChar * (1 - xPos);
              y = yChar * (i - yPos);

              // Note that "55" in the following depends on the
              // maximum size of an abc[] item.
              //
              abcLength = wcslen(abc[i]);
              hr = S_OK;
              if ((FAILED(hr)))
              {
                 MessageBox(hWnd, L"err", L"err", NULL);
              }else{
                  TextOut(hdc, x, y, abc[i], abcLength);
              }

         }
         // Indicate that painting is finished
         EndPaint (hWnd, &ps);
         return 0;
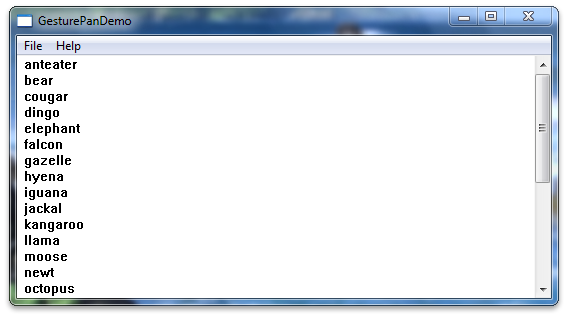
이제 애플리케이션을 빌드하고 실행할 때 상용구 텍스트와 세로 스크롤 막대가 있어야 합니다. 다음 이미지는 애플리케이션의 모양을 보여줍니다.
플릭 사용 안 함
애플리케이션의 이동 환경을 개선하려면 플릭을 해제해야 합니다. 이렇게 하려면 초기화될 때 hWnd 값에 창 속성을 설정합니다. 플릭에 사용되는 값은 tpcshrd.h 헤더에 저장되며, 이 헤더도 포함되어야 합니다. hWnd를 만든 후 다음 코드를 include 지시문 및 InitInstance 함수에 배치해야 합니다.
참고
이는 시간 또는 거리 임계값을 테스트하는 대신 터치 또는 펜 다운 이벤트에 대한 즉각적인 피드백이 필요한 애플리케이션에 유용합니다.
#include <tpcshrd.h>
[...]
BOOL InitInstance(HINSTANCE hInstance, int nCmdShow){
[...]
   const DWORD_PTR dwHwndTabletProperty =
    TABLET_DISABLE_PRESSANDHOLD | // disables press and hold (right-click) gesture
    TABLET_DISABLE_PENTAPFEEDBACK | // disables UI feedback on pen up (waves)
    TABLET_DISABLE_PENBARRELFEEDBACK | // disables UI feedback on pen button down (circle)
    TABLET_DISABLE_FLICKS; // disables pen flicks (back, forward, drag down, drag up)

   SetProp(hWnd, MICROSOFT_TABLETPENSERVICE_PROPERTY, reinterpret_cast<HANDLE>(dwHwndTabletProperty));
이동 환경 사용자 지정
기본적으로 Windows 7과 다른 이동 환경을 원할 수 있습니다. 이동 환경을 개선하려면 WM_GESTURE 메시지에 대한 처리기를 추가해야 합니다. 자세한 내용은 Single-Finger 이동 환경 개선을 참조하세요.
관련 항목
피드백
출시 예정: 2024년 내내 콘텐츠에 대한 피드백 메커니즘으로 GitHub 문제를 단계적으로 폐지하고 이를 새로운 피드백 시스템으로 바꿀 예정입니다. 자세한 내용은 다음을 참조하세요. https://aka.ms/ContentUserFeedback
다음에 대한 사용자 의견 제출 및 보기