Xamarin.iOS의 ARKit 2
ARKit은 지난해 iOS 11에 도입된 이후 상당히 성숙해졌습니다. 무엇보다도, 이제 수직 평면과 수평 평면을 감지하여 실내 증강 현실 환경의 실용성을 크게 향상시킬 수 있습니다. 또한 다음과 같은 새로운 기능이 있습니다.
- 참조 이미지 및 개체를 실제 이미지와 디지털 이미지 간의 접합으로 인식
- 실제 조명을 시뮬레이션하는 새로운 조명 모드
- AR 환경을 공유하고 유지하는 기능
- AR 콘텐츠를 저장하는 데 기본 설정되는 새 파일 형식
참조 개체 인식
ARKit 2의 한 가지 쇼케이스 기능은 참조 이미지 및 개체를 인식하는 기능입니다. 참조 이미지는 일반 이미지 파일에서 로드할 수 있지만(나중에 설명) 개발자 중심 ARObjectScanningConfiguration을 사용하여 참조 개체를 검색해야 합니다.
샘플 앱: 3D 개체 검색 및 검색
샘플은 다음을 보여 주는 Apple 프로젝트의 포트입니다.
- 개체를 사용한
NSNotification애플리케이션 상태 관리 - 사용자 지정 시각화
- 복잡한 제스처
- 개체 검사
- 저장 중
ARReferenceObject
참조 개체를 스캔하는 것은 배터리이며 프로세서를 많이 사용하며 오래된 디바이스는 안정적인 추적을 달성하는 데 문제가 있는 경우가 많습니다.
NSNotification 개체를 사용한 상태 관리
이 애플리케이션은 다음 상태 간에 전환되는 상태 컴퓨터를 사용합니다.
AppState.StartARSessionAppState.NotReadyAppState.ScanningAppState.Testing
또한 다음과 같은 경우에 포함된 상태 및 전환 집합을 사용합니다.AppState.Scanning
Scan.ScanState.ReadyScan.ScanState.DefineBoundingBoxScan.ScanState.ScanningScan.ScanState.AdjustingOrigin
앱은 상태 전환 알림을 게시하고 이러한 알림을 NSNotificationCenter 구독하는 사후 아키텍처를 사용합니다. 설정은 다음 코드 조각 ViewController.cs과 같습니다.
// Configure notifications for application state changes
var notificationCenter = NSNotificationCenter.DefaultCenter;

notificationCenter.AddObserver(Scan.ScanningStateChangedNotificationName, State.ScanningStateChanged);
notificationCenter.AddObserver(ScannedObject.GhostBoundingBoxCreatedNotificationName, State.GhostBoundingBoxWasCreated);
notificationCenter.AddObserver(ScannedObject.GhostBoundingBoxRemovedNotificationName, State.GhostBoundingBoxWasRemoved);
notificationCenter.AddObserver(ScannedObject.BoundingBoxCreatedNotificationName, State.BoundingBoxWasCreated);
notificationCenter.AddObserver(BoundingBox.ScanPercentageChangedNotificationName, ScanPercentageChanged);
notificationCenter.AddObserver(BoundingBox.ExtentChangedNotificationName, BoundingBoxExtentChanged);
notificationCenter.AddObserver(BoundingBox.PositionChangedNotificationName, BoundingBoxPositionChanged);
notificationCenter.AddObserver(ObjectOrigin.PositionChangedNotificationName, ObjectOriginPositionChanged);
notificationCenter.AddObserver(NSProcessInfo.PowerStateDidChangeNotification, DisplayWarningIfInLowPowerMode);
일반적인 알림 처리기는 UI를 업데이트하고 개체가 검사될 때 업데이트되는 이 처리기와 같은 애플리케이션 상태를 수정할 수 있습니다.
private void ScanPercentageChanged(NSNotification notification)
{
    var pctNum = TryGet<NSNumber>(notification.UserInfo, BoundingBox.ScanPercentageUserKey);
    if (pctNum == null)
    {
        return;
    }
    double percentage = pctNum.DoubleValue;
    // Switch to the next state if scan is complete
    if (percentage >= 100.0)
    {
        State.SwitchToNextState();
    }
    else
    {
        DispatchQueue.MainQueue.DispatchAsync(() => navigationBarController.SetNavigationBarTitle($"Scan ({percentage})"));
    }
}
마지막으로 메서드는 Enter{State} 모델 및 UX를 새 상태에 맞게 수정합니다.
internal void EnterStateTesting()
{
    navigationBarController.SetNavigationBarTitle("Testing");
    navigationBarController.ShowBackButton(false);
    loadModelButton.Hidden = true;
    flashlightButton.Hidden = false;
    nextButton.Enabled = true;
    nextButton.SetTitle("Share", UIControlState.Normal);

    testRun = new TestRun(sessionInfo, sceneView);
    TestObjectDetection();
    CancelMaxScanTimeTimer();
}
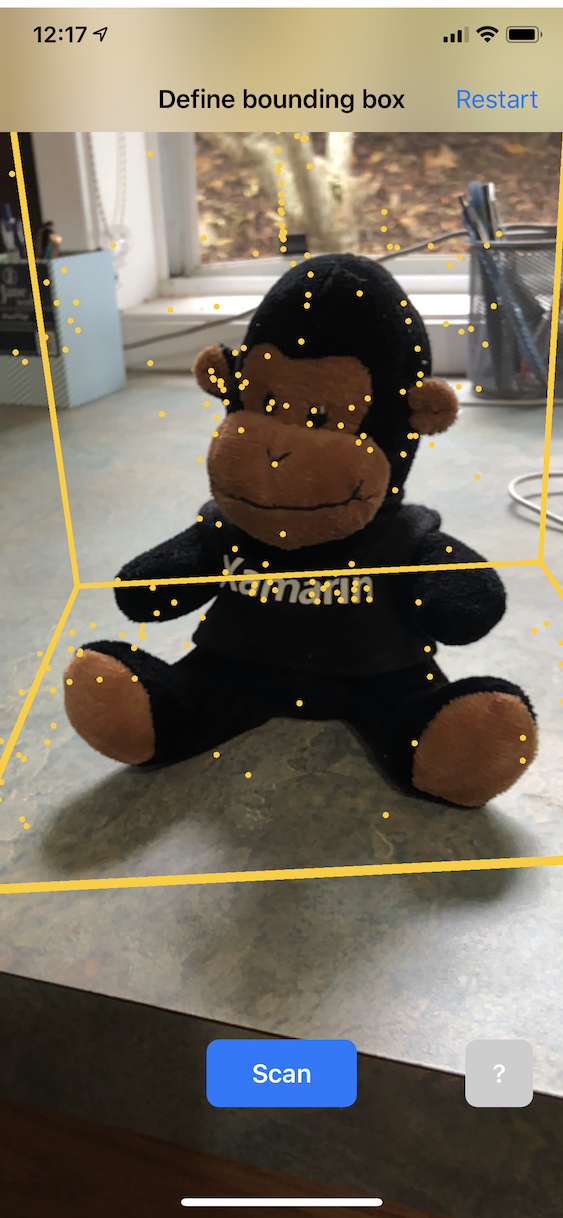
사용자 지정 시각화
앱은 검색된 가로 평면에 프로젝션된 경계 상자 내에 포함된 개체의 하위 수준 "지점 구름"을 보여줍니다.
이 지점 클라우드는 속성의 ARFrame.RawFeaturePoints 개발자가 사용할 수 있습니다. 지점 클라우드를 효율적으로 시각화하는 것은 까다로운 문제가 될 수 있습니다. 점을 반복한 다음 각 지점에 대해 새 SceneKit 노드를 만들고 배치하면 프레임 속도가 종료됩니다. 또는 비동기적으로 수행하면 지연이 있을 수 있습니다. 샘플은 세 부분으로 구성된 전략으로 성능을 기본.
- 안전하지 않은 코드를 사용하여 데이터를 제자리에 고정하고 데이터를 원시 바이트 버퍼로 해석합니다.
- 해당 원시 버퍼를
SCNGeometrySource"템플릿"SCNGeometryElement개체로 변환하고 만듭니다. - 를 사용하여 원시 데이터와 템플릿을 신속하게 "결합"합니다.
SCNGeometry.Create(SCNGeometrySource[], SCNGeometryElement[])
internal static SCNGeometry CreateVisualization(NVector3[] points, UIColor color, float size)
{
  if (points.Length == 0)
  {
    return null;
  }

  unsafe
  {
    var stride = sizeof(float) * 3;

    // Pin the data down so that it doesn't move
    fixed (NVector3* pPoints = &points[0])
    {
      // Important: Don't unpin until after `SCNGeometry.Create`, because geometry creation is lazy

      // Grab a pointer to the data and treat it as a byte buffer of the appropriate length
      var intPtr = new IntPtr(pPoints);
      var pointData = NSData.FromBytes(intPtr, (System.nuint) (stride * points.Length));

      // Create a geometry source (factory) configured properly for the data (3 vertices)
      var source = SCNGeometrySource.FromData(
        pointData,
        SCNGeometrySourceSemantics.Vertex,
        points.Length,
        true,
        3,
        sizeof(float),
        0,
        stride
      );

      // Create geometry element
      // The null and bytesPerElement = 0 look odd, but this is just a template object
      var template = SCNGeometryElement.FromData(null, SCNGeometryPrimitiveType.Point, points.Length, 0);
      template.PointSize = 0.001F;
      template.MinimumPointScreenSpaceRadius = size;
      template.MaximumPointScreenSpaceRadius = size;

      // Stitch the data (source) together with the template to create the new object
      var pointsGeometry = SCNGeometry.Create(new[] { source }, new[] { template });
      pointsGeometry.Materials = new[] { Utilities.Material(color) };
      return pointsGeometry;
    }
  }
}
결과는 다음과 같습니다.
복잡한 제스처
사용자는 대상 개체를 둘러싸는 경계 상자를 크기 조정, 회전 및 끌 수 있습니다. 연결된 제스처 인식기에서 흥미로운 두 가지 사항이 있습니다.
첫째, 모든 제스처 인식기는 임계값을 통과한 후에만 활성화됩니다. 예를 들어 손가락이 너무 많은 픽셀을 끌거나 회전이 각도를 초과합니다. 이 기술은 임계값을 초과할 때까지 이동을 누적한 다음 증분 방식으로 적용하는 것입니다.
// A custom rotation gesture recognizer that fires only when a threshold is passed
internal partial class ThresholdRotationGestureRecognizer : UIRotationGestureRecognizer
{
    // The threshold after which this gesture is detected.
    const double threshold = Math.PI / 15; // (12°)

    // Indicates whether the currently active gesture has exceeded the threshold
    private bool thresholdExceeded = false;

    private double previousRotation = 0;
    internal double RotationDelta { get; private set; }

    internal ThresholdRotationGestureRecognizer(IntPtr handle) : base(handle)
    {
    }

    // Observe when the gesture's state changes to reset the threshold
    public override UIGestureRecognizerState State
    {
        get => base.State;
        set
        {
            base.State = value;

            switch(value)
            {
                case UIGestureRecognizerState.Began :
                case UIGestureRecognizerState.Changed :
                    break;
                default :
                    // Reset threshold check
                    thresholdExceeded = false;
                    previousRotation = 0;
                    RotationDelta = 0;
                    break;
            }
        }
    }

    public override void TouchesMoved(NSSet touches, UIEvent evt)
    {
        base.TouchesMoved(touches, evt);

        if (thresholdExceeded)
        {
            RotationDelta = Rotation - previousRotation;
            previousRotation = Rotation;
        }

        if (! thresholdExceeded && Math.Abs(Rotation) > threshold)
        {
            thresholdExceeded = true;
            previousRotation = Rotation;
        }
    }
}
제스처와 관련하여 수행되는 두 번째 흥미로운 작업은 검색된 실제 평면과 관련하여 경계 상자를 이동하는 방법입니다. 이 측면은 이 Xamarin 블로그 게시물에서 설명합니다.
ARKit 2의 다른 새로운 기능
추가 추적 구성
이제 혼합 현실 환경의 기준으로 다음 중 어느 것을 사용할 수 있습니다.
- 디바이스 가속도계만(
AROrientationTrackingConfigurationiOS 11) - 얼굴(
ARFaceTrackingConfiguration, iOS 11) - 참조 이미지(
ARImageTrackingConfigurationiOS 12) - 3D 개체 검사(
ARObjectScanningConfigurationiOS 12) - 시각적 관성 오도메트(
ARWorldTrackingConfigurationiOS 12에서 개선됨)
AROrientationTrackingConfiguration이 블로그 게시물 및 F# 샘플에서 설명하는 이 샘플은 가장 제한적이며 디바이스와 화면을 실제 세계에 연결하지 않고도 디바이스의 동작과 관련하여 디지털 개체만 배치하므로 혼합 현실 환경이 좋지 않습니다.
이를 ARImageTrackingConfiguration 통해 실제 2D 이미지(그림, 로고 등)를 인식하고 이를 사용하여 디지털 이미지를 고정할 수 있습니다.
var imagesAndWidths = new[] {
    ("cover1.jpg", 0.185F),
    ("cover2.jpg", 0.185F),
     //...etc...
    ("cover100.jpg", 0.185F),
};

var referenceImages = new NSSet<ARReferenceImage>(
    imagesAndWidths.Select( imageAndWidth =>
    {
      // Tuples cannot be destructured in lambda arguments
        var (image, width) = imageAndWidth;
        // Read the image
        var img = UIImage.FromFile(image).CGImage;
        return new ARReferenceImage(img, ImageIO.CGImagePropertyOrientation.Up, width);
    }).ToArray());

configuration.TrackingImages = referenceImages;
이 구성에는 다음과 같은 두 가지 흥미로운 측면이 있습니다.
- 효율적이며 잠재적으로 많은 수의 참조 이미지와 함께 사용할 수 있습니다.
- 디지털 이미지는 해당 이미지가 실제 세계에서 이동하더라도 이미지에 고정됩니다(예: 책의 표지가 인식되는 경우, 책이 선반에서 꺼내고, 놓이는 등).
앞에서 ARObjectScanningConfiguration 설명한 것이며 3D 개체를 검사하기 위한 개발자 중심 구성입니다. 프로세서 및 배터리 집약적이므로 최종 사용자 애플리케이션에서 사용하면 안 됩니다.
최종 추적 구성 ARWorldTrackingConfiguration 은 대부분의 혼합 현실 환경의 주력 요소입니다. 이 구성은 "시각적 관성 오도 분석"을 사용하여 실제 "기능 지점"을 디지털 이미지와 연결합니다. 디지털 기하 도형 또는 스프라이트는 실제 가로 및 세로 평면을 기준으로 고정되거나 감지된 ARReferenceObject 인스턴스를 기준으로 고정됩니다. 이 구성에서 세계 원점은 Z축이 중력에 맞춰진 공간에서 카메라의 원래 위치이며, 디지털 개체는 실제 세계의 개체를 기준으로 "제자리에 유지"됩니다.
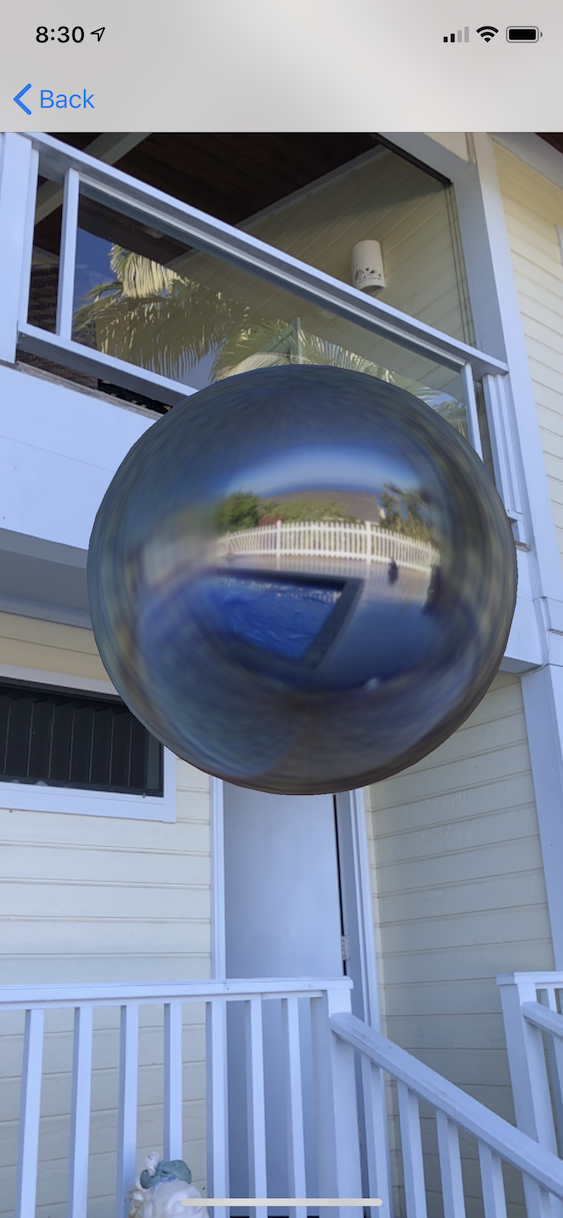
환경 텍스처링
ARKit 2는 캡처된 이미지를 사용하여 조명을 추정하고 빛나는 개체에 반사 하이라이트를 적용하는 "환경 텍스처링"을 지원합니다. 환경 큐브맵은 동적으로 구축되며, 카메라가 모든 방향으로 보이면 인상적으로 현실적인 경험을 생성할 수 있습니다.
환경 텍스처링을 사용하려면 다음을 수행합니다.
SCNMaterial개체는 0에서 1Metalness.ContentsRoughness.Contents까지의 값을 사용하고SCNLightingModel.PhysicallyBased할당해야 합니다.- 추적 구성은 다음을 설정
EnvironmentTexturing=AREnvironmentTexturing.Automatic해야 합니다.
var sphere = SCNSphere.Create(0.33F);
sphere.FirstMaterial.LightingModelName = SCNLightingModel.PhysicallyBased;
// Shiny metallic sphere
sphere.FirstMaterial.Metalness.Contents = new NSNumber(1.0F);
sphere.FirstMaterial.Roughness.Contents = new NSNumber(0.0F);

// Session configuration:
var configuration = new ARWorldTrackingConfiguration
{
    PlaneDetection = ARPlaneDetection.Horizontal | ARPlaneDetection.Vertical,
    LightEstimationEnabled = true,
    EnvironmentTexturing = AREnvironmentTexturing.Automatic
};
앞의 코드 조각에 표시된 완벽한 반사 텍스처는 샘플에서 재미있지만 환경 텍스처는 "기괴한 계곡" 응답을 트리거하지 않도록 구속과 함께 더 잘 사용될 수 있습니다(질감은 카메라가 기록한 내용에 따라 추정치에 불과합니다).
공유 및 영구 AR 환경
ARKit 2에 추가된 또 다른 주요 항목은 ARWorldMap 세계 추적 데이터를 공유하거나 저장할 수 있는 클래스입니다. 다음을 사용하여 현재 세계 지도를 가져옵니다.ARSession.GetCurrentWorldMapAsyncGetCurrentWorldMap(Action<ARWorldMap,NSError>)
// Local storage
var PersistentWorldPath => Environment.GetFolderPath(Environment.SpecialFolder.Personal) + "/arworldmap";

// Later, after scanning the environment thoroughly...
var worldMap = await Session.GetCurrentWorldMapAsync();
if (worldMap != null)
{
    var data = NSKeyedArchiver.ArchivedDataWithRootObject(worldMap, true, out var err);
    if (err != null)
    {
        Console.WriteLine(err);
    }
    File.WriteAllBytes(PersistentWorldPath, data.ToArray());
}
세계 지도를 공유하거나 복원하려면 다음을 수행합니다.
- 파일에서 데이터를 로드합니다.
- 개체에 무정부 상태
ARWorldMap - 속성의 값
ARWorldTrackingConfiguration.InitialWorldMap으로 사용합니다.
var data = NSData.FromArray(File.ReadAllBytes(PersistentWorldController.PersistenWorldPath));
var worldMap = (ARWorldMap)NSKeyedUnarchiver.GetUnarchivedObject(typeof(ARWorldMap), data, out var err);

var configuration = new ARWorldTrackingConfiguration
{
    PlaneDetection = ARPlaneDetection.Horizontal | ARPlaneDetection.Vertical,
    LightEstimationEnabled = true,
    EnvironmentTexturing = AREnvironmentTexturing.Automatic,
    InitialWorldMap = worldMap
};
ARWorldMap 볼 수 없는 세계 추적 데이터와 개체만 ARAnchor 포함되며 디지털 자산은 포함되지 않습니다. 기하 도형 또는 이미지를 공유하려면 기하 도형의 위치와 방향만 저장/전송하고 정적 SCNGeometry 개체에 적용하거나 직렬화된 개체를 저장/전송하여 사용 사례에 적합한 고유한 전략을 개발해야 합니다. ARWorldMap 공유를 기준으로 ARAnchor배치된 자산이 디바이스 또는 세션 간에 일관되게 표시된다는 장점이 있습니다.
유니버설 장면 설명 파일 형식
ARKit 2의 최종 헤드 라인 기능은 픽사의 유니버설 장면 설명 파일 형식의 애플의 채택이다. 이 형식은 ARKit 자산을 공유하고 저장하기 위한 기본 형식으로 Collada의 DAE 형식을 대체합니다. 자산 시각화에 대한 지원은 iOS 12 및 Mojave에 기본 제공되어 있습니다. USDZ 파일 확장명은 USD 파일을 포함하는 압축되지 않은 암호화되지 않은 zip 보관 파일입니다. Pixar 는 USD 파일 작업을 위한 도구를 제공하지만 타사 지원은 아직 많지 않습니다.
ARKit 프로그래밍 팁
수동 리소스 관리
ARKit에서는 리소스를 수동으로 관리하는 것이 중요합니다. 이렇게 하면 프레임 속도가 높을 뿐만 아니라 실제로 혼란스러운 "화면 고정"을 피할 필요가 있습니다. ARKit 프레임워크는 새 카메라 프레임()ARSession.CurrentFrame을 제공하는 것에 대해 지연됩니다. 현재 ARFrame 가 호출될 Dispose() 때까지 ARKit는 새 프레임을 제공하지 않습니다! 이렇게 하면 앱의 나머지 부분의 응답이 있더라도 비디오가 "동결"됩니다. 솔루션은 항상 블록을 사용하여 using 액세스 ARSession.CurrentFrame 하거나 수동으로 호출 Dispose() 하는 것입니다.
파생된 NSObject 모든 개체는 IDisposable Dispose 패턴을 구현하므로 NSObject 일반적으로 파생 클래스에서 구현하기 Dispose 위해 이 패턴을 따라야 합니다.
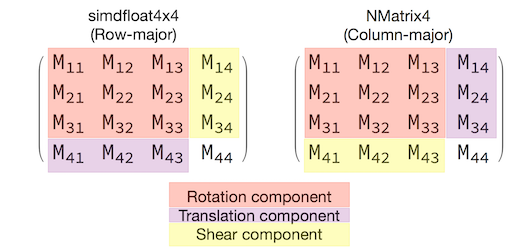
변환 행렬 조작
모든 3D 애플리케이션에서는 3D 공간을 통해 개체를 이동, 회전 및 전단하는 방법을 간략하게 설명하는 4x4 변환 매트릭스를 처리합니다. SceneKit에서 이러한 개체는 개체입니다 SCNMatrix4 .
이 속성은 SCNNode.Transform 행 주 simdfloat4x4 형식에서SCNNode 지원되는 변환 행렬을 반환 SCNMatrix4 합니다. 예를 들어 다음과 같습니다.
var node = new SCNNode { Position = new SCNVector3(2, 3, 4) };
var xform = node.Transform;
Console.WriteLine(xform);
// Output is: "(1, 0, 0, 0)\n(0, 1, 0, 0)\n(0, 0, 1, 0)\n(2, 3, 4, 1)"
여기서 볼 수 있듯이 위치는 맨 아래 행의 처음 세 요소에 인코딩됩니다.
Xamarin에서 변환 행렬을 조작하기 위한 일반적인 형식은 규칙에 따라 열 중심 방식으로 해석되는 형식입니다 NVector4. 즉, M14, M24, M34, M41, M42, M43이 아닌 변환/위치 구성 요소가 필요합니다.
행렬 해석의 선택과 일치하는 것은 적절한 동작에 매우 중요합니다. 3D 변환 행렬은 4x4이므로 일관성 실수는 컴파일 시간 또는 런타임 예외를 생성하지 않습니다. 즉, 작업이 예기치 않게 작동합니다. SceneKit/ARKit 개체가 정지되거나 날아가거나 지터가 있는 것 같으면 잘못된 변환 매트릭스가 적합합니다. 솔루션은 간단합니다 NMatrix4.Transpose . 요소의 현재 위치 변환을 수행합니다.