Xamarin.Mac의 컬렉션 뷰
이 문서에서는 Xamarin.Mac 앱에서 컬렉션 뷰를 사용하는 작업을 설명합니다. Xcode 및 Interface Builder에서 컬렉션 뷰를 만들고 기본 프로그래밍 방식으로 작업하는 방법에 대해 설명합니다.
Xamarin.Mac 앱에서 C# 및 .NET으로 작업할 때 개발자는 개발자가 작업하는 개발자와 Xcode에서 수행하는 것과 동일한 AppKit 컬렉션 뷰 컨트롤에 Objective-C 액세스할 수 있습니다. Xamarin.Mac은 Xcode와 직접 통합되므로 개발자는 Xcode의 인터페이스 작성기를 사용하여 컬렉션 뷰를 만들고 기본.
A NSCollectionView 는 을 사용하여 구성된 하위 보기의 그리드를 NSCollectionViewLayout표시합니다. 표의 각 하위 보기는 파일에서 보기의 콘텐츠 로드를 관리하는 하위 뷰로 .xib 표시됩니다NSCollectionViewItem.

이 문서에서는 Xamarin.Mac 앱에서 컬렉션 뷰를 사용하는 기본 사항을 설명합니다. 이 문서 전체에서 사용되는 주요 개념과 기술을 다루기 때문에 Hello, Mac 문서, 특히 Xcode 및 인터페이스 작성기 및 콘센트 및 작업 소개 섹션을 통해 작업하는 것이 좋습니다.
Xamarin.Mac Internals 문서의 섹션에 Objective-C 대한 C# 클래스/메서드 노출을 살펴보고, Register C# 클래스 Objective-C 를 개체 및 UI 요소에 연결하는 데 사용되는 명령과 Export 설명합니다.
컬렉션 뷰 정보
컬렉션 뷰()의 기본 목표는 컬렉션 뷰 레이아웃(NSCollectionView)을 사용하여 개체 그룹을 시각적으로 정렬하고 각 개별 개체(NSCollectionViewLayoutNSCollectionViewItem)가 더 큰 컬렉션에서 자체 보기를 가져오는 것입니다. 컬렉션 뷰는 데이터 바인딩 및 키-값 코딩 기술을 통해 작동하므로 이 문서를 계속 진행하기 전에 데이터 바인딩 및 키-값 코딩 설명서를 읽어야 합니다.
컬렉션 뷰에는 표준 기본 제공 컬렉션 뷰 항목(예: 개요 또는 테이블 뷰)이 없으므로 개발자는 이미지 필드, 텍스트 필드, 레이블 등과 같은 다른 AppKit 컨트롤을 사용하여 프로토타입 뷰를 디자인하고 구현할 책임이 있습니다. 이 프로토타입 뷰는 컬렉션 뷰에서 관리되는 각 항목을 표시하고 작업하는 데 사용되며 파일에 저장 .xib 됩니다.
개발자는 컬렉션 뷰 항목의 모양과 느낌을 담당하므로 컬렉션 뷰는 그리드에서 선택한 항목을 강조 표시하는 데 기본적으로 지원되지 않습니다. 이 기능 구현은 이 문서에서 다룹니다.
데이터 모델 정의
인터페이스 작성기에서 컬렉션 뷰를 데이터 바인딩하기 전에 바인딩의 데이터 모델 역할을 하려면 Xamarin.Mac 앱에서 KVC(키-값 코딩)/KVO(키-값 관찰) 규격 클래스를 정의해야 합니다. 데이터 모델은 컬렉션에 표시될 모든 데이터를 제공하고 애플리케이션을 실행하는 동안 사용자가 UI에서 수행하는 데이터를 수정합니다.
직원 그룹을 관리하는 앱의 예를 들어 다음 클래스를 사용하여 데이터 모델을 정의할 수 있습니다.
using System;
using Foundation;
using AppKit;

namespace MacDatabinding
{
    [Register("PersonModel")]
    public class PersonModel : NSObject
    {
        #region Private Variables
        private string _name = "";
        private string _occupation = "";
        private bool _isManager = false;
        private NSMutableArray _people = new NSMutableArray();
        #endregion

        #region Computed Properties
        [Export("Name")]
        public string Name {
            get { return _name; }
            set {
                WillChangeValue ("Name");
                _name = value;
                DidChangeValue ("Name");
            }
        }

        [Export("Occupation")]
        public string Occupation {
            get { return _occupation; }
            set {
                WillChangeValue ("Occupation");
                _occupation = value;
                DidChangeValue ("Occupation");
            }
        }

        [Export("isManager")]
        public bool isManager {
            get { return _isManager; }
            set {
                WillChangeValue ("isManager");
                WillChangeValue ("Icon");
                _isManager = value;
                DidChangeValue ("isManager");
                DidChangeValue ("Icon");
            }
        }

        [Export("isEmployee")]
        public bool isEmployee {
            get { return (NumberOfEmployees == 0); }
        }

        [Export("Icon")]
        public NSImage Icon
        {
            get
            {
                if (isManager)
                {
                    return NSImage.ImageNamed("IconGroup");
                }
                else
                {
                    return NSImage.ImageNamed("IconUser");
                }
            }
        }

        [Export("personModelArray")]
        public NSArray People {
            get { return _people; }
        }

        [Export("NumberOfEmployees")]
        public nint NumberOfEmployees {
            get { return (nint)_people.Count; }
        }
        #endregion

        #region Constructors
        public PersonModel ()
        {
        }

        public PersonModel (string name, string occupation)
        {
            // Initialize
            this.Name = name;
            this.Occupation = occupation;
        }

        public PersonModel (string name, string occupation, bool manager)
        {
            // Initialize
            this.Name = name;
            this.Occupation = occupation;
            this.isManager = manager;
        }
        #endregion

        #region Array Controller Methods
        [Export("addObject:")]
        public void AddPerson(PersonModel person) {
            WillChangeValue ("personModelArray");
            isManager = true;
            _people.Add (person);
            DidChangeValue ("personModelArray");
        }

        [Export("insertObject:inPersonModelArrayAtIndex:")]
        public void InsertPerson(PersonModel person, nint index) {
            WillChangeValue ("personModelArray");
            _people.Insert (person, index);
            DidChangeValue ("personModelArray");
        }

        [Export("removeObjectFromPersonModelArrayAtIndex:")]
        public void RemovePerson(nint index) {
            WillChangeValue ("personModelArray");
            _people.RemoveObject (index);
            DidChangeValue ("personModelArray");
        }

        [Export("setPersonModelArray:")]
        public void SetPeople(NSMutableArray array) {
            WillChangeValue ("personModelArray");
            _people = array;
            DidChangeValue ("personModelArray");
        }
        #endregion
    }
}
데이터 모델은 이 PersonModel 문서의 나머지 부분 전체에서 사용됩니다.
컬렉션 뷰 작업
컬렉션 뷰를 사용한 데이터 바인딩은 컬렉션에 대한 데이터를 제공하는 데 사용되는 것처럼 NSCollectionViewDataSource 테이블 뷰를 사용한 바인딩과 매우 비슷합니다. 컬렉션 보기에는 미리 설정된 표시 형식이 없으므로 사용자 상호 작용 피드백을 제공하고 사용자 선택을 추적하기 위해 더 많은 작업이 필요합니다.
셀 프로토타입 만들기
컬렉션 뷰에는 기본 셀 프로토타입이 포함되지 않으므로 개발자는 Xamarin.Mac 앱에 하나 이상의 .xib 파일을 추가하여 개별 셀의 레이아웃과 콘텐츠를 정의해야 합니다.
다음을 수행합니다.
솔루션 탐색기 프로젝트 이름을 마우스 오른쪽 단추로 클릭하고 새 파일 추가>...를 선택합니다.
Mac>보기 컨트롤러를 선택하고 이름을 지정하고(예:
EmployeeItem이 예제에서) 새로 만들기 단추를 클릭하여 만듭니다.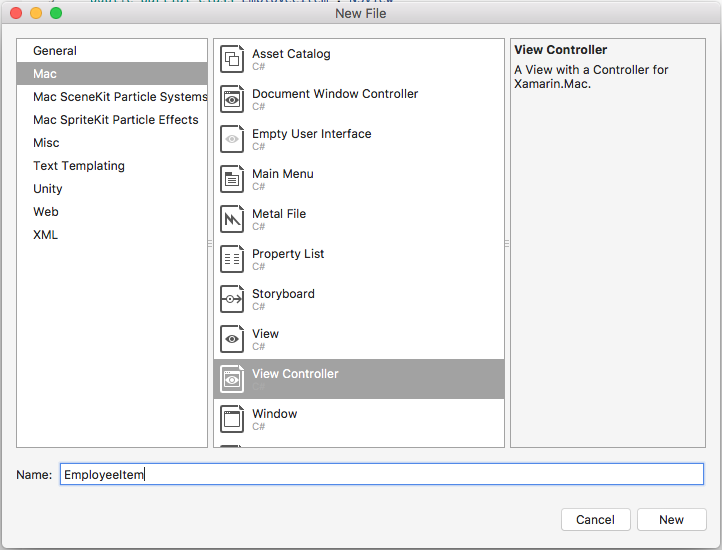
그러면 프로젝트의 솔루션에
EmployeeItem.csEmployeeItemController.csEmployeeItemController.xib및 파일이 추가됩니다.파일을 두 번 클릭하여
EmployeeItemController.xibXcode의 인터페이스 작성기에서 편집할 수 있도록 엽니다.보기에
NSBox두NSImageView개의NSLabel컨트롤을 추가하고 다음과 같이 배치합니다.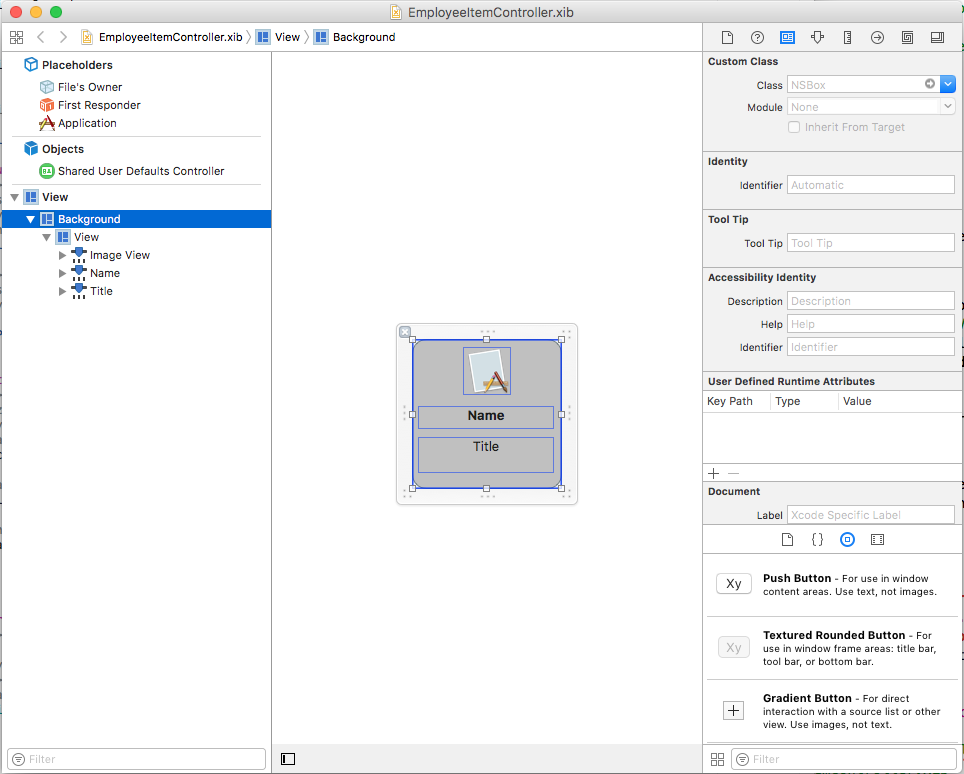
보조 편집기를 열고 셀의 선택 상태를 나타내는 데 사용할 수 있도록 아웃렛
NSBox을 만듭니 다.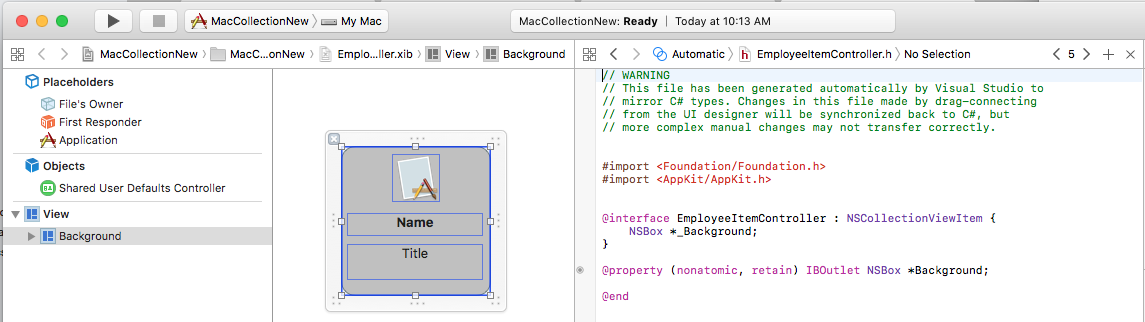
표준 편집기로 돌아가서 이미지 보기를 선택합니다.
바인딩 검사기에서 파일의 소유자에 바인딩을>선택하고 다음의 모델 키 경로를
self.Person.Icon입력합니다.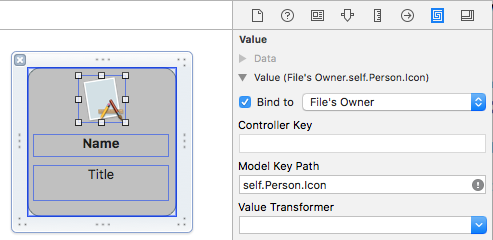
첫 번째 레이블을 선택하고 바인딩 검사기에서 파일 소유자에>바인딩을 선택하고 다음의 모델 키 경로를
self.Person.Name입력합니다.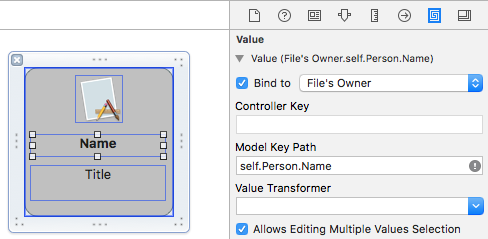
두 번째 레이블을 선택하고 바인딩 검사기에서 파일 소유자에>바인딩을 선택하고 다음의 모델 키 경로를
self.Person.Occupation입력합니다.
변경 내용을
.xib파일에 저장하고 Visual Studio로 돌아가 변경 내용을 동기화합니다.
EmployeeItemController.cs 파일을 편집하고 다음과 같이 표시합니다.
using System;
using System.Collections.Generic;
using System.Linq;
using Foundation;
using AppKit;

namespace MacCollectionNew
{
    /// <summary>
    /// The Employee item controller handles the display of the individual items that will
    /// be displayed in the collection view as defined in the associated .XIB file.
    /// </summary>
    public partial class EmployeeItemController : NSCollectionViewItem
    {
        #region Private Variables
        /// <summary>
        /// The person that will be displayed.
        /// </summary>
        private PersonModel _person;
        #endregion

        #region Computed Properties
        // strongly typed view accessor
        public new EmployeeItem View
        {
            get
            {
                return (EmployeeItem)base.View;
            }
        }

        /// <summary>
        /// Gets or sets the person.
        /// </summary>
        /// <value>The person that this item belongs to.</value>
        [Export("Person")]
        public PersonModel Person
        {
            get { return _person; }
            set
            {
                WillChangeValue("Person");
                _person = value;
                DidChangeValue("Person");
            }
        }

        /// <summary>
        /// Gets or sets the color of the background for the item.
        /// </summary>
        /// <value>The color of the background.</value>
        public NSColor BackgroundColor {
            get { return Background.FillColor; }
            set { Background.FillColor = value; }
        }

        /// <summary>
        /// Gets or sets a value indicating whether this <see cref="T:MacCollectionNew.EmployeeItemController"/> is selected.
        /// </summary>
        /// <value><c>true</c> if selected; otherwise, <c>false</c>.</value>
        /// <remarks>This also changes the background color based on the selected state
        /// of the item.</remarks>
        public override bool Selected
        {
            get
            {
                return base.Selected;
            }
            set
            {
                base.Selected = value;

                // Set background color based on the selection state
                if (value) {
                    BackgroundColor = NSColor.DarkGray;
                } else {
                    BackgroundColor = NSColor.LightGray;
                }
            }
        }
        #endregion

        #region Constructors
        // Called when created from unmanaged code
        public EmployeeItemController(IntPtr handle) : base(handle)
        {
            Initialize();
        }

        // Called when created directly from a XIB file
        [Export("initWithCoder:")]
        public EmployeeItemController(NSCoder coder) : base(coder)
        {
            Initialize();
        }

        // Call to load from the XIB/NIB file
        public EmployeeItemController() : base("EmployeeItem", NSBundle.MainBundle)
        {
            Initialize();
        }

        // Added to support loading from XIB/NIB
        public EmployeeItemController(string nibName, NSBundle nibBundle) : base(nibName, nibBundle) {

            Initialize();
        }

        // Shared initialization code
        void Initialize()
        {
        }
        #endregion
    }
}
이 코드를 자세히 살펴보면 컬렉션 뷰 셀의 프로토타입 역할을 할 수 있도록 클래스가 NSCollectionViewItem 상속됩니다. 이 속성은 Person Xcode의 이미지 뷰 및 레이블에 데이터를 바인딩하는 데 사용된 클래스를 노출합니다. 위에서 만든 인스턴스 PersonModel 입니다.
이 BackgroundColor 속성은 셀의 NSBoxFillColor 선택 상태 표시하는 데 사용할 컨트롤의 바로 가기입니다. 다음 코드는 해당 속성을 재정의NSCollectionViewItem하여 Selected 이 선택 상태를 설정하거나 지웁니다.
public override bool Selected
{
    get
    {
        return base.Selected;
    }
    set
    {
        base.Selected = value;

        // Set background color based on the selection state
        if (value) {
            BackgroundColor = NSColor.DarkGray;
        } else {
            BackgroundColor = NSColor.LightGray;
        }
    }
}
컬렉션 뷰 데이터 원본 만들기
컬렉션 뷰 데이터 원본(NSCollectionViewDataSource)은 컬렉션 뷰에 대한 모든 데이터를 제공하고 컬렉션의 각 항목에 필요한 대로 컬렉션 뷰 셀(프로토타입 사용 .xib )을 만들고 채웁니다.
프로젝트에 새 클래스를 추가하고, 호출 CollectionViewDataSource 하고, 다음과 같이 만듭니다.
using System;
using System.Collections.Generic;
using AppKit;
using Foundation;

namespace MacCollectionNew
{
    /// <summary>
    /// Collection view data source provides the data for the collection view.
    /// </summary>
    public class CollectionViewDataSource : NSCollectionViewDataSource
    {
        #region Computed Properties
        /// <summary>
        /// Gets or sets the parent collection view.
        /// </summary>
        /// <value>The parent collection view.</value>
        public NSCollectionView ParentCollectionView { get; set; }

        /// <summary>
        /// Gets or sets the data that will be displayed in the collection.
        /// </summary>
        /// <value>A collection of PersonModel objects.</value>
        public List<PersonModel> Data { get; set; } = new List<PersonModel>();
        #endregion

        #region Constructors
        /// <summary>
        /// Initializes a new instance of the <see cref="T:MacCollectionNew.CollectionViewDataSource"/> class.
        /// </summary>
        /// <param name="parent">The parent collection that this datasource will provide data for.</param>
        public CollectionViewDataSource(NSCollectionView parent)
        {
            // Initialize
            ParentCollectionView = parent;

            // Attach to collection view
            parent.DataSource = this;

        }
        #endregion

        #region Override Methods
        /// <summary>
        /// Gets the number of sections.
        /// </summary>
        /// <returns>The number of sections.</returns>
        /// <param name="collectionView">The parent Collection view.</param>
        public override nint GetNumberOfSections(NSCollectionView collectionView)
        {
            // There is only one section in this view
            return 1;
        }

        /// <summary>
        /// Gets the number of items in the given section.
        /// </summary>
        /// <returns>The number of items.</returns>
        /// <param name="collectionView">The parent Collection view.</param>
        /// <param name="section">The Section number to count items for.</param>
        public override nint GetNumberofItems(NSCollectionView collectionView, nint section)
        {
            // Return the number of items
            return Data.Count;
        }

        /// <summary>
        /// Gets the item for the give section and item index.
        /// </summary>
        /// <returns>The item.</returns>
        /// <param name="collectionView">The parent Collection view.</param>
        /// <param name="indexPath">Index path specifying the section and index.</param>
        public override NSCollectionViewItem GetItem(NSCollectionView collectionView, NSIndexPath indexPath)
        {
            var item = collectionView.MakeItem("EmployeeCell", indexPath) as EmployeeItemController;
            item.Person = Data[(int)indexPath.Item];

            return item;
        }
        #endregion
    }
}
이 코드를 자세히 살펴보면 클래스는 해당 Data 속성을 통해 인스턴스 목록을 PersonModel 상속 NSCollectionViewDataSource 하고 노출합니다.
이 컬렉션에는 섹션이 하나만 있으므로 코드는 메서드를 재정의 GetNumberOfSections 하고 항상 반환합니다 1. 또한 메서드는 GetNumberofItems 속성 목록의 항목 Data 수를 반환할 때 재정의됩니다.
메서드 GetItem 는 새 셀이 필요할 때마다 호출되며 다음과 같습니다.
public override NSCollectionViewItem GetItem(NSCollectionView collectionView, NSIndexPath indexPath)
{
    var item = collectionView.MakeItem("EmployeeCell", indexPath) as EmployeeItemController;
    item.Person = Data[(int)indexPath.Item];

    return item;
}
컬렉션 뷰의 메서드는 MakeItem 다시 사용할 수 있는 인스턴스 EmployeeItemController 를 만들거나 반환하기 위해 호출되며 해당 Person 속성은 요청된 셀에 표시되는 항목으로 설정됩니다.
다음 EmployeeItemController 코드를 사용하여 컬렉션 뷰 컨트롤러에 미리 등록해야 합니다.
EmployeeCollection.RegisterClassForItem(typeof(EmployeeItemController), "EmployeeCell");
호출에 사용되는 식별자(EmployeeCell)는 컬렉션 뷰에 등록된 뷰 컨트롤러의 이름과 일치해야 합니다.MakeItem 이 단계는 아래에서 자세히 설명합니다.
항목 선택 처리
컬렉션에서 항목의 선택 및 선택 취소를 처리하려면 이 항목이 NSCollectionViewDelegate 필요합니다. 이 예제에서는 기본 제공 NSCollectionViewFlowLayout 레이아웃 형식 NSCollectionViewDelegateFlowLayout 을 사용하므로 이 대리자의 특정 버전이 필요합니다.
프로젝트에 새 클래스를 추가하고, 호출 CollectionViewDelegate 하고, 다음과 같이 만듭니다.
using System;
using Foundation;
using AppKit;

namespace MacCollectionNew
{
    /// <summary>
    /// Collection view delegate handles user interaction with the elements of the
    /// collection view for the Flow-Based layout type.
    /// </summary>
    public class CollectionViewDelegate : NSCollectionViewDelegateFlowLayout
    {
        #region Computed Properties
        /// <summary>
        /// Gets or sets the parent view controller.
        /// </summary>
        /// <value>The parent view controller.</value>
        public ViewController ParentViewController { get; set; }
        #endregion

        #region Constructors
        /// <summary>
        /// Initializes a new instance of the <see cref="T:MacCollectionNew.CollectionViewDelegate"/> class.
        /// </summary>
        /// <param name="parentViewController">Parent view controller.</param>
        public CollectionViewDelegate(ViewController parentViewController)
        {
            // Initialize
            ParentViewController = parentViewController;
        }
        #endregion

        #region Override Methods
        /// <summary>
        /// Handles one or more items being selected.
        /// </summary>
        /// <param name="collectionView">The parent Collection view.</param>
        /// <param name="indexPaths">The Index paths of the items being selected.</param>
        public override void ItemsSelected(NSCollectionView collectionView, NSSet indexPaths)
        {
            // Dereference path
            var paths = indexPaths.ToArray<NSIndexPath>();
            var index = (int)paths[0].Item;

            // Save the selected item
            ParentViewController.PersonSelected = ParentViewController.Datasource.Data[index];

        }

        /// <summary>
        /// Handles one or more items being deselected.
        /// </summary>
        /// <param name="collectionView">The parent Collection view.</param>
        /// <param name="indexPaths">The Index paths of the items being deselected.</param>
        public override void ItemsDeselected(NSCollectionView collectionView, NSSet indexPaths)
        {
            // Dereference path
            var paths = indexPaths.ToArray<NSIndexPath>();
            var index = paths[0].Item;

            // Clear selection
            ParentViewController.PersonSelected = null;
        }
        #endregion
    }
}
및 ItemsDeselected 메서드는 ItemsSelected 재정의되고 사용자가 항목을 선택하거나 선택 취소할 때 컬렉션 뷰를 처리하는 뷰 컨트롤러의 속성을 설정하거나 지우 PersonSelected 는 데 사용됩니다. 이 내용은 아래에 자세히 나와 있습니다.
인터페이스 작성기에서 컬렉션 뷰 만들기
필요한 모든 지원 요소를 사용하여 기본 스토리보드를 편집하고 컬렉션 뷰를 추가할 수 있습니다.
다음을 수행합니다.
솔루션 탐색기 파일을 두 번 클릭하여
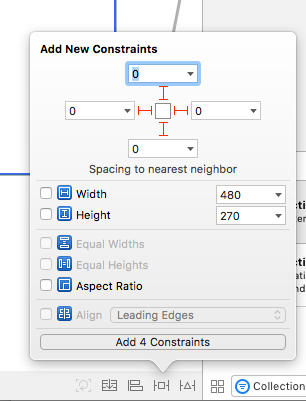
Main.StoryboardXcode의 인터페이스 작성기에서 편집할 수 있도록 엽니다.컬렉션 뷰를 기본 보기로 끌어와 크기를 조정하여 뷰를 채웁니다.

컬렉션 뷰를 선택한 상태에서 제약 조건 편집기를 사용하여 크기가 조정될 때 뷰에 고정합니다.
컬렉션 뷰가 디자인 화면에서 선택되어 있는지 확인하고(테두리가 있는 스크롤 보기 또는 클립 보기가 들어 있지 않음), 보조 편집기로 전환하고 컬렉션 보기에 대한 콘센트를 만듭니 다.
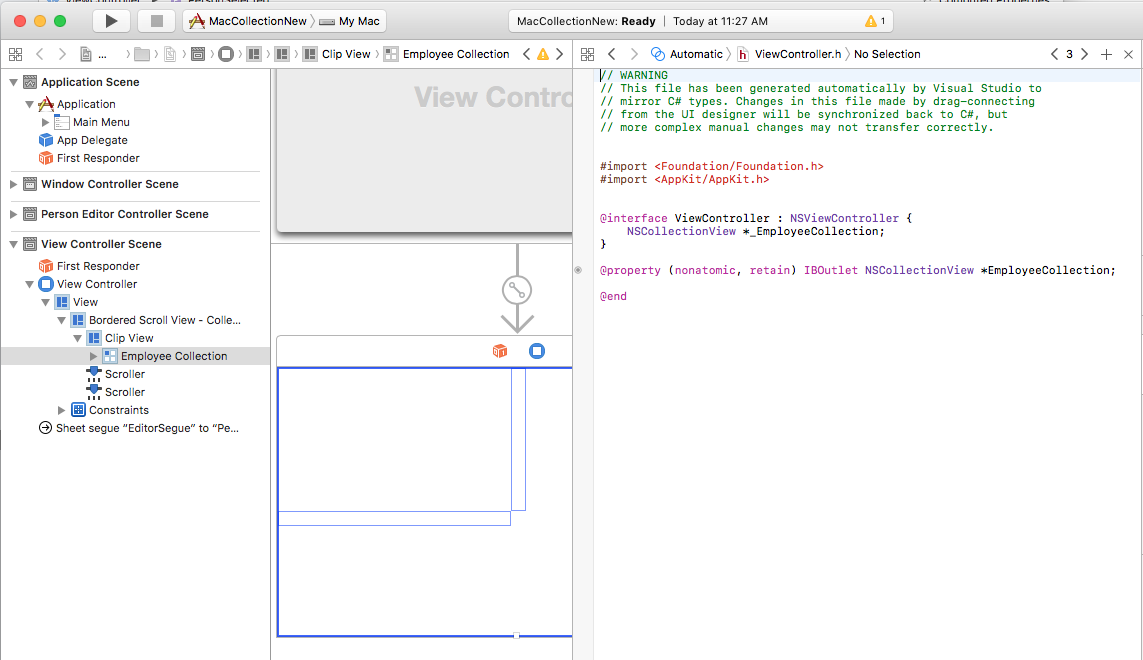
변경 내용을 저장하고 Visual Studio로 돌아가 동기화합니다.
이 모든 것을 하나로 합리기
이제 모든 지원 부분이 데이터 모델(PersonModel)으로 작동할 클래스와 함께 적용되고, NSCollectionViewDataSource 데이터를 공급하기 위해 추가되고, 항목 선택을 처리하기 위해 만들어졌으며NSCollectionView, NSCollectionViewDelegateFlowLayout 메인 스토리보드에 추가되고 콘센트(EmployeeCollection)로 노출되었습니다.
마지막 단계는 컬렉션 뷰가 포함된 뷰 컨트롤러를 편집하고 모든 조각을 함께 가져와 컬렉션을 채우고 항목 선택을 처리하는 것입니다.
ViewController.cs 파일을 편집하고 다음과 같이 표시합니다.
using System;
using AppKit;
using Foundation;
using CoreGraphics;

namespace MacCollectionNew
{
    /// <summary>
    /// The View controller controls the main view that houses the Collection View.
    /// </summary>
    public partial class ViewController : NSViewController
    {
        #region Private Variables
        private PersonModel _personSelected;
        private bool shouldEdit = true;
        #endregion

        #region Computed Properties
        /// <summary>
        /// Gets or sets the datasource that provides the data to display in the
        /// Collection View.
        /// </summary>
        /// <value>The datasource.</value>
        public CollectionViewDataSource Datasource { get; set; }

        /// <summary>
        /// Gets or sets the person currently selected in the collection view.
        /// </summary>
        /// <value>The person selected or <c>null</c> if no person is selected.</value>
        [Export("PersonSelected")]
        public PersonModel PersonSelected
        {
            get { return _personSelected; }
            set
            {
                WillChangeValue("PersonSelected");
                _personSelected = value;
                DidChangeValue("PersonSelected");
                RaiseSelectionChanged();
            }
        }
        #endregion

        #region Constructors
        /// <summary>
        /// Initializes a new instance of the <see cref="T:MacCollectionNew.ViewController"/> class.
        /// </summary>
        /// <param name="handle">Handle.</param>
        public ViewController(IntPtr handle) : base(handle)
        {
        }
        #endregion

        #region Override Methods
        /// <summary>
        /// Called after the view has finished loading from the Storyboard to allow it to
        /// be configured before displaying to the user.
        /// </summary>
        public override void ViewDidLoad()
        {
            base.ViewDidLoad();

            // Initialize Collection View
            ConfigureCollectionView();
            PopulateWithData();
        }
        #endregion

        #region Private Methods
        /// <summary>
        /// Configures the collection view.
        /// </summary>
        private void ConfigureCollectionView()
        {
            EmployeeCollection.RegisterClassForItem(typeof(EmployeeItemController), "EmployeeCell");

            // Create a flow layout
            var flowLayout = new NSCollectionViewFlowLayout()
            {
                ItemSize = new CGSize(150, 150),
                SectionInset = new NSEdgeInsets(10, 10, 10, 20),
                MinimumInteritemSpacing = 10,
                MinimumLineSpacing = 10
            };
            EmployeeCollection.WantsLayer = true;

            // Setup collection view
            EmployeeCollection.CollectionViewLayout = flowLayout;
            EmployeeCollection.Delegate = new CollectionViewDelegate(this);

        }

        /// <summary>
        /// Populates the Datasource with data and attaches it to the collection view.
        /// </summary>
        private void PopulateWithData()
        {
            // Make datasource
            Datasource = new CollectionViewDataSource(EmployeeCollection);

            // Build list of employees
            Datasource.Data.Add(new PersonModel("Craig Dunn", "Documentation Manager", true));
            Datasource.Data.Add(new PersonModel("Amy Burns", "Technical Writer"));
            Datasource.Data.Add(new PersonModel("Joel Martinez", "Web & Infrastructure"));
            Datasource.Data.Add(new PersonModel("Kevin Mullins", "Technical Writer"));
            Datasource.Data.Add(new PersonModel("Mark McLemore", "Technical Writer"));
            Datasource.Data.Add(new PersonModel("Tom Opgenorth", "Technical Writer"));
            Datasource.Data.Add(new PersonModel("Larry O'Brien", "API Docs Manager", true));
            Datasource.Data.Add(new PersonModel("Mike Norman", "API Documentor"));

            // Populate collection view
            EmployeeCollection.ReloadData();
        }
        #endregion

        #region Events
        /// <summary>
        /// Selection changed delegate.
        /// </summary>
        public delegate void SelectionChangedDelegate();

        /// <summary>
        /// Occurs when selection changed.
        /// </summary>
        public event SelectionChangedDelegate SelectionChanged;

        /// <summary>
        /// Raises the selection changed event.
        /// </summary>
        internal void RaiseSelectionChanged() {
            // Inform caller
            if (this.SelectionChanged != null) SelectionChanged();
        }
        #endregion
    }
}
이 코드를 자세히 Datasource 살펴보면 컬렉션 뷰에 대한 데이터를 제공할 인스턴스 CollectionViewDataSource 를 보유하도록 속성이 정의됩니다. PersonSelected 컬렉션 뷰에서 PersonModel 현재 선택한 항목을 나타내는 항목을 보유하도록 속성이 정의됩니다. 이 속성은 선택 영역이 변경되면 SelectionChanged 이벤트도 발생합니다.
클래스 ConfigureCollectionView 는 다음 줄을 사용하여 컬렉션 뷰에 셀 프로토타입 역할을 하는 뷰 컨트롤러를 등록하는 데 사용됩니다.
EmployeeCollection.RegisterClassForItem(typeof(EmployeeItemController), "EmployeeCell");
프로토타입을 등록하는 데 사용되는 식별자(EmployeeCell)는 위에 정의된 메서드 CollectionViewDataSource 에서 GetItem 호출된 식별자와 일치합니다.
var item = collectionView.MakeItem("EmployeeCell", indexPath) as EmployeeItemController;
...
또한 뷰 컨트롤러의 형식은 프로토타입을 정확하게 정의하는 파일의 .xib 이름과 일치해야 합니다. 이 예제 EmployeeItemController 의 경우 및 EmployeeItemController.xib.
컬렉션 뷰에 있는 항목의 실제 레이아웃은 컬렉션 뷰 레이아웃 클래스에 의해 제어되며 속성에 새 인스턴스 CollectionViewLayout 를 할당하여 런타임에 동적으로 변경할 수 있습니다. 이 속성을 변경하면 변경 내용에 애니메이션 효과를 주지 않고 컬렉션 보기 모양이 업데이트됩니다.
Apple은 가장 일반적인 용도 NSCollectionViewFlowLayoutNSCollectionViewGridLayout를 처리하는 컬렉션 뷰와 함께 두 가지 기본 제공 레이아웃 유형을 제공합니다. 개발자가 원에 항목을 배치하는 것과 같은 사용자 지정 형식이 필요한 경우 원하는 효과를 얻기 위해 필요한 메서드의 사용자 지정 인스턴스를 만들고 재정의 NSCollectionViewLayout 할 수 있습니다.
이 예제에서는 기본 흐름 레이아웃을 사용하여 클래스의 인스턴스를 NSCollectionViewFlowLayout 만들고 다음과 같이 구성합니다.
var flowLayout = new NSCollectionViewFlowLayout()
{
    ItemSize = new CGSize(150, 150),
    SectionInset = new NSEdgeInsets(10, 10, 10, 20),
    MinimumInteritemSpacing = 10,
    MinimumLineSpacing = 10
};
이 속성은 ItemSize 컬렉션에 있는 각 개별 셀의 크기를 정의합니다. 이 속성은 SectionInset 셀이 배치될 컬렉션의 가장자리에서 인셋을 정의합니다. MinimumInteritemSpacing 는 항목 간의 최소 간격을 정의하고 MinimumLineSpacing 컬렉션의 줄 사이의 최소 간격을 정의합니다.
레이아웃이 컬렉션 뷰에 할당되고 항목 선택을 처리하기 위해 인스턴스 CollectionViewDelegate 가 연결됩니다.
// Setup collection view
EmployeeCollection.CollectionViewLayout = flowLayout;
EmployeeCollection.Delegate = new CollectionViewDelegate(this);
메서드는 PopulateWithData 새 인스턴스를 CollectionViewDataSource만들고, 데이터로 채우고, 컬렉션 뷰에 연결하고, 메서드를 ReloadData 호출하여 항목을 표시합니다.
private void PopulateWithData()
{
    // Make datasource
    Datasource = new CollectionViewDataSource(EmployeeCollection);

    // Build list of employees
    Datasource.Data.Add(new PersonModel("Craig Dunn", "Documentation Manager", true));
    ...

    // Populate collection view
    EmployeeCollection.ReloadData();
}
메서드가 재정의 ViewDidLoad 되고 메서드와 PopulateWithData 메서드를 ConfigureCollectionView 호출하여 최종 컬렉션 뷰를 사용자에게 표시합니다.
public override void ViewDidLoad()
{
    base.ViewDidLoad();

    // Initialize Collection View
    ConfigureCollectionView();
    PopulateWithData();
}
요약
이 문서에서는 Xamarin.Mac 애플리케이션에서 컬렉션 뷰 작업을 자세히 살펴보았습니다. 먼저 KVC(키-값 코딩) 및 KVO(키-값 관찰)를 사용하여 C# 클래스 Objective-C 를 노출하는 방법을 살펴보았습니다. 다음으로, KVO 규격 클래스를 사용하고 Xcode의 인터페이스 작성기에서 컬렉션 뷰에 데이터 바인딩하는 방법을 보여 줍니다. 마지막으로 C# 코드에서 컬렉션 뷰와 상호 작용하는 방법을 보여 줬습니다.