Notiz
Zougrëff op dës Säit erfuerdert Autorisatioun. Dir kënnt probéieren, Iech unzemellen oder Verzeechnesser ze änneren.
Zougrëff op dës Säit erfuerdert Autorisatioun. Dir kënnt probéieren, Verzeechnesser ze änneren.
Note
This feature was previously called Forced Tunneling. Originally, a Management network interface was required only for Forced Tunneling. However, certain upcoming Firewall features will also require a Management network interface, so it has been decoupled from Forced Tunneling.
An Azure Firewall Management network interface separates firewall management traffic from customer traffic. To support forced tunneling and other management features, you must create an Azure Firewall with the Firewall Management network interface enabled, or enable it on an existing Azure Firewall to avoid service disruption.
What happens when you enable the Management network interface
If you enable a Management NIC, the firewall routes its management traffic through the AzureFirewallManagementSubnet (minimum subnet size /26) with its associated public IP address. You assign this public IP address for the firewall to manage traffic. The AzureFirewallManagementSubnet includes all traffic required for firewall operational purposes.
By default, the service associates a system-provided route table to the Management subnet. The only route allowed on this subnet is a default route to the Internet and Propagate gateway routes must be disabled. Avoid associating customer route tables to the Management subnet, as this configuration can cause service disruptions. If you do associate a route table, ensure it has a default route to the Internet to avoid service disruptions.

Enable the management NIC on existing firewalls
For Standard and Premium firewall versions, you must manually enable the Firewall Management NIC during the creation process as shown previously. However, all Basic Firewall versions and all Secured Hub firewalls always have a Management NIC enabled.
For an existing firewall, you must stop the firewall and then restart it with the Firewall Management network interface enabled to support forced tunneling. You can use stopping or starting the firewall to enable the Firewall Management NIC without needing to delete an existing firewall and redeploy a new one. Always start or stop the firewall during maintenance hours to avoid disruptions, including when attempting to enable the Firewall Management NIC.
Create the
AzureFirewallManagementSubnetin the Azure portal and use the appropriate IP address range for the virtual network.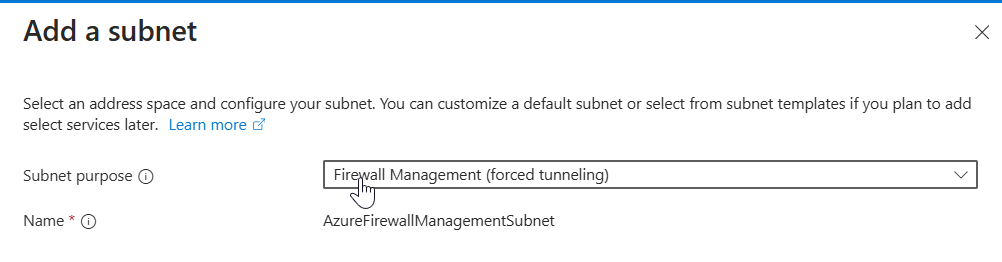
Create the new management public IP address with the same properties as the existing firewall public IP address: SKU, tier, and location.
Stop the firewall.
Use the information in Azure Firewall FAQ to stop the firewall:
$azfw = Get-AzFirewall -Name "FW Name" -ResourceGroupName "RG Name"
$azfw.Deallocate()
Set-AzFirewall -AzureFirewall $azfw
Start the firewall with the management public IP address and subnet.
Start a firewall with one public IP address and a management public IP address:
$azfw = Get-AzFirewall -Name "FW Name" -ResourceGroupName "RG Name"
$vnet = Get-AzVirtualNetwork -Name "VNet Name" -ResourceGroupName "RG Name"
$pip = Get-AzPublicIpAddress -Name "azfwpublicip" -ResourceGroupName "RG Name"
$mgmtPip = Get-AzPublicIpAddress -Name "mgmtpip" -ResourceGroupName "RG Name"
$azfw.Allocate($vnet, $pip, $mgmtPip)
$azfw | Set-AzFirewall
Start a firewall with two public IP addresses and a management public IP address:
$azfw = Get-AzFirewall -Name "FW Name" -ResourceGroupName "RG Name"
$vnet = Get-AzVirtualNetwork -Name "VNet Name" -ResourceGroupName "RG Name"
$pip1 = Get-AzPublicIpAddress -Name "azfwpublicip" -ResourceGroupName "RG Name"
$pip2 = Get-AzPublicIpAddress -Name "azfwpublicip2" -ResourceGroupName "RG Name"
$mgmtPip = Get-AzPublicIpAddress -Name "mgmtpip" -ResourceGroupName "RG Name"
$azfw.Allocate($vnet,@($pip1,$pip2), $mgmtPip)
$azfw | Set-AzFirewall
Note
You must reallocate a firewall and public IP to the original resource group and subscription. When you stop or start the firewall, the private IP address might change to a different IP address within the subnet. This can affect the connectivity of previously configured route tables.


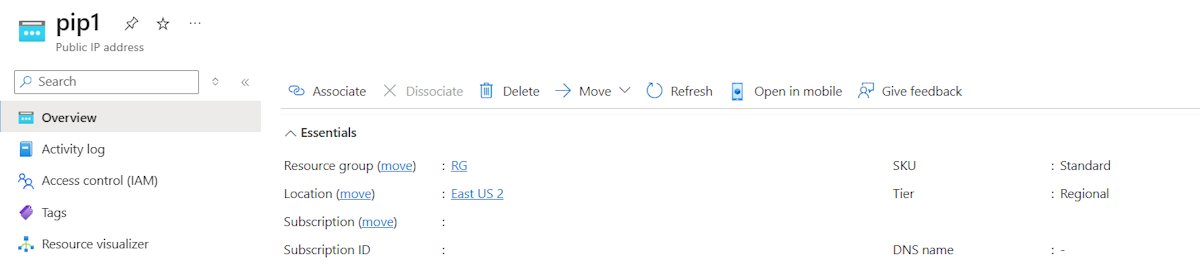
When you view the firewall in the Azure portal, you see the assigned management public IP address:

Note
If you remove all other IP address configurations on your firewall, you also remove the management IP address configuration, and the firewall is deallocated. You can't remove the public IP address assigned to the management IP address configuration, but you can assign a different public IP address.
Deploy a new Azure Firewall with management network interface for forced tunneling
If you prefer to deploy a new Azure Firewall instead of using the stop/start method, make sure to include a management subnet and management NIC as part of your configuration.
Important
- Single firewall per virtual network: Since two firewalls can't exist within the same virtual network, delete the old firewall before starting the new deployment if you plan to reuse the same virtual network.
- Pre-create subnet: Make sure the AzureFirewallManagementSubnet is created in advance to avoid deployment issues when using an existing virtual network.
Prerequisites
- Create the AzureFirewallManagementSubnet:
- Minimum subnet size: /26
- Example: 10.0.1.0/26
Deployment steps
- Go to Create a Resource in the Azure portal.
- Search for Firewall and select Create.
- On Create a Firewall, configure the following settings:
- Subscription: Select your subscription.
- Resource group: Select an existing resource group or create a new one.
- Name: Enter a name for the firewall.
- Region: Choose your region.
- Firewall SKU: Select Basic, Standard, or Premium.
- Virtual Network: Create a new virtual network or use an existing one. For example, use address space 10.0.0.0/16 and subnet 10.0.0.0/26 for AzureFirewallSubnet.
- Public IP Address: Add a new public IP address. For example, name it FW-PIP.
- Enable Firewall Management NIC: Select this option. Set the AzureFirewallManagementSubnet address range (for example, 10.0.1.0/26) and create a management public IP address (for example, Mgmt-PIP).
- Select Review + Create to validate and deploy the firewall. It takes a few minutes to deploy.