Notiz
Zougrëff op dës Säit erfuerdert Autorisatioun. Dir kënnt probéieren, Iech unzemellen oder Verzeechnesser ze änneren.
Zougrëff op dës Säit erfuerdert Autorisatioun. Dir kënnt probéieren, Verzeechnesser ze änneren.
🚀 CI/CD for Microsoft Fabric Using Azure DevOps & the
In this tutorial, you use the fabric-cicd python library to promote changed items (e.g., a specific Notebook) from the dev workspace to the test workspace, and eventually to prod.
1. Scenario Overview
Meet Alex — a Dev Lead working with Microsoft Fabric.
Alex's team builds Notebooks, Data Pipelines, Semantic Models, and Reports in a development Fabric workspace. When features are ready, Alex needs to promote changed items (e.g., a specific Notebook) from the dev workspace to the test workspace, and eventually to prod.
The Challenge
Alex's Notebooks use the %%configure magic command to attach to a specific Lakehouse. This means the Notebook definitions contain hardcoded GUIDs — workspace IDs, Lakehouse IDs, and SQL endpoint IDs — that are different in each environment.
What Alex Expects
| Requirement | Solution |
|---|---|
| Deploy changed items merged to the branch | fabric-cicd publish_all_items() deploys all in-scope item types |
| Explicit item type scoping | Pipeline parameter items_in_scope — you must specify which item types to deploy |
| Approval workflow before deploying to test/prod | ADO Environments with approval gates |
| Automatic GUID replacement (dev → test/prod) | fabric-cicd parameter files (parameter.yml) |
| Secure credential management | Azure Key Vault + ADO Variable Groups |
| Automated trigger on merge to branch | ADO Pipeline with branch triggers |
The Tools
| Tool | Purpose |
|---|---|
| Azure DevOps (ADO) | CI/CD orchestration, Git hosting, approvals |
fabric-cicd Python package |
Microsoft's open-source library for deploying Fabric items |
| Azure Key Vault | Securely stores Service Principal credentials |
| Service Principal (SPN) | Authenticates against the Fabric REST API |
2. Architecture Diagram
The following diagram illustrates the flow of the tutorial.

3. Prerequisites
Before you begin, make sure you have the following in place:
| # | Prerequisite | Details |
|---|---|---|
| 1 | Azure DevOps Organization & Project | A project with Repos and Pipelines enabled |
| 2 | Microsoft Fabric Workspaces | Three workspaces — one each for dev, test, and prod |
| 3 | Service Principal (SPN) | An Entra ID (Azure AD) App Registration with a client secret |
| 4 | SPN Permissions in Fabric | The SPN must be added as a Member or Admin on each target Fabric workspace |
| 5 | Azure Key Vault | A Key Vault with three secrets: Tenant ID, Client ID, and Client Secret |
| 6 | Fabric Git Integration | The dev workspace must be connected to the dev branch of your ADO repo |
| 7 | Python 3.12+ | Used in the pipeline agent to run the deployment script |
| 8 | fabric-cicd Python package |
Microsoft's open-source deployment library (PyPI) |
| 9 | Fabric Admin Setting for SPN | A Fabric Admin must enable "Service principals can use Fabric APIs" in the Fabric Admin Portal under Tenant Settings |
💡 Tip: To enable Service Principal access in Fabric, a Fabric Admin must enable "Service principals can use Fabric APIs" in the Fabric Admin Portal under Tenant Settings.
Download the source files
- Fork the Fabric-samples repository to your GitHub account.
- Clone your fork to your local machine:
git clone https://github.com/<your-account>/fabric-samples.git
cd fabric-samples
4. Initial Azure DevOps Setup
This section walks through every Azure DevOps resource you need to configure before the pipeline can run.
4.1 Azure Key Vault Integration
Your Service Principal credentials (Tenant ID, Client ID, and Secret) should never be stored in plain text. Instead, store them in Azure Key Vault.
Steps to Set Up Azure Key Vault
- Create a Key Vault in the Azure portal (or use an existing one).
- Add three secrets:
| Secret Name | Description | Example Value |
|---|---|---|
aztenantid |
Your Azure AD / Entra ID Tenant ID | xxxxxxxx-xxxx-xxxx-xxxx-xxxxxxxxxxxx |
azclientid |
The Service Principal's Application (Client) ID | xxxxxxxx-xxxx-xxxx-xxxx-xxxxxxxxxxxx |
azspnsecret |
The Service Principal's Client Secret value | your-secret-value |
Grant Access: The ADO service connection (or the ADO project identity) must have Get and List permissions on secrets in the Key Vault's Access Policies (or RBAC role
Key Vault Secrets User).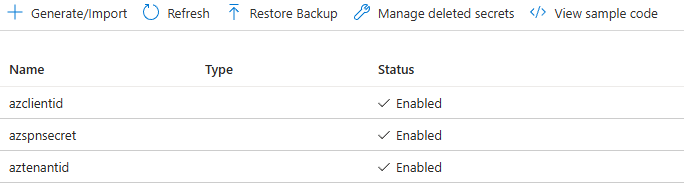

4.2 Variable Group: fabric_cicd_group_sensitive
This variable group is linked to Azure Key Vault, meaning the secret values are fetched at runtime and never exposed in the ADO UI.
Steps to Create
- Navigate to Pipelines → Library in your ADO project.
- Click + Variable group.
- Name it:
fabric_cicd_group_sensitive - Toggle on Link secrets from an Azure key vault as variables.
- Select your Azure subscription and Key Vault.
- Click + Add and select the three secrets:
aztenantidazclientidazspnsecret
- Click Save.
| Variable | Source | Sensitive? |
|---|---|---|
aztenantid |
Azure Key Vault | ✅ Yes |
azclientid |
Azure Key Vault | ✅ Yes |
azspnsecret |
Azure Key Vault | ✅ Yes |

Important
Because these variables are linked to Key Vault, they are accessed in the pipeline YAML as $(aztenantid), $(azclientid), and $(azspnsecret). They are automatically masked in logs.
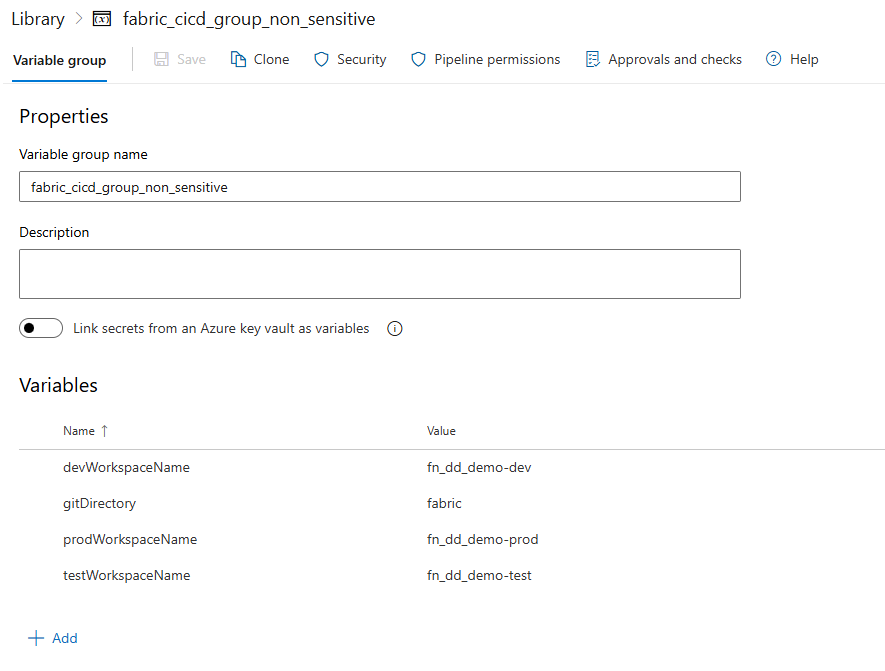
4.3 Variable Group: fabric_cicd_group_non_sensitive
This variable group stores non-secret configuration values-specifically the workspace names per environment and the Git directory path.
Steps to Create
- Navigate to Pipelines → Library in your ADO project.
- Click + Variable group.
- Name it:
fabric_cicd_group_non_sensitive - Add the following variables:
| Variable Name | Value | Description |
|---|---|---|
devWorkspaceName |
MyProject-Dev |
Name of the DEV Fabric workspace |
testWorkspaceName |
MyProject-Test |
Name of the TEST Fabric workspace |
prodWorkspaceName |
MyProject-Prod |
Name of the PROD Fabric workspace |
gitDirectory |
fabric |
The folder in your repo that contains the Fabric item definitions |
Click Save.

💡 How It Works in Code: The Python script reads these values using
os.environ. For example, when deploying totest, the script constructs the variable nametestWorkspaceName, converts it to uppercase (TESTWORKSPACENAME), and reads it from the environment-because ADO automatically injects non-sensitive variable group values as environment variables in uppercase.
4.4 ADO Environments & Approval Gates
ADO Environments allow you to add manual approval checks before deployments proceed. This is critical for promoting to test and prod.
Steps to Create Environments
- Navigate to Pipelines → Environments in your ADO project.
- Create three environments with the exact names matching your branch names:
| Environment Name | Approval Required? | Approvers |
|---|---|---|
dev |
❌ No (auto-deploy) | — |
test |
✅ Yes | Admin team / Lead |
prod |
✅ Yes | Admin team / Lead |
For
testandprod, click on the environment → ⋮ (More options) → Approvals and checks → + Add check → Approvals.Add the required approvers.
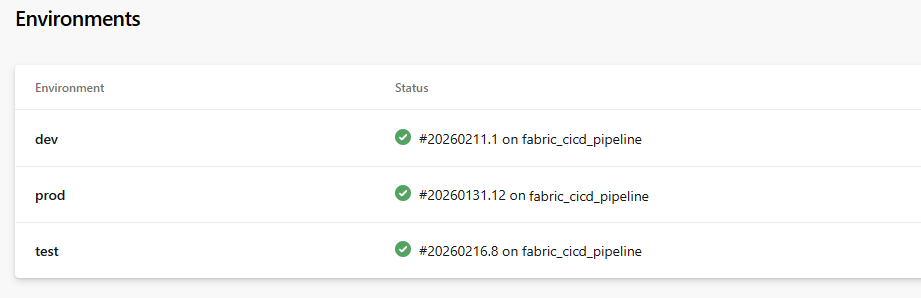

Example Environment Status View:
| Environment | Status |
|---|---|
| dev | ✅ #20260211.1 on fabric_cicd_pipeline |
| test | ✅ #20260216.8 on fabric_cicd_pipeline |
| prod | ✅ #20260131.12 on fabric_cicd_pipeline |
💡 Why Environments? The pipeline YAML uses
deploymentjobs withenvironment: $(target_env). Whentarget_envistestorprod, ADO pauses the pipeline and waits for the configured approver(s) to approve before proceeding.
4.5 Git Branch Strategy
The branching strategy is central to this CI/CD setup. You need three long-lived branches:

Key Points
| Branch | Connected to Fabric Workspace? | Purpose |
|---|---|---|
dev |
✅ Yes-synced with the DEV workspace | Source of truth. Changes made in the DEV workspace are committed here. |
test |
❌ No | Receives promoted items via PR merge. Tracks what's deployed to TEST. |
prod |
❌ No | Receives promoted items via PR merge. Tracks what's deployed to PROD. |
Why Only dev Is Connected
- Fabric's Git Integration syncs workspace items bidirectionally with a Git branch.
- The
testandprodbranches are not connected to workspaces because thefabric-cicdpackage handles deployment directly via the Fabric REST API. - These branches serve as a record of exactly which item versions have been promoted to each environment.
4.6 ADO Pipeline Setup
Create a pipeline in ADO that references the YAML file in your repo.
Steps
- Navigate to Pipelines → Pipelines → New pipeline.
- Choose Azure Repos Git and select your repository.
- Choose Existing Azure Pipelines YAML file.
- Point to the path:
Deploy-To-Fabric.yml(or wherever you've placed it). - Name the pipeline:
fabric_cicd_pipeline. - Under Pipeline permissions, ensure it has access to:
- Both variable groups (
fabric_cicd_group_sensitiveandfabric_cicd_group_non_sensitive) - All three environments (
dev,test,prod)
- Save (don't run yet).
⚠️ Permission Tip: The first time the pipeline runs, ADO may prompt you to authorize access to the variable groups and environments. An ADO admin can pre-authorize these under Pipeline → Settings.
5. Code Deep Dive: ADO Pipeline YAML
File: Deploy-To-Fabric.yml-located in the GitHub repo downloaded earlier.
Below is the full pipeline with line-by-line annotations.
# ──────────────────────────────────────────────────────────────
# TRIGGER: Runs automatically when code is pushed to dev, test, or prod
# Only triggers when changes are in the "fabric/" folder
# ──────────────────────────────────────────────────────────────
trigger:
 branches:
 include: [test, prod]
 paths:
 include:
  - fabric/**
🔍 Explanation-Trigger
- The pipeline auto-triggers on commits to the
testorprodbranches. It does not trigger ondev-becausedevis the source branch connected to Fabric Git integration. - The
pathsfilter ensures it only triggers when files inside thefabric/directory are changed-preventing unnecessary runs from changes to documentation, scripts, etc. - In practice: when a PR is merged from
dev→test, the merge commit lands on thetestbranch, triggering the pipeline targeting the TEST environment.
# ──────────────────────────────────────────────────────────────
# PARAMETERS: Runtime input-which Fabric item types to deploy
# ──────────────────────────────────────────────────────────────
parameters:
 - name: items_in_scope
 displayName: Enter Fabric items to be deployed
 type: string
 default: '["Notebook","DataPipeline","Lakehouse","SemanticModel","Report","VariableLibrary"]'
🔍 Explanation-Parameters
- This defines a runtime parameter that controls which Fabric item types are in scope for deployment.
- If this parameter isn't specified, all item types supported by the
fabric-cicdpackage will be deployed. - This also serves as an option for selective deployment-for example, you could pass only
["Notebook"]to deploy just Notebooks.
⚠️ Selective Deployment Warning: If you narrow
items_in_scopefor a selective deployment, you should not callunpublish_all_orphan_items()in the Python script-because it will remove items of the types specified initems_in_scopethat exist in the workspace but aren't present in the release branch. For example, if you deploy only["Notebook"]and there are Notebooks in the workspace that aren't in the branch, they will be deleted-even though they may still be valid. It will not remove items of other types (like Pipelines, Reports, etc.). Only useunpublish_all_orphan_items()when the branch represents the complete desired state for the item types in scope.
# ──────────────────────────────────────────────────────────────
# VARIABLES: Environment-specific config & secrets
# ──────────────────────────────────────────────────────────────
variables:
 - name: target_env
 value: ${{ replace(variables['Build.SourceBranch'], 'refs/heads/', '') }}
 - group: fabric_cicd_group_sensitive
 - group: fabric_cicd_group_non_sensitive
🔍 Explanation-Variables
| Variable | How It Works |
|---|---|
target_env |
Dynamically extracts the branch name from Build.SourceBranch. For example, refs/heads/test → test. This single variable drives the entire environment-aware behavior. |
fabric_cicd_group_sensitive |
Pulls aztenantid, azclientid, azspnsecret from Azure Key Vault at runtime. |
fabric_cicd_group_non_sensitive |
Pulls workspace names and gitDirectory as plain environment variables. |
# ──────────────────────────────────────────────────────────────
# STAGES & JOBS: Single deployment stage
# ──────────────────────────────────────────────────────────────
stages:
 - stage: DeployToFabric
 displayName: "Deploy to Fabric Workspace"
 jobs:
  - deployment: Deployment
  displayName: "Deploy Resources"
  environment: $(target_env)  # ◀── THIS triggers the approval gate!
  pool:
   name: Azure Pipelines
  strategy:
   runOnce:
   deploy:
    steps:
🔍 Explanation-Deployment Job
| Element | Purpose |
|---|---|
deployment: (not job:) |
A deployment job is required to use ADO Environments. It enables approval gates, deployment history, and audit trails. |
environment: $(target_env) |
Maps to the ADO Environment matching the branch name (dev, test, or prod). If approvals are configured on that environment, the pipeline pauses here until approved. |
strategy: runOnce |
Executes the deployment steps exactly once (as opposed to canary or rolling strategies). |
    steps:
    # Step 1: Checkout the source code
    - checkout: self

    # Step 2: Set up Python 3.12
    - task: UsePythonVersion@0
     inputs:
     versionSpec: '3.12'
     addToPath: true
     displayName: "Set up Python Environment"

    # Step 3: Install dependencies
    - script: |
     python -m pip install --upgrade pip
     pip install fabric-cicd
     displayName: "Install Fabric CICD Library"

    # Step 4: Run the deployment script
    - task: PythonScript@0
     inputs:
     scriptSource: 'filePath'
     scriptPath: '.deploy/deploy-to-fabric.py'
     arguments: >-
      --aztenantid $(aztenantid)
      --azclientid $(azclientid)
      --azspsecret $(azspnsecret)
      --items_in_scope ${{ parameters.items_in_scope }}
      --target_env $(target_env)
     displayName: 'Run deployment using fabric-cicd'
🔍 Explanation-Steps
| Step | What It Does |
|---|---|
| Checkout | Clones the repository so the pipeline has access to the Fabric item definitions in the fabric/ folder and the deployment script. |
| Python Setup | Installs Python 3.12 on the build agent. The fabric-cicd package requires Python 3.10+. |
| Install Dependencies | Installs the fabric-cicd package from PyPI. This is Microsoft's official library for automated Fabric deployments. |
| Run Script | Executes the Python deployment script, passing all necessary arguments: SPN credentials (from Key Vault), the list of item types to deploy, and the target environment name. |
⚠️ Security Note: The
$(aztenantid),$(azclientid), and$(azspnsecret)values are fetched from the Key Vault–linked variable group. They are automatically masked in pipeline logs — you'll see***instead of actual values.
6. Code Deep Dive: Python Deployment Script
File: .deploy/deploy-to-fabric.py — located in the GitHub repo downloaded earlier.
This is the heart of the deployment. Let's walk through each section.
6.1 Imports & Dependencies
import os, argparse, requests, ast
from fabric_cicd import (
 FabricWorkspace,
 publish_all_items,
 unpublish_all_orphan_items,
 change_log_level,
 append_feature_flag,
)
from azure.identity import ClientSecretCredential
| Import | Purpose |
|---|---|
os |
Access environment variables (non-sensitive variable group values) |
argparse |
Parse command-line arguments passed from the pipeline |
requests |
Make HTTP calls to the Fabric REST API (for workspace ID lookup) |
fabric_cicd |
Microsoft's library — handles the heavy lifting of deploying Fabric items |
ClientSecretCredential |
Azure Identity library — authenticates using SPN credentials |
6.2 Workspace ID Lookup Function
def get_workspace_id(p_ws_name, p_token):
 url = "https://api.fabric.microsoft.com/v1/workspaces"
 headers = {
  "Authorization": f"Bearer {p_token.token}",
  "Content-Type": "application/json"
 }
 response = requests.get(url, headers=headers)
 ws_id = ''
 if response.status_code == 200:
  workspaces = response.json()["value"]
  for workspace in workspaces:
   if workspace["displayName"] == p_ws_name:
    ws_id = workspace["id"]
    return workspace["id"]
  if ws_id == '':
   return f"Error: Workspace {p_ws_name} could not found."
 else:
  return f"Error: {response.status_code}, {response.text}"
What this does:
- Calls the Fabric REST API (
GET /v1/workspaces) to list all workspaces the SPN has access to. - Searches for a workspace whose
displayNamematches the target workspace name. - Returns the workspace GUID if found, or an error message if not.
💡 Why not hardcode the workspace ID? By looking it up dynamically by name, the script is more resilient to workspace recreation and avoids storing GUIDs in the variable group.
6.3 Feature Flags & Logging
append_feature_flag("enable_shortcut_publish")
change_log_level("DEBUG")
| Setting | Purpose |
|---|---|
enable_shortcut_publish |
Enables deployment of Lakehouse shortcuts — a feature that's opt-in via feature flag in fabric-cicd. |
DEBUG log level |
Provides verbose output during deployment — very helpful for troubleshooting. The "DEBUG" argument is optional — calling change_log_level() without it enables more verbose logging. Remove the change_log_level() if debug logs aren't required. |
6.4 Argument Parsing
parser = argparse.ArgumentParser(description='Process Azure Pipeline arguments.')
parser.add_argument('--aztenantid', type=str, help='tenant ID')
parser.add_argument('--azclientid', type=str, help='SP client ID')
parser.add_argument('--azspsecret', type=str, help='SP secret')
parser.add_argument('--target_env', type=str, help='target environment')
parser.add_argument('--items_in_scope', type=str, help='Defines the item types to be deployed')
args = parser.parse_args()
These arguments are passed from the pipeline YAML step. The parser makes them available as args.aztenantid, args.azclientid, etc.
6.5 Authentication
token_credential = ClientSecretCredential(
 client_id=args.azclientid,
 client_secret=args.azspsecret,
 tenant_id=args.aztenantid,
)
This creates an Azure credential object using the Service Principal's Client ID, Secret, and Tenant ID. This credential is used both for:
- Calling the Fabric REST API (workspace lookup)
- Passing to
FabricWorkspacefor thefabric-cicddeployment
6.6 Dynamic Workspace Resolution
tgtenv = args.target_env       # e.g., "test"
ws_name = f'{tgtenv}WorkspaceName'    # e.g., "testWorkspaceName"
workspace_name = os.environ[ws_name.upper()]  # reads TESTWORKSPACENAME from env vars
The clever part: The variable group fabric_cicd_group_non_sensitive contains variables like devWorkspaceName, testWorkspaceName, etc. ADO injects these as uppercase environment variables. The script dynamically constructs the variable name based on the target environment.
# Generate a token and look up the workspace ID
resource = 'https://api.fabric.microsoft.com/'
scope = f'{resource}.default'
token = token_credential.get_token(scope)

lookup_response = get_workspace_id(workspace_name, token)
if lookup_response.startswith("Error"):
 raise ValueError(f"{lookup_response}. Perhaps workspace name is set incorrectly...")
else:
 wks_id = lookup_response
6.7 Initialize FabricWorkspace & Deploy
repository_directory = os.environ["GITDIRECTORY"] # e.g., "fabric"

item_types = args.items_in_scope.strip("[]").split(",") # Convert string to list

target_workspace = FabricWorkspace(
 workspace_id=wks_id,
 environment=tgtenv,
 repository_directory=repository_directory,
 item_type_in_scope=item_types,
 token_credential=token_credential,
)

# Deploy!
publish_all_items(target_workspace)
unpublish_all_orphan_items(target_workspace)
| Method | What It Does |
|---|---|
FabricWorkspace(...) |
Initializes the deployment context — reads item definitions from the Git repo, loads parameter files for GUID replacement, and prepares the deployment plan. |
publish_all_items() |
Deploys all in-scope items to the target workspace. Handles creation of new items and updating of existing ones. |
unpublish_all_orphan_items() |
Removes items from the target workspace that are no longer present in the Git branch — keeping the workspace clean. |
⚠️ IMPORTANT — Understanding
unpublish_all_orphan_items(): This method will delete items of the types specified initems_in_scopefrom the target workspace that are not present in the release branch (i.e., the branch used as the source for thefabric-cicdpackage). It will not touch items of other types. In this tutorial, thetestbranch contains all the items intended for the TEST workspace, so it is safe to callunpublish_all_orphan_items()— it will only remove items that have been intentionally deleted from the branch.However, if you are doing a selective deployment (e.g., deploying only Notebooks via a narrowed
items_in_scope), be cautious withunpublish_all_orphan_items()— it would delete any Notebooks in the workspace that aren't in the branch, even if they are still valid and were simply not part of the selective release.
💡 Tip:
unpublish_all_orphan_items()supports excluding specific items from removal by passing a regex pattern. Any items whose names match the regex will be preserved in the workspace even if they aren't in the source branch. For more details and usage examples, see the official API reference.
7. Code Deep Dive: Parameter Files (GUID Replacement)
This is where the magic happens — how %%configure GUIDs are swapped per environment.
How It Works
The fabric-cicd package looks for a file named parameter.yml in the .deploy directory (or the repository root). This file defines find-and-replace rules that are applied to item definitions before deployment.
💡 Tip: The
parameter.ymlfind-and-replace feature supports many approaches beyond what's shown in this tutorial — including regex patterns, file-scoped replacements, and more. For the full list of options and advanced usage, see the official documentation: 👉 fabric-cicd Parameter File Documentation
💡 Tip — Variable Library: It is recommended to leverage Variable Library whenever possible to manage environment-specific values, rather than relying solely on
find_replacein parameter files. Variable Libraries provide a centralized, reusable way to manage configuration across environments. For more information, see Get started with Variable Libraries.
File: parameter.yml — located in the GitHub repo downloaded earlier.
7.1 Parameter File Structure
find_replace:
 - find_value: "bfddf0b6-5b74-461a-a963-e89ddc32f852"  # DEV Workspace ID
 replace_value:
  test: " $workspace.$id"         # Replaced with TEST workspace ID
  prod: " $workspace.$id"         # Replaced with PROD workspace ID
🔍 Understanding Each Entry
Entry 1 — Workspace ID Replacement
- find_value: "bfddf0b6-5b74-461a-a963-e89ddc32f852" # DEV Workspace ID
 replace_value:
 test: " $workspace.$id" # Auto-resolves to the TEST workspace's actual ID
 prod: " $workspace.$id" # Auto-resolves to the PROD workspace's actual ID
find_value: The GUID found in the Notebook's%%configurecommand — this is the DEV workspace ID.replace_value: The$workspace.$idis a built-in token infabric-cicdthat automatically resolves to the target workspace's ID at deployment time.- Since
devisn't listed inreplace_value, the GUID is only replaced when deploying totestorprod.
Entry 2 — Lakehouse ID Replacement
- find_value: "981f2f9a-0436-4942-b158-019bd73cdf1c" # DEV DemoLakehouse GUID
 replace_value:
 test: "$items.Lakehouse.DemoLakehouse.$id" # Resolves to TEST Lakehouse ID
 prod: "$items.Lakehouse.DemoLakehouse.$id" # Resolves to PROD Lakehouse ID
$items.Lakehouse.DemoLakehouse.$idis a dynamic token that looks up the Lakehouse namedDemoLakehousein the target workspace and returns its ID.- Pattern:
$items.<ItemType>.<ItemName>.$id
Entry 3 — SQL Endpoint ID Replacement (Dynamic Notation)
- find_value: "91280ad0-b76e-4c98-a656-95d8f09a5e28" # DEV SQL Endpoint GUID
 replace_value:
 test: $items.Lakehouse.DemoLakehouse.$sqlendpointid # Resolved dynamically at deploy time
 prod: $items.Lakehouse.DemoLakehouse.$sqlendpointid # Resolved dynamically at deploy time
- Instead of hardcoding the SQL endpoint GUID for each environment (e.g.,
204fd20c-e34c-4bef-9dce-4ecf53b0e878for TEST or29bda5ec-ebc7-466e-a618-ef5bbea75e13for PROD), this entry uses dynamic notation —$items.Lakehouse.DemoLakehouse.$sqlendpointid. - The
fabric-cicdpackage resolves this at deployment time by looking up the SQL endpoint ID of theDemoLakehouseLakehouse in the target workspace. This eliminates the need to manually find and maintain SQL endpoint GUIDs across environments.
7.2 Dynamic Tokens Summary
| Token | Resolves To |
|---|---|
$workspace.$id |
The target workspace's GUID |
$items.Lakehouse.<name>.$id |
The GUID of a Lakehouse named <name> in the target workspace |
$items.<ItemType>.<ItemName>.$id |
Generic pattern for any item type |
$items.Lakehouse.<name>.$sqlendpointid |
The SQL endpoint GUID of a Lakehouse (resolved dynamically) |
7.3 Feature Branch Parameter File (Advanced)
For teams using feature branches (not just dev), there's a variant parameter file where all three environments (dev, test, prod) have replacements:
- find_value: "d34e3a2a-96ba-4461-9a80-496894ca4cda" # Feature branch Workspace ID
 replace_value:
 dev: " $workspace.$id"
 test: " $workspace.$id"
 prod: " $workspace.$id"
This is useful when developers work in their own Fabric workspaces and need GUIDs replaced even when deploying to DEV.
8. Deployment Flow: End-to-End Walkthrough
Here's the complete flow when Alex wants to promote a Notebook from dev to test:
Step 1: 🔧 Developer Makes Changes in DEV
Alex modifies the IngestApiData Notebook in the DEV Fabric workspace (e.g., adds a new cell). Fabric's Git Integration syncs this change to the dev branch automatically (or via a manual commit).
Step 2: 📋 Create a Pull Request (dev → test)
Alex creates a Pull Request in ADO:
- Source branch:
dev - Target branch:
test - Title: "Promote changed Notebook items to Test"
The PR contains all the changed items that Alex wants to deploy to the TEST environment.
Step 3: ✅ PR Approval & Merge
A reviewer (or Alex's admin) reviews the PR:
- Inspects the changes to the Notebook definition files
- Approves the PR
- Completes the merge → The changes are now on the
testbranch
Step 4: 🚀 Pipeline Auto-Triggers
The merge commit on the test branch triggers the fabric_cicd_pipeline because:
- The
testbranch is in the trigger'sincludelist - The changes are inside the
fabric/path
The pipeline begins execution:
Pipeline Variable: target_env = "test"
Step 5: ⏸️ Approval Gate
Because the pipeline uses environment: $(target_env) and target_env = test, ADO checks the test environment for approval gates.
- The pipeline pauses and sends a notification to the configured approver(s).
- The admin reviews and clicks Approve.
Step 6: ⚡ Script Execution
After approval, the pipeline:
- ⚙️ Sets up Python 3.12
- 📦 Installs
fabric-cicd - ▶️ Runs
deploy-to-fabric.pywith:
- SPN credentials from Key Vault
--target_env test--items_in_scope ["Notebook","Lakehouse",...]
The Python script:
- 🔐 Authenticates using the SPN
- 🔍 Resolves
testWorkspaceName→ looks up the workspace ID - 📄 Loads
parameter.ymland applies GUID replacements - 📤 Publishes items to the TEST workspace
- 🧹 Cleans up orphaned items
Step 7: ✅ Deployment Complete
The Notebook is now deployed to the TEST workspace with:
- ✅ The newly added cell present
- ✅ All GUIDs in
%%configurereplaced with TEST environment values
9. Validation: Confirming a Successful Deployment
After the pipeline completes, validate that the deployment was successful:
Check 1: Pipeline Status
In ADO → Pipelines → Runs, confirm the pipeline run shows ✅ Succeeded for the test environment.
Check 2: Notebook Content in TEST Workspace
Open the IngestApiData Notebook in the TEST Fabric workspace and verify:
New cell is present: The newly added cell that was developed in DEV should now appear in the TEST version of the notebook.
GUIDs are replaced in Cell 1: In the
%%configurecommand (typically in Cell 1), verify that:
| GUID Type | Should Show | Should NOT Show |
|---|---|---|
| Workspace ID | TEST workspace ID | |
| DemoLakehouse ID | TEST Lakehouse ID | |
| SQL Endpoint ID | TEST SQL Endpoint ID (resolved dynamically) | 91280ad0-...) |
✅ Success! The
%%configurecell now points to TEST lakehouses, and the new development work has been cleanly promoted.
10. Troubleshooting & Common Pitfalls
| Problem | Cause | Solution |
|---|---|---|
| Pipeline fails with "Workspace not found" | Workspace name in variable group doesn't match Fabric | Double-check testWorkspaceName in the fabric_cicd_group_non_sensitive variable group |
| GUIDs not being replaced | parameter.yml not in the expected location |
Ensure the file is in the .deploy/ folder alongside the script, or in the repository root |
Permission denied errors from Fabric API |
SPN lacks workspace access | Add the SPN as a Member or Admin on the target Fabric workspace |
| Pipeline doesn't trigger on merge | Path filter mismatch | Ensure your Fabric items are inside the fabric/ directory in the repo |
ModuleNotFoundError: fabric_cicd |
Package not installed | Ensure the pip install fabric-cicd step is present and succeeds |
| Approval notification not received | Environment not configured | Verify the ADO Environment name matches target_env exactly (case-sensitive) |
| SQL Endpoint GUID not replaced | Dynamic notation misconfigured | Ensure $items.Lakehouse.<name>.$sqlendpointid syntax is correct and the Lakehouse exists in the target workspace |
os.environ key error |
Variable group not linked to pipeline | Authorize the pipeline to access fabric_cicd_group_non_sensitive |
| Feature flag errors for shortcuts | fabric-cicd version too old |
Upgrade fabric-cicd to the latest version: pip install fabric-cicd --upgrade |
11. Summary
This tutorial demonstrated a production-grade CI/CD workflow for Microsoft Fabric using Azure DevOps:
| Component | What We Set Up |
|---|---|
| Azure Key Vault | Securely stores SPN credentials (Tenant ID, Client ID, Secret) |
| ADO Variable Groups | One Key Vault–linked (sensitive), one plain (workspace names) |
| ADO Environments | dev, test, prod with approval gates on test and prod |
| Git Branches | dev (connected to Fabric), test and prod (deployment targets) |
| Pipeline YAML | Auto-triggers on branch merge, parameterized item selection |
| Python Script | Authenticates via SPN, resolves workspace, deploys via fabric-cicd |
| Parameter File | Swaps DEV GUIDs with environment-specific values using dynamic tokens |
Key Takeaways
- Only the
devbranch is connected to a Fabric workspace —testandprodbranches serve as deployment records. fabric-cicd's parameter files handle GUID replacement automatically using dynamic tokens like$workspace.$idand$items.Lakehouse.<name>.id.- ADO Environments with approvals provide governance — no deployment to higher environments without explicit approval.
- Service Principal authentication via Azure Key Vault ensures credentials are never exposed in code or logs.
📚 Further Reading: