Notiz
Zougrëff op dës Säit erfuerdert Autorisatioun. Dir kënnt probéieren, Iech unzemellen oder Verzeechnesser ze änneren.
Zougrëff op dës Säit erfuerdert Autorisatioun. Dir kënnt probéieren, Verzeechnesser ze änneren.
The Security Copilot platform includes navigation features that help you work efficiently. This article covers two landing experiences, home menu options, how to start chat sessions, and prompt features.
Understand the landing experience
When you open Security Copilot, the landing page can vary by onboarding and rollout stage.
- Agents-first experience (new) – Agents are the default homepage, with guided actions to help you get started.
- Chat-first experience (existing) – Chat and prompts are available directly on the homepage.
Agents-first experience
In the agents-first experience, the Agents area is the primary entry point when you open Security Copilot. From the Agents area, you can browse available agents, view active agents in your workspace, and access setup options.
Note
The agents-first homepage doesn't include the general chat prompt bar. To start a general chat session, go to All history and select New session.
Chat-first experience
In the chat-first experience, the homepage opens directly to the chat prompt bar where you can start typing prompts immediately. The Agents area is accessible from the home menu but is not the default view.

Explore interface landmarks
Homepage landmarks vary by experience: agents-first or chat-first.
Agents-first landmarks
In the agents-first experience, navigation centers on the Agents area and the home menu.

For more information on finding and using agents, see Discover agents.
Chat-first landmarks
In the chat-first experience, the homepage includes key landmarks.
In this context, plugins are data connectors and capabilities that Security Copilot can use while responding to prompts.
After you submit your first prompt, additional features become available.

- View the process log to see what Security Copilot is up to.
- Create a promptbook based on the selected prompts.
- Share your session with your team.
- Side panel where the Pin board displays.
- Pin a prompt to the pin board.
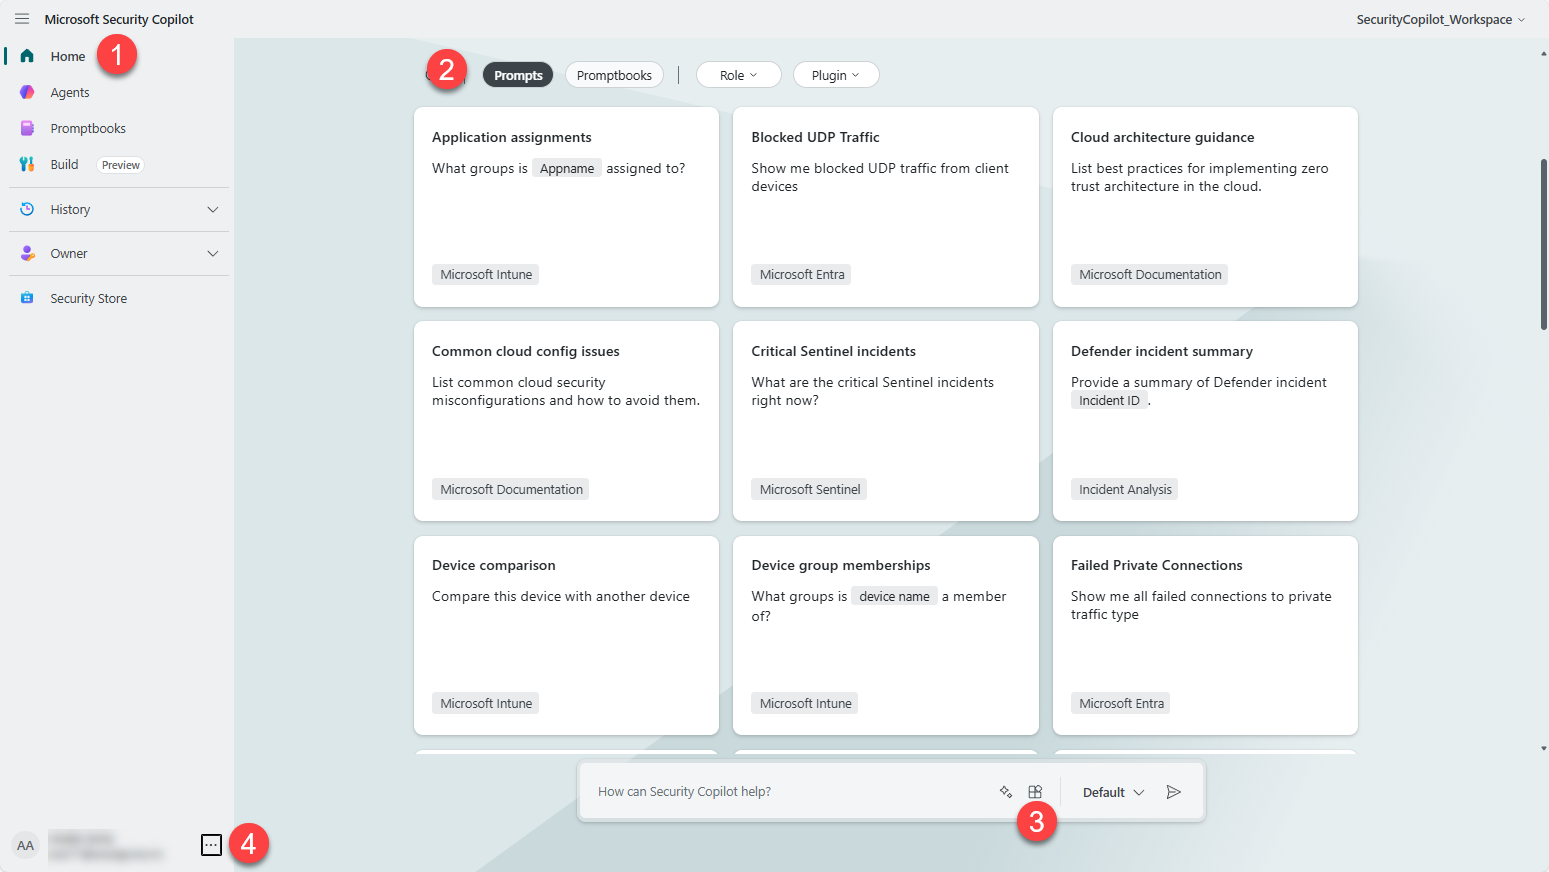
Use the home menu
The home menu provides access to key areas of Security Copilot. The same options are available in both experiences, but the default homepage view differs.
Home gets you back to the initial page.
Agents – In the agents-first experience, this is the default homepage. In the chat-first experience, select Agents from the home menu to access the agent library. Browse the agent library, view agents active in your workspace, and, depending on your role, set up and manage agents. For more information, see Discover agents and Setup and manage agents.
Promptbooks - For more information, see Using promptbooks.
Build - For more information, see Build custom agents.
All history - Provides access to your session history and allows you to create a new session.
Owner - This menu is available only if you have the Security Copilot Owner role.
- Owner settings - For more information, see Configure owner settings.
- Plugin settings - For more information, see Manage plugin restrictions.
- Role assignment - For more information, see Assign roles.
- Usage monitoring - For more information, see Monitor security compute units use.
Settings - Includes access to set the theme, time zone, and language preferences.
Tenant switching - Allows you to switch between tenants. Requires specific authentication.

When a user signs in to Security Copilot in their home tenant, but the security data is in a different tenant, they must explicitly switch to the tenant that contains the security data.
With the tenant switch feature, an external member or guest account that has the appropriate role in the target tenant is authorized to conduct sessions by using data in that tenant.
The Security Copilot portal reloads and initially shows the tenant ID in the URL, for example:
https://securitycopilot.microsoft.com/?tenantId=xxxxxxxx-xxxx-xxxx-xxxx-xxxxxxxxxxxxTip
Manually modifying the tenant ID portion of the Security Copilot URL will also switch the tenant.
For more information, see the following articles:
Access chat and sessions
Note
If you have the agents-first experience (the Agents page opens first), the homepage doesn't include the general chat prompt bar. Use the steps in this section to start a general chat session. If you have the chat-first experience (the prompt bar opens first), the prompt bar is available directly on the homepage. You can also use All history to resume a previous session or start a new one.
To start a chat session:
- Select All history.
- Review your previous sessions.
- Select New session.
You can continue previous sessions or start a new one from the All history view.
Use prompts
Use these resources for promptbooks, starter prompts, and prompt-writing guidance.
Note
In some experiences, prompts are accessed through a chat session instead of directly from the homepage.
Manage sources
Manage plugin enablement and file sources.
To manage plugins and file inputs, see:
Get help
Access the support link and documentation articles from the Get help menu.

For documentation, training videos, and support options, see:
Prompt features
The following features are available after you submit a prompt.
View the process log
The process log appears directly under your prompt after you send it. As the response forms, notice the selected plugin.

Each plugin and its capabilities directly correspond to prompts found when selecting See all system capabilities.
For example, in the process log, the Microsoft Defender XDR plugin is selected. The prompt icon  precedes the prompt
 Generate guided response, which indicates that this prompt was a specific capability of the plugin.
When you select the Prompts button, use the search to find capabilities. Select See all system capabilities to see all the prompts listed for each plugin.
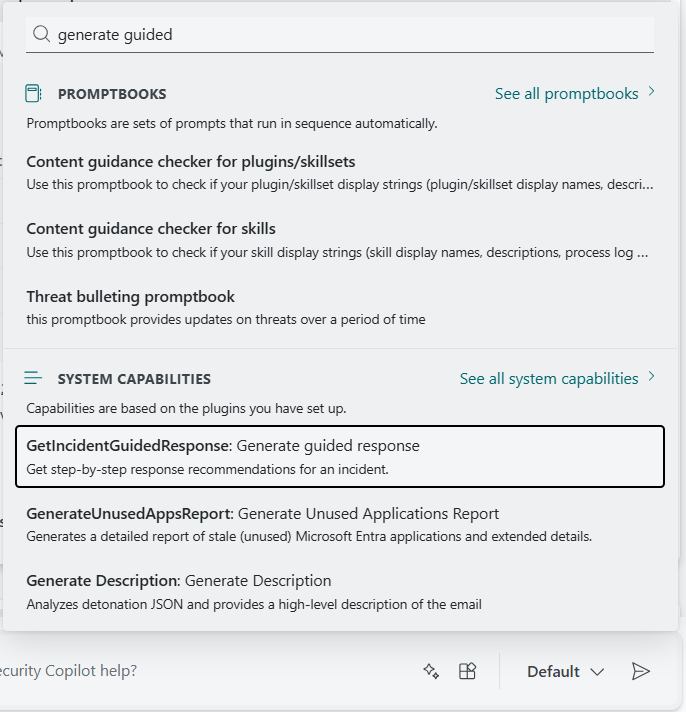
Note
The Generate guided response session is just one of the possible sessions created by the Defender XDR embedded experience. When you interact with an embedded Copilot experience to produce results, the session will appear in your session list.
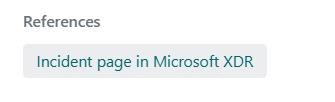
Many responses include direct links to data provided by the Microsoft service plugin used to generate that response. Use the direct links and the process log to build trust in Security Copilot while you verify it's delivering accurate, appropriate responses.
Pin important items to the session
Use the pin board to keep track of important responses in your session.

When a response is pinned for the first time, Security Copilot generates a summary of the session for the pin board.
Pin multiple prompt-response pairs to expand what is included in the summary. Pinned items show a condensed response that is expandable. The last prompt pinned is ordered last in the pin board. If you pin a prompt from the middle of the session last, that's where it's pinned on the pin board.

Along with the summary, the pin board features tags under the session name to help provide context to the session.
Share a session
At any time during a Security Copilot session, share your work with your team or decision makers. Select the Share icon to create a link.
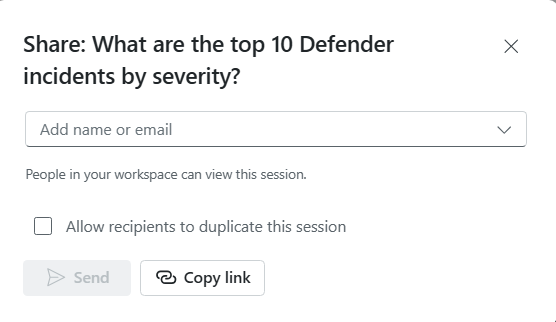
The send via email option isn't available in these regions. Use the Copy link and send manually for the following regions:
SouthAfricaNorthUAENorth
Tip
Keep in mind that the shared session link references the entire session, not just the portion completed before you selected the Share feature.
The Share feature is also available while reviewing All history.
Warning
When the link is shared by the owner to anyone with Security Copilot access in the same tenant, they are able to view the shared session. Shared sessions show a static display of the entire session, whether they normally have access to the underlying security data or not.
While accessing a shared session, there's an option to Export the results.
View the shared session summary and pinned items to quickly understand the shared content. For more information, see Shared session access.
Create a promptbook
For more information, see Build your own promptbook