Note
Access to this page requires authorization. You can try signing in or changing directories.
Access to this page requires authorization. You can try changing directories.
Authenticated network scans provide an agentless way to discover and assess network infrastructure devices, such as switches, routers, WLAN controllers, firewalls, and VPN gateways.
For more information, see Authenticated network scans.
Note
The Windows authenticated scan is deprecated from December 18,2025. For more information, see Windows authenticated scan deprecation FAQs.
Prerequisites
To configure scan jobs, you need the Manage security settings in Defender permission. For more information, see Create and manage roles for role-based access control.
Supported devices
Any network device that responds to SNMPv2 or SNMPv3 queries can be discovered by authenticated network scans. We recommend that you configure all your network devices for scanning, regardless of vendor or operating system.
Supported Windows versions for the scanner
The scanner is supported on Windows 10, version 1903 and Windows Server, version 1903 and later. For more information, see Windows 10, version 1903 and Windows Server, version 1903
Note
You can install up to 40 scanners per tenant.
Select scanner device
To select a device that performs the authenticated network scans:
Decide on a Defender for Endpoint onboarded device (client or server) that has a network connection to the management port for the network devices you plan on scanning.
Allow SNMP traffic between the Defender for Endpoint scanning device and the targeted network devices (for example, by the firewall).
Decide which network devices are assessed for vulnerabilities (for example, a Cisco switch or a Palo Alto Networks firewall).
Make sure SNMP read-only is enabled on all configured network devices to allow the Defender for Endpoint scanning device to query the configured network devices.
SNMP writeisn't needed for the proper functionality of this feature.Obtain the IP addresses of the network devices to be scanned (or the subnets where these devices are deployed).
Obtain the SNMP credentials of the network devices (for example, Community String, noAuthNoPriv, authNoPriv, authPriv). You need to provide the credentials when configuring a new scan job.
Proxy client configuration: No extra configuration is required other than the Defender for Endpoint device proxy requirements.
To allow the scanner to be authenticated and work properly, add the following domains/URLs:
*.security.microsoft.comlogin.microsoftonline.com*.blob.core.windows.net/networkscannerstable/*
Note
Not all URLs are specified in the Defender for Endpoint documented list of allowed data collection.
Install the scanner
In the Microsoft Defender Portal, select Settings > Device discovery > Authenticated scans.
Download the scanner and install it on the designated Defender for Endpoint scanning device.


Register the scanner
You can complete the registration on the designated scanning device or any other device (for example, your personal client device).
The account the user signs in with and the device used to complete the sign in process, must be in the same tenant where the device is onboarded to Microsoft Defender for Endpoint.
To complete the scanner registration process:
Copy and follow the URL that appears on the command line and use the provided installation code to complete the registration process. You might need to change command prompt settings to copy the URL.
Type the code and sign in using a Microsoft account that has the Manage security settings in Defender permission.
When finished, you should see a message confirming you've signed in.
Note
A scheduled task that searches for updates runs regularly. When the task runs, it compares the version of the scanner on the client device to the version of the agent on the update location. The update location is where Windows looks for updates, such as on a network share or from the internet.
If there's a difference between the two versions, the update process determines which files are different and need to be updated on the local computer. Once the required updates are determined, the downloading of the updates start.
Configure a new authenticated network scan
In the Microsoft Defender Portal, select Settings > Device discovery > Authenticated scans.
Select Add new scan and choose Network device authenticated scan and select Next.
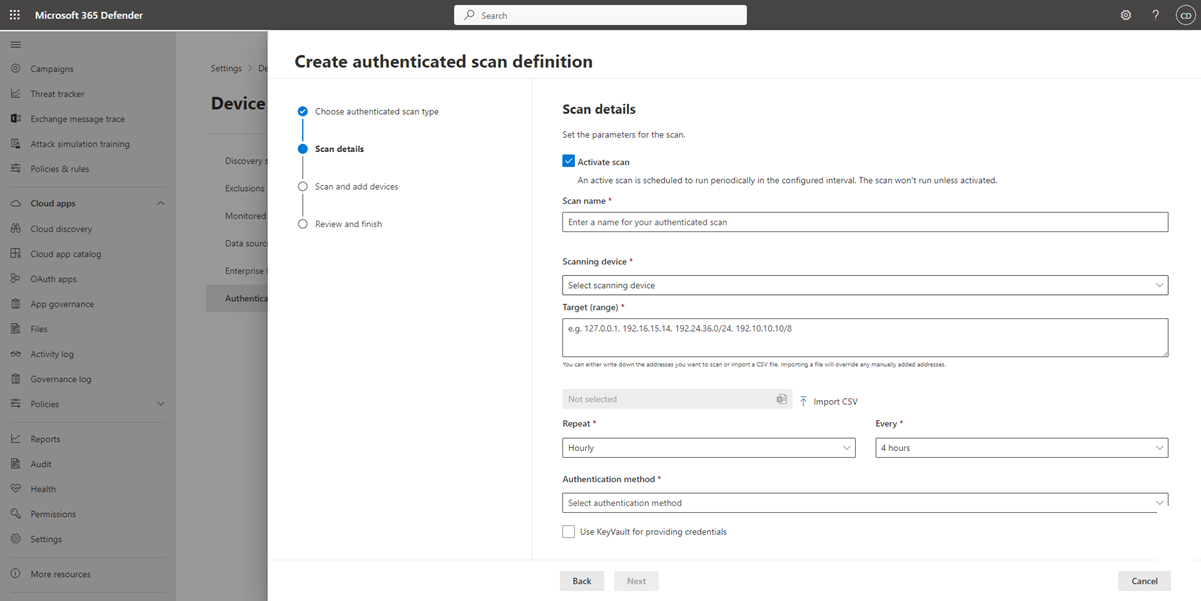
Select whether to Activate scan.
Type a Scan name.
Select the Scanning device: The onboarded device you use to scan the network devices.
Type the Target (range): The IP address ranges or hostnames you want to scan. You can either enter the addresses or import a CSV file. Importing a file overrides any manually added addresses.
Select the Scan interval: By default, the scan runs every four hours. You can change the scan interval or have it only run once, by selecting Don't repeat.
Select your Authentication method.
You can select to Use azure KeyVault for providing credentials: If you manage your credentials in Azure KeyVault, you can type the Azure KeyVault URL and Azure KeyVault secret name to be accessed by the scanning device to provide credentials. The secret value is dependent on the method you choose, as described in the following table:
Authentication Method Azure KeyVault secret value AuthPrivUsername;AuthPassword;PrivPassword AuthNoPrivUsername;AuthPassword CommunityStringCommunityString Select Next to run or skip the test scan.
Select Next to review the settings and the select Submit to create your new network device authenticated scan.

Note
To prevent device duplication in the network device inventory, make sure each IP address is configured only once across multiple scanning devices.
Scan and add network devices
During the setup process, you can perform a one time test scan to verify that:
- There's connectivity between the Defender for Endpoint scanning device and the configured target network devices.
- The configured SNMP credentials are correct.
Each scanning device can support up to 1,500 successful IP addresses scan. For example, if you scan 10 different subnets where only 100 IP addresses return successful results, you can scan 1,400 IP more addresses from other subnets on the same scanning device.
If there are multiple IP address ranges/subnets to scan, the test scan results take several minutes to show up. A test scan is available for up to 1,024 addresses.
When the results are displayed, you can choose which devices to include in the periodic scan. If you skip viewing the scan results, all configured IP addresses are added to the network device authenticated scan (regardless of the device's response). The scan results can also be exported.
View network devices in the device inventory
Newly discovered devices are displayed under the device inventory in the new Network devices tab. It might take up to two hours after adding a scanning job until the devices are updated.
