Note
Access to this page requires authorization. You can try signing in or changing directories.
Access to this page requires authorization. You can try changing directories.
This article provides guidance on the remote management of contacts on Microsoft Teams certified Phones using the Teams admin center. This feature allows users to easily access emergency or frequently used contacts available in the Company contacts folder on Teams Phones.
Note
This feature is currently available only for common area phones
Steps for managing contacts in Teams admin center
To manage contacts on Teams phones through the Teams admin center, follow these steps:
Update the Teams phone to version 1449/1.0.94.2025062601 or later: After updating the phone, you will notice changes. To update your Teams phones, refer to Update your phones remotely. Ensure that you are running Android version 1449/1.0.94.2025062601 or later.
Sign in to the Teams admin center.
Navigate to Teams devices > Phones > click on the Common area phones tab.
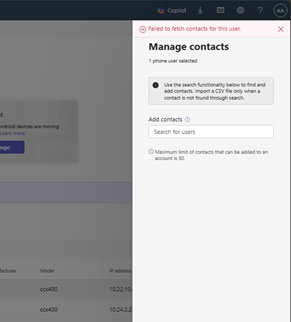
To add contacts to the Company contacts folder:
a. Select the devices for which you want to add contacts, then click Manage Contacts.
a. A right pane opens. In the Add contact search box, search and select the desired contacts.
a. If you cannot find contacts in the search box, use the Import contacts option. A sample CSV file is available for download.
a. Click Save.
a. The contacts sync to the Company contacts folder within approximately 24 hours.
To delete contacts from the Company contacts folder:
a. Select the device from which you need to delete contacts, then click Manage Contacts.
a. In the right pane, remove the applicable contacts and click Save.
a. Confirm the deletion in the pop-up that appears.
Permissions to manage contacts:
You must have mailbox permissions to manage contacts for Teams Devices accounts. Without these permissions, you encounter an error in Teams admin center when attempting to view or add contacts.
In these situations, refer to the Mailbox Permission Script Execution Guide and add the necessary permissions to the relevant accounts.
Mailbox Permission Script Execution Guide
Overview
This guide provides step-by-step instructions for an admin user to execute a PowerShell script that grants FullAccess mailbox permissions in bulk using a CSV file. The script supports Modern Authentication (MFA/Authenticator app) and logs all actions.
Prerequisites
Windows PowerShell 5.1 or later (or PowerShell Core)
PowerShell script file (grant_mailbox_permissions.ps1)
Export the Common area phones inventory from Teams admin center
Export and Download the CSV file from Common area phones screen.

Running the Script
Open PowerShell as Administrator.
Navigate to the folder containing the script and CSV file: cd "C:\Path\To\Your\Folder"
Run the script:
#Install and import the Exchange Online module if not already installed
Install-Module -Name ExchangeOnlineManagement -Scope CurrentUser -Force Import-Module ExchangeOnlineManagement

#Prompt for admin user principal name only (no password)
$adminUser = Read-Host "Enter the Admin User UPN (e.g.,

#Prompt for CSV file path (no double quotes in the file path)
$csvPath = Read-Host "Enter the full path to your CSV file (e.g., C:\scripts\user_upns.csv no quotes)"

#Connect to Exchange Online (interactive login, supports MFA)
Connect-ExchangeOnline -UserPrincipalName $adminUser

#Log file path
$logPath = "mailbox_permission_log.txt"

#Import the CSV file
$users = Import-Csv -Path $csvPath

foreach ($user in $users) { $userUPN = $user.UPN $serialNumber = $user.'Serial Number' if ([string]::IsNullOrWhiteSpace($userUPN)) { $logEntry = "$(Get-Date -Format 'yyyy-MM-dd HH:mm:ss') SKIPPED: Missing UPN for Serial Number $serialNumber" Write-Host $logEntry -ForegroundColor Yellow Add-Content -Path $logPath -Value $logEntry continue } try { Write-Host "Adding FullAccess permission for $adminUser to $userUPN's mailbox..." Add-MailboxPermission -Identity $userUPN -User $adminUser -AccessRights FullAccess -InheritanceType All -ErrorAction Stop $logEntry = "$(Get-Date -Format 'yyyy-MM-dd HH:mm:ss') SUCCESS: Added FullAccess for $adminUser to $userUPN" Write-Host $logEntry -ForegroundColor Green } catch { $logEntry = "$(Get-Date -Format 'yyyy-MM-dd HH:mm:ss') ERROR: Failed to add FullAccess for $adminUser to $userUPN. Error: $_" Write-Host $logEntry -ForegroundColor Red } Add-Content -Path $logPath -Value $logEntry }

Write-Host "Script completed. Check $logPath for details."
Enter the Admin User principal name (UPN) when prompted.
Enter the full path to your CSV file when prompted.
Authenticate using your usual method (including Authenticator app if necessary).
Script Behavior
The script connects to Exchange Online using your admin account (supports MFA).
The script reads each row in your CSV file.
When the (User principal name) UPN is missing, it logs a SKIPPED entry with the Serial Number.
When the UPN is present, it attempts to grant "FullAccess" permission.
The script logs SUCCESS or ERROR for each attempt in mailbox_permission_log.txt.
Sample Log Entries
2025-07-23 20:00:01 SUCCESS: Added FullAccess for admin@yourdomain.com to user1@domain.com 2025-07-23 20:00:02 ERROR: Failed to add FullAccess for admin@yourdomain.com to user2@domain.com. Error: 2025-07-23 20:00:03 SKIPPED: Missing UPN for Serial Number 99999
Troubleshooting
Module not found? Run: Install-Module -Name ExchangeOnlineManagement -Scope CurrentUser -Force
Permission denied? Ensure you have the necessary Exchange Online admin rights.
Script errors? Check the log file for details and review your CSV for formatting issues.
Security Note
The script does not store your password. All authentication is handled securely via Microsoft’s sign-in prompt.
Support
If you have any questions or need further assistance, contact your IT support team.
Note
Manage contacts is currently applicable only for common area phones. All Manage Contacts operations, such as adding or deleting a contact, may take up to 24 hours to reflect on the device. Contact deletion can be performed for one device at a time. The activity log is currently available only for Phones and can be used to track just the Manage Contacts operations.
Known Issue
When organizational contacts with both email and phone numbers are pushed from Teams admin center, calls route to their phone number instead of the Teams client. We are currently investigating this issue. Note that this issue doesn’t affect organizational contacts without phone numbers or external contacts.