Provision cloud resources in Microsoft Visual Studio
TeamsFx integrates with Azure and the Microsoft 365 cloud, which allows to place your app in Azure with a single command. TeamsFx integrates with Azure Resource Manager (ARM), which enables to provision Azure resources that your application needs for code approach.
Sign in to your Azure account
Open Visual Studio.
Open the Microsoft Teams App project.
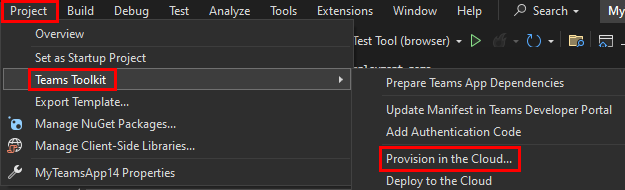
Select Project > Teams Toolkit > Provision in the Cloud.
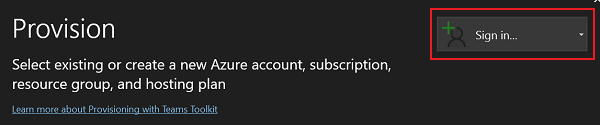
Select Sign in....
Note
If you're already signed in, your username is displayed, or you've an option to Add an account.
After you've signed in to your Azure account using your credentials, the browser closes automatically.
Provision cloud resources
After you open your project in Visual Studio, to provision cloud resources follow these steps:
Select Project > Teams Toolkit > Provision in the Cloud....
The Provision window appears.
Enter the following details to provision your resources:
- Select your Subscription name from the dropdown menu.
- Select your Resource group from the dropdown menu or you can create new Resource group by selecting New....
- Select your Region from the dropdown menu.
- Select Provision.

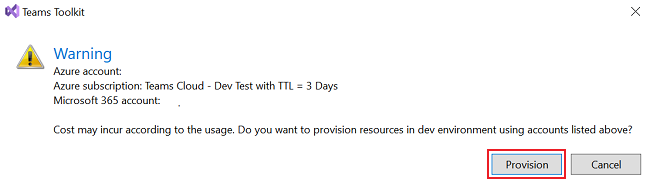
In the pop-up window that appears, select Provision.
The provisioning process creates resources in the Azure cloud. You can monitor the progress by observing the Microsoft Teams Toolkit output window.
In the pop-up window that appears, to view all the resources that are provisioned, select View provisioned resources.


Provision actions
The following actions are designed for provision:
- teamsApp/create
- teamsApp/update
- teamsApp/validateManifest
- teamsApp/validateAppPackage
- teamsApp/zipAppPackage
- teamsApp/publishAppPackage
- aadApp/create
- aadApp/update
- botAadApp/create
- arm/deploy
- azureStorage/enableStaticWebsite
- script
teamsApp/create
If the environment variable that stores Teams app ID is empty or the app ID isn't found from Teams Developer Portal, then the teamsApp/create action creates a new Teams app. It operates on Teams app in Teams Developer Portal.
  - uses: teamsApp/create
    with:
      # #required. Name of Teams app
      name: <your-preferred-app-name>
      # Write the information of created resources into environment file for the specified environment variable(s).
    writeToEnvironmentFile:
      # The id for Teams app
      teamsAppId: <your-preferred-env-var-name>
teamsApp/update
When you apply the Teams app manifest to an existing Teams app in Teams Developer Portal. teamsApp/update action uses the app ID in manifest.json file to determine which Teams app to update. It operates on Teams app in Teams Developer Portal.
- uses: teamsApp/update
    with:
      # Required. Relative path to the yaml file. This is the path for built zip file.
      appPackagePath: <path-to-teams-app-package-file>
teamsApp/validateManifest
The teamsApp/validateManifest action renders Teams app manifest template with environment variables and validates Teams app manifest file using its schema.
- uses: teamsApp/validateManifest
    with:
      # Required. Relative path to the yaml file. Path to Teams app manifest file
    manifestPath: <path-to-manifest-file>
teamsApp/validateAppPackage
The teamsApp/validateAppPackage action validates Teams app package using validation rules.
  - uses: teamsApp/validateAppPackage
      with:
      # Required. Relative path to the yaml file. This is the path for built zip file.
    appPackagePath: <path-to-teams-app-package-file>
teamsApp/zipAppPackage
The teamsApp/zipAppPackage action renders Teams app manifest template with environment variables and compresses the manifest file with two icons into a zip file.
- uses: teamsApp/zipAppPackage
    with:
      # Required. Relative path to the yaml file. This is the path for Teams app manifest file. Environment variables in manifest will be replaced before apply to Microsoft Entra app.
    manifestPath: <path-to-manifest-file>
      # Required. Relative path to the yaml file. This is the path for built zip file.
    outputZipPath: <path-to-generated-zip-file>
      # Required. Relative path to the yaml file. This is the path for built manifest json file.
    outputJsonPath: <path-to-generated-json-file>
teamsApp/publishAppPackage
The teamsApp/publishAppPackage action publishes built Teams app zip file to tenant app catalog. It operates in Microsoft 365 tenant app catalog.
- uses: teamsApp/publishAppPackage
    with:
      # Required. Relative path to this file. This is the path for built zip file.
    appPackagePath: <path-to-teams-app-package>
    # Write the information of created resources into environment file for the specified environment variable(s).
    writeToEnvironmentFile:
      # The Teams app id in tenant app catalog.
    publishedAppId: <your-preferred-env-var-name>
aadApp/create
The aadApp/create action creates a new Microsoft Entra application to authenticate users if the environment variable that stores the clientId is empty. It operates in Microsoft Entra ID in Microsoft 365 tenant.
- uses: aadApp/create
    with:
      # Required. The Microsoft Entra app's display name. When you run aadApp/update, the Microsoft Entra app name will be updated based on the definition in manifest. If you don't want to change the name, make sure the name in Microsoft Entra app manifest is the same with the name defined here.
      name: <your-application-name>
      # Required. If the value is false, the action will not generate client secret for you
      generateClientSecret: true
      # Required. Specifies what Microsoft accounts are supported for the current application. Supported values are: `AzureADMyOrg`, `AzureADMultipleOrgs`, `AzureADandPersonalMicrosoftAccount`, `PersonalMicrosoftAccount`.
      signInAudience: "AzureADMyOrg"
    # Write the information of created resources into environment file for the specified environment variable(s).
    writeToEnvironmentFile:
      # Required. The client (application) ID of Microsoft Entra application. The action will refer the environment variable defined here to determine whether to create a new Microsoft Entra app.
      clientId: <your-preferred-env-var-name>
      # Required when `generateClientSecret` is `true`. The action will refer the environment variable defined here to determine whether to create a new client secret. It's recommended to add `SECRET_` prefix to the environment variable name so it will be stored to the .env.{envName}.user environment file.
      clientSecret: <your-preferred-env-var-name>
      # Required. The object ID of Microsoft Entra application
      objectId: <your-preferred-env-var-name>
      # Optional. The tenant ID of Microsoft Entra tenant
      tenantId: <your-preferred-env-var-name>
      # Optional. The Microsoft Entra authority
      authority: <your-preferred-env-var-name>
      # Optional. The host name of Microsoft Entra authority
      authorityHost: <your-preferred-env-var-name>
aadApp/update
aadApp/update action updates your Microsoft Entra application based on Microsoft Entra app manifest. It refers to the ID property in Microsoft Entra app manifest to determine which Microsoft Entra app to update. aadApp/update operates on Microsoft Entra ID in your Microsoft 365 tenant.
- uses: aadApp/update
    with:
      # Required. Relative path to the yaml file. Path to the Microsoft Entra app manifest. Environment variables in manifest will be replaced before apply to Microsoft Entra app.
      manifestPath: <path-to-manifest-file>
      # Required. Relative path to the yaml folder. This action will output the final Microsoft Entra app manifest used to update Microsoft Entra app to this path.
      outputFilePath : <path-to-output-file>
botAadApp/create
The botAadApp/create action creates a new or reuses an existing Microsoft Entra application for bot. It operates on Microsoft Entra ID in the Microsoft 365 tenant.
- uses: botAadApp/create
    with:
      # Required. The Microsoft Entra app's display name
      name: <your-app-name>
    writeToEnvironmentFile:
      # The The Microsoft Entra app's client id created for bot.
      botId: <your-preferred-env-var-name>
      # The The Microsoft Entra app's client secret created for bot.
      botPassword: <your-preferred-env-var-name>
arm/deploy
The arm/deploy action deploys given ARM templates in parallel. It operates on Azure subscription.
- uses: arm/deploy
    with:
      # Required. You can use built-in environment variable `AZURE_SUBSCRIPTION_ID` here. TeamsFx will ask you select one subscription if its value is empty. You're free to reference other environment variable here, but TeamsFx will not ask you to select subscription if it's empty in this case.
      subscriptionId: ${{AZURE_SUBSCRIPTION_ID}}
      # Required. You can use built-in environment variable `AZURE_RESOURCE_GROUP_NAME` here. TeamsFx will ask you to select or create one resource group if its value is empty. You're free to reference other environment variable here, but TeamsFx will not ask you to select or create resource group if it's empty in this case.
      resourceGroupName: ${{AZURE_RESOURCE_GROUP_NAME}}
      # Required. The ARM templates to be deployed.
      templates:
        # Required. Relative path to the yaml file.
      - path: <path-to-arm-template>
        # Optional. Relative path to the yaml file. TeamsFx will replace the environment variable reference with real value before deploy ARM template.
        parameters: <path-to-arm-template-parameter>
        # Required. Name of the ARM template deployment.
        deploymentName: <arm-deployment-name>
      # Optional. Teams Toolkit will download this bicep CLI version from github for you, will use bicep CLI in PATH if you remove this config.
      bicepCliVersion: v0.9.1
azureStorage/enableStaticWebsite
The azureStorage/enableStaticWebsite action enables static website setting in Azure Storage. It operates on Azure Storage.
- uses: azureStorage/enableStaticWebsite
    with:
      # Required. The resource id of Azure Storage
      storageResourceId: ${{<env-name-of-azure-storage-resource-id>}}
      # Required. The path to index page.
      indexPage: <path-to-index-page>
      # Required. The path to error page.
      errorPage: <path-to-error-page>
script
The script action executes a user-defined script.
- uses: script
    with:
     # Required. Command to run or path to the script. Succeeds if exit code is 0. '::set-teamsfx-env key=value' is a special command to generate output variables into .env file, in this case, "mykey=abc" will be added the output in the corresponding .env file.
     run: $my_key="abc"; echo "::set-teamsfx-env mykey=${my_key}"
     # Optional. Available values are: bash, sh, powershell(Powershell Desktop), pwsh(powershell core), cmd. If omitted, it defaults to bash on Linux/MacOS, defaults to pwsh on windows.
     shell: <shell-name>
     # Optional. Current working directory. Defaults to the directory of this file.
     workingDirectory: <working-directory>
     # Optional. Timeout in ms.
     timeout: <timeout-in-ms>
     # Optional. Redirect stdout and stderr to a file.
     redirectTo: <path-to-output-file>
Customize resource provision
The provision steps are defined in the teamsapp.yml file, under the provision property. You can add, remove, or update actions to the provision property to define the expected actions you want to do during provision.
Reference environment variables in parameter files
Teams Toolkit supports referencing the values from environment variables in the teamsapp.yml file, Teams app manifest, Microsoft Entra app manifest, and Azure parameter files. You can use the syntax ${{ENV_VARIABLE_NAME}} to reference environment variables.
The following example sets the value of environment variable MY_AZURE_SUBSCRIPTION_ID to subscriptionId:
subscriptionId: ${{MY_AZURE_SUBSCRIPTION_ID}}
Customize ARM template files
If the predefined templates don't meet your app requirements, you can create your own ARM template or update existing ARM template and provide the path to arm/deploy action as follows:
- uses: arm/deploy
    with:
      subscriptionId: ${{AZURE_SUBSCRIPTION_ID}}
      resourceGroupName: ${{AZURE_RESOURCE_GROUP_NAME}}
      templates:
      - path: <path-to-your-arm-template>
        parameters: <path-to-your-parameter-file>
        deploymentName: <arm-deployment-name>
      bicepCliVersion: <bicep-cli-version>
The arm/deploy action support ARM templates that are written in bicep and json format. If you use json format, you can omit the bicepCliVersion parameter. You need to have basic knowledge of Azure Resource Manager. For more information, see Azure Resource Manager documentation.
Manage your resources
You can sign in to Azure portal and manage all resources created using Teams Toolkit.
- You can select a resource group from the existing list or the new resource group that you've created.
- You can see the details of the resource group you've selected in the overview section of the table of contents.
Customize Teams apps
You can customize your bot or the Teams app by adding environment variables to use a Microsoft Entra app that you've created. You can customize the Teams app in the following ways:
- Use an existing Microsoft Entra app for your Teams app
- Use an existing Microsoft Entra app for your bot
Use an existing Microsoft Entra app for your Teams app
To use a Microsoft Entra app created for your Teams app and to add environment variables to the .env files, follow these steps.
Open the
teamsapp.ymlfile and find theaadApp/createaction.Find the environment variable names that store information for Microsoft Entra app in the
writeToEnvironmentFileproperty. If you create projects using Teams Toolkit the defaultwriteToenvironmentFileproperty definition is as follows:writeToEnvironmentFile: clientId: AAD_APP_CLIENT_ID clientSecret: SECRET_AAD_APP_CLIENT_SECRET objectId: AAD_APP_OBJECT_ID tenantId: AAD_APP_TENANT_ID authority: AAD_APP_OAUTH_AUTHORITY authorityHost: AAD_APP_OAUTH_AUTHORITY_HOSTAdd values for each environment variable from step 2.
Add the following environment variables and their values to
env\.env.{env}file. For example:AAD_APP_CLIENT_ID=<value of Microsoft Entra application's client id (application id)> # example: 00000000-0000-0000-0000-000000000000 AAD_APP_OBJECT_ID=<value of Microsoft Entra application's object id> # example: 00000000-0000-0000-0000-000000000000 AAD_APP_TENANT_ID=<value of Microsoft Entra's (tenant) id>> # example: 00000000-0000-0000-0000-000000000000 AAD_APP_OAUTH_AUTHORITY=<value of Microsoft Entra's authority> # example: https://login.microsoftonline.com/<Directory (tenant) ID> AAD_APP_OAUTH_AUTHORITY_HOST=<host of Microsoft Entra's authority> # example: https://login.microsoftonline.com AAD_APP_ACCESS_AS_USER_PERMISSION_ID=<id of access_as_user permission> # example: 00000000-0000-0000-0000-000000000000If your application requires a Microsoft Entra app client secret, add the following environment variable and its value to
env\.env.{env}.userfile. For example:SECRET_AAD_APP_CLIENT_SECRET=<value of Microsoft Entra application's client secret>
If you don't have a Microsoft Entra app yet or you've one but don't know where to find the correct value, see Use existing Microsoft Entra app in TeamsFx project.
Note
- Remember to update the environment variable names in the examples if you use different names in
writeToEnvironmentFile. - If you don't use
aadApp/createaction to create Microsoft Entra application, you can add necessary environment variables with your preferred name without following above steps. - Ensure you do not share the same Microsoft Entra app in multiple environments.
Use an existing Microsoft Entra app for your bot
You can follow the steps to add environment variables to the .env files to use a Microsoft Entra app created for your Teams app.
Open the
teamsapp.ymlfile and find thebotAadApp/createaction.Find the environment variable names that store information for Microsoft Entra app in the
writeToEnvironmentFileproperty. The defaultwriteToEnvironmentFiledefinition if you create projects using Teams Toolkit is as follows:writeToEnvironmentFile: botId: BOT_ID botPassword: SECRET_BOT_PASSWORDAdd values for each environment variable from step 2.
Add the environment variable and its value to
env\.env.{env}file. For example:BOT_ID=<value of Microsoft Entra application's client id (application id)> # example: 00000000-0000-0000-0000-000000000000Add the environment variable and its value to
env\.env.{env}.userfile. For example:SECRET_BOT_PASSWORD=<value of Microsoft Entra application's client secret>
If you don't have a Microsoft Entra app for your bot yet or you've one but don't know where to find the correct values, see Use existing Microsoft Entra app in TeamsFx project.
Note
- Remember to update the environment variable names in the examples if you use different names in
writeToEnvironmentFile. - If you don't use
botAadApp/createaction to create Microsoft Entra application, you can add necessary environment variables with your preferred name without following above steps. - Ensure that you do not share the same Microsoft Entra app in multiple environments.
See also
Platform Docs
Feedback
Coming soon: Throughout 2024 we will be phasing out GitHub Issues as the feedback mechanism for content and replacing it with a new feedback system. For more information see: https://aka.ms/ContentUserFeedback.
Submit and view feedback for