Nota
L-aċċess għal din il-paġna jeħtieġ l-awtorizzazzjoni. Tista’ tipprova tidħol jew tibdel id-direttorji.
L-aċċess għal din il-paġna jeħtieġ l-awtorizzazzjoni. Tista’ tipprova tibdel id-direttorji.
In this quickstart, you assess and migrate a .NET project by using GitHub Copilot modernization for .NET. You complete the following tasks:
- Assess a sample project (Contoso University)
- Start the migration process
Prerequisites
Windows Operating System.
Visual Studio 2026 (or Visual Studio 2022 version 17.14.17 and newer).
.NET desktop development workload with the following optional components enabled:
- GitHub Copilot
- GitHub Copilot modernization agent
GitHub Copilot Subscription (paid or free).
Signed in to Visual Studio using a GitHub account with Copilot access.
Important
If you change subscriptions, you must restart Visual Studio.
Code must be written in C#.
Note
These prerequisites apply to Visual Studio. For other development environments, see Install GitHub Copilot modernization.
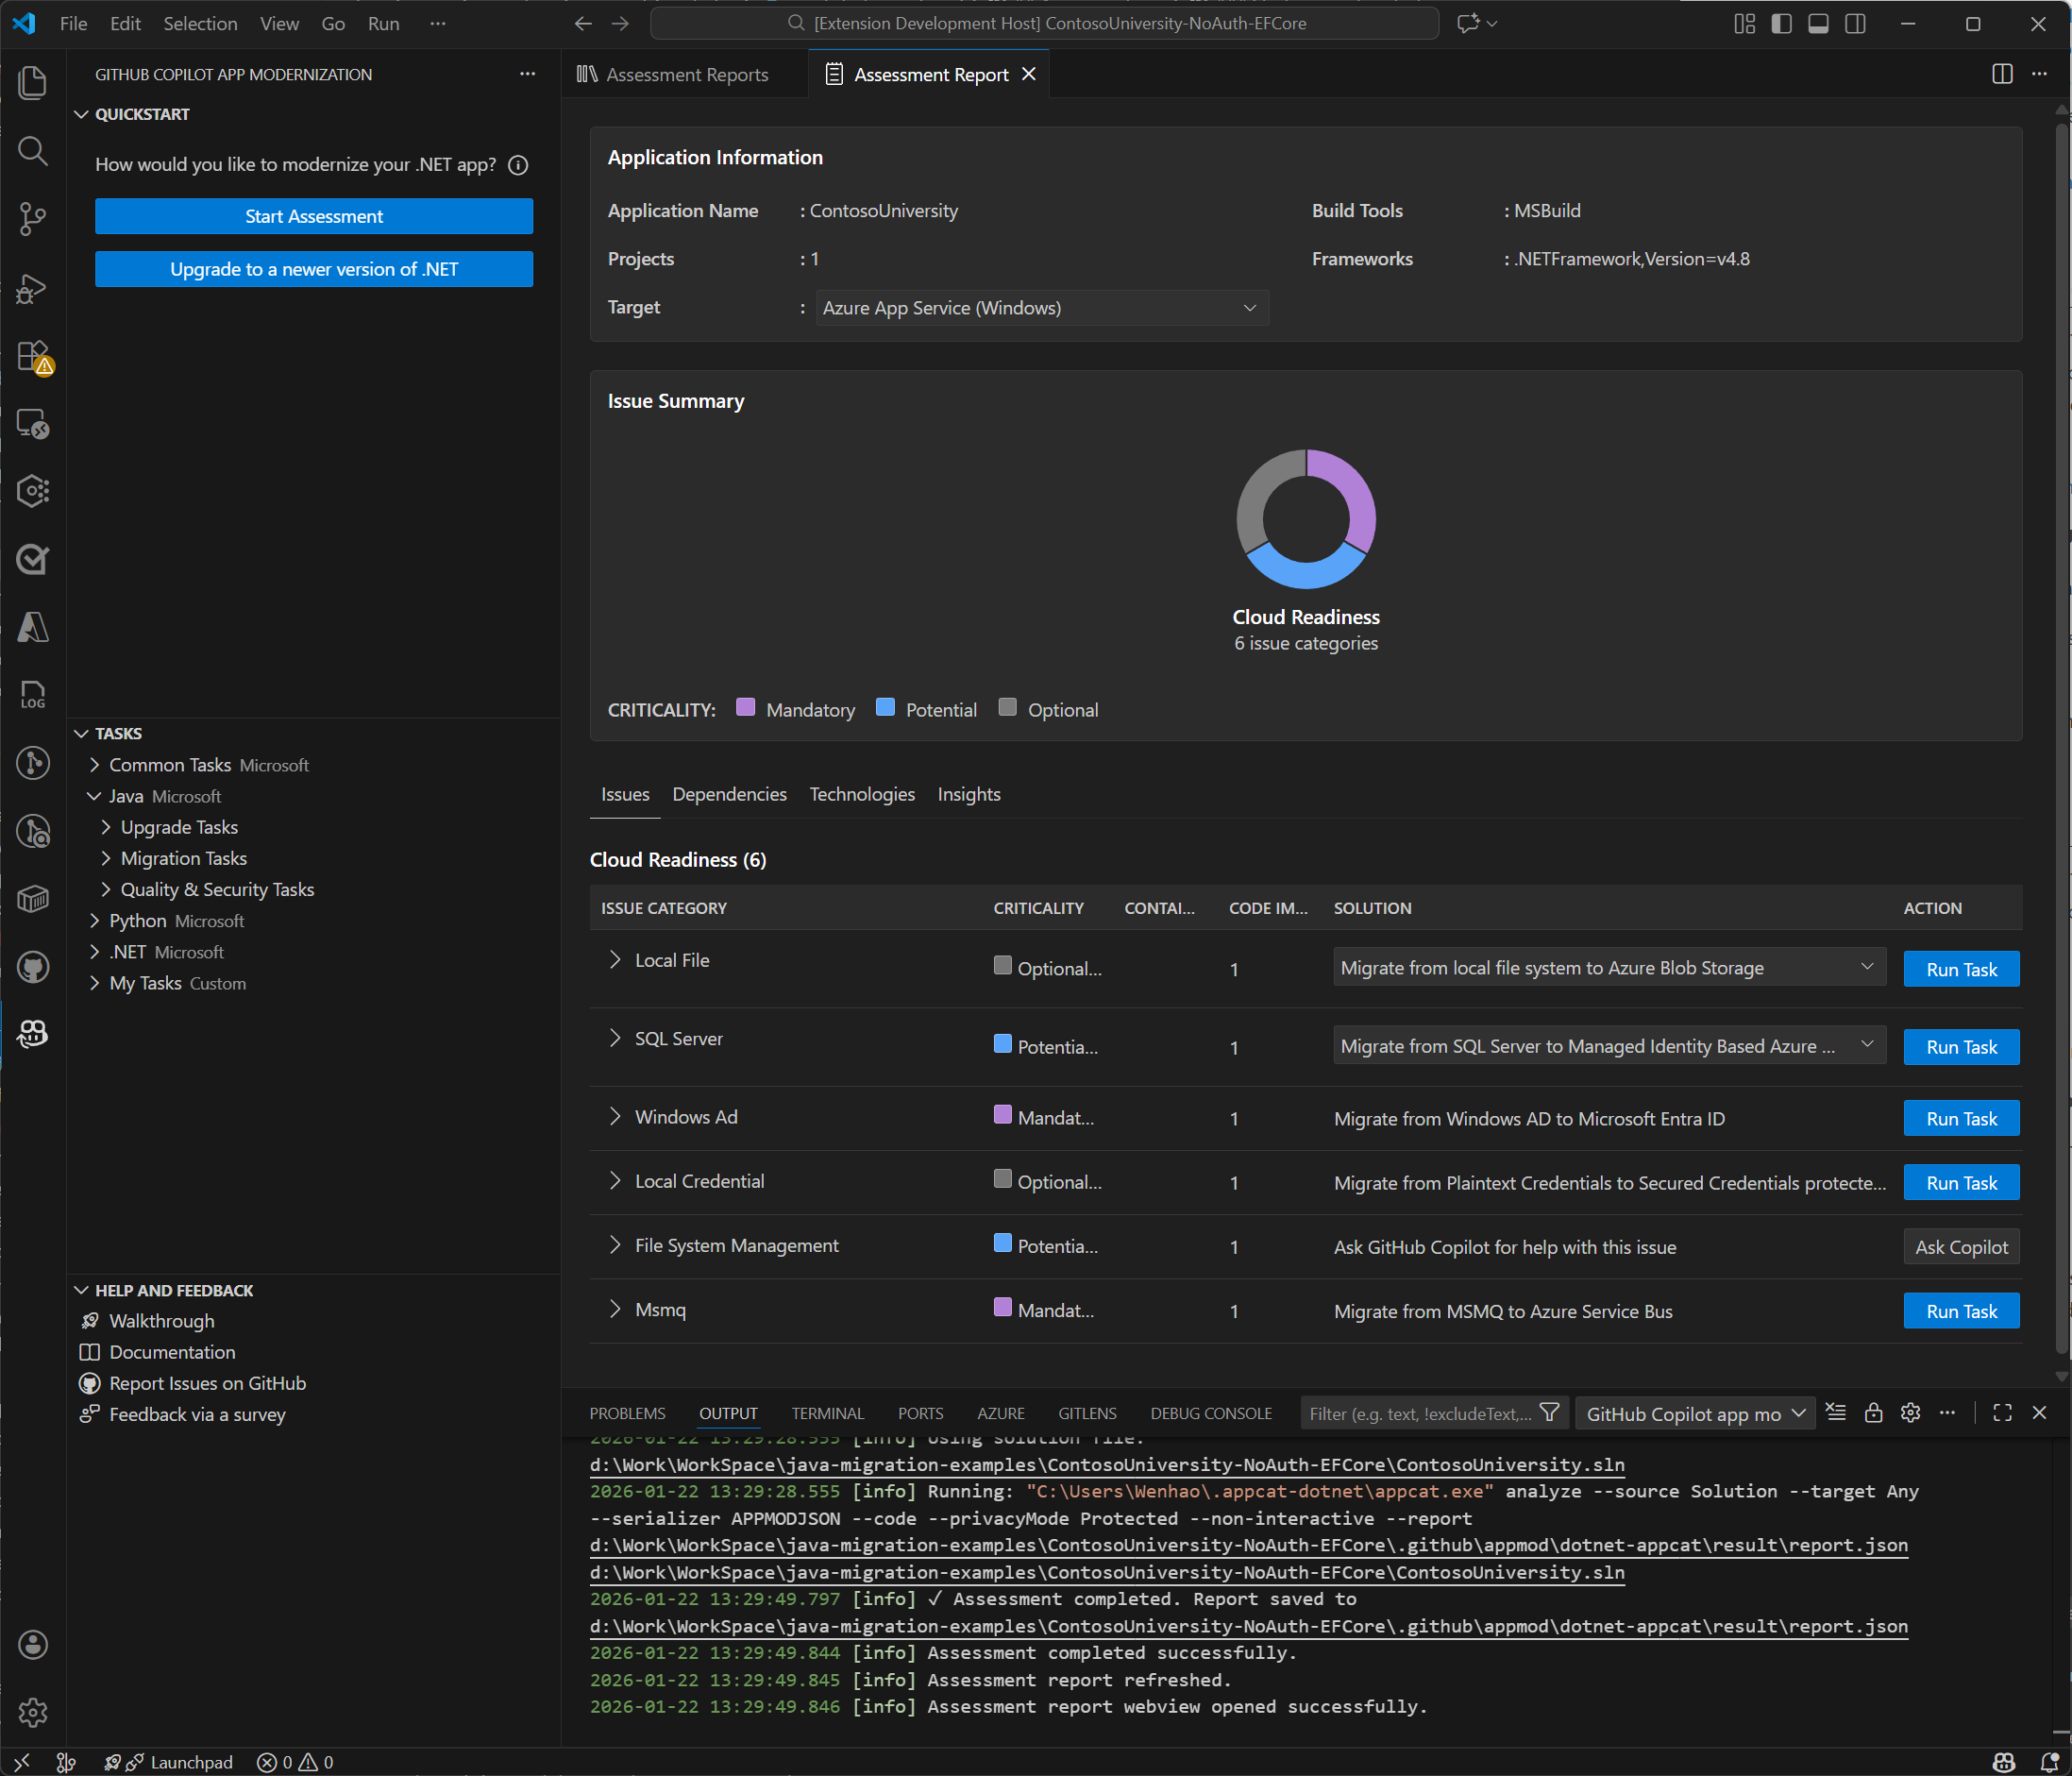
Assess app readiness
GitHub Copilot modernization for .NET assessment helps you find app readiness challenges, learn their impact, and see recommended migration tasks. Each migration task includes references to set up Azure resources, add configurations, and make code changes. Follow these steps to start your migration:
Clone the .NET migration copilot samples repository to your computer.
In Visual Studio, open the Contoso University solution from the samples repository.
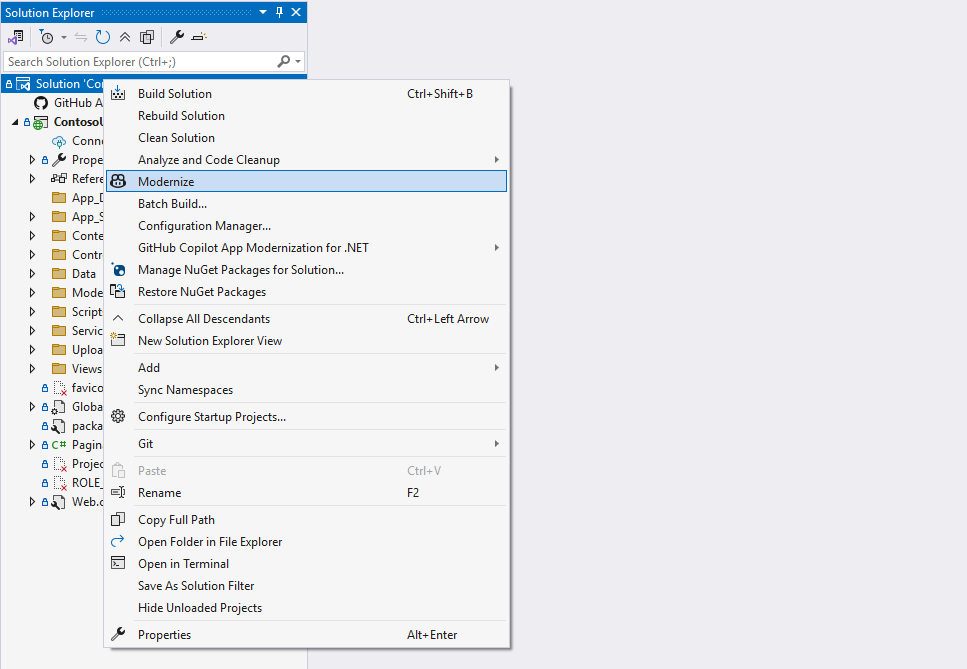
In Solution Explorer, right-click the solution node and select Modernize.
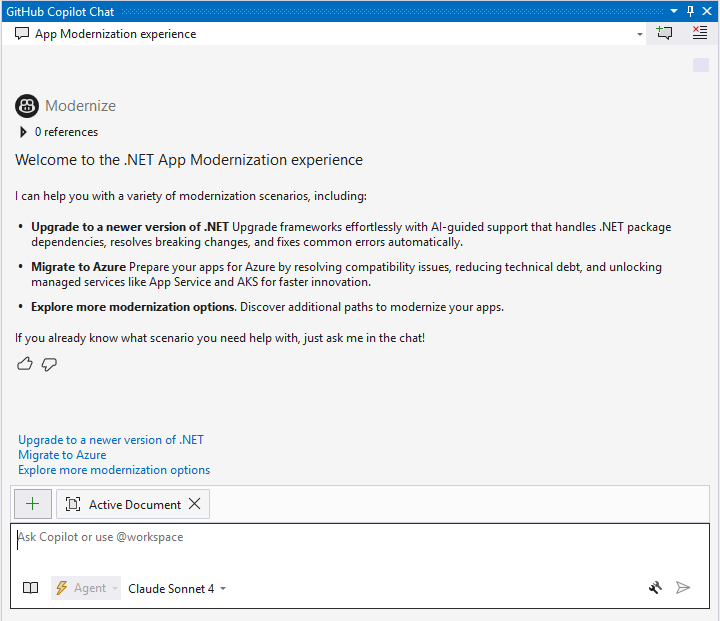
The GitHub Copilot Chat window opens with a welcome message and predefined options. Select Migrate to Azure from the available choices and send it to Copilot.
Tip
Instead of steps 3 and 4, you can open GitHub Copilot Chat directly and send
@Modernize Migrate to Azureto start the assessment and migration flow.A new Copilot chat session opens and shows the welcome message. The assessment starts automatically and analyzes your project for migration readiness.
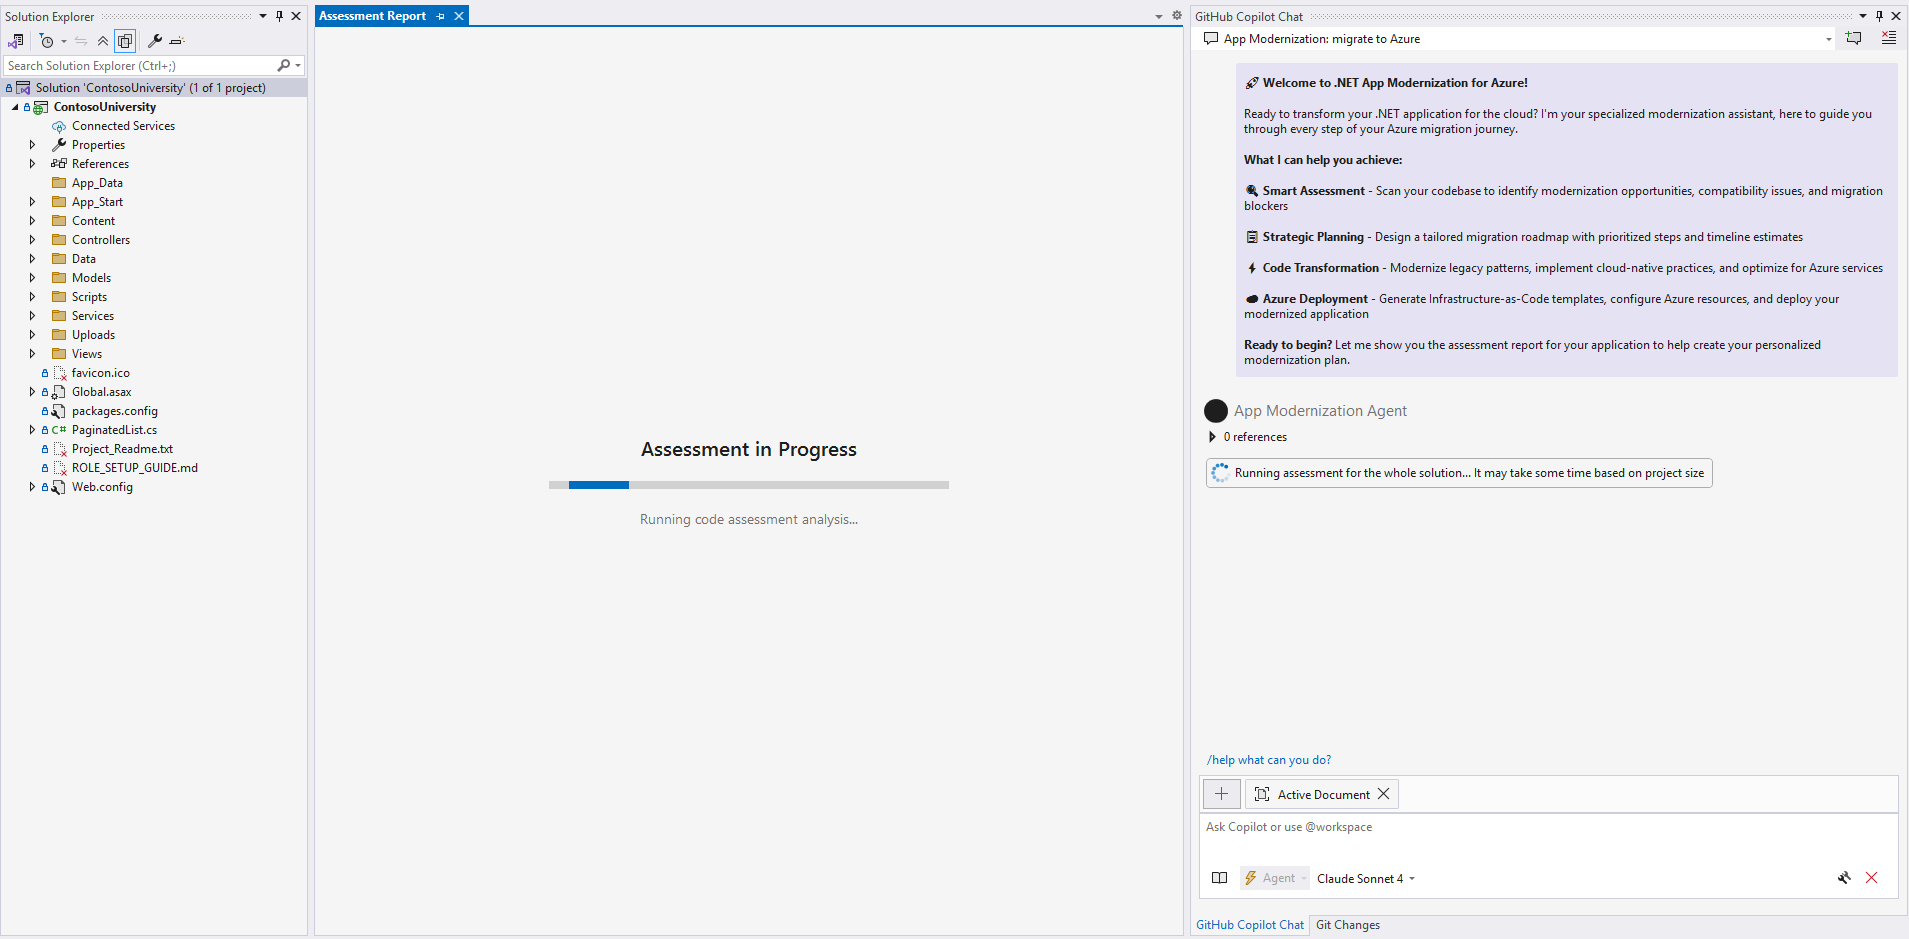
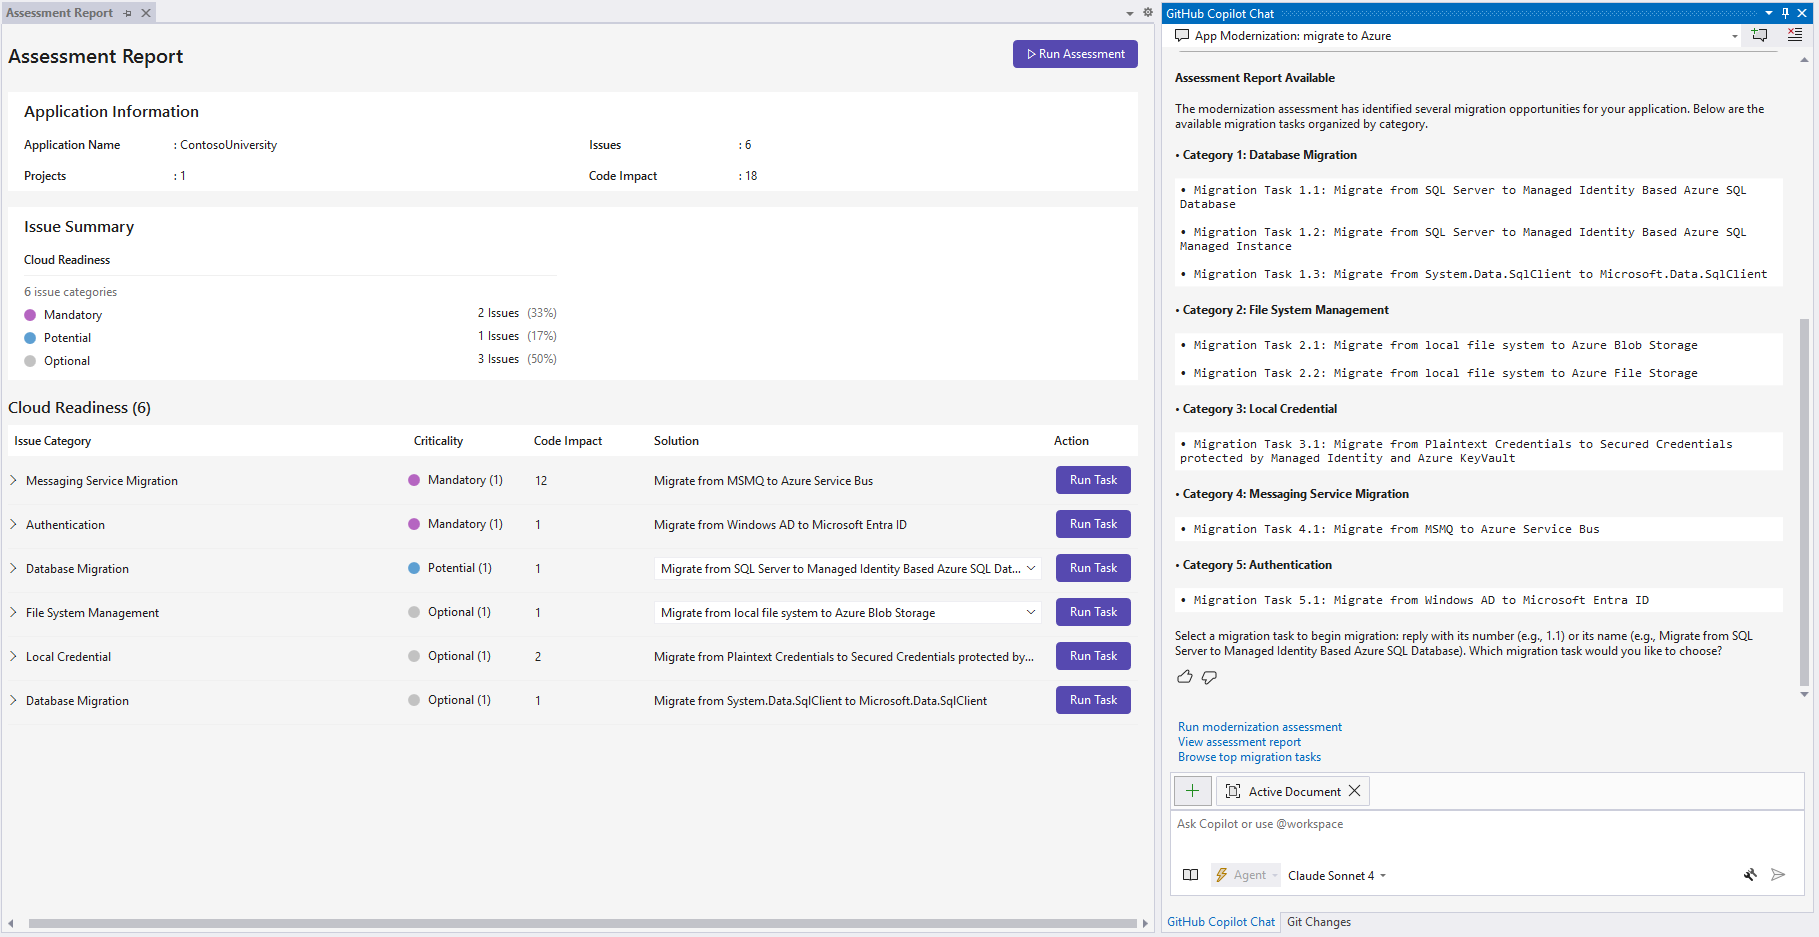
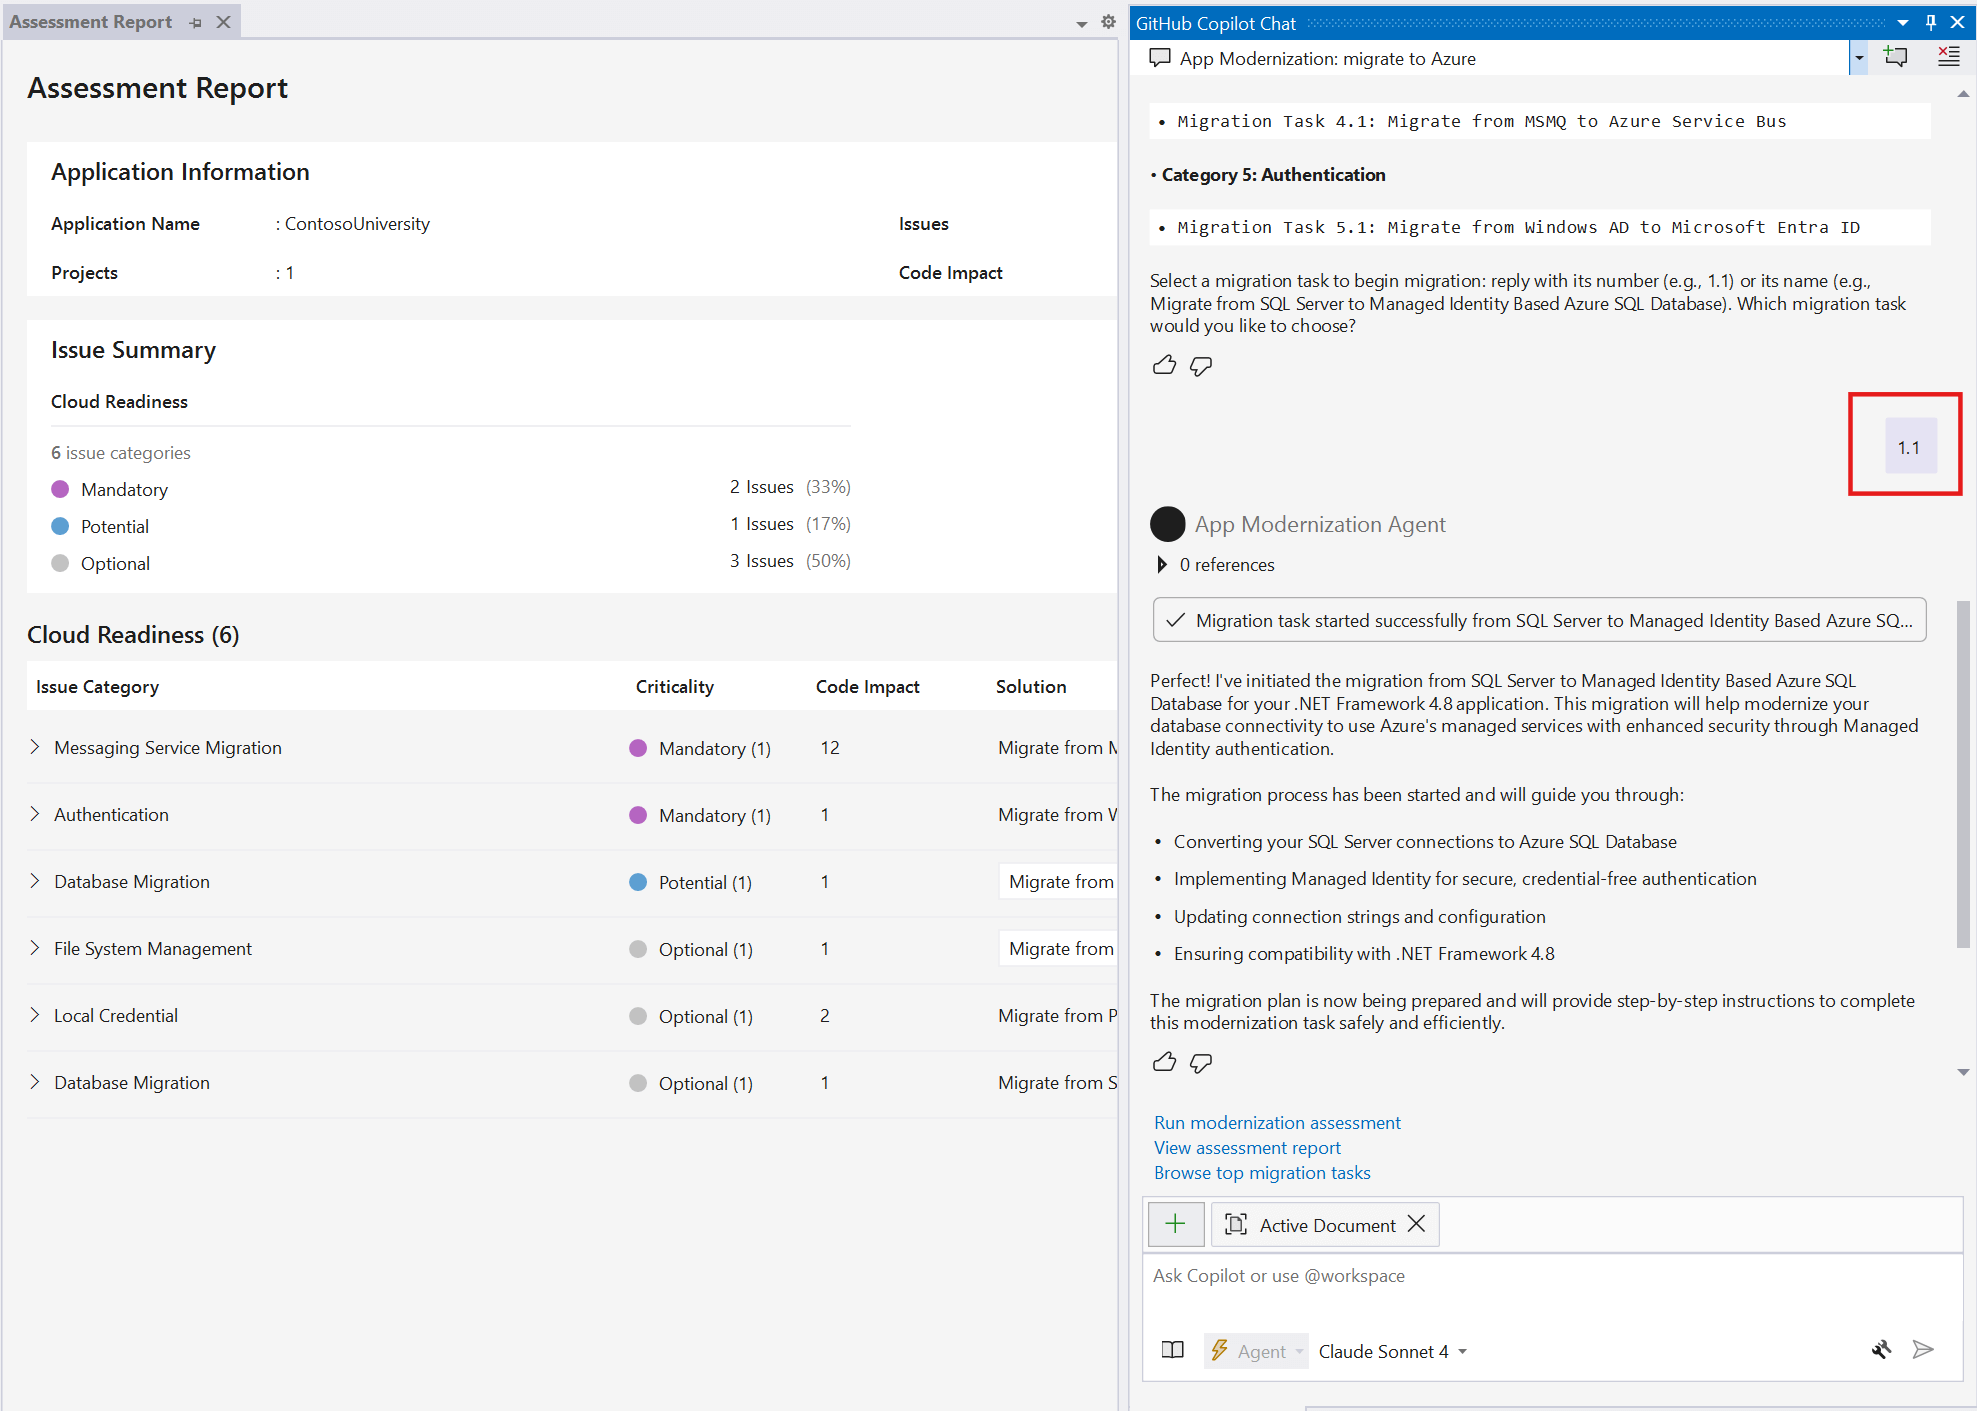
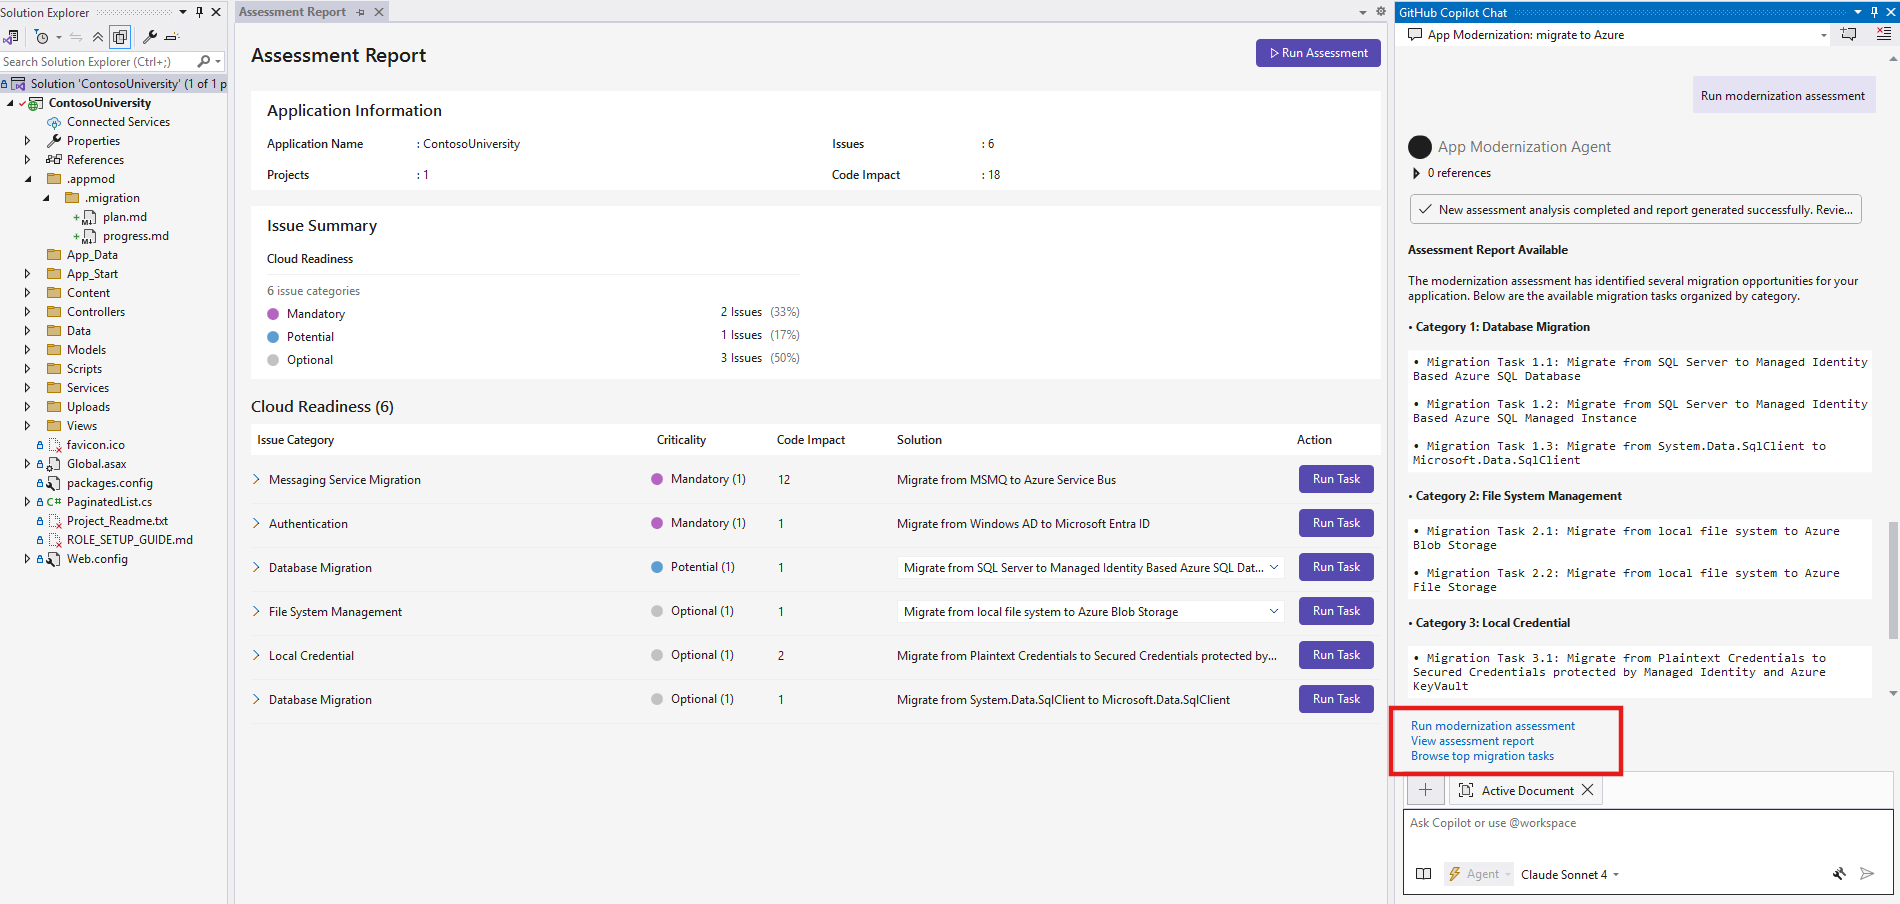
When the assessment finishes, you see a comprehensive assessment report UI page and a list of migration tasks in the chat window.
App migrations
GitHub Copilot modernization for .NET includes predefined tasks for common migration scenarios and follows Microsoft's best practices.
Start a migration task
Start a migration task in one of the following ways:
Option 1. Run from the Assessment Report
Select the Run Task button in the Assessment Report from the previous step to start a migration task.
Option 2. Send in Copilot Chat
Send the migration task number (for example, 1.1) or its name in the chat.
Plan and progress tracker generation
- When you start the migration, GitHub Copilot starts a session named "Modernization: migrate from
<source technology>to<target technology>" in agent mode with predefined prompts. - The tool creates two files in the
.appmod/.migrationfolder:plan.md: The overall migration plan.progress.md: A progress tracker that GitHub Copilot updates as it completes tasks.
- Edit these files to customize your migration before you continue.
Start code remediation
If you're satisfied with the plan and progress tracker, enter a prompt to start the migration process, such as:
The plan and progress tracker look good to me. Go ahead with the migration.GitHub Copilot starts the migration process and might ask for your approval to use knowledge base tools in the Model Context Protocol (MCP) server. Grant permission when prompted.
Copilot follows the plan and progress tracker to:
- Manage dependencies.
- Apply configuration changes.
- Make code changes.
- Build the solution, fix all compilation and configuration errors, and ensure a successful build.
- Fix security vulnerabilities.
Default chat messages
GitHub Copilot modernization for .NET provides default chat message options to streamline your workflow.
Choose one of the predefined options and send it in the chat:
- Run modernization assessment: Starts a new assessment of your application to identify migration readiness issues and Azure compatibility challenges.
- View assessment report: Opens the previous assessment report and shows a summary of migration tasks based on the results. If no previous assessment exists, it runs a new assessment first.
- Browse top migration tasks: Shows recommended migration tasks and common modernization scenarios, regardless of any specific assessment results.
Tip
These default messages help you quickly navigate common workflows without typing custom prompts. You can also enter your own messages to interact with Copilot for specific questions or needs.
Next steps
Prerequisites
A GitHub account with an active GitHub Copilot subscription under any plan.
The latest version of Visual Studio Code. Must be version 1.101 or later.
- GitHub Copilot in Visual Studio Code. For setup instructions, see Set up GitHub Copilot in Visual Studio Code. Be sure to sign in to your GitHub account within Visual Studio Code.
- GitHub Copilot modernization. Restart Visual Studio Code after installation.
A .NET development environment to build and test the project.
Assess app readiness
GitHub Copilot modernization for .NET assessment helps you find app readiness challenges, learn their impact, and see recommended migration tasks. Each migration task includes references to set up Azure resources, add configurations, and make code changes. Follow these steps to start your migration:
Clone the .NET migration copilot samples repository to your computer.
In Visual Studio Code, open the Contoso University solution from the samples repository.
Open the GitHub Copilot modernization extension.
In the QUICKSTART section, select Start Assessment. The Assessment reports page opens.
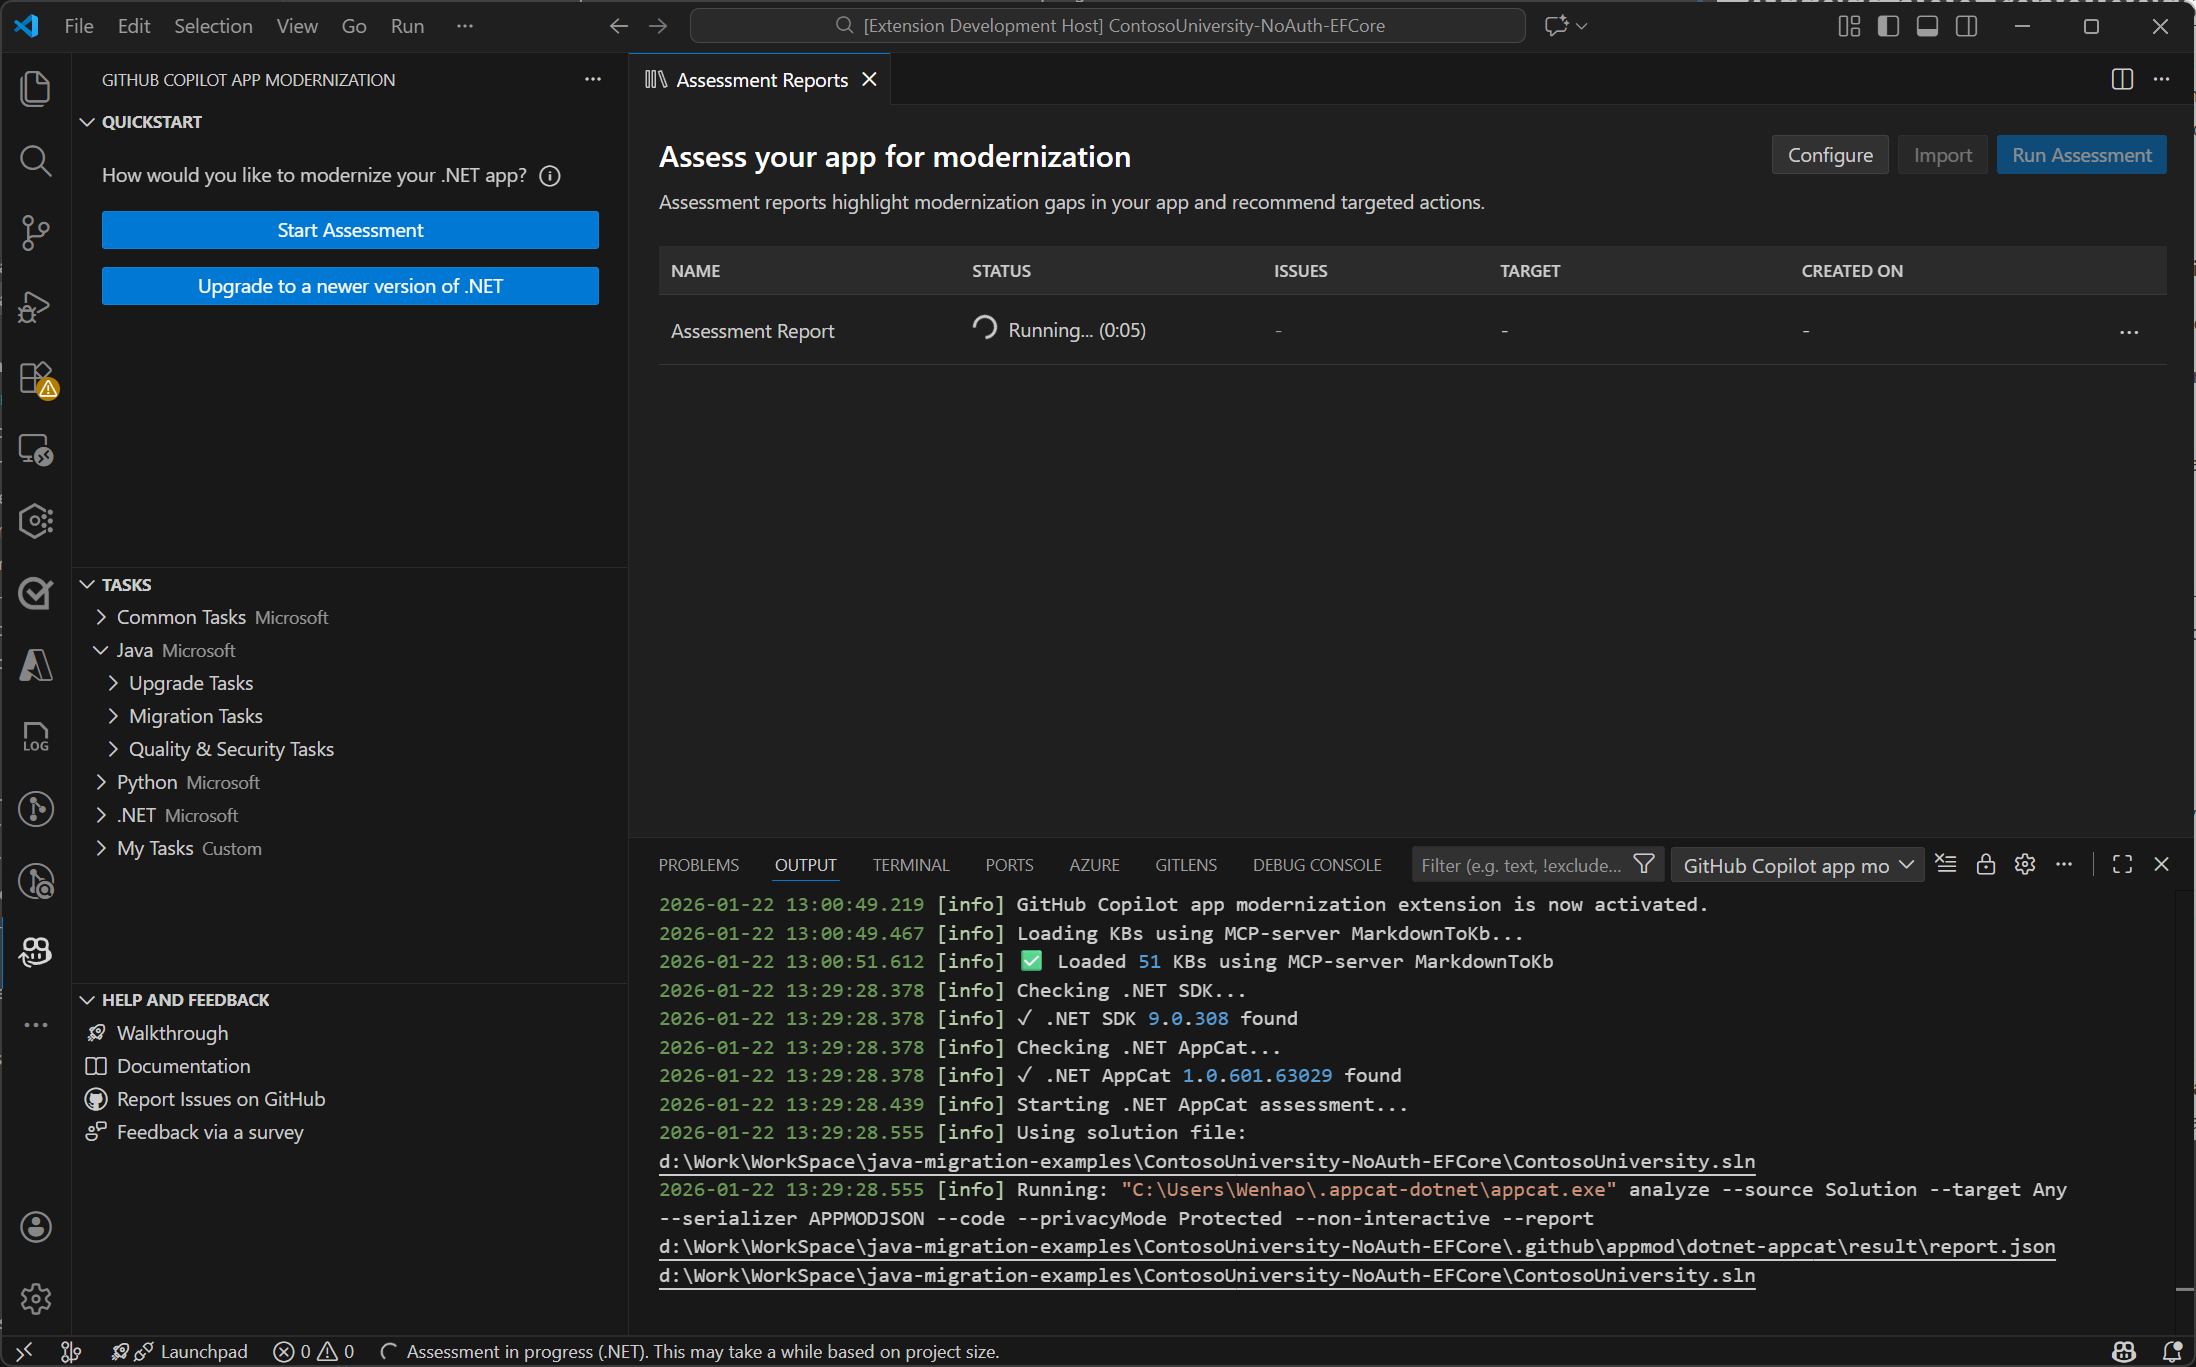
Select Run Assessment in the upper-right corner of the page.
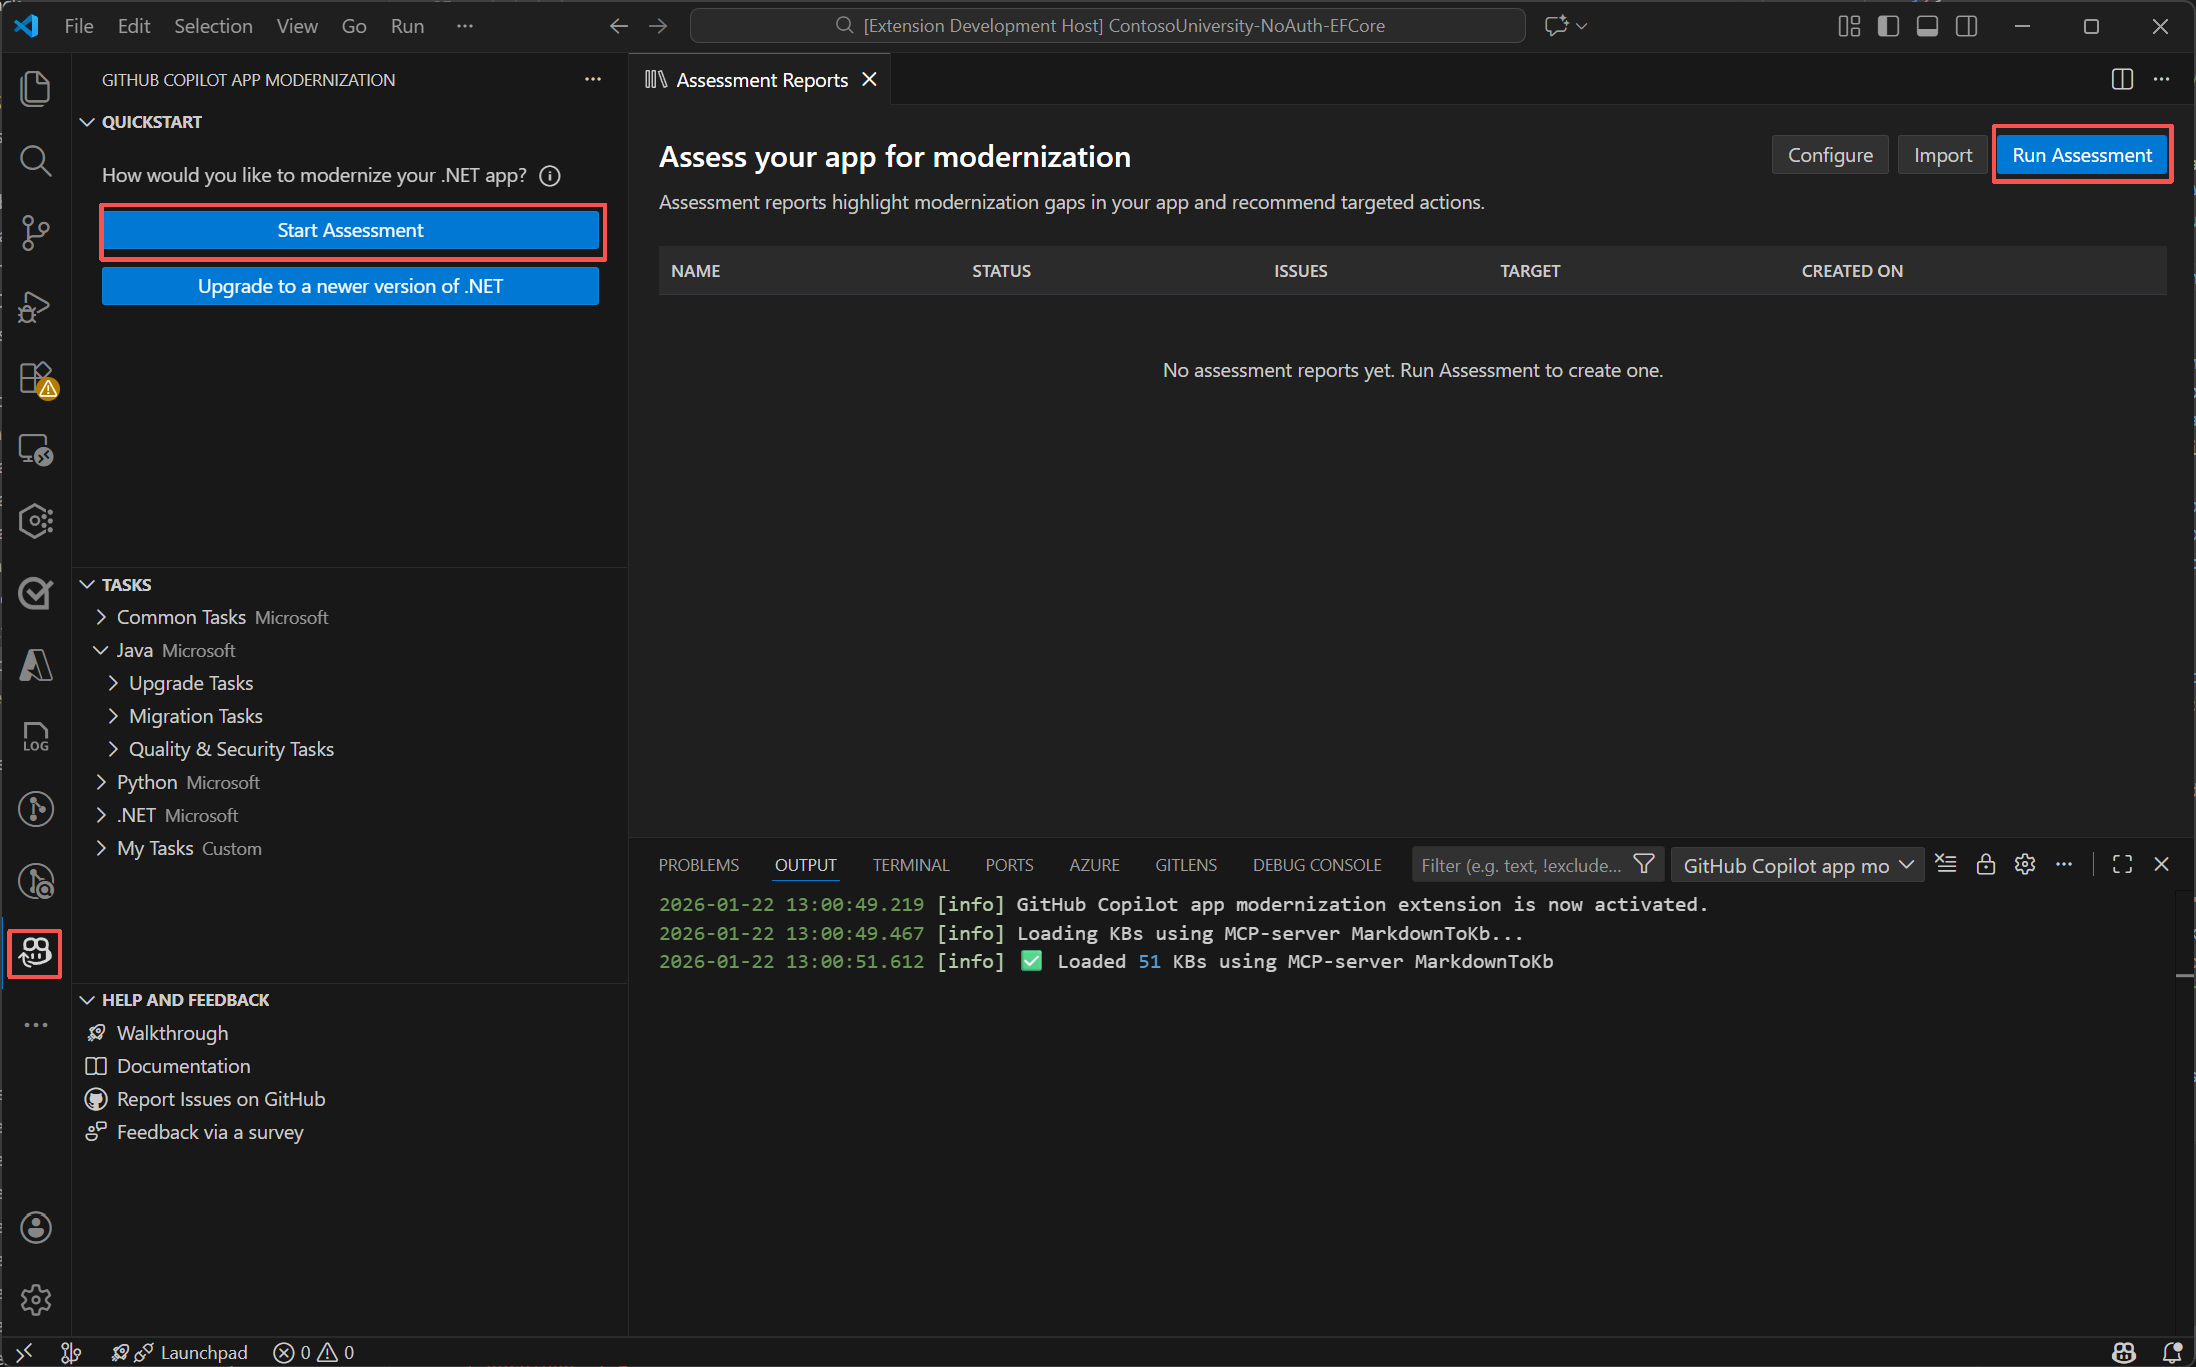
The assessment starts automatically and analyzes your project for migration readiness.
When the assessment finishes, you see a comprehensive assessment report UI page and a list of migration tasks in the chat window.
App migrations
GitHub Copilot modernization for .NET includes predefined tasks for common migration scenarios and follows Microsoft's best practices.
Chat-based migration (recommended)
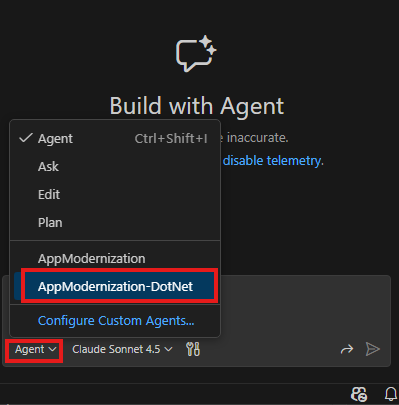
Chat-based migration is the recommended way to start a migration. The AppModernization-DotNet custom agent is optimized for application modernization tasks. This agent lets you use simple, natural language prompts to perform complex migration scenarios.
Complete the following steps to select the custom agent and start the migration:
Make sure you have a .NET project open in Visual Studio Code.
Select the chat icon in the Activity Bar to open the Copilot chat window.
In the chat window, locate the agent selector dropdown menu at the top of the chat input box. Select AppModernization-DotNet from the list. This custom agent is designed for .NET application modernization and migration scenarios.
Enter a prompt using the format
migrate from <source> to <target>in the chat window. For example:migrate from rabbitmq to Azure service busThe agent analyzes your code, creates a migration plan, makes code changes, runs validations, and generates a summary. Select Continue to proceed through each step and Keep to accept the changes.
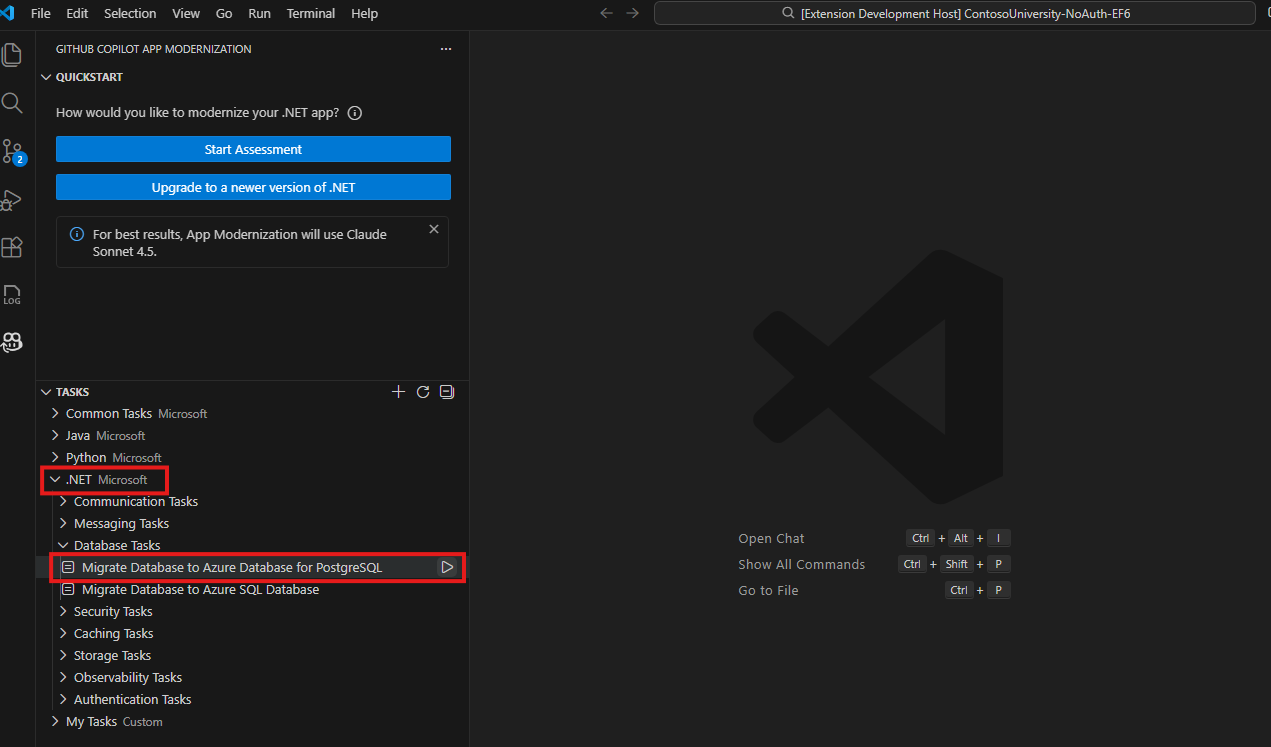
Start a migration task from the UI
You can also start a migration task from the UI:
Option 1. Run from the Assessment Report
Select the Run Task button in the Assessment Report from the previous step to start a migration task.
Option 2. Apply a predefined task
Run the specific task in the TASKS - .NET section. For example, the Migrate Database to Azure Database for PostgreSQL task under Database Tasks updates your database connection, configurations, dependencies, and data access code to use Azure Database for PostgreSQL.
Plan and progress tracker generation
When you start the migration, GitHub Copilot starts a session in agent mode.
The tool creates two files in the .github/appmod/code-migration/<target-branch-name> folder:
plan.md: The overall migration plan.progress.md: A progress tracker that GitHub Copilot updates as it completes tasks.
Edit these files to customize your migration before you continue.

Start code remediation
When you're satisfied with the plan and progress tracker, enter continue to start the migration.
GitHub Copilot starts the migration process and might ask for your approval to use knowledge base tools in the Model Context Protocol (MCP) server. Grant permission when prompted.
Copilot follows the plan and progress tracker to:
- Manage dependencies.
- Apply configuration changes.
- Make code changes.
- Build the project, fix all compilation and configuration errors, and ensure a successful build.
- Fix security vulnerabilities.
Repeatedly select or enter Continue to confirm the use of tools or commands and wait for the code changes to finish.
Note
In Visual Studio Code, modernization uses the AppModernization-DotNet custom agent with Claude Sonnet 4.5 by default for best results when updating .NET code to migrate to Azure. It falls back to the 'auto' model if Sonnet 4.5 isn't available to you. You can configure the custom agent to modify the 'model' setting by selecting Configure Custom Agents from the Agent menu. Alternatively, you can use the language model picker in the chat window to switch models for the current chat session.
Validation iteration
After the code changes finish, the migration tool starts a validation and fix iteration loop. This loop includes the following five steps:
- Detect Common Vulnerabilities and Exposures (CVEs) in current dependencies and fix them.
- Build the project and resolve any build errors.
- Analyze the code for functional consistency.
- Analyze the project for unit test failures and automatically generate a plan to fix them until the tests pass.
- Analyze the code for migration items missed in the initial code migration and fix them.
After all processes complete, the migration tool generates a summary. Review the code changes and confirm them by selecting Keep.
Prerequisites
- A GitHub account with an active GitHub Copilot subscription under any plan.
- Copilot CLI installed.
Install the plugin
In a terminal, run
copilotto start Copilot CLI.copilotAdd the marketplace and install the plugin:
/plugin marketplace add microsoft/github-copilot-modernization
/plugin install github-copilot-modernization@github-copilot-modernization
Verify the plugin is installed:
/plugin listYou should see
github-copilot-modernizationin the list.
Assess app readiness
GitHub Copilot modernization assessment helps you find app readiness challenges, learn their impact, and see recommended migration tasks.
Clone the .NET migration copilot samples repository to your computer.
Navigate to the Contoso University project folder:
cd dotnet-migration-copilot-samples/ContosoUniversityStart Copilot CLI with the modernization agent:
copilot --agent=github-copilot-modernization:modernizeImportant
You must select the
github-copilot-modernization:modernizeagent before running any modernization prompts. If you're already in a Copilot CLI session, use/agentand selectgithub-copilot-modernization:modernizefrom the list.Ask the agent to assess the application:
copilot> modernize my applicationThe agent automatically starts the assessment phase and analyzes your project for migration readiness—including dependencies, frameworks, and Azure migration opportunities.
When the assessment finishes, the agent presents a summary of findings and asks: "Proceed to planning?"
Migrate your app
After reviewing the assessment, continue through the planning and execution phases.
Full modernization (assess → plan → execute)
The agent runs the complete workflow automatically when you confirm each phase:
- Assessment → Review findings → Confirm to proceed.
- Planning → The agent generates a migration plan (
plan.md) → Review and confirm. - Execution → The agent routes tasks to specialized executor agents that apply code changes, run builds, and validate results.
The agent handles everything—just confirm at each checkpoint.
Specific migration task
If you already know what you want to migrate, skip the assessment and go straight to execution:
copilot> migrate from local SQL Server to Azure SQL Database
For multiple tasks, list them:
copilot> migrate from RabbitMQ to Azure Service Bus and upgrade to .NET 9
Unattended execution
For fully autonomous execution without prompts, use the --allow-all flag:
copilot --agent=github-copilot-modernization:modernize --allow-all
Enterprise playbook
To embed modernization policies, place Markdown files in the .github/modernize/playbook/ directory. During the planning phase, playbook constraints merge with assessment results—playbook policies take precedence over assessment recommendations.
For more information, see Migrate .NET apps to Azure using GitHub Copilot modernization in Copilot CLI.
Validation
After the agent applies code changes, it runs validation checks:
- Builds the project and resolves any build errors.
- Detects Common Vulnerabilities and Exposures (CVEs) in dependencies and fixes them.
- Runs tests and fixes any failures.
After all validation checks pass, the agent generates a summary. Review the results and verify:
dotnet build
dotnet test
Next Steps
Ikkollabora magħna fuq GitHub
Is-sors għal dan il-kontenut jista’ jinstab fuq GitHub, fejn tista’ wkoll toħloq u tirrevedi l-problemi u t-talbiet għall-immerġjar. Għal aktar informazzjoni, ara l-gwida għall-kontributuri tagħna.