Nota
L-aċċess għal din il-paġna jeħtieġ l-awtorizzazzjoni. Tista’ tipprova tidħol jew tibdel id-direttorji.
L-aċċess għal din il-paġna jeħtieġ l-awtorizzazzjoni. Tista’ tipprova tibdel id-direttorji.
Warning
PHP on Windows reached the end of support in November 2022. PHP is supported only for App Service on Linux. This article is for reference only.
Azure App Service provides a highly scalable, self-patching web hosting service. This quickstart tutorial shows how to deploy a PHP app to Azure App Service on Windows.
You create the web app using the Azure CLI in Cloud Shell, and you use Git to deploy sample PHP code to the web app.

You can follow the steps here using a Mac, Windows, or Linux machine. Once the prerequisites are installed, it takes about five minutes to complete the steps.
If you don't have an Azure account, create a free account before you begin.
Prerequisites
To complete this quickstart:
Download the sample locally
In a terminal window, run the following commands. It will clone the sample application to your local machine, and navigate to the directory containing the sample code.
git clone https://github.com/Azure-Samples/php-docs-hello-world
cd php-docs-hello-world
Make sure the default branch is
main.git branch -m mainTip
The branch name change isn't required by App Service. However, since many repositories are changing their default branch to
main, this quickstart also shows you how to deploy a repository frommain.
Run the app locally
Run the application locally so that you see how it should look when you deploy it to Azure. Open a terminal window and use the
phpcommand to launch the built-in PHP web server.php -S localhost:8080Open a web browser, and navigate to the sample app at
http://localhost:8080.You see the Hello World! message from the sample app displayed in the page.

In your terminal window, press Ctrl+C to exit the web server.
Azure Cloud Shell
Azure hosts Azure Cloud Shell, an interactive shell environment that you can use through your browser. You can use either Bash or PowerShell with Cloud Shell to work with Azure services. You can use the Cloud Shell preinstalled commands to run the code in this article, without having to install anything on your local environment.
To start Azure Cloud Shell:
| Option | Example/Link |
|---|---|
| Select Try It in the upper-right corner of a code or command block. Selecting Try It doesn't automatically copy the code or command to Cloud Shell. |  |
| Go to https://shell.azure.com, or select the Launch Cloud Shell button to open Cloud Shell in your browser. |  |
| Select the Cloud Shell button on the menu bar at the upper right in the Azure portal. |  |
To use Azure Cloud Shell:
Start Cloud Shell.
Select the Copy button on a code block (or command block) to copy the code or command.
Paste the code or command into the Cloud Shell session by selecting Ctrl+Shift+V on Windows and Linux, or by selecting Cmd+Shift+V on macOS.
Select Enter to run the code or command.
Configure a deployment user
FTP and local Git can deploy to an Azure web app by using a deployment user. Once you configure your deployment user, you can use it for all your Azure deployments. Your account-level deployment username and password are different from your Azure subscription credentials.
To configure the deployment user, run the az webapp deployment user set command in Azure Cloud Shell. Replace <username> and <password> with a deployment user username and password.
- The username must be unique within Azure, and for local Git pushes, must not contain the ‘@’ symbol.
- The password must be at least eight characters long, with two of the following three elements: letters, numbers, and symbols.
az webapp deployment user set --user-name <username> --password <password>
The JSON output shows the password as null. If you get a 'Conflict'. Details: 409 error, change the username. If you get a 'Bad Request'. Details: 400 error, use a stronger password.
Record your username and password to use to deploy your web apps.
Create a resource group
A resource group is a logical container into which Azure resources, such as web apps, databases, and storage accounts, are deployed and managed. For example, you can choose to delete the entire resource group in one simple step later.
In the Cloud Shell, create a resource group with the az group create command. The following example creates a resource group named myResourceGroup in the West Europe location. To see all supported locations for App Service in Free tier, run the az appservice list-locations --sku FREE command.
az group create --name myResourceGroup --location "West Europe"
You generally create your resource group and the resources in a region near you.
When the command finishes, a JSON output shows you the resource group properties.
Create an Azure App Service plan
In the Cloud Shell, create an App Service plan with the az appservice plan create command.
The following example creates an App Service plan named myAppServicePlan in the Free pricing tier:
az appservice plan create --name myAppServicePlan --resource-group myResourceGroup --sku FREE --is-linux
When the App Service plan has been created, the Azure CLI shows information similar to the following example:
{
  "freeOfferExpirationTime": null,
  "geoRegion": "West Europe",
  "hostingEnvironmentProfile": null,
  "id": "/subscriptions/0000-0000/resourceGroups/myResourceGroup/providers/Microsoft.Web/serverfarms/myAppServicePlan",
  "kind": "linux",
  "location": "West Europe",
  "maximumNumberOfWorkers": 1,
  "name": "myAppServicePlan",
  < JSON data removed for brevity. >
  "targetWorkerSizeId": 0,
  "type": "Microsoft.Web/serverfarms",
  "workerTierName": null
}
Create a web app
In the Cloud Shell, create a web app in the
myAppServicePlanApp Service plan with theaz webapp createcommand.In the following example, replace
<app-name>with a globally unique app name (valid characters area-z,0-9, and-). The runtime is set toPHP|7.4. To see all supported runtimes, runaz webapp list-runtimes.az webapp create --resource-group myResourceGroup --plan myAppServicePlan --name <app-name> --runtime 'PHP|8.1' --deployment-local-gitWhen the web app has been created, the Azure CLI shows output similar to the following example:
 Local git is configured with url of <URL>
 {
   "availabilityState": "Normal",
   "clientAffinityEnabled": true,
   "clientCertEnabled": false,
   "cloningInfo": null,
   "containerSize": 0,
   "dailyMemoryTimeQuota": 0,
   "defaultHostName": "<app-name>.azurewebsites.net",
   "enabled": true,
   < JSON data removed for brevity. >
 }
You've created an empty new web app, with git deployment enabled.
Note
The URL of the Git remote is shown in the
deploymentLocalGitUrlproperty. Save this URL as you need it later.Browse to your newly created web app.
Here's what your new web app should look like:

Push to Azure from Git
Because you're deploying the
mainbranch, you need to set the default deployment branch for your App Service app tomain. (See Change deployment branch.) In the Cloud Shell, set theDEPLOYMENT_BRANCHapp setting by using theaz webapp config appsettings setcommand.az webapp config appsettings set --name <app-name> --resource-group myResourceGroup --settings DEPLOYMENT_BRANCH='main'Back in the local terminal window, add an Azure remote to your local Git repository. Replace <deploymentLocalGitUrl-from-create-step> with the URL of the Git remote that you saved from Create a web app.
git remote add azure <deploymentLocalGitUrl-from-create-step>Push to the Azure remote to deploy your app with the following command. When Git Credential Manager prompts you for credentials, make sure you enter the credentials you created in Configure local git deployment, not the credentials you use to sign in to the Azure portal.
git push azure mainThis command might take a few minutes to run. While running, it displays information similar to the following example:
  Counting objects: 2, done.
  Delta compression using up to 4 threads.
  Compressing objects: 100% (2/2), done.
  Writing objects: 100% (2/2), 352 bytes | 0 bytes/s, done.
  Total 2 (delta 1), reused 0 (delta 0)
  remote: Updating branch 'main'.
  remote: Updating submodules.
  remote: Preparing deployment for commit id '25f18051e9'.
  remote: Generating deployment script.
  remote: Running deployment command...
  remote: Handling Basic Web Site deployment.
  remote: Kudu sync from: '/home/site/repository' to: '/home/site/wwwroot'
  remote: Copying file: '.gitignore'
  remote: Copying file: 'LICENSE'
  remote: Copying file: 'README.md'
  remote: Copying file: 'index.php'
  remote: Ignoring: .git
  remote: Finished successfully.
  remote: Running post deployment command(s)...
  remote: Deployment successful.
  To <URL>
      cc39b1e..25f1805  main -> main
Browse to the app
Browse to the deployed application using your web browser.
The PHP sample code is running in an Azure App Service web app.

Congratulations! You've deployed your first PHP app to App Service.
Update locally and redeploy the code
Using a local text editor, open the
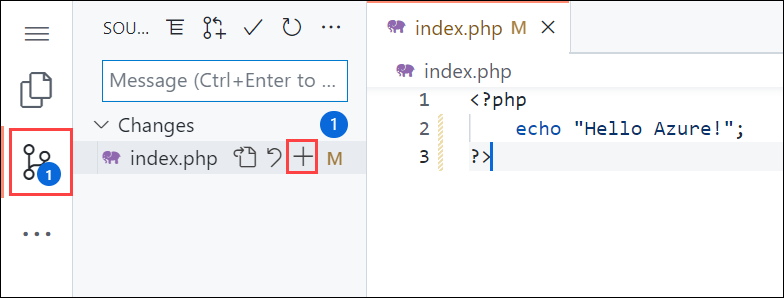
index.phpfile within the PHP app, and make a small change to the text within the string next toecho:echo "Hello Azure!";In the local terminal window, commit your changes in Git, and then push the code changes to Azure.
git commit -am "updated output"
git push azure main
Once deployment has completed, return to the browser window that opened during the Browse to the app step, and refresh the page.

Manage your new Azure app
Go to the Azure portal to manage the web app you created. Search for and select App Services.

Select the name of your Azure app.

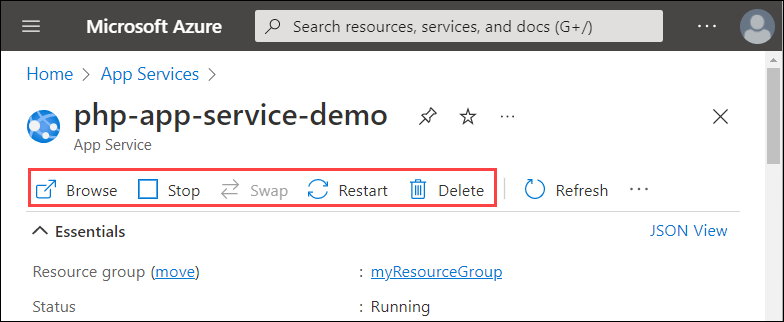
Your web app's Overview page will be displayed. Here, you can perform basic management tasks like Browse, Stop, Restart, and Delete.

The web app menu provides different options for configuring your app.
Clean up resources
In the preceding steps, you created Azure resources in a resource group. If you don't expect to need these resources in the future, delete the resource group by running the following command in the Cloud Shell:
az group delete --name myResourceGroup
This command might take a minute to run.
Azure App Service provides a highly scalable, self-patching service for web hosting. This quickstart shows how to deploy a PHP app to Azure App Service on Linux.

You can follow the steps here using a Mac, Windows, or Linux machine. Once the prerequisites are installed, it takes about ten minutes to complete the steps.
Prerequisites
- An Azure account with an active subscription. Create an account for free.
- Git
- PHP
- Azure CLI to run commands in any shell to create and configure Azure resources.
Download the sample repository
In the following steps, you create the web app by using the Azure CLI, and then you deploy sample PHP code to the web app.
You can use the Azure Cloud Shell.
In a terminal window, run the following commands to clone the sample application to your local machine and navigate to the project root.
git clone https://github.com/Azure-Samples/php-docs-hello-world
cd php-docs-hello-world
To run the application locally, use the
phpcommand to launch the built-in PHP web server.php -S localhost:8080Browse to the sample application at
http://localhost:8080in a web browser.
In your terminal window, press Ctrl+C to exit the web server.
Deploy your application code to Azure
Azure CLI has a command az webapp up that creates the necessary resources and deploys your application in a single step.
In the terminal, deploy the code in your local folder using the az webapp up command:
az webapp up --runtime "PHP:8.2" --os-type=linux
- If the
azcommand isn't recognized, be sure you have Azure CLI installed. - The
--runtime "PHP:8.2"argument creates the web app with PHP version 8.2. - The
--os-type=linuxargument creates the web app on App Service on Linux. - You can optionally specify a name with the argument
--name <app-name>. If you don't provide one, then a name is automatically generated. - You can optionally include the argument
--location <location-name>where<location_name>is an available Azure region. You can retrieve a list of allowable regions for your Azure account by running theaz account list-locationscommand. - If you see the error Could not auto-detect the runtime stack of your app, make sure you're running the command in the code directory. To learn more, see Troubleshooting auto-detect issues with az webapp up.
The command can take a few minutes to complete. While it's running, it provides messages about creating the resource group, the App Service plan, and the app resource, configuring logging, and doing ZIP deployment. It then provides the app's URL on Azure.
The webapp '<app-name>' doesn't exist
Creating Resource group '<group-name>' ...
Resource group creation complete
Creating AppServicePlan '<app-service-plan-name>' ...
Creating webapp '<app-name>' ...
Configuring default logging for the app, if not already enabled
Creating zip with contents of <directory-location> ...
Getting scm site credentials for zip deployment
Starting zip deployment. This operation can take a while to complete ...
Deployment endpoint responded with status code 202
You can launch the app at http://<app-name>.azurewebsites.net
{
  "URL": "http://<app-name>.azurewebsites.net",
  "appserviceplan": "<app-service-plan-name>",
  "location": "centralus",
  "name": "<app-name>",
  "os": "linux",
  "resourcegroup": "<group-name>",
  "runtime_version": "php|8.2",
  "runtime_version_detected": "0.0",
  "sku": "FREE",
  "src_path": "<directory-path>"
}
Note
The az webapp up command does the following actions:
Create a default resource group.
Create a default App Service plan.
Create an app with the specified name.
Zip deploy all files from the current working directory, with build automation enabled.
Cache the parameters locally in the .azure/config file so that you don't need to specify them again when deploying later with
az webapp upor otheraz webappcommands from the project folder. The cached values are used automatically by default.
Browse to the deployed application in your web browser at the URL that's provided in the terminal.
The PHP sample code is running in an Azure App Service.

Congratulations! You deployed your first PHP app to App Service using the Azure portal.
Update and redeploy the app
Locate the directory php-docs-hello-world and open the index.php file using a local text editor. Make a small change to the text within the string next to
echo:echo "Hello Azure!";Save your changes, then redeploy the app using the az webapp up command again with these arguments:
az webapp up --runtime "PHP:8.2" --os-type=linuxOnce deployment is completed, return to the browser window that opened during the Browse to the app step, and refresh the page.

Manage your new Azure app
Go to the Azure portal to manage the web app you created. Search for and select App Services.

Select your Azure app to open it.

Your web app's Overview page should be displayed. Here, you can perform basic management tasks like Browse, Stop, Restart, and Delete.

The web app menu provides different options for configuring your app.
Clean up resources
When you're finished with the sample app, you can remove all of the resources for the app from Azure so you can avoid extra charges and keep your Azure subscription uncluttered. Removing the resource group also removes all resources in the resource group and is the fastest way to remove all Azure resources for your app.
Delete the resource group by using the az group delete command.
az group delete --name myResourceGroup
This command takes a minute to run.


