Add resources to your integration service environment (ISE) in Azure Logic Apps
Important
On August 31, 2024, the ISE resource will retire, due to its dependency on Azure Cloud Services (classic), which retires at the same time. Before the retirement date, export any logic apps from your ISE to Standard logic apps so that you can avoid service disruption. Standard logic app workflows run in single-tenant Azure Logic Apps and provide the same capabilities plus more.
Starting November 1, 2022, you can no longer create new ISE resources. However, ISE resources existing before this date are supported through August 31, 2024. For more information, see the following resources:
- ISE Retirement - what you need to know
- Single-tenant versus multi-tenant and integration service environment for Azure Logic Apps
- Azure Logic Apps pricing
- Export ISE workflows to a Standard logic app
- Integration Services Environment will be retired on 31 August 2024 - transition to Logic Apps Standard
- Cloud Services (classic) deployment model is retiring on 31 August 2024
After you create an integration service environment (ISE), you can add resources such as Consumption logic apps, integration accounts, and connectors so that they can access the resources in your Azure virtual network. For example, managed ISE connectors that become available after you create your ISE don't automatically appear in the Logic App Designer. Before you can use these ISE connectors, you have to manually add and deploy those connectors to your ISE so that they appear in the Logic App Designer.
Important
For logic apps and integration accounts to work together in an ISE, both must use the same ISE as their location.
Prerequisites
An Azure account and subscription. If you don't have an Azure subscription, sign up for a free Azure account.
The ISE that you created to run your Consumption logic app workflows
To create, add, or update resources that are deployed to an ISE, you need to be assigned the Owner or Contributor role on that ISE, or you have permissions inherited through the Azure subscription or Azure resource group associated with the ISE. For people who don't have owner, contributor, or inherited permissions, they can be assigned the Integration Service Environment Contributor role or Integration Service Environment Developer role. For more information, see What is Azure role-based access control (Azure RBAC)?
Create logic apps
To develop logic apps that run in your integration service environment (ISE), follow these steps:
Find and open your ISE, if not already open. From the ISE menu, under Settings, select Logic apps > Add.
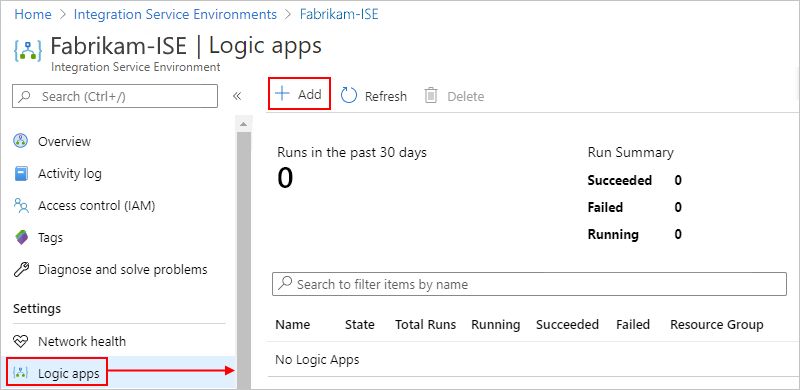
Provide information about the logic app that you want to create, for example:
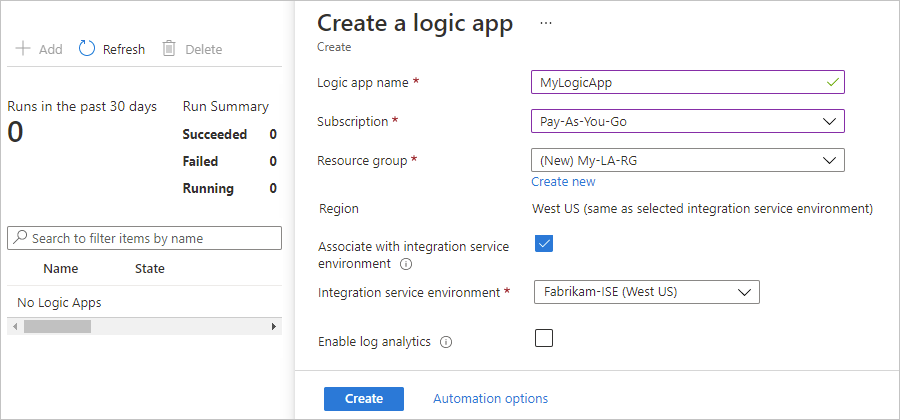
Property Required Description Logic app name Yes The name for the logic app to create Subscription Yes The name for the Azure subscription to use Resource group Yes The name for the new or existing Azure resource group to use Region Yes The Azure region for your logic app, which matches the location for the ISE that you later select Associate with integration service environment* Yes Select this option so you can choose an ISE to use. Integration service environment Yes From the list, select the ISE that you want to use, if not already selected. Important: To use an integration account with your logic app, both must use the same ISE.
When you're done, select Create.
Continue creating your logic app in the usual way.
For differences in how triggers and actions work and how they're labeled when you use an ISE compared to the multi-tenant Logic Apps service, see Isolated versus multi-tenant in the ISE overview.
To manage logic apps and API connections in your ISE, see Manage your integration service environment.
Create integration accounts
Based on the ISE SKU selected at creation, your ISE includes specific integration account usage at no additional cost. Logic apps that exist in an integration service environment (ISE) can reference only integration accounts that exist in the same ISE. So, for an integration account to work with logic apps in an ISE, both the integration account and logic apps must use the same environment as their location. For more information about integration accounts and ISEs, see Integration accounts with ISE.
To create an integration account that uses an ISE, follow these steps:
Find and open your ISE, if not already open. From the ISE menu, under Settings, select Integration accounts > Add.
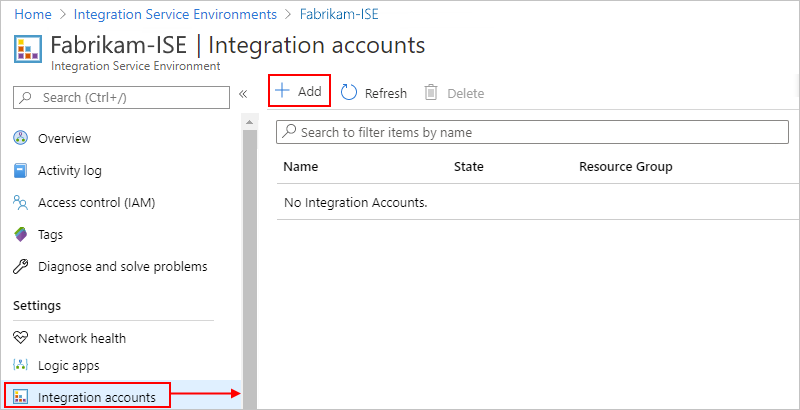
Provide information about the logic app that you want to create, for example:
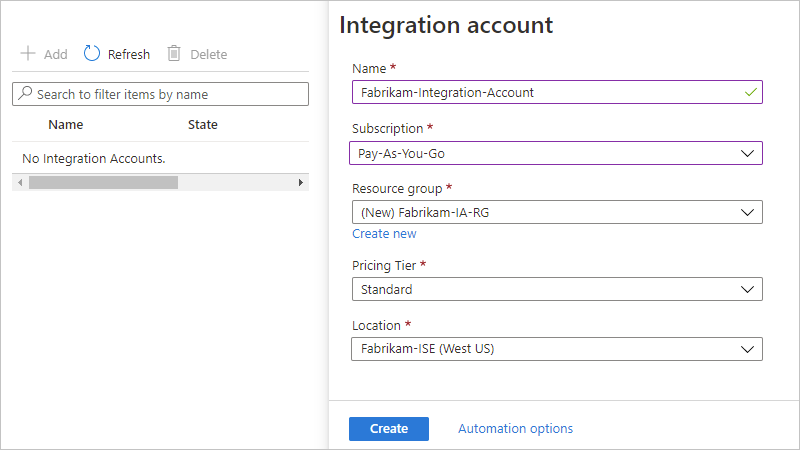
Property Required Description Name Yes The name for the integration account that you want to create Subscription Yes The name for the Azure subscription that you want to use Resource group Yes The name for the Azure resource group (new or existing) to use Pricing Tier Yes The pricing tier to use for the integration account Location Yes From the list, under Integration service environments, select the same ISE that your logic apps use, if not already selected. Important: To use an integration account with your logic app, both must use the same ISE.
When you're done, select Create.
Link your logic app to your integration account in the usual way.
Continue by adding resources to your integration account, such as trading partners and agreements.
To manage integration accounts in your ISE, see Manage your integration service environment.
Add ISE connectors
After you create your ISE, managed ISE connectors don't automatically appear in the connector picker on the Logic App Designer. Before you can use these ISE connectors, you have to manually add and deploy these connectors to your ISE so that they appear in the Logic App Designer.
Important
Managed ISE connectors currently don't support tags. If you set up a policy that enforces tagging, trying to add ISE connectors might fail with an error similar to this example:
{
   "error": {
      "code": "IntergrationServiceEnvironmentManagedApiDefinitionTagsNotSupported",
      "message": "The tags are not supported in the managed API 'azureblob'."
   }
}
So, to add ISE connectors, you have to either disable or remove your policy.
On your ISE menu, under Settings, select Managed connectors. On the toolbar, select Add.
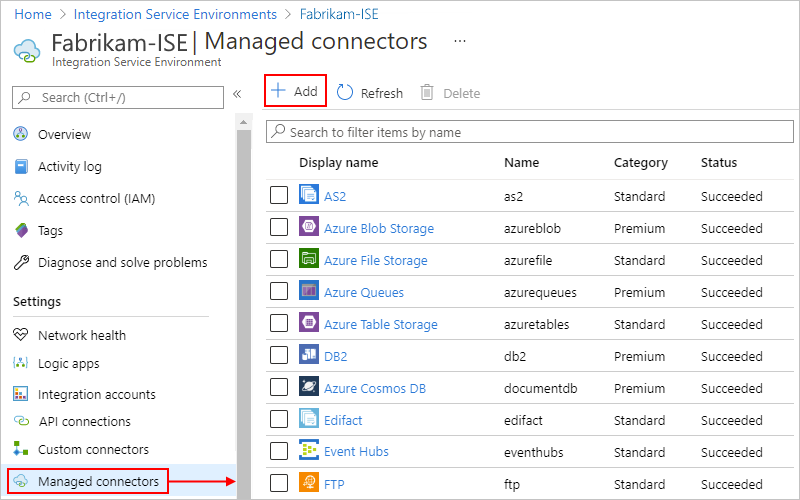
On the Add a new managed connector pane, open the Find connector list. Find and select the ISE connector that you want to use but isn't yet deployed in your ISE. When you're done, select Create.

Only ISE connectors that are eligible but not yet deployed to your ISE appear available for you to select. Connectors that are already deployed in your ISE appear unavailable for selection.
Create custom connectors
To use custom connectors in your ISE, create those custom connectors from directly inside your ISE.
Find and open your ISE, if not already open. From the ISE menu, under Settings, select Custom connectors > Add.
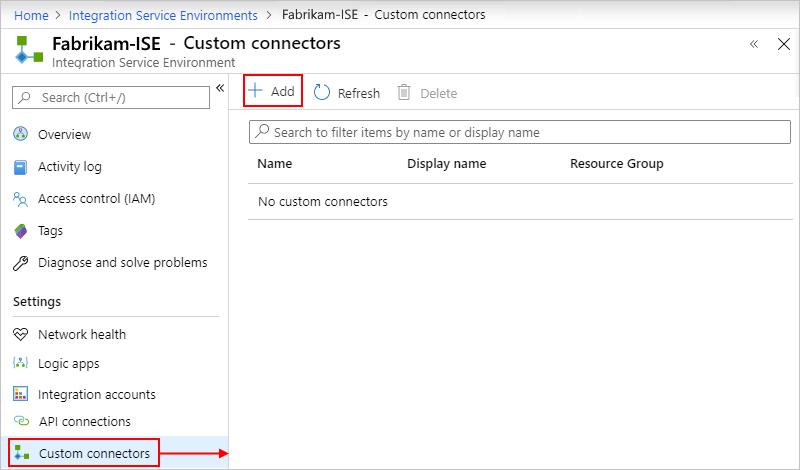
Provide the name, Azure subscription, and Azure resource group (new or existing) to use for your custom connector.
From the Location list, under the Integration service environments section, select the same ISE that your logic apps use, and select Create, for example:

Select your new custom connector, and then select Edit, for example:
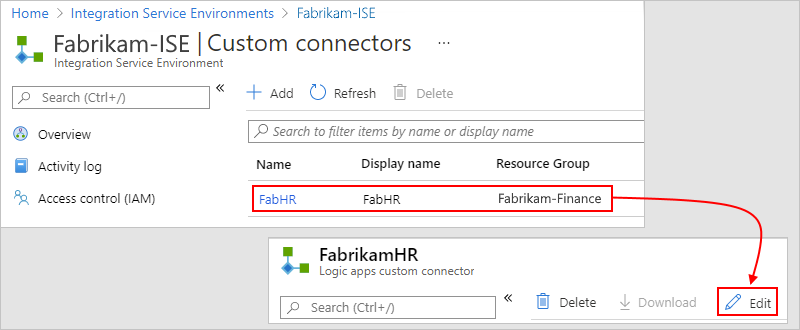
Continue by creating the connector in the usual way from an OpenAPI definition or SOAP.
To manage custom connectors in your ISE, see Manage your integration service environment.
Next steps
Feedback
Disponibbli dalwaqt: Matul l-2024 se nkunu qed inwaqqfu gradwalment Problemi GitHub bħala l-mekkaniżmu ta’ feedback għall-kontenut u se nibdluh b’sistema ġdida ta’ feedback. Għal aktar informazzjoni, ara: https://aka.ms/ContentUserFeedback.
Issottometti u ara feedback għal