Nota
L-aċċess għal din il-paġna jeħtieġ l-awtorizzazzjoni. Tista’ tipprova tidħol jew tibdel id-direttorji.
L-aċċess għal din il-paġna jeħtieġ l-awtorizzazzjoni. Tista’ tipprova tibdel id-direttorji.
This article describes how to collect diagnostic data to send to Microsoft support and engineering teams when they help troubleshoot issues with Microsoft Defender Antivirus.
Note
As part of the investigation or response process, you can collect an investigation package from a device. Here's how: Collect investigation package from devices.
For performance-specific issues related to Microsoft Defender Antivirus, see: Performance analyzer for Microsoft Defender Antivirus.
On at least two devices that are experiencing the same issue, use the following procedures to generate the diagnostic log files:
Open an elevated Command Prompt (a Command Prompt window you opened by selecting Run as administrator). For example:
- Open the Start menu, and then type cmd.
- Right-click on the Command Prompt result, and then select Run as administrator.
In the elevated Command Prompt, do one of the following steps:
Save the diagnostics log files on the local device: Run the following commands:
set "_done=" & (for /f "delims=" %d in ('dir "%ProgramData%\Microsoft\Windows Defender\Platform" /ad /b /o:-n') do if not defined _done (cd /d "%ProgramData%\Microsoft\Windows Defender\Platform\%d" & set _done=1)) >nul 2>&1

MpCmdRun.exe -GetFiles
By default, the diagnostic log files are generated, compressed, and saved to the file
C:\ProgramData\Microsoft\Windows Defender\Support\MpSupportFiles.cabon the local device.The name of the .cab file is the same on every device.
Copy the diagnostics log files to a central location: To save the diagnostic log files from multiple devices in one place, use the following syntax:
set "_done=" & (for /f "delims=" %d in ('dir "%ProgramData%\Microsoft\Windows Defender\Platform" /ad /b /o:-n') do if not defined _done (cd /d "%ProgramData%\Microsoft\Windows Defender\Platform\%d" & set _done=1)) >nul 2>&1

MpCmdRun.exe -GetFiles -SupportLogLocation <RootPath>
The diagnostic log files are still generated, compressed, and saved to the file
C:\ProgramData\Microsoft\Windows Defender\Support\MpSupportFiles.cabby default. But then the .cab file is copied with a new name into a subfolder of the location specified by the<RootPath>value (for example,P:\Dataor\\Server01\Data). The filename and path of the resulting .cab file uses the following syntax:<RootPath>\<MMDD>\MpSupport-<Hostname>-<HHMM>.cab.<RootPath>is the value you specified for the SupportLogLocation switch.<MMDD>is the month and day when you ran the MpCmdRun.exe command (for example, 0318 for March 18).<Hostname>is the name of the device where you ran the MpCmdRun.exe command (for example, LAPTOP01).<HHMM>is the Universal Coordinated Time (UTC) when you ran the MpCmdRun.exe command (for example 2221 for 22:21 UTC).
Note
If you don't have write access to the location specified by the SupportLogLocation switch, the diagnostic log files are still saved to the default location
C:\ProgramData\Microsoft\Windows Defender\Support\MpSupportFiles.cabon the local device. But the step that copies and renames the .cab file to the SupportLogLocation path fails.In this example, you ran the following commands on the device named LAPTOP01 on March 18 at 22:21 UTC:
set "_done=" & (for /f "delims=" %d in ('dir "%ProgramData%\Microsoft\Windows Defender\Platform" /ad /b /o:-n') do if not defined _done (cd /d "%ProgramData%\Microsoft\Windows Defender\Platform\%d" & set _done=1)) >nul 2>&1

MpCmdRun.exe -GetFiles -SupportLogLocation "\\SERVER01\Data"
In this example, the resulting .cab file is available at
\\SERVER01\Data\0318\MpSupport-LAPTOP01-2221.cabThe resulting .cab filenames are guaranteed to be unique in the central location, even if you ran the MpCmdRun.exe command at exactly the same time on multiple devices.
After a few minutes, the diagnostic log files are generated, compressed, and saved. The resulting .cab file includes the following information:
- Any trace files from Microsoft Antimalware Service.
- The Windows Update history log.
- All Microsoft Antimalware Service events from the System event log.
- All relevant Microsoft Antimalware Service registry locations.
- The log file of MpCmdRun.
- The log file of the signature update helper tool.
Copy the .cab files to a location that Microsoft support can access (for example, a password-protected OneDrive folder).
Use group policy to specify where diagnostic log files are copied
You can use group policy on the local device (registry-based settings) or in the Central Store on a domain controller to specify where the diagnostic log files are copied after they're generated on the local device. Setting the location in group policy eliminates the need to use the SupportLogLocation switch in the MpCmdRun.exe command as described in the previous section.
To set the SupportLogLocation value in group policy, do the following steps:
Do one of the following steps:
- Group policy on the local device: Open Local Group Policy Editor. For example:
- Open the Start menu, and then type group policy.
- Right-click on the Edit group policy result, and then select Run as administrator.
- Group policy for the domain: On a domain-joined Group Policy management computer, open the Group Policy Management Console (GPMC).
- In the GPMC console tree, expand Group Policy Objects in the forest and domain containing the GPO that you want to edit.
- Right-click on the GPO, and then select Edit.
- Group policy on the local device: Open Local Group Policy Editor. For example:
In the console tree, go to Computer configuration > Administrative templates > Windows components > Microsoft Defender Antivirus.
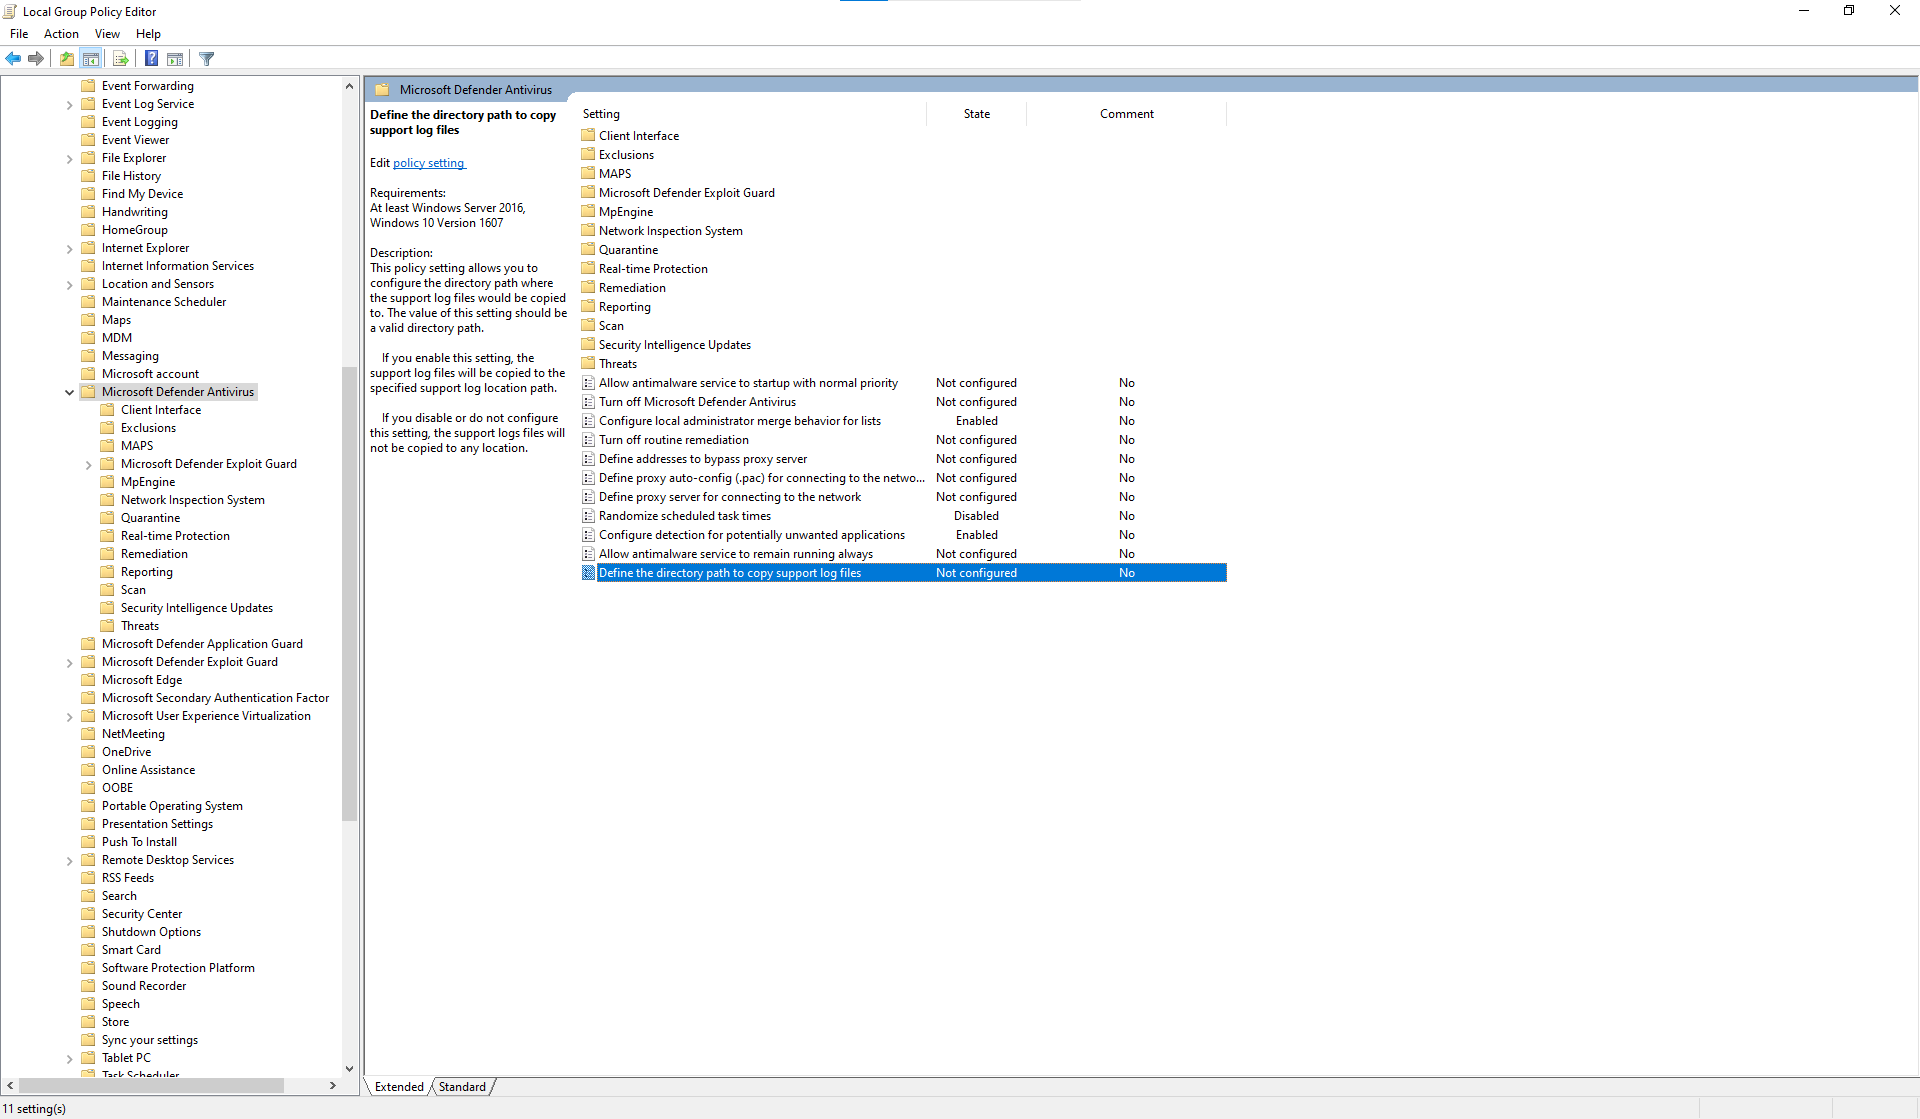
In the details pane of Microsoft Defender Antivirus, open Define the directory path to copy support log files using any of the following methods:
- Double-click on the setting.
- Right-click on the setting, and then select Edit
- Select the setting, and then select Action > Edit.
In the Define the directory path to copy support log files window that opens, configure the following options:
- Select Enabled.
- Options section: In the Define the directory path to copy support log files box, enter a path value.
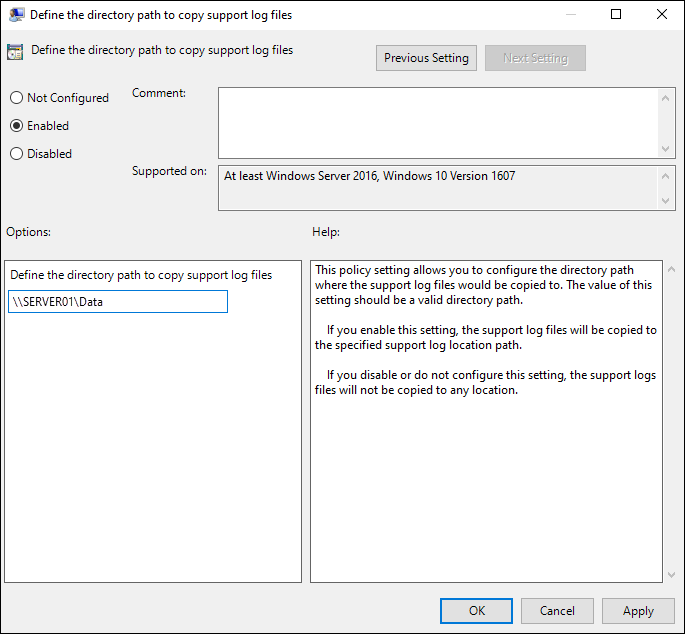
When you're finished in the Define the directory path to copy support log files window, select OK.

