Tag items in a review set in eDiscovery (preview)
Organizing content in a review set is important to complete various workflows in the eDiscovery process. This workflow includes:
- Culling unnecessary content
- Identifying relevant content
- Identifying content that must be reviewed by an expert or attorney
When experts, attorneys, or other users review content in a review set, their opinions related to the content can be captured by using tags. For example, if the intent is to cull unnecessary content, a user can tag documents with a tag such as "nonresponsive". After content has been reviewed and tagged, a review set search can be created to exclude any content tagged as "nonresponsive". This process eliminates the nonresponsive content from the next steps in the eDiscovery workflow.
You can use tag templates to define tags and review workflow across all cases and review sets in your organization. This method is the recommended approach and helps provide structure and standardization for tagging to ensure searches identify similar content across your organization. You can also use the tagging panel in an individual review set to customize tags for each case when tag templates don't meet your needs, but tags created here are specifically for the individual case and review set.
Tip
Get started with Microsoft Copilot for Security to explore new ways to work smarter and faster using the power of AI. Learn more about Microsoft Copilot for Security in Microsoft Purview.
Tag types
eDiscovery (preview) has two types of tags:
- Single-select tags: Restricts reviewers to selecting a single tag within a tag group. These types of tags can be useful to ensure that reviewers don't select conflicting tags such as "responsive" and "nonresponsive". Single choice tags appear as radio buttons.
- Multi-select tags: Allow reviews to select multiple tags within a tag group. These types of tags appear as checkboxes.
Tag groups
In addition to the tag types, the structure of how tag groups are organized in the tag panel can be used to make tagging documents more intuitive. Tags are organized in tag groups. Review set search supports the ability to search by tag and by tag groups. This means you can create a review set search to retrieve documents tagged with any tag in a group or the group itself.
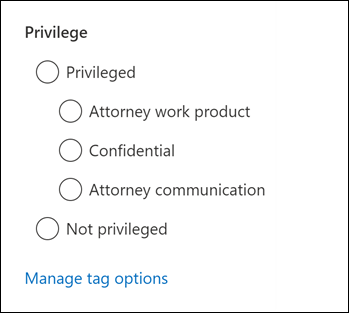
For example, if you need to identify and tag privileged content, grouping can be used to make it clear that a reviewer can tag a document as Privileged (the tag group) and select Attorney work product (specific tag) as the type of privilege within the tag group.
Tag templates (preview)
Tag templates are used to define and standardize tags and the review workflow across all cases and review sets in your organization. Each tag template contains tag groups where you can create a grouping structure for individual tags. You can create tag templates in the Tag templates tab in eDiscovery settings.
Create tag templates
To create a new tag template, complete the following steps:
- Go to the Microsoft Purview portal and sign in using the credentials for a user account assigned eDiscovery permissions.
- Select the Settings solution card and then select eDiscovery.
- Select Tag templates.
- On the Manage tag templates page, select Create.
- On the New tag template page, enter a name and description for the tag template.
- In the initial tag group, enter a tag group name and use the dropdown to define if this as a Multi-select or Single-elect tag group.
- Enter at least one tag name in the tag group. Select Add tag to add additional tags to the tag group.
- If needed, select Add tag group to add additional tag groups and tags to the tag template.
- Preview the tag template group and tag structure in the Preview pane on the right side of the New tag template page.
- When complete, select Save.
The tag template is now available for use in all cases and review sets in your organization.
Manage tag templates
After you create a tag template, you can edit or delete it. You can also view information about the tag template, including the dates when it was created or last modified.
To edit a tag template, select the tag template name on the Manage tag templates page and select Edit. On the Edit tag template page, you can edit the tag template name, description, and tag groups and tags. When you're done, select Save.
To delete a tag template, select the tag template name on the Manage tag templates page and select Delete. Select Yes to confirm the deletion or No to cancel the deletion.
Apply tag templates to a case and review sets
After you've created a tag template, you can apply it to a review set. You can apply a tag template when you create a new review set or when you edit an existing review set.
To apply a tag template to a new review set, complete the following steps:
- Go to the Microsoft Purview portal and sign in using the credentials for a user account assigned eDiscovery permissions.
- Select the eDiscovery solution card and then select Cases in the left nav.
- Select a case, then select the Review sets tab.
- Select the review set that you want to export and select Open review set.
- On the review set command bar, select Manage > Tags.
- On the Manage tags page, delete the blank tag group then select Import tag templates.
- On the Import tag templates flyout page, select the tag template that you want to apply to the review set and then select Import.
- If needed, you can edit the tag template as it applies to the case and review set.
- Select Save to apply the tag templates to the case and review set.
The applied tag template is now available for use in the case and all included review sets.
Create tags for a specific case or review set
If you choose not to use tag templates for a specific case or review set, you can create tags directly in the review set. This is useful when you need to create tags that are specific to a case or review set. However, these tags are unique to the case or review set and can't be used in other cases or review sets.
Before applying tags to items in a review set, you need to create a tag structure.
- Open a review set and on the review set command bar, select Manage > Tags.
- On the Manage tags flyout page, enter a Tag group name and select either Multi-select or Single-select for the tag group.
- Enter one or more tags in the tag group. Select Add tag to add additional tags to the tag group.
- Select Add tag group if more tag groups and tags are needed.
- Preview the tag template group and tag structure in the Preview pane on the right side of the New tag template page.
- Select Save to apply the tag group and tags to the case and review set.
Apply tags
With the tag structure from tag templates or custom tagging in place, reviewers can apply tags to items in a review set by configuring tagging settings.
In the review set command bar, select Tag files to display the Tag files flyout page (also called the tagging panel).
On the Tag files flyout page, you can set the following options to configure how to tag items displayed in the review set. The filters or filter queries currently applied to the review set determine which items are displayed and therefore the items that you can apply tags to. For more information, see Search content in a review set in eDiscovery (preview).
Choose selection. Choose one the following options to determine the scope of items to apply tags to.
- Tag selected items: This option applies tags to the items that you select. You can select items before or after launching the tagging panel. This option displays (in real time) the number of selected items that are tagged.
- Tag all items in list: This option applies tags to all items displayed in the review set. This option displays the total number of items that are tagged.
Expand selection: Use the following options to tag additional items that are related to tagged items in the review set. Depending on the Enable group option enabled in the review set settings, you'll see the following options:
With Enable group in settings disabled:
- None: This option doesn't apply tags to associated family items or associated conversation items. It only applies tags to the items that are selected or to all items in the review set list.
- Include family groups: This option applies the same tag to the associated family items of items that are tagged. Family items are items that share the same FamilyId metadata property value. For example, a document that's attached to an email message shares the same FamilyId as the email message. So if this option is selected for this example, the email message and the document are tagged, even though the document might not be included in the list of review set items.
- Include conversation groups: This option applies the same tag to all items that are in the same Teams or Viva Engage conversation as the items that are tagged. Conversation items are items that share the same ConversationId metadata property value. All messages, posts, and corresponding transcript file of a conversation share the same ConversationId. If this option is selected, then all items in the same conversation (and transcript file) are tagged, even though some of those conversation items might not be included in the list of review set items.
Note
Including family or conversation groups doesn't change the count of items shown in the Tag selected items or Tag all items in list options. In other words, the number of grouped items that are tagged is not displayed.
With Enable group in settings enabled:
- None: This option doesn't apply tags to family group items or conversation group items. It only applies tags to the items that are selected or to all items in the review set list.
- Include family groups: This option applies the same tag to the associated family items of items that are tagged. Family group items are items that share the same GroupId metadata property value. For example, a document that's attached to an PowerPoint file shares the same GroupId as the document. So if this option is selected for this example, the document and the PowerPoint file are both tagged. Both are grouped together in the list of review set items.
- Include conversation groups: This option applies the same tag to all items that are in the same email, Teams, or Viva Engage conversation as the items that are tagged. Conversation group items are items that share the same ThreadId metadata property value. All messages, posts, and corresponding transcript files of a conversation share the same ThreadId. If this option is selected, then all items in the same conversation (and transcript file) are tagged. All items are grouped together in the list of review set items.
Assign tags: This section displays the tags (organized by tag groups) that you can apply to documents. These are either the tag groups and tags assigned using tag templates or custom tag groups and tags that you've created for this case. You can only apply one single-choice tag (identified by a radio button) per tag group. However, you can apply multiple multi-choice tags (identified by a checkbox).
Select Apply tags to apply the tags based on your settings.
The Applying tags status message is displayed for each tag group on the tagging panel to indicate a tagging process has been started. Tags for each tag group in the Assign tags section are greyed out until the process is completed.
Tip
If you're in the process of configuring the settings on the tagging panel, but want to start over, select Reset tag assignment to clear the current setting. This control doesn't apply to items that are already tagged, and it doesn't change or remove tags from previously tagged items.
Set up smart tags
Machine learning (ML) capabilities in eDiscovery (preview) can help you make the decision process more efficient when reviewing case documents in a review set. Smart tags are a way to bring the ML capabilities to where the decisions are recorded: when tagging documents during review. When you create a smart tag group, then the decisions that are the result of the ML model that you've associated with the smart tag group are displayed in-line with the tags in the tag group. This helps see the ML results information in-line when you're reviewing specific documents.
How to set up a smart tag group
In a review set, select Manage review set and then select Manage tags.
Select Add tag group and then select Add smart tag group.
Select the ML model that you want to associate to the tag group.
This creates a tag group and N child tags, where N is the number of possible outputs of the model. For example, the attorney-client privilege detection model has two possible outputs:
- Positive: Use to tag documents that contain attorney-client privileged content.
- Negative: Use to tag documents that don't contain attorney-client privileged content.
If you select this model, a tag group with two child tags is created (one child tag named Positive and the other named Negative) for the review set. In this example, each child tag corresponds to one of the possible outputs from the attorney-client privilege detection model.
Optionally, you can rename the tag group and the child tags. For example, you could rename the Positive tag to Privileged and the Negative tag to Not privileged.
How to use smart tags
When reviewing a document, the model's results are displayed next to the appropriate child tag. For example, if you have a smart tag group for attorney-client privilege detection and you review a document that is potentially privileged, the reason for that conclusion is displayed next to the appropriate tag. It's important to note that the tag isn't automatically applied to the document. The reviewer makes the decision about how to tag the document.
Monitor tagging jobs
When you tag a large number of items (or select the Tag all items in list) option, a Tagging documents job is created. You view the status of this job on the Jobs tab in the case. This view helps you track large tagging jobs that may take a long time to complete. In some cases, a tagging job might be complete, but the Applying tags status message in the tagging panel is still displayed. To update the status of tagging jobs, select Refresh in the review set command bar.
Removing tags
You can remove tags from items in a review set. However, you can't remove a single-choice tag that's been applied to a review set item. You can only change a single-choice tag to another single-choice tag within the same tag group.
To remove a tag:
- Select the items that you want to remove the tag from.
- Select Tag files to display the tagging panel.
- Under Assign tags, unselect the tag, and then select Apply tags.
You can also use the previous procedure to change the tag applied to selected items. After unselecting the current tag, you can select a different one.
Tilbakemeldinger
Kommer snart: Gjennom 2024 faser vi ut GitHub Issues som tilbakemeldingsmekanisme for innhold, og erstatter det med et nytt system for tilbakemeldinger. Hvis du vil ha mer informasjon, kan du se: https://aka.ms/ContentUserFeedback.
Send inn og vis tilbakemelding for