Add tasks or child items as checklist items
Azure DevOps Services | Azure DevOps Server 2022 - Azure DevOps Server 2019
Your board in Azure DevOps lets you visualize your team’s tasks, track progress, and manage work items efficiently. This article provides step-by-step instructions on how to add task checklists to your board, enhancing your team’s productivity and transparency.
The following image shows a representation of various tasks and bugs in progress. Some are still pending, while others are marked as completed. By incorporating the Issue work item type into your Iteration backlog, you can seamlessly add issues as checklists

Learn checklist features
Make use of the following features for checklists.
- Enable checklists on all boards (product and portfolio levels).
- Create parent-child links by adding checklist items to work items.
- For product-level boards:
- Manage Bugs with tasks: Add and track them within checklists.
- Manage Bugs with requirements: Add tasks to bugs tracked on the board.
- Mark checklist items as “done” to update work item states.
- Customize checklist features in the Board settings.
- Automatically assign child items to the sprint/iteration path of parent work items.
- Add any work item type using the checklist feature.
- To track work item types as checklists, add them to the next-lower hierarchical backlog. For more information, see Customize backlogs/boards (Inheritance process) or Process configuration XML element reference (on-premises XML process).
Tip
You can disable it from the common configurations dialog.
Prerequisites
Boards are automatically created when you create a project or add a team. Each team has access to their own product and portfolio boards as described in About teams and Agile tools.
- You must connect to a project. If you don't have a project yet, create one.
- You must be added to a team or project.
- To add work items and exercise all board features, you must be granted Basic access or higher.
- To view or modify work items, your View work items in this node and Edit work items in this node permissions set to Allow. By default, the Contributors group has this permission set. For more information, see Set permissions and access for work tracking.
- Users with Stakeholder access for a private project can add work items and update status through drag-and-drop, but cannot update fields displayed on cards. They can add tasks and change task status.
- Users with Stakeholder access for a public project have full access to board features just like users with Basic access.
- You must connect to a project. If you don't have a project yet, create one.
- You must be added to a team or project.
- To add work items and exercise all board features, you must be granted Basic access or higher.
- To view or modify work items, your View work items in this node and Edit work items in this node permissions set to Allow. By default, the Contributors group has this permission set. For more information, see Set permissions and access for work tracking.
- Users with Stakeholder access for a private project can add work items and update status through drag-and-drop, but cannot update fields displayed on cards. They can add tasks and change task status.
- You must connect to a project. If you don't have a project yet, create one.
- You must be added to a team or project.
- To add work items and exercise all board features, you must be granted Basic access or higher.
- To view or modify work items, your View work items in this node and Edit work items in this node permissions set to Allow. By default, the Contributors group has this permission set. For more information, see Set permissions and access for work tracking.
- Users with Stakeholder access can't exercise these board features: add work items, drag-and-drop work items to update status, or update fields displayed on cards. They can add tasks and change task status.
Note
- Visualize and optimize work flow with both boards and Taskboards.
- Boards: Ideal for tracking requirements, independent of sprints, and equipped with a cumulative flow chart for progress tracking.
- Taskboards: Linked to specific sprints, they facilitate task tracking within the sprint.
- Progress monitoring: Achieved through detailed capacity charts and sprint burndown charts.
- For information about Taskboard usage and best practices, see Update and monitor your Taskboard.
Open your board from the web portal
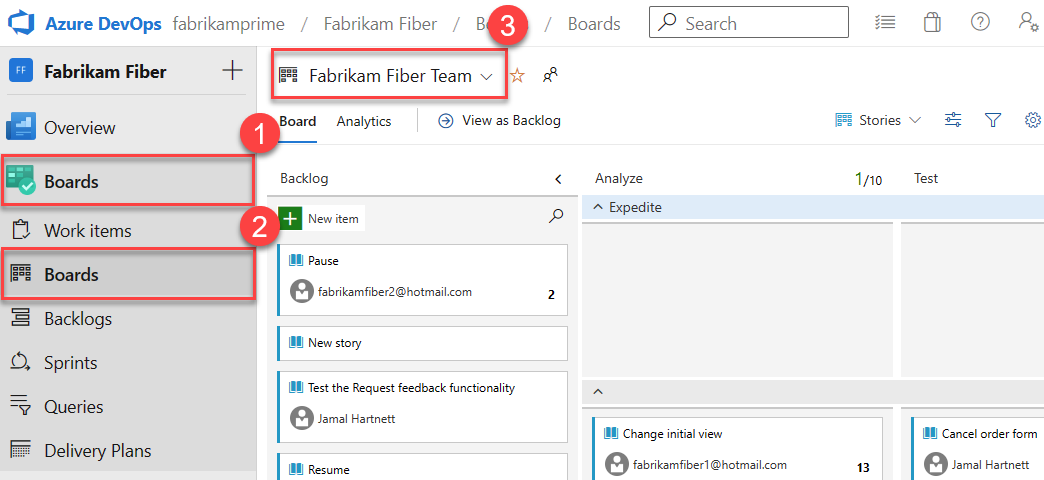
Check that you selected the right project, and select Boards > Boards. Then select the correct team from the team selector menu.

To select another team's board, open the selector. Then select a different team, or select the
 Browse all team boards option. Or, you can enter a keyword in the search box to filter the list of team backlogs for the project.
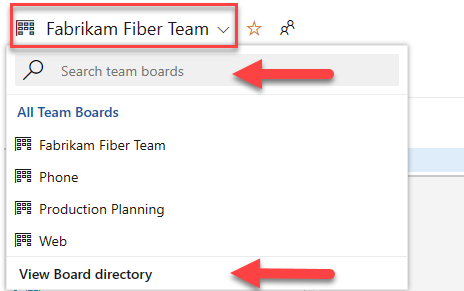
Tip
Select the
 star icon to make a team board a favorite. Favorite artifacts (
 favorite icon) appear at the top of the team selector list.
Check that you selected Backlog items for Scrum, Stories for Agile, or Requirements for CMMI as the backlog level.

To switch to the product backlog, select Stories backlog. To switch to a Taskboard, see Update and monitor your Taskboard.
Check that you selected the right project, and select Boards > Boards. Then select the correct team from the team selector menu.
To select another team's board, open the selector. Then select a different team, or select the
Browse all team boards option. Or, you can enter a keyword in the search box to filter the list of team backlogs for the project.Tip
Select the
star icon to make a team board a favorite. Favorite artifacts (
favorite icon) appear at the top of the team selector list.Check that you selected Backlog items for Scrum, Stories for Agile, or Requirements for CMMI as the backlog level.
To switch to the product backlog, select Stories backlog. To switch to a Taskboard, see Update and monitor your Taskboard.
Add one or more child items to a checklist
In the following example, tasks get added to the product board using the checklist feature. You can use the same procedures to add any other supported checklist item from your board.
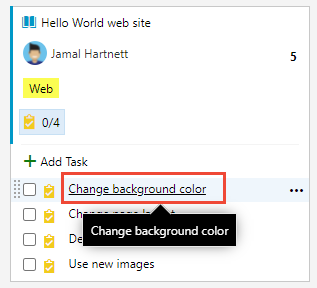
From your board, select
 Work item actions > + Add Task. If you already have a work item open, select Add link > New item. For more information, see Link work items to objects.
If you have many tasks to add, keep entering their titles and select Enter after each title.

Select the task title to add details.
Note
Tasks that you create from your board appear on your sprint Taskboard. Also, tasks that you create from the sprint backlog or Taskboard appear within tasks checklists on your board.
Mark a checklist item as done
When you complete a task or other checklist item, choose the checkbox to change its status to Done, Closed, or Completed.
The State of the work item is updated from Active to Closed for projects based on an Agile or CMMI process, and from To Do to Done for projects based on a Scrum or Basic process.
Tip
Regardless of the number of workflow states a checklist item might have, marking it as checked transitions it to its closed or completed state.
Expand or collapse a checklist on a board
When you open a board, there's an unexpanded view of checklists. Select the checklist summary to expand and collapse it.

Reorder tasks, reparent tasks, or reassign tasks to a sprint
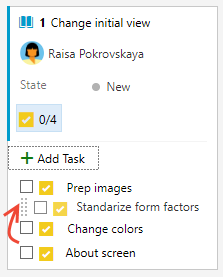
You can drag a task within a work item to reorder it. Or, you can drag the task to another work item on the board to reparent it.
Note
Users with Stakeholder access can't drag-and-drop tasks or reorder and reparent tasks.
Tasks or other child items you add as checklists are automatically assigned to the Iteration Path of their parent work item. To reassign a checklist item to a different sprint, you must open the item and change its Iteration Path. Or, open the sprint backlogs and drag it to the new sprint using the Planning pane. For more information, see Assign backlog items to a sprint.
Reassign a checklist item
Checklist items show the avatars of those team members assigned to the item. You can view the avatar assignment of checklist items, or reassign a checklist item by choosing the item's …Work items action menu and selecting Assigned to.
Note
Avatar images and the Assign to menu option requires you to enable the New Boards Hub preview feature. To enable this feature, see Manage or enable features.

Configure your board
To configure or change the layout of your board, see Customize your boards.
Related content
Tilbakemeldinger
Kommer snart: Gjennom 2024 faser vi ut GitHub Issues som tilbakemeldingsmekanisme for innhold, og erstatter det med et nytt system for tilbakemeldinger. Hvis du vil ha mer informasjon, kan du se: https://aka.ms/ContentUserFeedback.
Send inn og vis tilbakemelding for