Create or add a team
Azure DevOps Services | Azure DevOps Server 2022 - Azure DevOps Server 2019
This article explains how to create new teams, add members, configure team settings, and follow best practices for team management in Azure DevOps.
As your organization grows, add teams to manage specific products, services, or feature areas. Equip teams with tools to manage backlogs, plan sprints, configure dashboards, define alerts, and set team favorites.
Each new project includes a default team named after the project that you can rename or reassign as needed.
To maintain Agile practices while scaling teams, review Scale Agile to Large Teams. For more information on team-configurable tools, see About teams and Agile tools.
Note
This article explains how to add teams or team members to an Azure DevOps project. For information on Microsoft Teams or integrating it with Azure Boards, see Welcome to Microsoft Teams or Use the Azure Boards app in Microsoft Teams.
To move work items between teams, see Move work items from one team to another.
Prerequisites
| Category | Requirements |
|---|---|
| Permissions | - Member of the Project Administrators security group. - To add members to a team or change its configuration, be a team administrator or member of the Project Administrators group. |
| Tools | To use Azure CLI commands: Azure DevOps CLI. |
| Category | Requirements |
|---|---|
| Permissions | - Member of the Project Administrators security group. - To add members to a team or change its configuration, be a team administrator or member of the Project Administrators group. |
Create a team and add team members
To create a team, do the following steps.
Note
When you create a team, you can automatically generate the Area Path as a child node of the main project. To establish a hierarchical team structure, first define the Area Paths at the project level, then create your teams, and assign the appropriate Area Paths to each team. For more information, see Configure a hierarchy of teams.
From the Azure CLI tool, you can list teams, create a team, update a team configuration, and delete a team.
Note
To enable the new user interface for managing teams, enable the New Teams Page from the Preview features tool. To learn how, see Manage or enable features.
- Sign in to your organization (
https://dev.azure.com/{Your_Organization}). - Select Project settings > Teams.

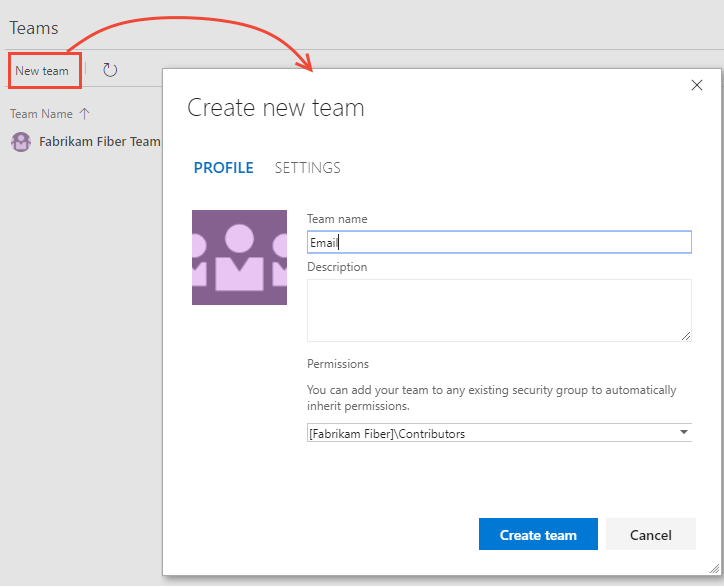
Select New team.

Enter a team name and the names of project members who you want to assign to the team. Optionally, enter a description. Add at least one name as a team Administrator. Select Create an area path with the name of the team, or leave it unchecked and assign the Area Path for the team after it gets created. You can choose an existing area path or add a new one at that time.

Note
Consider adding one or more users as team administrators. Team administrators have the necessary permissions to add team members and configure all team settings—including backlogs, boards, and Taskboards. For more information, see Manage and configure team tools.
When you're ready, select Create.
Select the team to add a team image, or configure other team elements.
Select Settings to upload an image, change the team name, add a team administrator, or delete the team.

Choose Save.
Select Iterations and areas to set the Area Paths and Iteration Paths for the team to use.

For more information, see the following articles:
Select the Current UI tab. The New Teams Page UI is only available for Azure DevOps Services.
Upon creation of a team, the following items are automatically configured:
- Security group with the team name containing the members assigned to the team, for example, [Fabrikam Fiber]\Production Planning. You can use this name to filter queries or to @mention all members of the team.
- Default notifications assigned to the team. For more information, see Manage notifications for a team, project, or organization.
- Default dashboard named Overview assigned to the team. To configure the dashboard, see Add widgets to a dashboard.
Important
Configuring the Area Paths and Iteration Paths used by the team is essential for many of the Azure Board tools to work, such as Backlogs, Boards, Sprints, and Delivery Plans. Team tools aren't available until the team's default area path is set. Area Paths and Iteration Paths are first configured for the project and then assigned or selected by the team.
If you are moving from one team to two or more teams, you may want to review and revise the Area Paths assigned to the default project team.
To configure other team features, see Manage teams and configure team tools.
Set the default project team
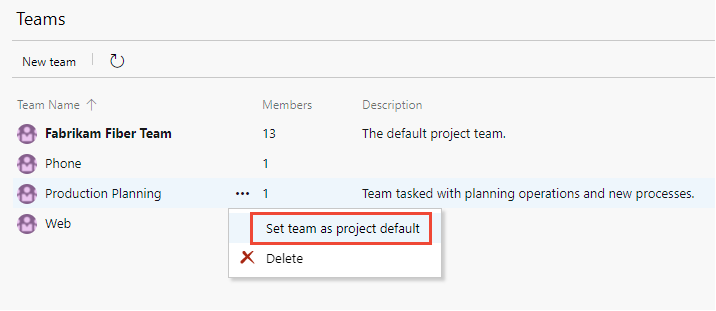
Each project has a default team assigned. You can change which project is assigned as the default with the following procedures.
Open Project settings > Teams as indicated in the previous section.
Choose
 More options for the team you want to designate as the default, and choose Set team as project default.
Choose the Current UI tab. The New Teams Page UI is only available for Azure DevOps Services.
List teams with Azure CLI
You can list teams using Azure DevOps team list. To learn how to list team members, see Add users to a team or project, List team members.
az devops team list [--project]
                    [--skip]
                    [--top]
Tip
If you don't specify a top number, 100 teams are returned. To list all teams in a project, specify a number for top which is greater than the current number of teams defined.
Parameters
- project: Optional. Name or ID of the project. Example: --project "Fabrikam Fiber." You can configure the default project using
az devops configure -d project=NAME_OR_ID. Required if not configured as default or picked up via git config. - skip: Optional. Number of teams to skip.
- top: Optional. Maximum number of teams to return.
Example
For example, the following command returns the 11 teams defined in the Fabrikam Fiber project. For addition output formats, see Output formats for Azure CLI commands.
Each team is assigned a unique ID.
az devops team list --project "Fabrikam Fiber" --output table
The following table output provides information on each of the attributes defined for the team.
ID                                    Name                Description
------------------------------------  ------------------  ----------------------------------------------------------------------------
7f099146-29a2-4798-9949-77c9f5f79653  Account Management  Management team focused on creating and maintaining customer services
2017b37a-486b-4222-ac84-b8b9eefa540e  Customer Profile    Feature team focused on securing account data
a90cd8f0-8e0d-42d6-aeb2-13442b826730  Email               Feature team delivering email apps
a48cb46f-7366-4f4b-baf5-b3632398ed1e  Fabrikam Team       The default project team. Was Fabrikam Fiber Team
e42fccbc-d96f-4c98-8168-7a85ecede548  Internet            Feature team developing web apps
b70aa504-33b4-4d17-a85d-0fbf4829a154  Phone               Feature team delivering phone apps
43e6bd2e-696f-492c-bbf7-9cde9cd420ea  Service Delivery    Management team responsible for ensure high performance delivery of services
8920d2ec-eed1-4792-8934-82a57abce7c2  Service Status      Feature team focused on monitoring and addressing service issues
9c676c8c-1910-4f73-b7b9-a946b5c551ae  Shopping Cart       Feature team managing shopping cart apps
64b86488-e105-4901-ba43-ffd48137bb93  TV                  Feature team developing TV apps
cda2b9b0-0335-4a0d-8bd0-67611d64ce9d  Voice               Feature team focused on voice communications
Grant team members permissions
For teams to work autonomously, give them permissions that they don't have by default. Suggested tasks include providing team administrators or team leads permissions to:
- Create and edit child nodes under their default area path
- Create shared queries and folders under the Shared Queries folder
For more information on setting permissions and access for select users, see Set permissions and access for work tracking.
If your deployment is integrated with SQL Server Reports, you need to Grant permissions to view or create SQL Server reports to team members.
Next steps
Related articles
REST API Resources


