Create and manage inherited processes
Azure DevOps Services | Azure DevOps Server 2022 - Azure DevOps Server 2019
You customize your project, Agile tools, and the work tracking system through an inherited process. The customizations you make are in effect for all projects that use the process. A process defines the building blocks of the work tracking system. Whenever you create a project, you select the process you want your project to use.
Important
This article applies to Azure DevOps Services and Azure DevOps Server 2019 and later versions. To customize any project defined on a collection for TFS 2018 or earlier, see On-premises XML process model.
Important
You can only use the Inheritance process model for projects defined on a project collection configured to support the Inheritance process model. If your on-premises collection is configured to use the On-premises XML process model, you can only use that process model to customize the work tracking experience. To learn more, see Customize work tracking, Choose the process model for your project collection.
To customize any project defined on a collection for TFS 2018 or earlier, see On-premises XML process model.
To learn more about what you can customize, see About process customization and inherited processes.
Learn how to perform these tasks:
- Open Settings>Process
- Create an inherited process
- Customize an inherited process
- Copy an inherited process
- Change projects to use an inherited process or a system process
- Add a project based on a process
- Enable or disable a process
- Set a process as the default to use when adding projects
Note
You can review changes made to an inherited process through the audit log. To learn more, see Access, export, and filter audit logs.
Prerequisites
Prior to customizing a process, we recommend that you review Configure and customize Azure Boards, which provides guidance on how to customize Azure Boards to meet your business needs. For a description of the different backlogs and boards, see Tasks supported by Backlogs, Boards, Taskboards, and Plans.
- You must have an organization created in Azure DevOps Services. If you haven't created one yet, do that now.
- To create, edit, and manage processes, you must be a member of the Project Collection Administrators group, or have the corresponding collection-level permissions Create process, Delete process, Edit process, or Delete a field from organization set to Allow. See Set permissions and access for work tracking, Customize an inherited process.
- You must have selected the Inheritance process model for the project collection where the project is created. To learn more, see Choose the process model for your project collection.
- To create, edit, and manage processes, you must be a member of the Project Collection Administrators group, or have the corresponding permissions Create process, Delete process, Edit process, or Delete a field from organization set to Allow. See Set permissions and access for work tracking, Customize an inherited process.
Open Settings>Process
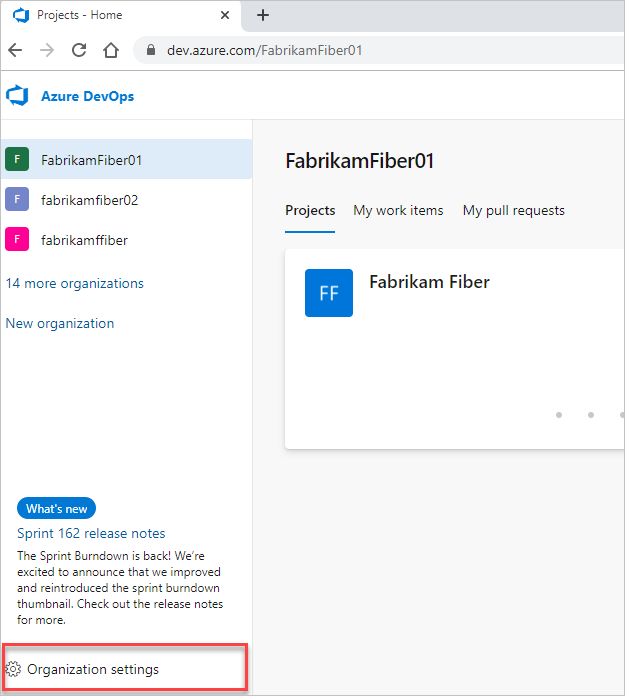
You create, manage, and make customizations to processes from Organization settings>Process.
Choose the
 Azure DevOps logo to open Projects. Then choose Organization settings.
Then, choose Process.
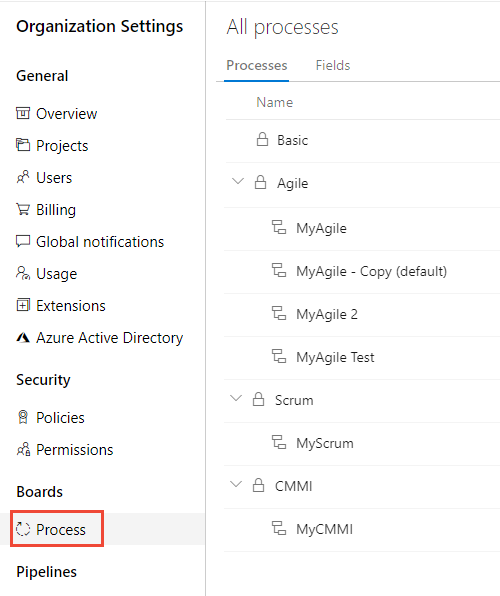
Important
If you don't see Process, then you're working from TFS-2018 or earlier version. The Process page isn't supported. You must use the features supported for the On-premises XML process model.
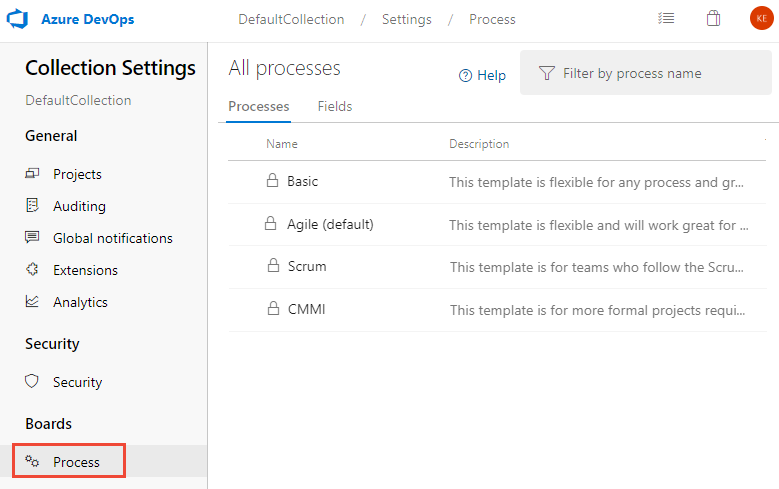
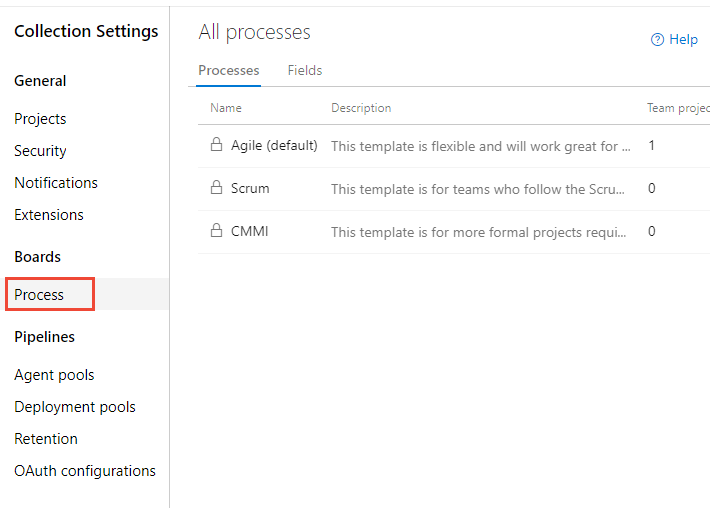
You create, manage, and make customizations to processes from Collection Settings>Process.
Choose the
 Azure DevOps logo to open Projects. Choose the project collection whose processes you want to customize, and then choose Collection Settings.
Then, choose Process.
You create, manage, and make customizations to processes from Admin settings>Process.
Choose the
 Azure DevOps logo to open Projects. Then choose Admin settings.
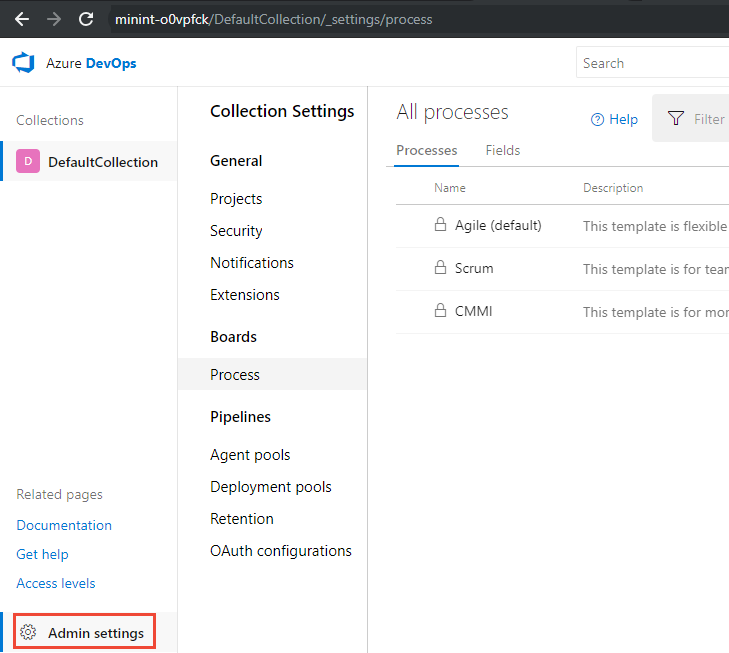
Then, choose Process.
Create an inherited process
You can create an inherited process from any one of the four system processes: Basic, Agile, Scrum, or CMMI.
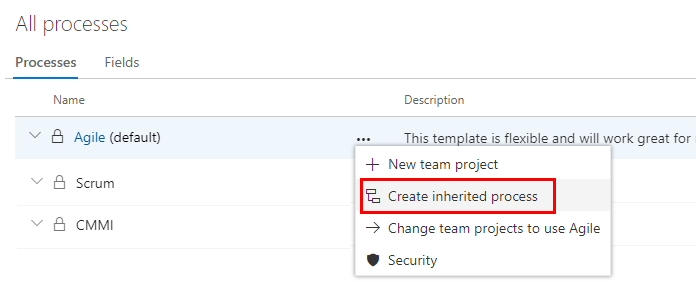
From the Process page, open the … context menu of the process you'll use to create an inherited process, and then choose Create inherited process.
Here, we create an inherited process from the Agile system process.
If you don't have access to these options, ask a member of your Project Collection Administrators group to grant you permissions. To find a member, see Look up a project collection administrator.
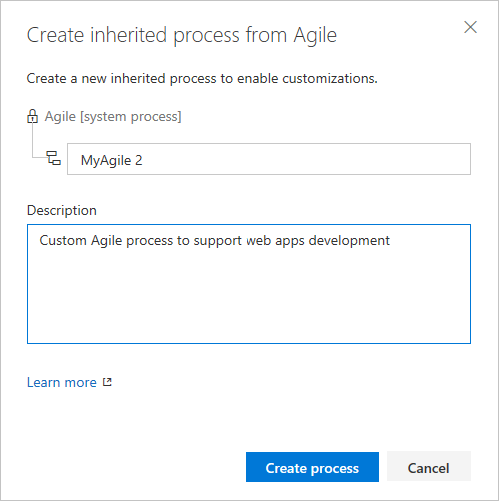
Enter a name for your process and optionally a description. (For naming restrictions, see About process customization and inherited processes, Process name restrictions.
Once you've defined the inherited process, you can perform these actions:
- Customize a project using an inherited process
- Create a project that uses the inherited process
- Change project(s) to use the inherited process
Note
All inherited processes and their child processes are automatically updated with any updates made to their parent system processes. Updates to processes are documented in Release Notes for Azure DevOps Server.
Change the process used by a project
You can change the process a project uses from a system process or inherited process to another inherited process. There are two mechanisms to change a projects process. The first is to switch to a process where the project is derived from the same system process. Meaning, you can move a project between processes that use the same base process like Agile or Scrum.
The second method is to migrate your project from one process model to another process model. For example, change the process model used by the project from Agile to Scrum, or Basic to Agile.
For the second method, we have provided detailed steps for three common scenarios of changing the process used by a project.
Note
You can change the process of a project as long as you don't have any undeleted work items of a custom work item type that isn't also defined in the target process.
Also, if you change a project to a system process or other inherited process that doesn't contain the same custom fields, data is still maintained. However, the custom fields that aren't represented in the current process won't appear on the work item form. You can still access the field data through a query or REST APIs. These fields are essentially locked from changes and appear as read-only values.
Choose the process that contains the project you want to change. For example, say you want to change a project from Agile to Scrum, then choose the Agile process.
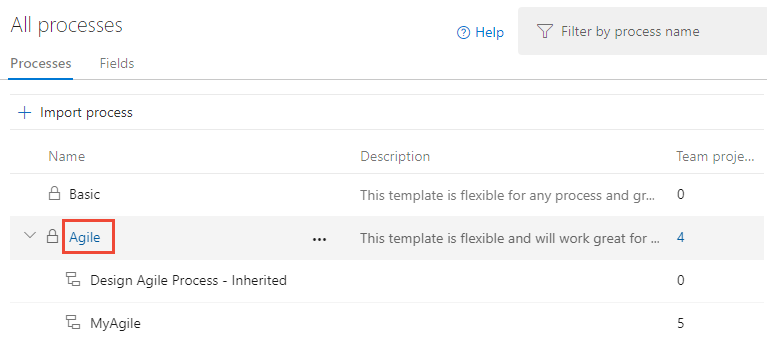
Choose Projects, and then choose the
 actions icon for the project you want to change, and select Change process.
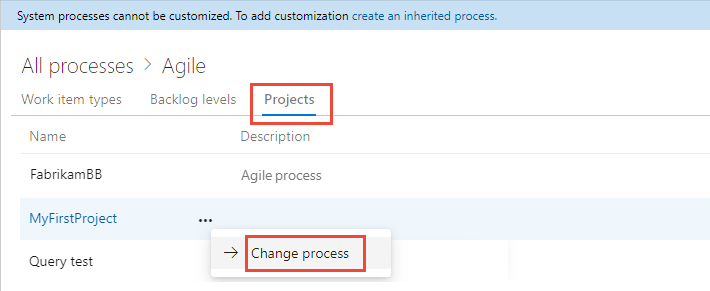
Follow the steps in the wizard
Important
When you change a project to use an inherited process, you may find one or more Agile tools or work items appear in an invalid state. For example:
- If you make a field required, work items with that field undefined show an error message. You'll need to resolve the errors to make additional changes and save the work item.
- If you add or remove/hide workflow states of a WIT that appears on the Kanban board, you'll need to update the Kanban board column configurations for all teams defined in the project.
Create a project from a process
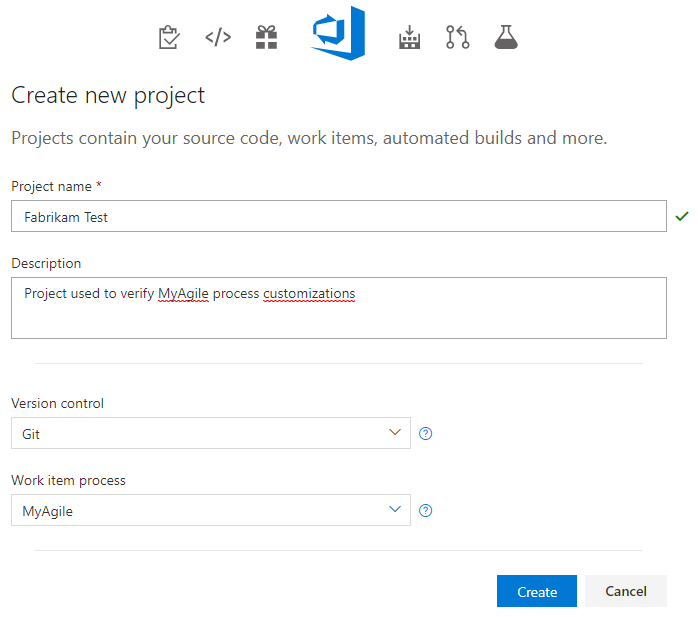
Open the … context menu for the process you want to use and choose New team project.
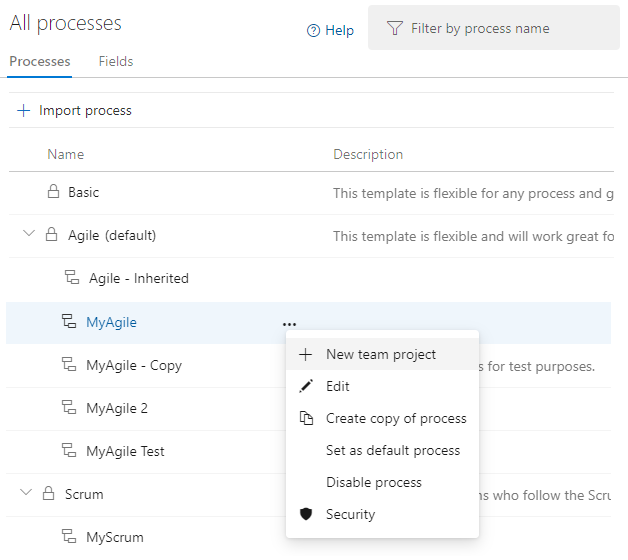
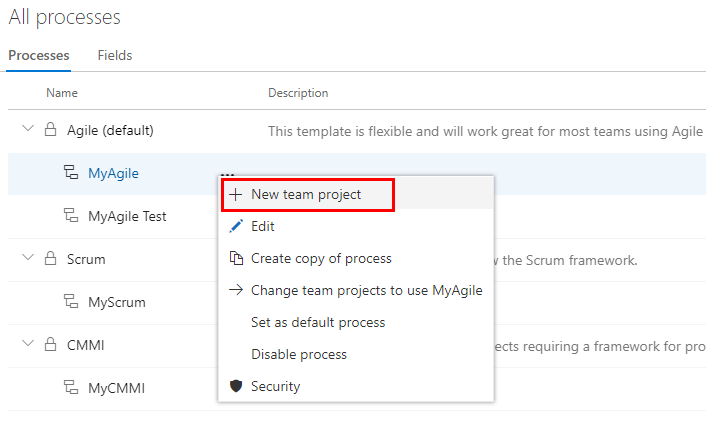
The Create new project page opens. Fill out the form. To learn more, see Create a project.
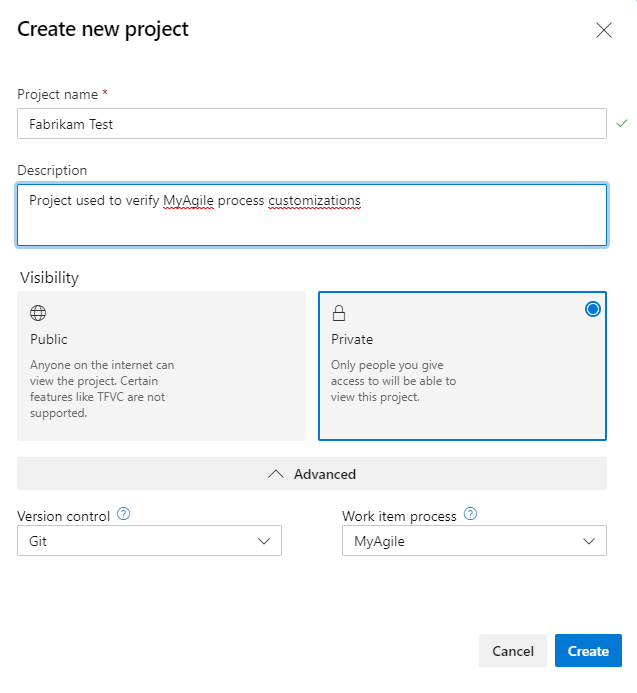
Copy a process
It's a good practice to test the customizations you make before rolling out the changes to your organization. To test your customization, you create a copy of a process, make your updates, verify the updates appear as desired, and then move projects to the new process.
Tip
If you make a change to a process that is used by one or more projects, each project that uses the process updates immediately to the incremental process change. To bundle your process changes before you roll them out to all projects, following the steps outlined next.
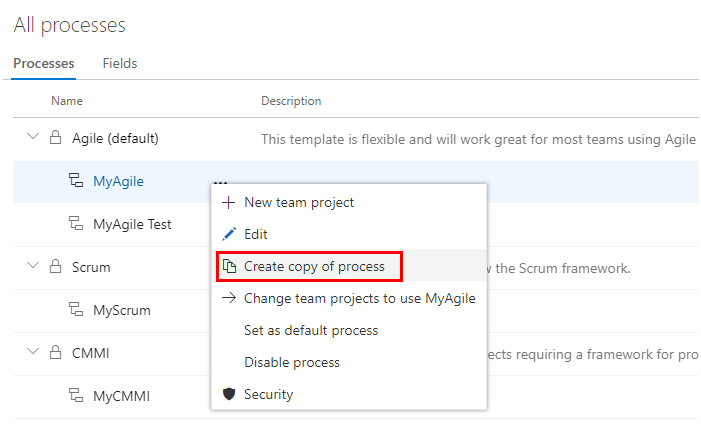
Create a copy of the process that you want to change. From the Process page, open the … context menu for the process you want to copy and choose Copy process.
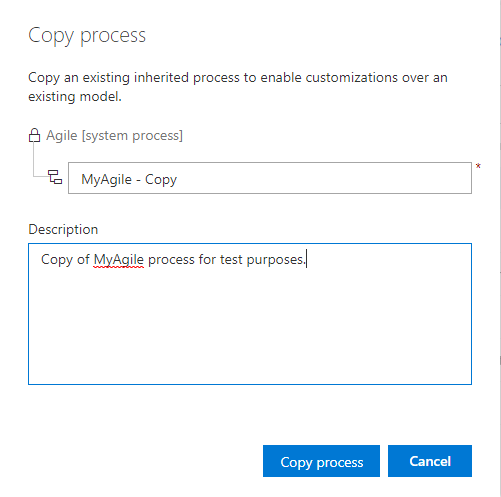
Fill out the form with the name of the copied process and choose Copy process.
Make your changes to the copied process. Since no project is using this process, these changes do not impact any project.
To verify your changes, create a test project based on the copied and updated process. If you have already created a test project, change the process of the test project using the Change project to use ProcessName option from the context menu.
Once you have fully tested your customizations, you're ready to roll out your changes to all projects. To roll out your changes, change the process of the projects that need the new changes. Select the Change project to use ProcessName option from the context menu.
Disable or delete the original process.
Enable/disable a process
To prevent projects being created from a process, you disable it. You might choose this option when you want to apply several customizations and don't want the process used until they are complete. Or, you might want to retire use of a process in favor of moving projects to a new process.
All system processes and newly created inherited processes are enabled by default.
- To disable or enable a process, open the … context menu for the process and choose Disable process or Enable process.
Set the default process
Set an inherited process as the default to have it pre-selected for other projects you plan to create.
To set a process as the default, open the … context menu for the inherited process and choose Set as default process. This option isn't available with any of the system processes.
Project Collection Administrators can add projects from the Projects page.
Try this next
Related articles
Programmatically work with processes
You can get, create, update, and delete processes defined for an organization using the REST API, Processes.
Tilbakemeldinger
Kommer snart: Gjennom 2024 faser vi ut GitHub Issues som tilbakemeldingsmekanisme for innhold, og erstatter det med et nytt system for tilbakemeldinger. Hvis du vil ha mer informasjon, kan du se: https://aka.ms/ContentUserFeedback.
Send inn og vis tilbakemelding for