How to deprovision devices that were previously auto-provisioned
You may find it necessary to deprovision devices that were previously auto-provisioned through the Device Provisioning Service. For example, a device may be sold or moved to a different IoT hub, or it may be lost, stolen, or otherwise compromised.
In general, deprovisioning a device involves two steps:
Disenroll the device from your provisioning service to prevent future auto-provisioning. Depending on whether you want to revoke access temporarily or permanently, you can either disable or delete an enrollment entry. For devices that use X.509 attestation, you may want to disable/delete an entry in the hierarchy of your existing enrollment groups.
- To learn how to disenroll a device, see How to disenroll a device from Azure IoT Hub Device Provisioning Service.
- To learn how to disenroll a device programmatically using one of the provisioning service SDKs, see Manage device enrollments with service SDKs.
Deregister the device from your IoT hub to prevent future communications and data transfer. Again, you can temporarily disable or permanently delete the device's entry in the identity registry for the IoT Hub where it was provisioned. See Disable devices to learn more about disablement.
The exact steps you take to deprovision a device depend on its attestation mechanism and its applicable enrollment entry with your provisioning service. The following sections provide an overview of the process, based on the enrollment and attestation type.
Individual enrollments
Devices that use TPM attestation or X.509 attestation with a leaf certificate are provisioned through an individual enrollment entry.
To deprovision a device that has an individual enrollment:
Disenroll the device from your provisioning service:
- For devices that use TPM attestation, delete the individual enrollment entry to permanently revoke the device's access to the provisioning service, or disable the entry to temporarily revoke its access.
- For devices that use X.509 attestation, you can either delete or disable the entry. Be aware, though, if you delete an individual enrollment for a device that uses X.509 and an enabled enrollment group exists for a signing certificate in that device's certificate chain, the device can re-enroll. For such devices, it may be safer to disable the enrollment entry. Doing so prevents the device from re-enrolling, regardless of whether an enabled enrollment group exists for one of its signing certificates.
Disable or delete the device in the identity registry of the IoT hub that it was provisioned to.
Enrollment groups
With X.509 attestation, devices can also be provisioned through an enrollment group. Enrollment groups are configured with a signing certificate, either an intermediate or root CA certificate, and control access to the provisioning service for devices with that certificate in their certificate chain. To learn more about enrollment groups and X.509 certificates with the provisioning service, see X.509 certificate attestation.
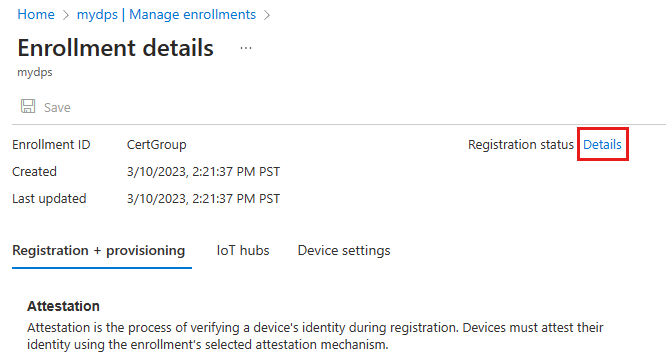
To see a list of devices that have been provisioned through an enrollment group, you can view the enrollment group's details. This is an easy way to understand which IoT hub each device has been provisioned to. To view the device list:
Sign in to the Azure portal and navigate to your provisioning service.
Select Manage enrollments, then select the Enrollment groups tab.
Select the enrollment group to open its details.
Select Details to view the registration records for the enrollment group.

With enrollment groups, there are two scenarios to consider:
To deprovision all of the devices that have been provisioned through an enrollment group:
Disable the enrollment group to disallow its signing certificate.
Use the list of provisioned devices for that enrollment group to disable or delete each device from the identity registry of its respective IoT hub.
After disabling or deleting all devices from their respective IoT hubs, you can optionally delete the enrollment group. Be aware, though, that if you delete the enrollment group and there is an enabled enrollment group for a signing certificate higher up in the certificate chain of one or more of the devices, those devices can re-enroll.
Note
Deleting an enrollment group doesn't delete the registration records for devices in the group. DPS uses the registration records to determine whether the maximum number of registrations has been reached for the DPS instance. Orphaned registration records still count against this quota. For the current maximum number of registrations supported for a DPS instance, see Quotas and limits.
You may want to delete the registration records for the enrollment group before deleting the enrollment group itself. You can see and manage the registration records for an enrollment group manually on the registration status page for the group in the Azure portal. Or, you can retrieve and manage the registration records programmatically using the Device Registration State REST APIs or equivalent APIs in the DPS service SDKs, or using the az iot dps enrollment-group registration Azure CLI commands.
To deprovision a single device from an enrollment group:
Create a disabled individual enrollment for the device.
- If you have the device (end-entity) certificate, you can create a disabled X.509 individual enrollment.
- If you don't have the device certificate, you can create a disabled symmetric key individual enrollment based on the device ID in the registration record for that device.
To learn more, see Disallow specific devices in an enrollment group.
The presence of a disabled individual enrollment for a device revokes access to the provisioning service for that device while still permitting access for other devices that have the enrollment group's signing certificate in their chain. Do not delete the disabled individual enrollment for the device. Doing so will allow the device to re-enroll through the enrollment group.
Use the list of provisioned devices for that enrollment group to find the IoT hub that the device was provisioned to and disable or delete it from that hub's identity registry.