Merk
Tilgang til denne siden krever autorisasjon. Du kan prøve å logge på eller endre kataloger.
Tilgang til denne siden krever autorisasjon. Du kan prøve å endre kataloger.
Applies to: ![]() IoT Edge 1.5
IoT Edge 1.5
Important
IoT Edge 1.5 LTS is the supported release. IoT Edge 1.4 LTS reached end of life on November 12, 2024. If you're using an earlier release, see Update IoT Edge.
By using Azure IoT Edge, you can configure your devices to use an Enrollment over Secure Transport (EST) server to manage x509 certificates.
This tutorial walks you through hosting a test EST server and configuring an IoT Edge device for the enrollment and renewal of device identity x509 certificates. In this tutorial, you learn how to:
- Create and host a test EST server for device identity certificates
- Configure DPS group enrollment
- Configure device
Prerequisites
Before you begin, make sure you have the following prerequisites:
- An existing IoT Edge device with the latest Azure IoT Edge runtime installed. If you need to create a test device, complete the Quickstart: Deploy your first IoT Edge module to a virtual Linux device.
- Your IoT Edge device requires Azure IoT Edge runtime 1.2 or later for EST support. EST certificate renewal requires Azure IoT Edge runtime 1.3 or later.
- IoT Hub Device Provisioning Service (DPS) linked to IoT Hub. For information about configuring DPS, see Quickstart: Set up the IoT Hub Device Provisioning Service with the Azure portal.
Note
To use EST and IoT Edge for automatic device identity certificate issuance and renewal, which is recommended for production, IoT Edge must provision as part of a DPS CA-based enrollment group. Other methods of provisioning, including manual X.509 provisioning with IoT Hub and DPS with individual enrollment, don't support automatic device identity certificate renewal.
What is Enrollment over Secure Transport?
Enrollment over Secure Transport (EST) is a cryptographic protocol that automates the issuance of x.509 certificates. It's used for public key infrastructure (PKI) clients, like IoT Edge instances that need client certificates associated to a Certificate Authority (CA). EST replaces the need for manual certificate management, which can be risky and error-prone.
EST server
For certificate issuance and renewal, your devices need access to an EST server.
Important
For production, use GlobalSign IoT Edge Enroll or DigiCert IoT Device Manager.
For more information about using GlobalSign's EST service, see Automatic IoT Edge Certificate Management with GlobalSign EST.
For testing and development, you can use a test EST server. In this tutorial, you create a test EST server.
Run EST server on device
To quickly get started, this tutorial shows the steps to deploy a simple EST server in a container locally on the IoT Edge device. This method is the simplest approach to try it out.
The Dockerfile uses Ubuntu 18.04, a Cisco library called libest, and sample server code. It's configured with the following settings that you can change:
- Root CA valid for 20 years
- EST server certificate valid for 10 years
- Set the certificate default-days to 1 to test EST renewal
- EST server runs locally on the IoT Edge device in a container
Caution
Don't use this Dockerfile in production.
Connect to the device, for example using SSH, where you installed IoT Edge.
Create a file named
Dockerfile(case sensitive) and add the sample content using your favorite text editor.Tip
If you want to host your EST server in Azure Container Instance, change
myestserver.westus.azurecontainer.ioto the DNS name of your EST server. When choosing a DNS name, be aware the DNS label for an Azure Container instance must be at least five characters in length.# DO NOT USE IN PRODUCTION - Use only for testing FROM ubuntu:18.04 RUN apt update && apt install -y apache2-utils git openssl libssl-dev build-essential && \ git clone https://github.com/cisco/libest.git && cd libest && \ ./configure --disable-safec && make install && \ rm -rf /src && apt remove --quiet -y libssl-dev build-essential && \ apt autoremove -y && apt clean -y && apt autoclean -y && \ rm -rf /var/lib/apt /tmp/* /var/tmp/* WORKDIR /libest/example/server/ # Setting the root CA expiration to 20 years RUN sed -i "s|-days 365|-days 7300 |g" ./createCA.sh ## If you want to use the EST server to issue Edge CA certificates, ## uncomment the RUN sed section after this comment block. ## The sed commands add special extensions for Edge CA certificates. For more information see: ## https://learn.microsoft.com/azure/iot-edge/how-to-manage-device-certificates?tabs=windows#edge-ca-in-production ## ## IMPORTANT: ## DO NOT issue Edge CA certificates in production. ## For production, use digital certificates from a trusted CA. ## See https://techcommunity.microsoft.com/blog/iotblog/automatic-iot-edge-certificate-management-with-globalsign-est/4384385 ## ## Using EST for Edge CA is for demonstration and learning purposes only. ## # RUN sed -i "s|basicConstraints=CA:FALSE|basicConstraints=critical,CA:TRUE,pathlen:0|g" ./estExampleCA.cnf && \ # sed -i "s|keyUsage=digitalSignature|keyUsage=critical,digitalSignature,keyCertSign|g" ./estExampleCA.cnf && \ # sed -i "s|authorityKeyIdentifier=keyid|authorityKeyIdentifier=keyid:always|g" ./estExampleCA.cnf ## If you want to host your EST server remotely (for example, an Azure Container Instance), ## change myestserver.westus.azurecontainer.io to the fully qualified DNS name of your EST server ## OR, change the IP address ## and uncomment the corresponding lines. # RUN sed -i "s|DNS.2 = ip6-localhost|DNS.2 = myestserver.westus.azurecontainer.io|g" ./ext.cnf # RUN sed -i "s|IP.2 = ::1|IP.2 = <YOUR EST SERVER IP ADDRESS>|g" ./ext.cnf # Set EST server certificate to be valid for 10 years RUN sed -i "s|-keyout \$EST_SERVER_PRIVKEY -subj|-keyout \$EST_SERVER_PRIVKEY -days 7300 -subj |g" ./createCA.sh # Create the CA RUN echo 1 | ./createCA.sh # Set cert default-days to 1 to show EST renewal RUN sed -i "s|default_days = 365|default_days = 1 |g" ./estExampleCA.cnf # The EST server listens on port 8085 by default # Uncomment to change the port to 443 or something else. If changed, EXPOSE that port instead of 8085. # RUN sed -i "s|estserver -c|estserver -p 443 -c |g" ./runserver.sh EXPOSE 8085 CMD ./runserver.shIn the directory containing your
Dockerfile, build your image from the sample Dockerfile.sudo docker build . --tag estStart the container and expose the container's port 8085 to port 8085 on the host.
sudo docker run -d -p 8085:8085 estNow, your EST server is running and can be reached using
localhoston port 8085. Verify that it's available by running a command to see its server certificate.openssl s_client -showcerts -connect localhost:8085You should see -----BEGIN CERTIFICATE----- midway through the output. Retrieving the certificate verifies that the server is reachable and can present its certificate.
Tip
To run this container in the cloud, build the image and push the image to Azure Container Registry. Then, follow the quickstart to deploy to Azure Container Instance.
Download CA certificate
Each device requires the Certificate Authority (CA) certificate that's associated with a device identity certificate.
On the IoT Edge device, create the /var/aziot/certs directory if it doesn't exist, and then change directory to it.
# If the certificate directory doesn't exist, create, set ownership, and set permissions
sudo mkdir -p /var/aziot/certs
sudo chown aziotcs:aziotcs /var/aziot/certs
sudo chmod 755 /var/aziot/certs

# Change directory to /var/aziot/certs
cd /var/aziot/certs
Retrieve the CA certificate from the EST server into the /var/aziot/certs directory and name it
cacert.crt.pem.openssl s_client -showcerts -verify 5 -connect localhost:8085 < /dev/null | sudo awk '/BEGIN/,/END/{ if(/BEGIN/){a++}; out="cert"a".pem"; print >out}' && sudo cp cert2.pem cacert.crt.pemThe key service user aziotcs should own the certificates. Set the ownership to aziotcs for all the certificate files and set permissions. For more information about certificate ownership and permissions, see Permission requirements.
# Give aziotcs ownership to certificates
sudo chown -R aziotcs:aziotcs /var/aziot/certs
# Read and write for aziotcs, read-only for others
sudo find /var/aziot/certs -type f -name "*.*" -exec chmod 644 {} \;
Provision IoT Edge device using DPS
By using the Device Provisioning Service, you can automatically issue and renew certificates from an EST server in IoT Edge. When you use the tutorial EST server, the identity certificates expire in one day, making manual provisioning with IoT Hub impractical since each time the certificate expires you must manually update the thumbprint in IoT Hub. DPS CA authentication with enrollment group enables the device identity certificates to be renewed without any manual steps.
Upload CA certificate to DPS
If you don't have a Device Provisioning Service linked to IoT Hub, see Quickstart: Set up the IoT Hub Device Provisioning Service with the Azure portal.
Transfer the cacert.crt.pem file from your device to a computer with access to the Azure portal such as your development computer. An easy way to transfer the certificate is to remotely connect to your device, display the certificate by using the command
cat /var/aziot/certs/cacert.crt.pem, copy the entire output, and paste the contents to a new file on your development computer.In the Azure portal, go to your instance of IoT Hub Device Provisioning Service.
Under Settings, select Certificates, and then select +Add.

Setting Value Certificate name Enter a friendly name for the CA certificate. Certificate .pem or .cer file Browse to the cacert.crt.pemfrom the EST server.Set certificate status to verified on upload Select the checkbox. Select Save.
Create enrollment group
In the Azure portal, go to your instance of IoT Hub Device Provisioning Service.
Under Settings, select Manage enrollments.
Select Add enrollment group and complete the following steps to configure the enrollment.
On the Registration + provisioning tab, choose the following settings:
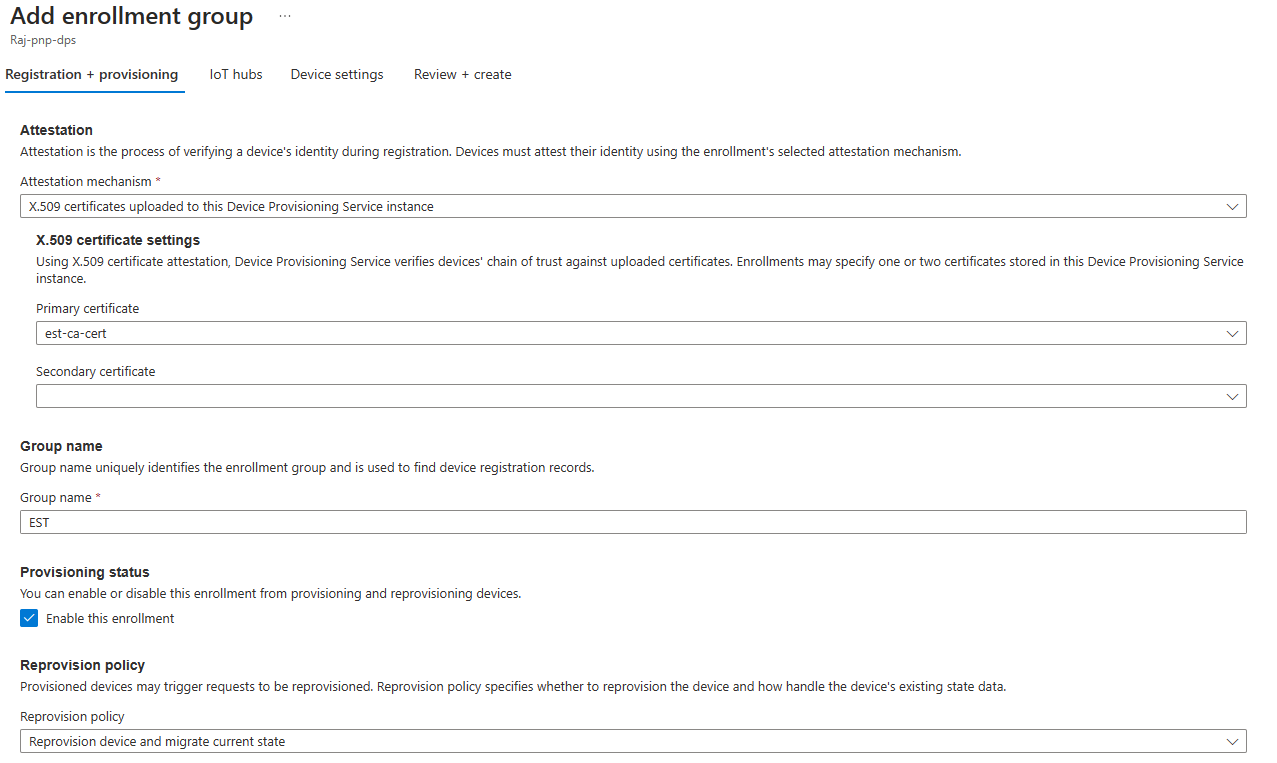
Setting Value Attestation mechanism Select X.509 certificates uploaded to this Device Provisioning Service instance. Primary certificate Choose your certificate from the dropdown list. Group name Provide a friendly name for this group enrollment. Provisioning status Select Enable this enrollment checkbox. On the IoT hubs tab, choose your IoT hub from the list.
On the Device settings tab, select the Enable IoT Edge on provisioned devices checkbox. The other settings aren't relevant to the tutorial. You can accept the default settings.
Select Review + create.
Now that an enrollment exists for the device, the IoT Edge runtime can automatically manage device certificates for the linked IoT hub.
Configure IoT Edge device
On the IoT Edge device, update the IoT Edge configuration file to use device certificates from the EST server.
Open the IoT Edge configuration file using an editor. For example, use the
nanoeditor to open the /etc/aziot/config.toml file:sudo nano /etc/aziot/config.tomlAdd or replace the following sections in the configuration file. These configuration settings initially use username and password authentication to get the device certificate from the EST server. The device certificate authenticates to the EST server for future certificate renewals.
Replace the following placeholder text:
<DPS-ID-SCOPE>with the ID Scope of the DPS linked to the IoT hub containing the registered device, andmyiotedgedevicewith the device ID registered in Azure IoT Hub. You can find the ID Scope value on the DPS Overview page.# DPS provisioning with X.509 certificate # Replace with ID Scope from your DPS [provisioning] source = "dps" global_endpoint = "https://global.azure-devices-provisioning.net" id_scope = "<DPS-ID-SCOPE>" [provisioning.attestation] method = "x509" registration_id = "myiotedgedevice" [provisioning.attestation.identity_cert] method = "est" common_name = "myiotedgedevice" # Auto renewal settings for the identity cert # Available only from IoT Edge 1.3 and above [provisioning.attestation.identity_cert.auto_renew] rotate_key = false threshold = "80%" retry = "4%" # Trusted root CA certificate in the global EST options # Optional if the EST server's TLS certificate is already trusted by the system's CA certificates. [cert_issuance.est] trusted_certs = [ "file:///var/aziot/certs/cacert.crt.pem", ] # The default username and password for libest # Used for initial authentication to EST server # # Not recommended for production [cert_issuance.est.auth] username = "estuser" password = "estpwd" [cert_issuance.est.urls] default = "https://localhost:8085/.well-known/est"Note
In this example, IoT Edge uses username and password to authenticate to the EST server every time it needs to obtain a certificate. This method isn't recommended in production because it requires storing a secret in plaintext. Also, IoT Edge should use an identity certificate to authenticate to the EST server. To modify for production:
- Consider using long-lived bootstrap certificates that you store on the device during manufacturing similar to the recommended approach for DPS. To see how to configure bootstrap certificate for EST server, see Authenticate a Device Using Certificates Issued Dynamically via EST.
- Configure
[cert_issuance.est.identity_auto_renew]using the same syntax as the provisioning certificate auto-renew configuration shown in the previous example.
This way, IoT Edge certificate service uses the bootstrap certificate for initial authentication with EST server, and requests an identity certificate for future EST requests to the same server. If, for some reason, the EST identity certificate expires before renewal, IoT Edge falls back to using the bootstrap certificate.
Run
sudo iotedge config applyto apply the new settings.Run
sudo iotedge checkto verify your IoT Edge device configuration. All configuration checks should succeed. For this tutorial, you can ignore production readiness errors and warnings, DNS server warnings, and connectivity checks.Navigate to your device in IoT Hub. Certificate thumbprints are added to the device automatically by using DPS and the EST server.
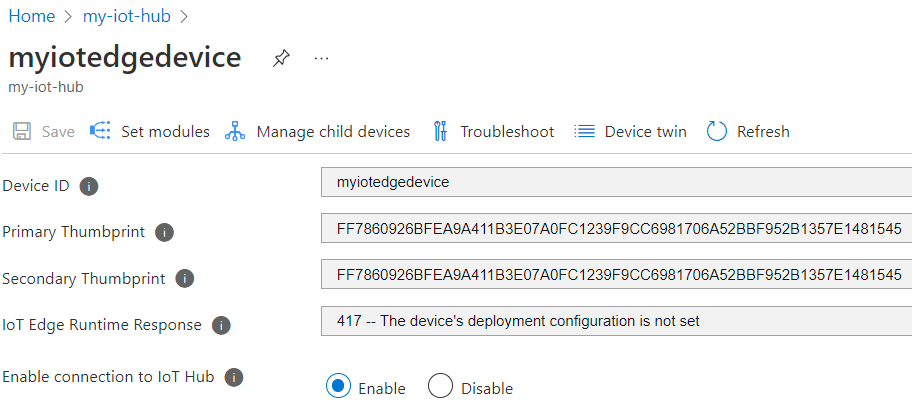
Note
When you create a new IoT Edge device, it displays the status code
417 -- The device's deployment configuration isn't set in the Azure portal.This status is normal, and means that the device is ready to receive a module deployment.
Test certificate renewal
You can immediately reissue the device identity certificates by removing the existing certificates and keys from the device and then applying the IoT Edge configuration. IoT Edge detects the missing files and requests new certificates.
On the IoT Edge device, stop the IoT Edge runtime.
sudo iotedge system stopDelete the existing certificates and keys.
sudo sh -c "rm /var/lib/aziot/certd/certs/*"
sudo sh -c "rm /var/lib/aziot/keyd/keys/*"
Apply the IoT Edge configuration to renew certificates.
sudo iotedge config applyYou might need to wait a few minutes for the runtime to start.
Go to your device in IoT Hub. Certificate thumbprints are updated.
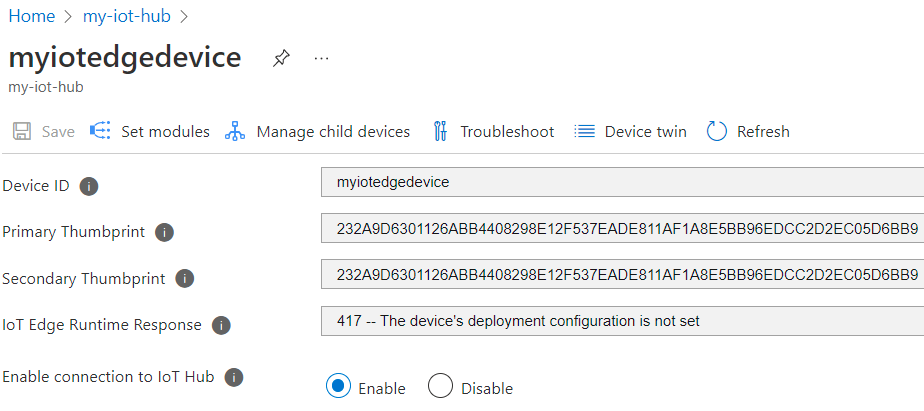
List the certificate files by using the command
sudo ls -l /var/lib/aziot/certd/certs. You should see recent creation dates for the device certificate files.Use the
opensslcommand to check the new certificate contents. For example:sudo openssl x509 -in /var/lib/aziot/certd/certs/deviceid-bd732105ef89cf8edd2606a5309c8a26b7b5599a4e124a0fe6199b6b2f60e655.cer -text -nooutReplace the device certificate file name (.cer) with your device's certificate file.
You should notice the certificate Validity date range has changed.
The following optional tests demonstrate how IoT Edge renews certificates from the EST server when they expire or are missing. After each test, you can verify new thumbprints in the Azure portal and use the openssl command to verify the new certificate.
- Wait a day for the certificate to expire. The test EST server is configured to create certificates that expire after one day. IoT Edge automatically renews the certificate.
- Adjust the percentage in
thresholdfor auto renewal set in config.toml (currently set to 80% in the example configuration). For example, set it to10%and observe the certificate renewal approximately every 2 hours. - Adjust the
thresholdto an integer followed bym(minutes). For example, set it to60mand observe certificate renewal 1 hour before expiry.
Clean up resources
You can keep the resources and configurations that you created in this tutorial and reuse them. Otherwise, delete the local configurations and the Azure resources that you used in this article to avoid charges.
Delete Azure resources
You can't undo deleting Azure resources and resource groups. Make sure that you don't accidentally delete the wrong resource group or resources. If you created the IoT Hub inside an existing resource group that has resources you want to keep, delete only the IoT Hub resource itself, not the resource group.
To delete the resources:
- Sign in to the Azure portal, and then select Resource groups.
- Select the name of the resource group that contains your IoT Edge test resources.
- Review the list of resources that your resource group contains. If you want to delete all of them, you can select Delete resource group. If you want to delete only some of them, select each resource to delete them individually.
Next steps
- To use EST server to issue Edge CA certificates, see the example configuration.
- Using a username and password to bootstrap authentication to EST server isn't recommended for production. Instead, consider using long-lived bootstrap certificates that can be stored on the device during manufacturing similar to the recommended approach for DPS. For information about how to configure bootstrap certificate for EST server, see Authenticate a Device Using Certificates Issued Dynamically via EST.
- EST server can be used to issue certificates for all devices in a hierarchy as well. Depending on whether you have ISA-95 requirements, it might be necessary to run a chain of EST servers with one at every layer or use the API proxy module to forward the requests. For more information, see Kevin's blog.
- For enterprise grade solutions, consider: GlobalSign IoT Edge Enroll, DigiCert IoT Device Manager, and Keytos EZCA.
- For more information about certificates, see Understand how Azure IoT Edge uses certificates.