Data science with a Windows Data Science Virtual Machine
The Windows Data Science Virtual Machine (DSVM) is a powerful data science development environment that supports data exploration and modeling tasks. The environment comes prebuilt and prebundled with several popular data analytics tools that make it easy to start your analysis for on-premises, cloud, or hybrid deployments.
The DSVM works closely with Azure services. It can read and process data already stored on Azure, in Azure Synapse (formerly SQL DW), Azure Data Lake, Azure Storage, or Azure Cosmos DB. It can also take advantage of other analytics tools, such as Azure Machine Learning.
In this article, you learn how to use your DSVM to both handle data science tasks and to interact with other Azure services. This is a sample of tasks the DSVM can cover:
- Use a Jupyter Notebook to experiment with your data in a browser, using Python 2, Python 3, and Microsoft R. (Microsoft R is an enterprise-ready version of R designed for high performance.)
- Explore data and develop models locally on the DSVM, using Microsoft Machine Learning Server and Python.
- Administer your Azure resources, using the Azure portal or PowerShell.
- Extend your storage space and share large-scale datasets/code across your whole team, with an Azure Files share as a mountable drive on your DSVM.
- Share code with your team with GitHub. Access your repository with the preinstalled Git clients: Git Bash and Git GUI.
- Access Azure data and analytics services:
- Azure Blob storage
- Azure Cosmos DB
- Azure Synapse (formerly SQL DW)
- Azure SQL Database
- Build reports and a dashboard with the Power BI Desktop instance - preinstalled on the DSVM - and deploy them in the cloud.
- Install more tools on your virtual machine.
Note
Additional usage charges apply for many of the data storage and analytics services listed in this article. For more information, visit the Azure pricing page.
Prerequisites
- An Azure subscription. If you don't have an Azure subscription, create a free account before you begin.
- A provisioned DSVM on the Azure portal. For more information, visit the Creating a virtual machine resource.
Note
We recommend that you use the Azure Az PowerShell module to interact with Azure. To get started, see Install Azure PowerShell. To learn how to migrate to the Az PowerShell module, see Migrate Azure PowerShell from AzureRM to Az.
Use Jupyter Notebooks
The Jupyter Notebook provides a browser-based IDE for data exploration and modeling. You can use Python 2, Python 3, or R in a Jupyter Notebook.
To start the Jupyter Notebook, select the Jupyter Notebook icon on the Start menu or on the desktop. In the DSVM command prompt, you can also run the command jupyter notebook from the directory that hosts existing notebooks or where you want to create new notebooks.
After you start Jupyter, navigate to the /notebooks directory. This directory hosts example notebooks that are prepackaged into the DSVM. You can:
- Select the notebook to see the code.
- Select Shift+Enter to run each cell.
- Select Cell > Run to run the entire notebook.
- Create a new notebook; select the Jupyter icon (upper-left corner), select the New button, and then choose the notebook language (also known as kernels).
Note
At this time, Python 2.7, Python 3.6, R, Julia, and PySpark kernels in Jupyter are supported. The R kernel supports programming in both open-source R and Microsoft R. In the notebook, you can explore your data, build your model, and test that model with your choice of libraries.
Explore data and develop models with Microsoft Machine Learning Server
Note
Support for Machine Learning Server Standalone ended on July 1, 2021. We removed it from the DSVM images after June 30, 2021. Existing deployments can still access the software, but support ended after July 1, 2021.
You can use R and Python for your data analytics directly on the DSVM.
For R, you can use R Tools for Visual Studio. Microsoft provides other libraries, in addition to the open-source CRAN R resource. These libraries enable both scalable analytics and the ability to analyze data masses that exceed the memory size limitations of parallel chunked analysis.
For Python, you can use an IDE - for example, Visual Studio Community Edition -which has the Python Tools for Visual Studio (PTVS) extension preinstalled. By default, only Python 3.6, the root Conda environment, is configured on PTVS. To enable Anaconda Python 2.7:
- Create custom environments for each version. Select Tools > Python Tools > Python Environments, and then select + Custom in Visual Studio Community Edition.
- Provide a description, and set the environment prefix path as c:\anaconda\envs\python2 for Anaconda Python 2.7.
- Select Auto Detect > Apply to save the environment.
Visit the PTVS documentation resource for more information about how to create Python environments.
You can now create a new Python project. Select File > New > Project > Python, and select the type of Python application you want to build. You can set the Python environment for the current project to the desired version (Python 2.7 or 3.6) by right-clicking Python environments, and then selecting Add/Remove Python Environments. Visit the product documentation for more information about working with PTVS.
Manage Azure resources
The DSVM allows you to build your analytics solution locally on the virtual machine. It also allows you to access services on the Azure cloud platform. Azure provides several services, including compute, storage, data analytics, and more, that you can administer and access from your DSVM.
You have two available options to administer your Azure subscription and cloud resources:
Visit the Azure portal in your browser.
Use PowerShell scripts. Run Azure PowerShell from a desktop shortcut or from the Start menu. Visit the Microsoft Azure PowerShell documentation resource for more information.
Extend storage by using shared file systems
Data scientists can share large datasets, code, or other resources within the team. The DSVM has about 45 GB of available space. To expand your storage, you can use Azure Files and either mount it on one or more DSVM instances, or access it with a REST API. You can also use the Azure portal, or use Azure PowerShell to add extra dedicated data disks.
Note
The maximum space on an Azure File share is 5 TB. Each file has a 1 TB size limit.
This Azure PowerShell script creates an Azure Files share:
# Authenticate to Azure.
Connect-AzAccount
# Select your subscription
Get-AzSubscription –SubscriptionName "<your subscription name>" | Select-AzSubscription
# Create a new resource group.
New-AzResourceGroup -Name <dsvmdatarg>
# Create a new storage account. You can reuse existing storage account if you want.
New-AzStorageAccount -Name <mydatadisk> -ResourceGroupName <dsvmdatarg> -Location "<Azure Data Center Name For eg. South Central US>" -Type "Standard_LRS"
# Set your current working storage account
Set-AzCurrentStorageAccount –ResourceGroupName "<dsvmdatarg>" –StorageAccountName <mydatadisk>

# Create an Azure Files share
$s = New-AzStorageShare <<teamsharename>>
# Create a directory under the file share. You can give it any name
New-AzStorageDirectory -Share $s -Path <directory name>
# List the share to confirm that everything worked
Get-AzStorageFile -Share $s
You can mount an Azure Files share in any virtual machine in Azure. We suggest that you place the VM and the storage account in the same Azure data center, to avoid latency and data transfer charges. These Azure PowerShell commands mount the drive on the DSVM:
# Get the storage key of the storage account that has the Azure Files share from the Azure portal. Store it securely on the VM to avoid being prompted in the next command.
cmdkey /add:<<mydatadisk>>.file.core.windows.net /user:<<mydatadisk>> /pass:<storage key>

# Mount the Azure Files share as drive Z on the VM. You can choose another drive letter if you want.
net use z:  \\<mydatadisk>.file.core.windows.net\<<teamsharename>>
You can access this drive as you would any normal drive on the VM.
Share code in GitHub
The GitHub code repository hosts code samples and code sources for many tools that the developer community shares. It uses Git as the technology to track and store versions of the code files. GitHub also serves as a platform to create your own repository. Your own repository can store your team's shared code and documentation, implement version control, and control access permissions for stakeholders who want to view and contribute code. GitHub supports collaboration within your team, use of code developed by the community, and contributions of code back to the community. Visit the GitHub help pages for more information about Git.
The DSVM comes loaded with client tools on the command line and in the GUI to access the GitHub repository. The Git Bash command-line tool operates with Git and GitHub. Visual Studio is installed on the DSVM and has the Git extensions. Both the Start menu and the desktop have icons for these tools.
Use the git clone command to download code from a GitHub repository. To download the data science repository published by Microsoft into the current directory, for example, run this command in Git Bash:
git clone https://github.com/Azure/DataScienceVM.git
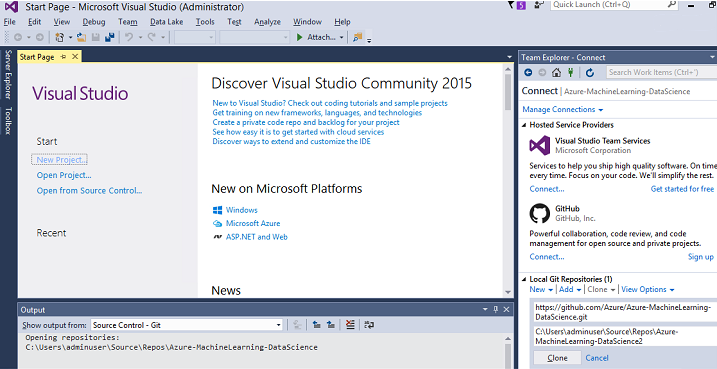
Visual Studio can handle the same clone operation. This screenshot shows how to access Git and GitHub tools in Visual Studio:
You can work with available github.com resources in your GitHub repository. For more information, visit the GitHub cheat sheet resource.
Access Azure data and analytics services
Azure Blob storage
Azure Blob storage is a reliable, economical cloud storage service for both large and small data resources. This section describes how to move data to Blob storage, and access data stored in an Azure blob.
Prerequisites
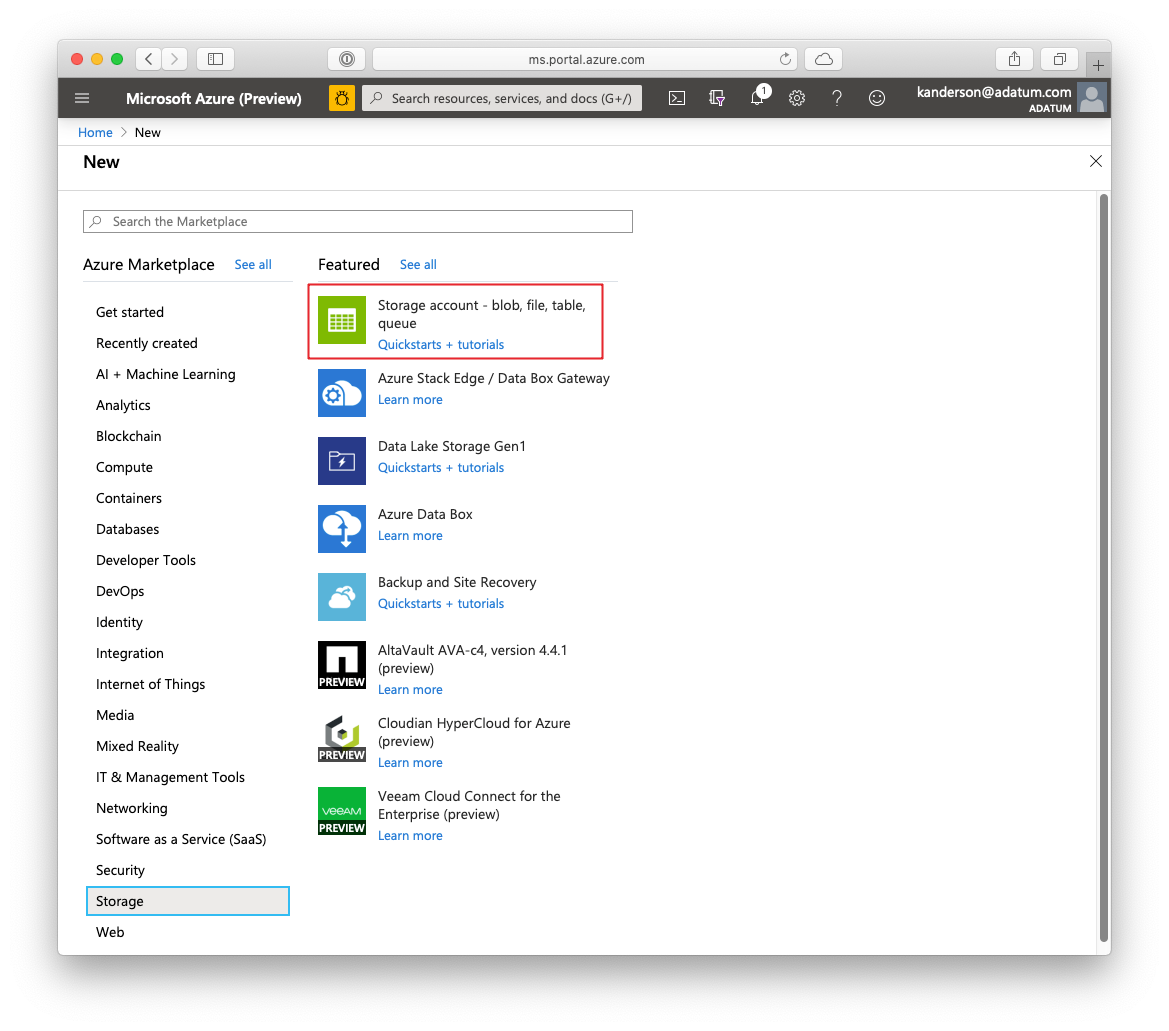
An Azure Blob storage account, created in the Azure portal.
Confirm that the command-line AzCopy tool is preinstalled, with this command:
C:\Program Files (x86)\Microsoft SDKs\Azure\AzCopy\azcopy.exeThe directory hosting azcopy.exe is already in your PATH environment variable, so you can avoid typing the full command path when you run this tool. For more information about the AzCopy tool, read the AzCopy documentation.
Start the Azure Storage Explorer tool. You can download it from the Storage Explorer webpage.
Move data from a VM to an Azure blob: AzCopy
To move data between your local files and Blob storage, you can use AzCopy on the command line or in PowerShell:
AzCopy /Source:C:\myfolder /Dest:https://<mystorageaccount>.blob.core.windows.net/<mycontainer> /DestKey:<storage account key> /Pattern:abc.txt
- Replace C:\myfolder with the directory path hosting your file
- Replace mystorageaccount with your Blob storage account name
- Replace mycontainer with the container name
- Replace storage account key with your Blob storage access key
You can find your storage account credentials in the Azure portal.
Run the AzCopy command in PowerShell or from a command prompt. These are AzCopy command examples:
# Copy *.sql from a local machine to an Azure blob
"C:\Program Files (x86)\Microsoft SDKs\Azure\AzCopy\azcopy" /Source:"c:\Aaqs\Data Science Scripts" /Dest:https://[ENTER STORAGE ACCOUNT].blob.core.windows.net/[ENTER CONTAINER] /DestKey:[ENTER STORAGE KEY] /S /Pattern:*.sql

# Copy back all files from an Azure blob container to a local machine

"C:\Program Files (x86)\Microsoft SDKs\Azure\AzCopy\azcopy" /Dest:"c:\Aaqs\Data Science Scripts\temp" /Source:https://[ENTER STORAGE ACCOUNT].blob.core.windows.net/[ENTER CONTAINER] /SourceKey:[ENTER STORAGE KEY] /S
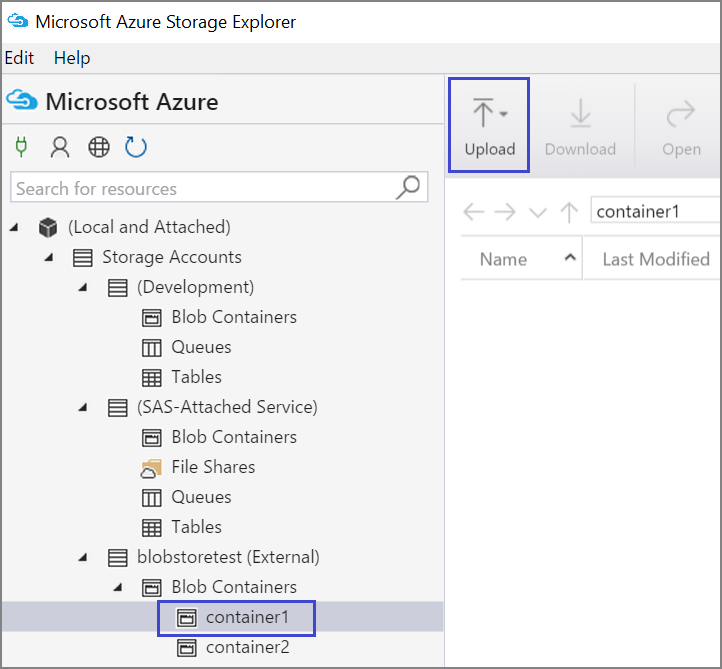
After you run the AzCopy command to copy the file to an Azure blob, your file will appear in Azure Storage Explorer.
Move data from a VM to an Azure blob: Azure Storage Explorer
You can also upload data from the local file in your VM with Azure Storage Explorer:
To upload data to a container, select the target container, and select the Upload button.
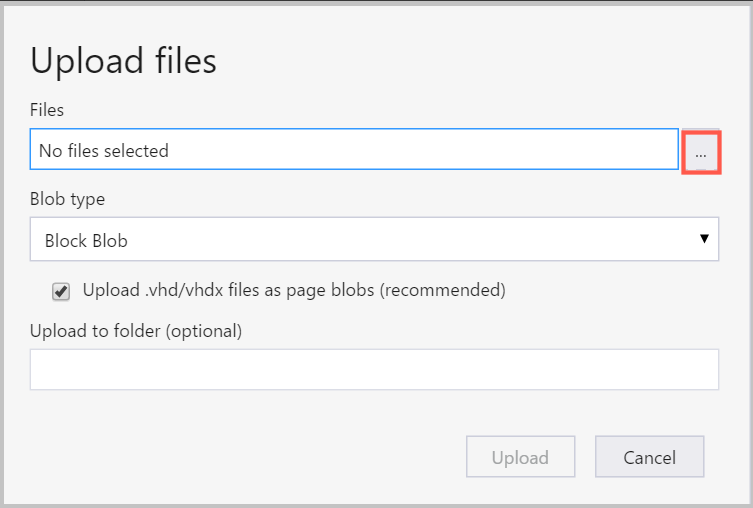
At the right of the Files box, select the ellipsis (...), select one or multiple files to upload from the file system, and select Upload to begin uploading the files.
Read data from an Azure blob: Python ODBC
The BlobService library can read data directly from a blob located in a Jupyter Notebook or in a Python program. First, import the required packages:
import pandas as pd
from pandas import Series, DataFrame
import numpy as np
import matplotlib.pyplot as plt
from time import time
import pyodbc
import os
from azure.storage.blob import BlobService
import tables
import time
import zipfile
import random
Plug in your Blob storage account credentials, and read data from the blob:
CONTAINERNAME = 'xxx'
STORAGEACCOUNTNAME = 'xxxx'
STORAGEACCOUNTKEY = 'xxxxxxxxxxxxxxxx'
BLOBNAME = 'nyctaxidataset/nyctaxitrip/trip_data_1.csv'
localfilename = 'trip_data_1.csv'
LOCALDIRECTORY = os.getcwd()
LOCALFILE =  os.path.join(LOCALDIRECTORY, localfilename)

#download from blob
t1 = time.time()
blob_service = BlobService(account_name=STORAGEACCOUNTNAME,account_key=STORAGEACCOUNTKEY)
blob_service.get_blob_to_path(CONTAINERNAME,BLOBNAME,LOCALFILE)
t2 = time.time()
print(("It takes %s seconds to download "+BLOBNAME) % (t2 - t1))

#unzip downloaded files if needed
#with zipfile.ZipFile(ZIPPEDLOCALFILE, "r") as z:
#    z.extractall(LOCALDIRECTORY)

df1 = pd.read_csv(LOCALFILE, header=0)
df1.columns = ['medallion','hack_license','vendor_id','rate_code','store_and_fwd_flag','pickup_datetime','dropoff_datetime','passenger_count','trip_time_in_secs','trip_distance','pickup_longitude','pickup_latitude','dropoff_longitude','dropoff_latitude']
print 'the size of the data is: %d rows and  %d columns' % df1.shape
The data is read as a data frame:
Azure Synapse Analytics and databases
Azure Synapse Analytics is an elastic data "warehouse as a service," with an enterprise-class SQL Server experience. This resource describes how to provision Azure Synapse Analytics. After you provision Azure Synapse Analytics, this walkthrough explains how to handle data upload, exploration, and modeling by using data within Azure Synapse Analytics.
Azure Cosmos DB
Azure Cosmos DB is a cloud-based NoSQL database. It can handle JSON documents, for example, and can store and query the documents. These example steps show how to access Azure Cosmos DB from the DSVM:
The Azure Cosmos DB Python SDK is already installed on the DSVM. To update it, run
pip install pydocumentdb --upgradefrom a command prompt.Create an Azure Cosmos DB account and database from the Azure portal.
Download the Azure Cosmos DB Data Migration Tool from the Microsoft Download Center and extract it to a directory of your choice.
Import the JSON data (volcano data) stored in a public blob into Azure Cosmos DB with the following command parameters to the migration tool. (Use dtui.exe from the directory where you installed the Azure Cosmos DB Data Migration Tool.) Enter the source and target location with these parameters:
/s:JsonFile /s.Files:https://data.humdata.org/dataset/a60ac839-920d-435a-bf7d-25855602699d/resource/7234d067-2d74-449a-9c61-22ae6d98d928/download/volcano.json /t:DocumentDBBulk /t.ConnectionString:AccountEndpoint=https://[DocDBAccountName].documents.azure.com:443/;AccountKey=[[KEY];Database=volcano /t.Collection:volcano1
After you import the data, you can go to Jupyter and open the notebook titled DocumentDBSample. It contains Python code to access Azure Cosmos DB and handle some basic querying. Visit the Azure Cosmos DB service documentation page for more information about Azure Cosmos DB.
Use Power BI reports and dashboards
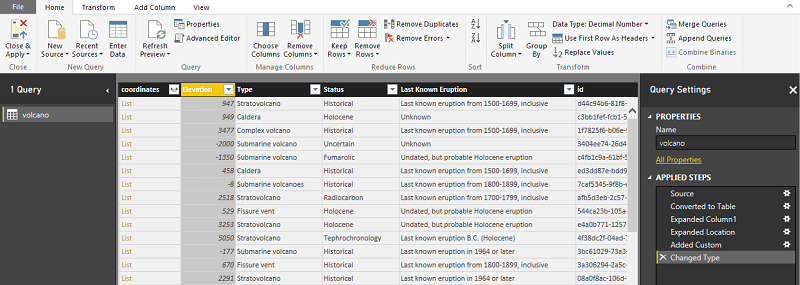
You can visualize the Volcano JSON file described in the preceding Azure Cosmos DB example in Power BI Desktop, for visual insights into the data itself. This Power BI article offers detailed steps. These are the steps, at a high-level:
- Open Power BI Desktop, and select Get Data. Specify this URL:
https://cahandson.blob.core.windows.net/samples/volcano.json. - The JSON records, imported as a list, should become visible. Convert the list to a table, so that Power BI can work with it.
- Select the expand (arrow) icon to expand the columns.
- The location is a Record field. Expand the record and select only the coordinates. Coordinate is a list column.
- Add a new column to convert the list coordinate column into a comma-separated LatLong column. Use the formula
Text.From([coordinates]{1})&","&Text.From([coordinates]{0})to concatenate the two elements in the coordinate list field. - Convert the Elevation column to decimal, and select the Close and Apply buttons.
You can use the following code as an alternative to the preceding steps. It scripts out the steps used in the Advanced Editor in Power BI to write the data transformations in a query language:
let
    Source = Json.Document(Web.Contents("https://cahandson.blob.core.windows.net/samples/volcano.json")),
    #"Converted to Table" = Table.FromList(Source, Splitter.SplitByNothing(), null, null, ExtraValues.Error),
    #"Expanded Column1" = Table.ExpandRecordColumn(#"Converted to Table", "Column1", {"Volcano Name", "Country", "Region", "Location", "Elevation", "Type", "Status", "Last Known Eruption", "id"}, {"Volcano Name", "Country", "Region", "Location", "Elevation", "Type", "Status", "Last Known Eruption", "id"}),
    #"Expanded Location" = Table.ExpandRecordColumn(#"Expanded Column1", "Location", {"coordinates"}, {"coordinates"}),
    #"Added Custom" = Table.AddColumn(#"Expanded Location", "LatLong", each Text.From([coordinates]{1})&","&Text.From([coordinates]{0})),
    #"Changed Type" = Table.TransformColumnTypes(#"Added Custom",{{"Elevation", type number}})
in
    #"Changed Type"
You now have the data in your Power BI data model. Your Power BI Desktop instance should appear as follows:
You can start building reports and visualizations with the data model. This Power BI article explains how to build a report.
Scale the DSVM dynamically
You can scale the DSVM up and down to meet the needs of your project. If you don't need to use the VM in the evening or on weekends, you can shut down the VM from the Azure portal.
Note
You incur compute charges if you only use the shutdown button for the operating system on the VM. Instead, you should deallocate your DSVM using the Azure portal or Cloud Shell.
For a large-scale analysis project, you might need more CPU, memory, or disk capacity. If so, you can find VMs of different numbers of CPU cores, memory capacity, disk types (including solid-state drives), and GPU-based instances for deep learning that meet your compute and budgetary needs. The Azure Virtual Machines pricing page shows the full list of VMs, along with their hourly compute prices.
Add more tools
The DSVM offers prebuilt tools that can address many common data-analytics needs. They save time because you don't have to individually install and configure your environments. They also save you money, because you pay for only resources that you use.
You can use other Azure data and analytics services profiled in this article to enhance your analytics environment. In some cases, you might need other tools, including specific proprietary partner tools. You have full administrative access on the virtual machine to install the tools that you need. You can also install other packages in Python and R that aren't preinstalled. For Python, you can use either conda or pip. For R, you can use install.packages() in the R console, or use the IDE and select Packages > Install Packages.
Deep learning
In addition to the framework-based samples, you can get a set of comprehensive walkthroughs that were validated on the DSVM. These walkthroughs help you jump-start your development of deep-learning applications in image and text/language analysis domains.
Running neural networks across different frameworks: This walkthrough shows how to migrate code from one framework to another. It also shows how to compare models and runtime performance across frameworks.
A how-to guide to build an end-to-end solution to detect products within images: The image detection technique can locate and classify objects within images. This technology has the potential to bring huge rewards in many real-life business domains. For example, retailers can use this technique to identify a product that a customer picked up from the shelf. This information helps retail stores manage product inventory.
Deep learning for audio: This tutorial shows how to train a deep-learning model for audio event detection on the urban sounds dataset. It also provides an overview of how to work with audio data.
Classification of text documents: This walkthrough demonstrates how to build and train two neural network architectures: Hierarchical Attention Network and Long Short Term Memory (LSTM) network. These neural networks use the Keras API for deep learning, to classify text documents.
Summary
This article described some of the things you can do on the Microsoft Data Science Virtual Machine. There are many more things you can do to make the DSVM an effective analytics environment.
