Overfør til Innovate Summit:
Lær hvordan overføring og modernisering til Azure kan øke bedriftens ytelse, robusthet og sikkerhet, slik at du kan omfavne KUNSTIG INTELLIGENS fullt ut.Registrer deg nå
Denne nettleseren støttes ikke lenger.
Oppgrader til Microsoft Edge for å dra nytte av de nyeste funksjonene, sikkerhetsoppdateringene og den nyeste tekniske støtten.
Add entities to threat intelligence in Microsoft Sentinel
Artikkel
Gjelder for:
Microsoft Sentinel in the Azure portal
During an investigation, you examine entities and their context as an important part of understanding the scope and nature of an incident. When you discover an entity as a malicious domain name, URL, file, or IP address in the incident, it should be labeled and tracked as an indicator of compromise (IOC) in your threat intelligence.
For example, you might discover an IP address that performs port scans across your network or functions as a command and control node by sending and/or receiving transmissions from large numbers of nodes in your network.
With Microsoft Sentinel, you can flag these types of entities from within your incident investigation and add them to your threat intelligence. You can view the added indicators by querying them or searching for them in the threat intelligence management interface and use them across your Microsoft Sentinel workspace.
Add an entity to your threat intelligence
The Incident details page and the investigation graph give you two ways to add entities to threat intelligence.
On the Microsoft Sentinel menu, select Incidents from the Threat management section.
Select an incident to investigate. On the Incident details pane, select View full details to open the Incident details page.
On the Entities pane, find the entity that you want to add as a threat indicator. (You can filter the list or enter a search string to help you locate it.)
Select the three dots to the right of the entity, and select Add to TI from the pop-up menu.
Add only the following types of entities as threat indicators:
Domain name
IP address (IPv4 and IPv6)
URL
File (hash)
The investigation graph is a visual, intuitive tool that presents connections and patterns and enables your analysts to ask the right questions and follow leads. Use it to add entities to your threat intelligence indicator lists by making them available across your workspace.
On the Microsoft Sentinel menu, select Incidents from the Threat management section.
Select an incident to investigate. On the Incident details pane, select Actions, and choose Investigate from the pop-up menu to open the investigation graph.
Select the entity from the graph that you want to add as a threat indicator. On the side pane that opens, select Add to TI.
Only add the following types of entities as threat indicators:
Domain name
IP address (IPv4 and IPv6)
URL
File (hash)
Whichever of the two interfaces you choose, you end up here.
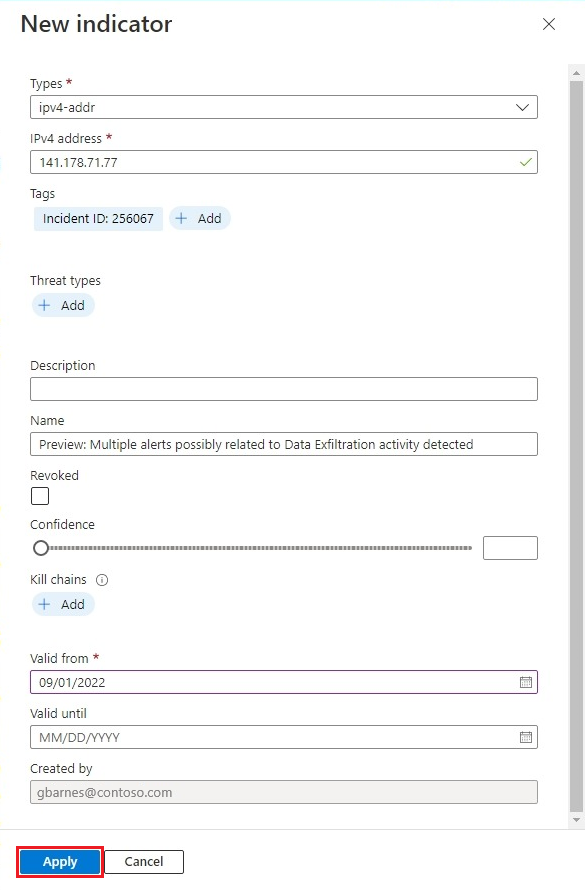
The New indicator side pane opens. The following fields are populated automatically:
Types
The type of indicator represented by the entity you're adding.
Dropdown list with possible values: ipv4-addr, ipv6-addr, URL, file, and domain-name.
Required. Automatically populated based on the entity type.
Value
The name of this field changes dynamically to the selected indicator type.
The value of the indicator itself.
Required. Automatically populated by the entity value.
Tags
Free-text tags you can add to the indicator.
Optional. Automatically populated by the incident ID. You can add others.
Name
Name of the indicator. This name is what appears in your list of indicators.
Optional. Automatically populated by the incident name.
Created by
Creator of the indicator.
Optional. Automatically populated by the user signed in to Microsoft Sentinel.
Fill in the remaining fields accordingly.
Threat types
The threat type represented by the indicator.
Optional. Free text.
Description
Description of the indicator.
Optional. Free text.
Revoked
Revoked status of the indicator. Select the checkbox to revoke the indicator. Clear the checkbox to make it active.
Optional. Boolean.
Confidence
Score that reflects confidence in the correctness of the data, by percent.
The time from which this indicator is considered valid.
Required. Date/time.
Valid until
The time at which this indicator should no longer be considered valid.
Optional. Date/time.
When all the fields are filled in to your satisfaction, select Apply. A message appears in the upper-right corner to confirm that your indicator was created.