Scale with additional process servers
By default, when you're replicating VMware VMs or physical servers to Azure using Site Recovery, a process server is installed on the configuration server machine, and is used to coordinate data transfer between Site Recovery and your on-premises infrastructure. To increase capacity and scale out your replication deployment, you can add additional standalone process servers. This article describes how to setup a scale-out process server.
Before you start
Capacity planning
Make sure you've performed capacity planning for VMware replication. This helps you to identify how and when you should deploy additional process servers.
From 9.24 version, guidance is added during selection of process server for new replications. Process server will be marked Healthy, Warning and Critical based on certain criteria. To understand different scenarios that can influence state of process server, review the process server alerts.
Note
Use of a cloned Process Server component is not supported. Follow the steps in this article for each PS scale-out.
Sizing requirements
Verify the sizing requirements summarized in the table. In general, if you have to scale your deployment to more than 200 source machines, or you have a total daily churn rate of more than 2 TB, you need additional process servers to handle the traffic volume.
| Additional process server | Cache disk size | Data change rate | Protected machines |
|---|---|---|---|
| 4 vCPUs (2 sockets * 2 cores @ 2.5 GHz), 8-GB memory | 300 GB | 250 GB or less | Replicate 85 or less machines. |
| 8 vCPUs (2 sockets * 4 cores @ 2.5 GHz), 12-GB memory | 600 GB | 250 GB to 1 TB | Replicate between 85-150 machines. |
| 12 vCPUs (2 sockets * 6 cores @ 2.5 GHz) 24-GB memory | 1 TB | 1 TB to 2 TB | Replicate between 150-225 machines. |
Where each protected source machine is configured with 3 disks of 100 GB each.
Prerequisites
The prerequisites for the additional process server are summarized in the following table.
Configuration and process server requirements
Hardware requirements
| Component | Requirement |
|---|---|
| CPU cores | 8 |
| RAM | 16 GB |
| Number of disks | 3, including the OS disk, process server cache disk, and retention drive for failback |
| Free disk space (process server cache) | 600 GB |
| Free disk space (retention disk) | 600 GB |
Software requirements
| Component | Requirement |
|---|---|
| Operating system | Windows Server 2012 R2 Windows Server 2016 Note: Windows Server 2019 is only supported for modernized architecture. As classic architecture is under deprecation, no new feature supports will be added to it. We suggest you use the modernized architecture. |
| Operating system locale | English (en-*) |
| Windows Server roles | Don't enable these roles: - Active Directory Domain Services - Internet Information Services - Hyper-V |
| Group policies | Don't enable these group policies: - Prevent access to the command prompt. - Prevent access to registry editing tools. - Trust logic for file attachments. - Turn on Script Execution. Learn more |
| IIS | - No pre-existing default website - No pre-existing website/application listening on port 443 - Enable anonymous authentication - Enable FastCGI setting |
| FIPS (Federal Information Processing Standards) | Do not enable FIPS mode |
Network requirements
| Component | Requirement |
|---|---|
| IP address type | Static |
| Ports | 443 (Control channel orchestration) 9443 (Data transport) |
| NIC type | VMXNET3 (if the configuration server is a VMware VM) |
| Internet access (the server needs access to the following URLs, directly or via proxy): | |
| *.backup.windowsazure.com | Used for replicated data transfer and coordination |
| *.blob.core.windows.net | Used to access storage account that stores replicated data. You can provide the specific URL of your cache storage account. |
| *.hypervrecoverymanager.windowsazure.com | Used for replication management operations and coordination |
| https://login.microsoftonline.com | Used for replication management operations and coordination |
| time.nist.gov | Used to check time synchronization between system and global time |
| time.windows.com | Used to check time synchronization between system and global time |
|
OVF setup needs access to these additional URLs. They're used for access control and identity management by Microsoft Entra ID. |
| https://dev.mysql.com/get/Downloads/MySQLInstaller/mysql-installer-community-5.7.20.0.msi | To complete MySQL download. In a few regions, the download might be redirected to the CDN URL. Ensure that the CDN URL is also approved, if necessary. |
Note
If you have private links connectivity to Site Recovery vault, you do not need any additional internet access for the Configuration Server. An exception to this is while setting up the CS machine using OVA template, you will need access to following URLs over and above private link access - https://www.live.com and https://www.microsoft.com. If you do not wish to allow access to these URLs, please set up the CS using Unified Installer.
Note
While setting up private endpoints to protect VMware and physical machines, you will need to install MySQL on the configuration server manually. Follow the steps here to perform the manual installation.
Required software
| Component | Requirement |
|---|---|
| VMware vSphere PowerCLI | Not required for versions 9.14 and higher |
| MYSQL | MySQL should be installed. You can install manually, or Site Recovery can install it. (Refer to configure settings for more information) |
Note
Upgrading MySQL on the configuration server is not supported.
Sizing and capacity requirements
The following table summarizes capacity requirements for the configuration server. If you're replicating multiple VMware VMs, review the capacity planning considerations and run the Azure Site Recovery Deployment Planner tool.
| CPU | Memory | Cache disk | Data change rate | Replicated machines |
|---|---|---|---|---|
| 8 vCPUs 2 sockets * 4 cores @ 2.5 GHz |
16 GB | 300 GB | 500 GB or less | < 100 machines |
| 12 vCPUs 2 socks * 6 cores @ 2.5 GHz |
18 GB | 600 GB | 500 GB-1 TB | 100 to 150 machines |
| 16 vCPUs 2 socks * 8 cores @ 2.5 GHz |
32 GB | 1 TB | 1-2 TB | 150 -200 machines |
Download installation file
Download the installation file for the process server as follows:
Sign in to the Azure portal, and browse to your Recovery Services Vault.
Open Site Recovery Infrastructure > VMware and Physical Machines > Configuration Servers (under For VMware & Physical Machines).
Select the configuration server to drill down into the server details. Then click + Process Server.
In Add Process server > Choose where you want to deploy your process server, select Deploy a Scale-out Process Server on-premises.

Click Download the Microsoft Azure Site Recovery Unified Setup. This downloads the latest version of the installation file.
Warning
The process server installation version should be the same as, or earlier than, the configuration server version you have running. A simple way to ensure version compatibility is to use the same installer, that you most recently used to install or update your configuration server.
Install from the UI
Install as follows. After setting up the server, you migrate source machines to use it.
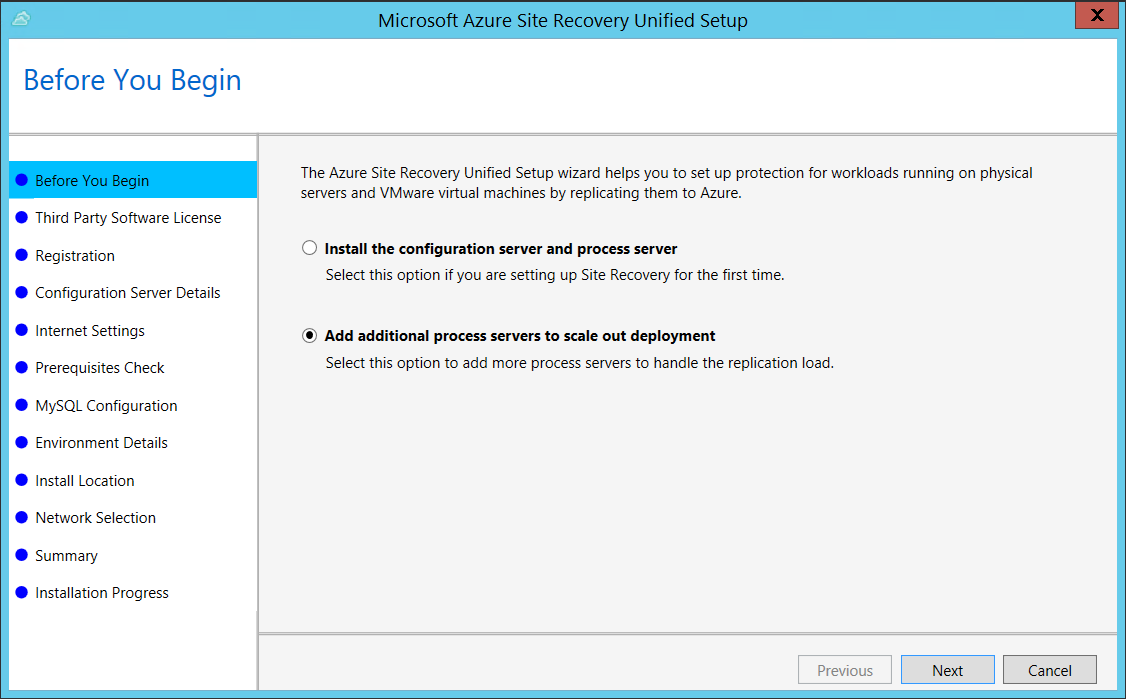
Launch the Azure Site Recovery UnifiedSetup.exe
In Before you begin, select Add additional process servers to scale out deployment.
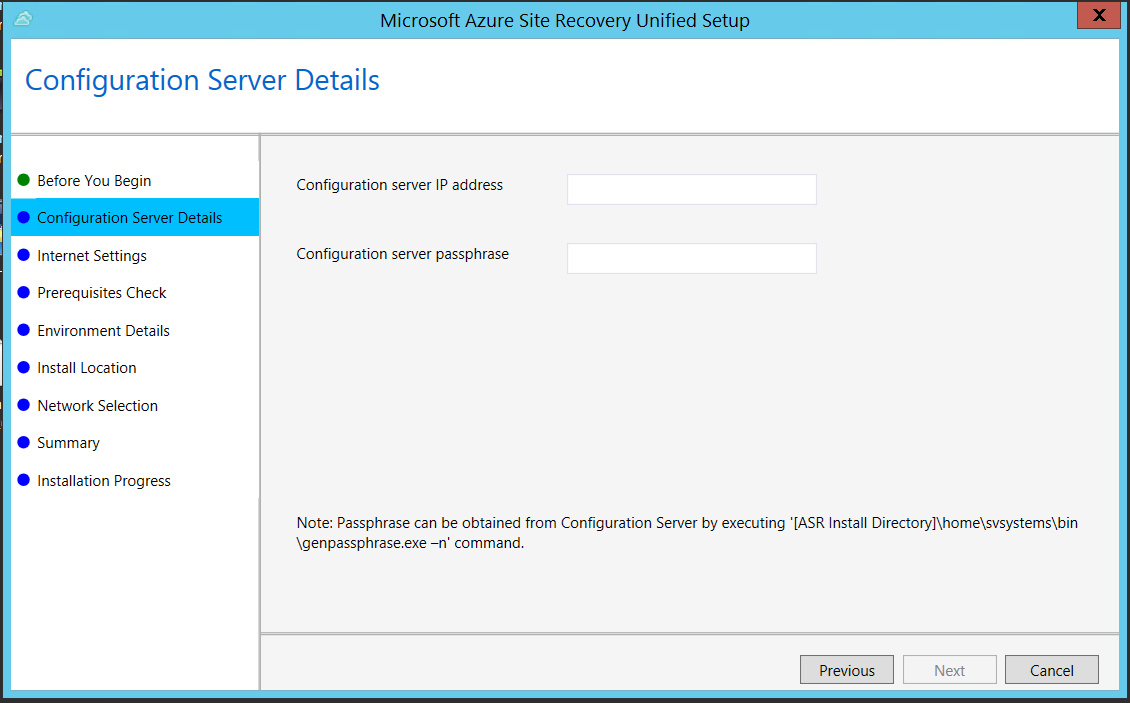
In Configuration Server Details, specify the IP address of the Configuration Server, and the passphrase.
In Internet Settings, specify how the Provider running on the Configuration Server connects to Azure Site Recovery over the Internet.
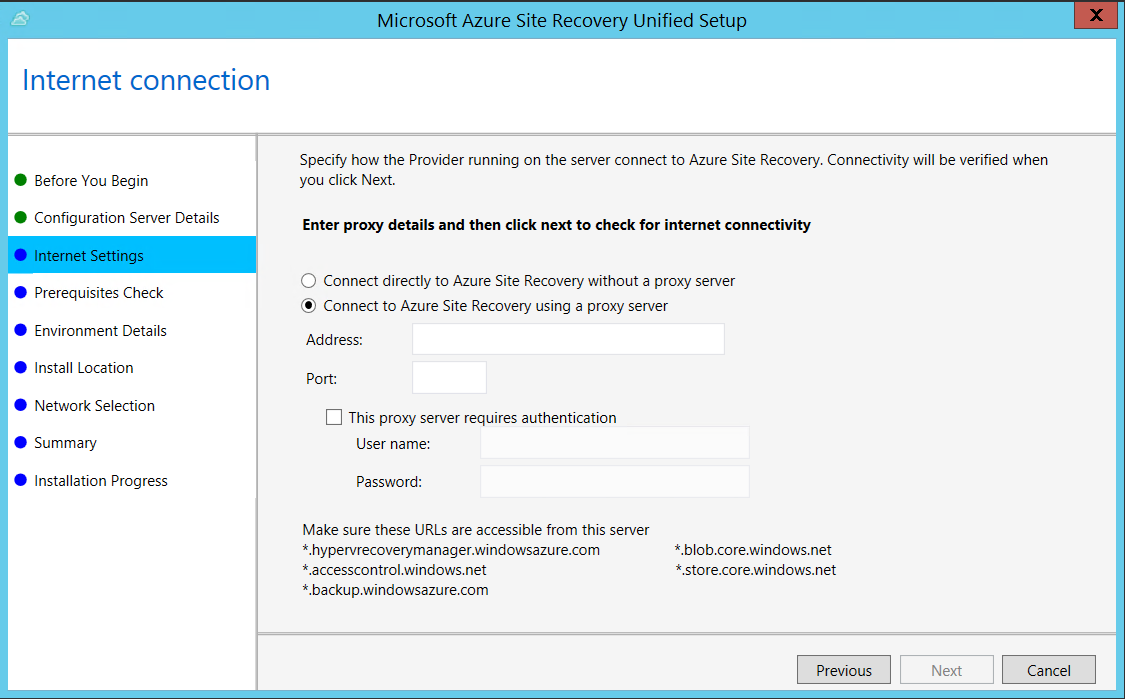
If you want to connect with the proxy that's currently set up on the machine, select Connect with existing proxy settings.
If you want the Provider to connect directly, select Connect directly without a proxy.
If the existing proxy requires authentication, or if you want to use a custom proxy for the Provider connection, select Connect with custom proxy settings.
- If you use a custom proxy, you need to specify the address, port, and credentials.
- If you're using a proxy, you should have already allowed access to the service urls.
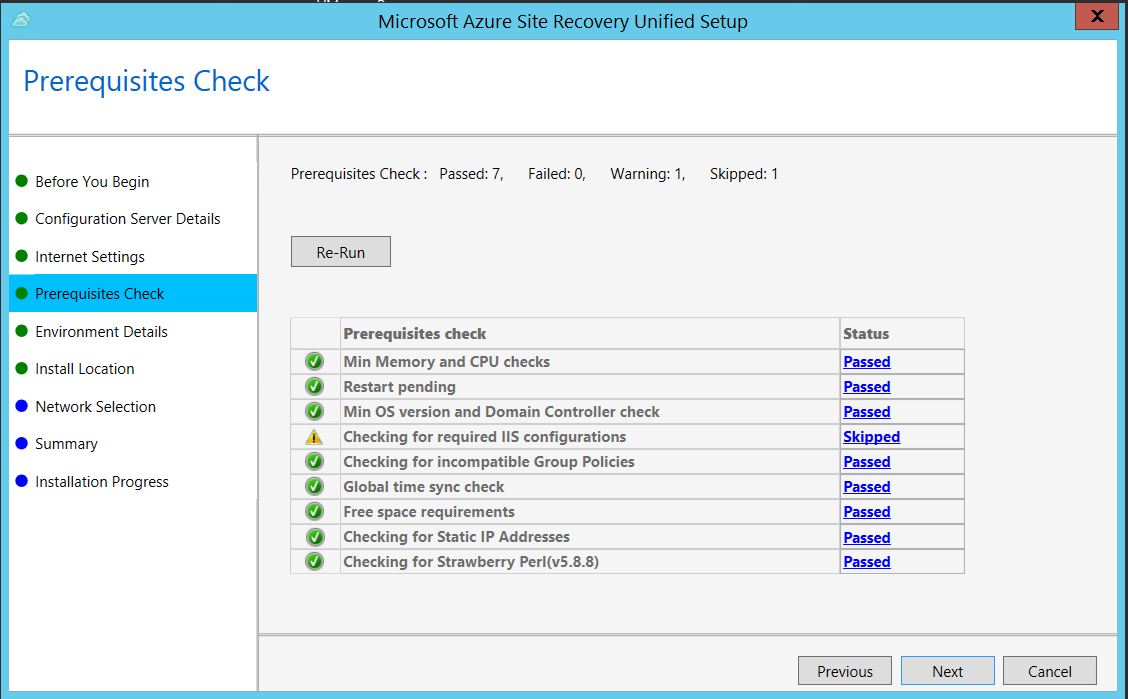
In Prerequisites Check, Setup runs a check to make sure that installation can run. If a warning appears about the Global time sync check, verify that the time on the system clock (Date and Time settings) is the same as the time zone.
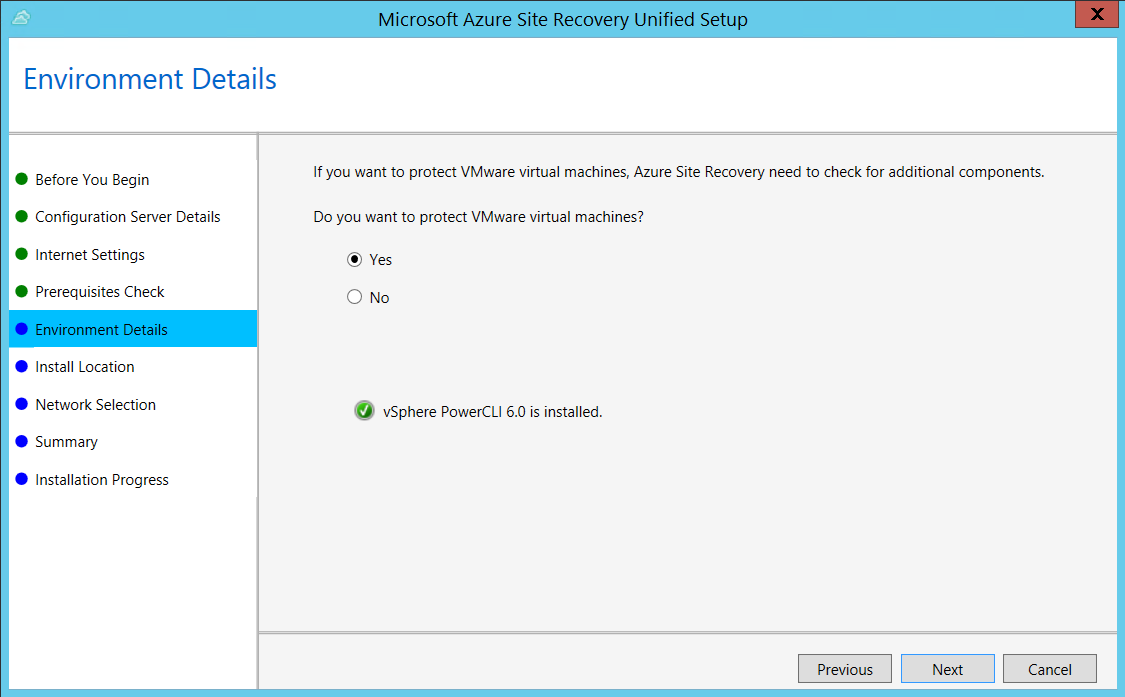
In Environment Details, select whether you're going to replicate VMware VMs. If you are, then setup checks that PowerCLI 6.0 is installed.
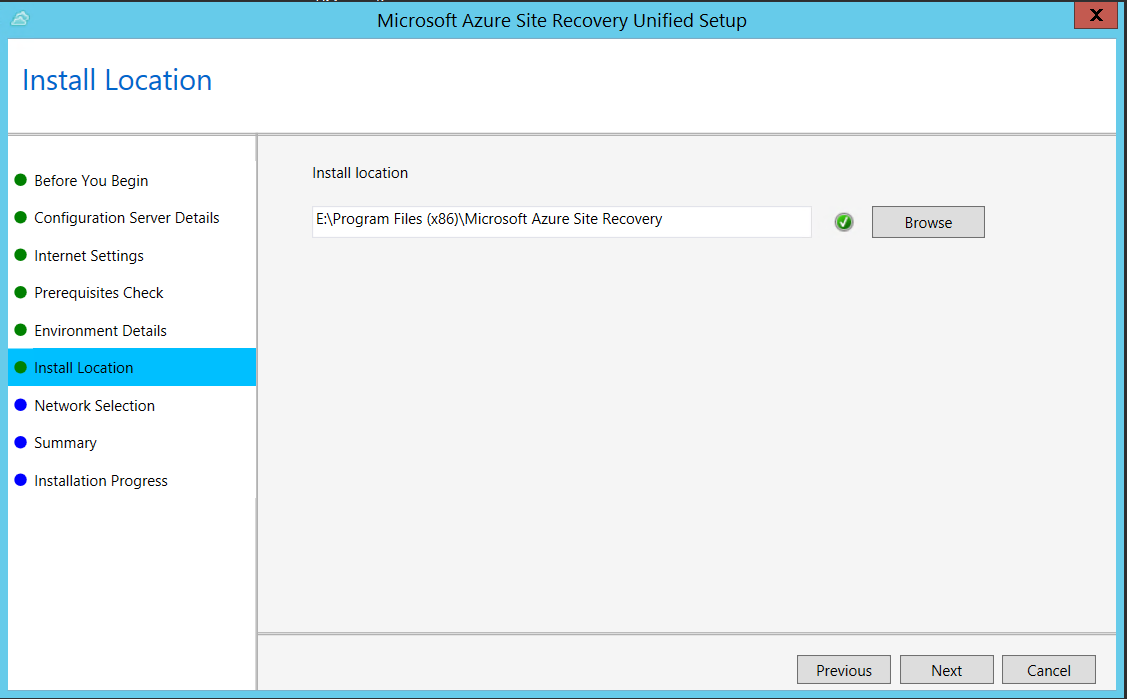
In Install Location, select where you want to install the binaries and store the cache. The drive you select must have at least 5 GB of disk space available, but we recommend a cache drive with at least 600 GB of free space.
In Network Selection, specify the listener (network adapter and SSL port) on which the Configuration Server sends and receives replication data. Port 9443 is the default port used for sending and receiving replication traffic, but you can modify this port number to suit your environment's requirements. In addition to the port 9443, we also open port 443, which is used by a web server to orchestrate replication operations. Do not use Port 443 for sending or receiving replication traffic.

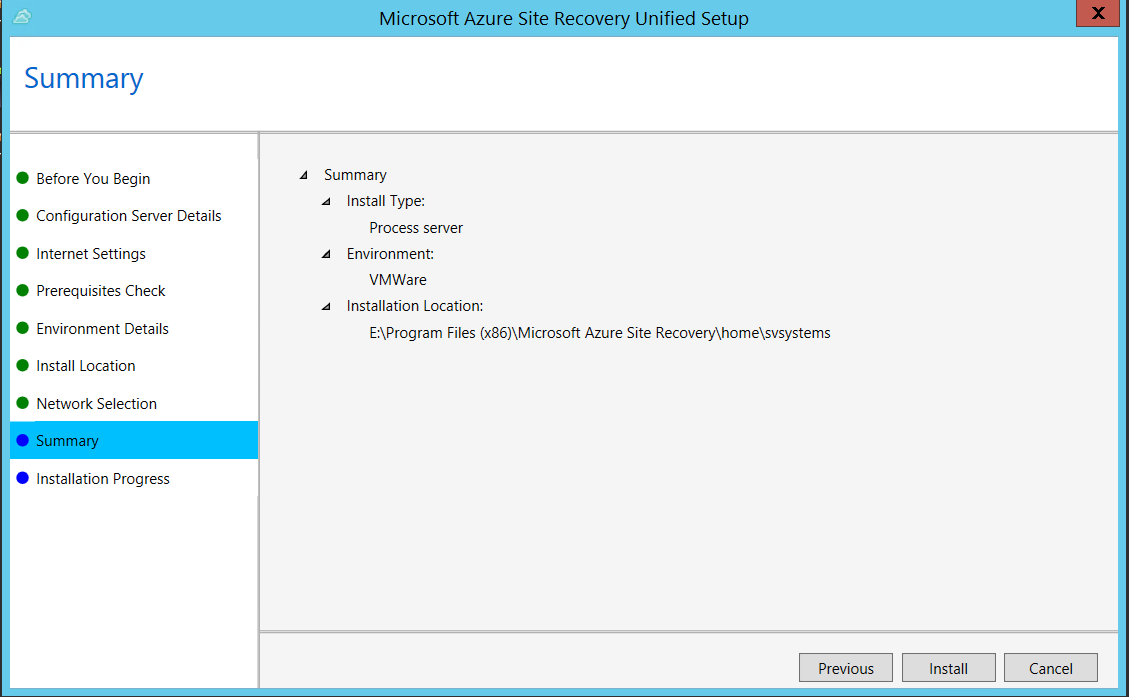
In Summary, review the information and click Install. When installation finishes, a passphrase is generated. You will need this when you enable replication, so copy it and keep it in a secure location.
Install from the command line
Install by running the following command:
UnifiedSetup.exe [/ServerMode <CS/PS>] [/InstallDrive <DriveLetter>] [/MySQLCredsFilePath <MySQL credentials file path>] [/VaultCredsFilePath <Vault credentials file path>] [/EnvType <VMware/NonVMware>] [/PSIP <IP address to be used for data transfer] [/CSIP <IP address of CS to be registered with>] [/PassphraseFilePath <Passphrase file path>]
Where command line parameters are as follows:
| Parameter Name | Type | Description | Possible Values |
|---|---|---|---|
| /ServerMode | Mandatory | Specifies whether both the configuration and process servers should be installed, or the process server only | CS PS |
| /InstallLocation | Mandatory | The folder in which the components are installed | Any folder on the computer |
| /MySQLCredsFilePath | Mandatory | The file path in which the MySQL server credentials are stored | The file should be the format specified below |
| /VaultCredsFilePath | Mandatory | The path of the vault credentials file | Valid file path |
| /EnvType | Mandatory | Type of environment that you want to protect | VMware NonVMware |
| /PSIP | Mandatory | IP address of the NIC to be used for replication data transfer | Any valid IP Address |
| /CSIP | Mandatory | The IP address of the NIC on which the configuration server is listening on | Any valid IP Address |
| /PassphraseFilePath | Mandatory | The full path to location of the passphrase file | Valid file path |
| /BypassProxy | Optional | Specifies that the configuration server connects to Azure without a proxy | |
| /ProxySettingsFilePath | Optional | Proxy settings (The default proxy requires authentication, or a custom proxy) | The file should be in the format specified below |
| DataTransferSecurePort | Optional | Port number on the PSIP to be used for replication data | Valid Port Number (default value is 9433) |
| /SkipSpaceCheck | Optional | Skip space check for cache disk | |
| /AcceptThirdpartyEULA | Mandatory | Flag implies acceptance of third-party EULA | |
| /ShowThirdpartyEULA | Optional | Displays third-party EULA. If provided as input all other parameters are ignored |
For example:
MicrosoftAzureSiteRecoveryUnifiedSetup.exe /q /x:C:\Temp\Extracted
cd C:\Temp\Extracted
UNIFIEDSETUP.EXE /AcceptThirdpartyEULA /servermode "PS" /InstallLocation "D:\" /EnvType "VMware" /CSIP "10.150.24.119" /PassphraseFilePath "C:\Users\Administrator\Desktop\Passphrase.txt" /DataTransferSecurePort 443
Create a proxy settings file
If you need to set up a proxy, the ProxySettingsFilePath parameter takes a file as input. You can create the file as follows, and pass it as input ProxySettingsFilePath parameter.
* [ProxySettings]
* ProxyAuthentication = "Yes/No"
* Proxy IP = "IP Address"
* ProxyPort = "Port"
* ProxyUserName="UserName"
* ProxyPassword="Password"
Next steps
Learn about managing process server settings
Tilbakemeldinger
Kommer snart: Gjennom 2024 faser vi ut GitHub Issues som tilbakemeldingsmekanisme for innhold, og erstatter det med et nytt system for tilbakemeldinger. Hvis du vil ha mer informasjon, kan du se: https://aka.ms/ContentUserFeedback.
Send inn og vis tilbakemelding for