Use VMware Tanzu Application Accelerator with the Azure Spring Apps Enterprise plan
Note
The Basic, Standard, and Enterprise plans will be deprecated starting from mid-March, 2025, with a 3 year retirement period. We recommend transitioning to Azure Container Apps. For more information, see the Azure Spring Apps retirement announcement.
The Standard consumption and dedicated plan will be deprecated starting September 30, 2024, with a complete shutdown after six months. We recommend transitioning to Azure Container Apps. For more information, see Migrate Azure Spring Apps Standard consumption and dedicated plan to Azure Container Apps.
Note
Application Accelerator for VMware Tanzu reaches the end of support on August 31, 2025. For more information, see Deprecation of Tanzu components.
This article applies to: ❎ Basic/Standard ✅ Enterprise
This article shows you how to use Application Accelerator for VMware Tanzu (App Accelerator) with the Azure Spring Apps Enterprise plan to bootstrap developing your applications in a discoverable and repeatable way.
App Accelerator helps you bootstrap developing your applications and deploying them in a discoverable and repeatable way. You can use App Accelerator to create new projects based on published accelerator projects. For more information, see Application Accelerator for VMware Tanzu in the VMware documentation.
Prerequisites
An Azure subscription. If you don't have an Azure subscription, create a free account before you begin.
Understand and fulfill the requirements listed in the Requirements section of Enterprise plan in Azure Marketplace.
Azure CLI with the Azure Spring Apps extension. Use the following command to remove previous versions and install the latest extension. If you previously installed the
spring-cloudextension, uninstall it to avoid configuration and version mismatches.az extension remove --name spring az extension add --name spring az extension remove --name spring-cloudTo use App Accelerator in VS Code, you also need to satisfy the following prerequisites:
Enable App Accelerator
You can enable App Accelerator when you provision an Azure Spring Apps Enterprise plan instance. If you already have an Azure Spring Apps Enterprise plan resource, see the Manage App Accelerator in an existing Enterprise plan instance section to enable it.
You can enable App Accelerator using the Azure portal or the Azure CLI.
Use the following steps to enable App Accelerator using the Azure portal:
Open the Azure portal.
On the Basics tab, select Enterprise tier in the Pricing section and specify the required information. Then select Next: VMware Tanzu settings.
On the VMware Tanzu settings tab, select Enable App Accelerator.
Specify other settings, and then select Review and Create.
On the Review an create tab, make sure that Enable App Accelerator and Enable Dev Tools Portal are set to Yes. Select Create to create the Enterprise plan instance.
Monitor App Accelerator
Application Accelerator lets you generate new projects from files in Git repositories. The following table describes Application Accelerator's components:
| Component name | Instance count | vCPU per instance | Memory per instance | Description |
|---|---|---|---|---|
accelerator-server |
2 | 0.4 core | 0.5Gi | Serves API used by Dev Tools Portal to list available accelerators and options. |
accelerator-engine |
1 | 1 core | 3Gi | Processes the input values and files - pulled from a snapshot of a Git repository - and applies dynamic transformations to generate projects. |
accelerator-controller |
1 | 0.2 core | 0.25Gi | Reconciles Application Accelerator resources. |
source-controller |
1 | 0.2 core | 0.25Gi | Registers a controller to reconcile the ImageRepositories and MavenArtifacts resources used by Application Accelerator. |
flux-source-controller |
1 | 0.2 core | 0.25Gi | Registers a controller to reconcile GithubRepository resources used by Application Accelerator. Supports managing Git repository sources for Application Accelerator. |
You can see the running instances and resource usage of all the components by using the Azure portal or the Azure CLI.
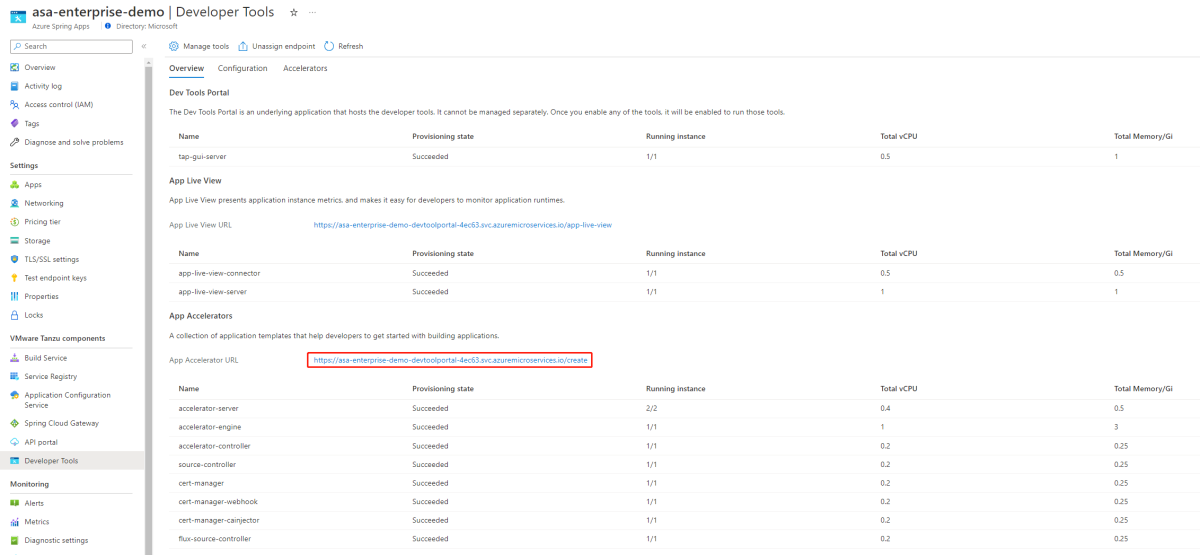
You can view the state of Application Accelerator in the Azure portal on the Developer Tools page, as shown in the following screenshot:
Configure Dev Tools to access Application Accelerator
To access Application Accelerator, you must configure Tanzu Dev Tools. For more information, see Configure Tanzu Dev Tools in the Azure Spring Apps Enterprise plan.
Use Application Accelerator to bootstrap your new projects
To use Application Accelerator to bootstrap your new projects, you must get permissions to manage accelerators. You can then manage predefined accelerators or your own accelerators.
Get permissions to manage accelerators
Managing your accelerators requires the following permissions:
- Read: Get Azure Spring Apps Predefined Accelerator
- Other: Disable Azure Spring Apps Predefined Accelerator
- Other: Enable Azure Spring Apps Predefined Accelerator
- Write: Create or Update Microsoft Azure Spring Apps Customized Accelerator
- Read: Get Azure Spring Apps Customized Accelerator
For more information, see How to use permissions in Azure Spring Apps.
Manage predefined accelerators
You can start with several predefined accelerators to bootstrap your new projects. You can disable or enable the built-in accelerators according to your own preference.
You can manage predefined accelerators using the Azure portal and the Azure CLI.
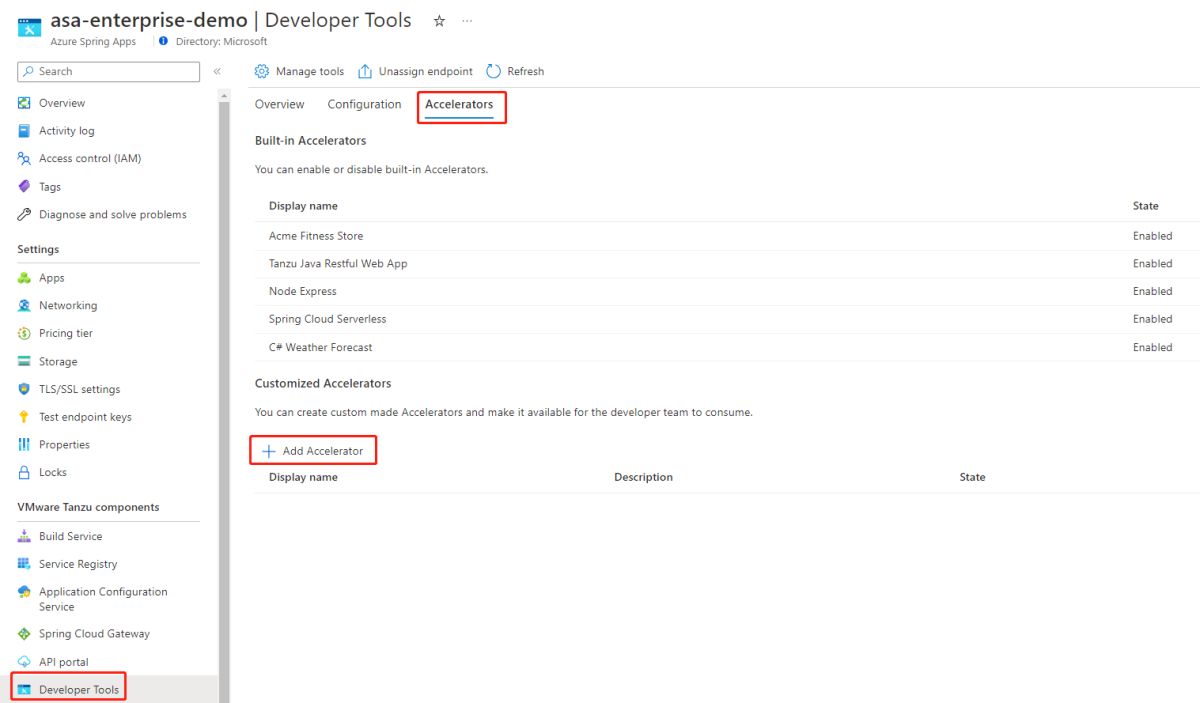
You can view the built-in accelerators in the Azure portal on the Accelerators tab, as shown in the following screenshot:
Manage your own accelerators
In addition to using the predefined accelerators, you can create your own accelerators. You can use any Git repository in Azure DevOps, GitHub, GitLab, or Bitbucket.
Use the following steps to create and maintain your own accelerators:
First, create a file named accelerator.yaml in the root directory of your Git repository.
You can use the accelerator.yaml file to declare input options that users fill in using a form in the UI. These option values control processing by the template engine before it returns the zipped output files. If you don't include an accelerator.yaml file, the repository still works as an accelerator, but the files are passed unmodified to users. For more information, see the Create an accelerator.yaml file in Application Accelerator section of Tanzu Application Platform v1.5.
Next, publish the new accelerator.
After you create your accelerator.yaml file, you can create your accelerator. You can then view it in the Azure portal or the Application Accelerator page in Dev Tools Portal. You can publish the new accelerator by using the Azure portal or the Azure CLI.
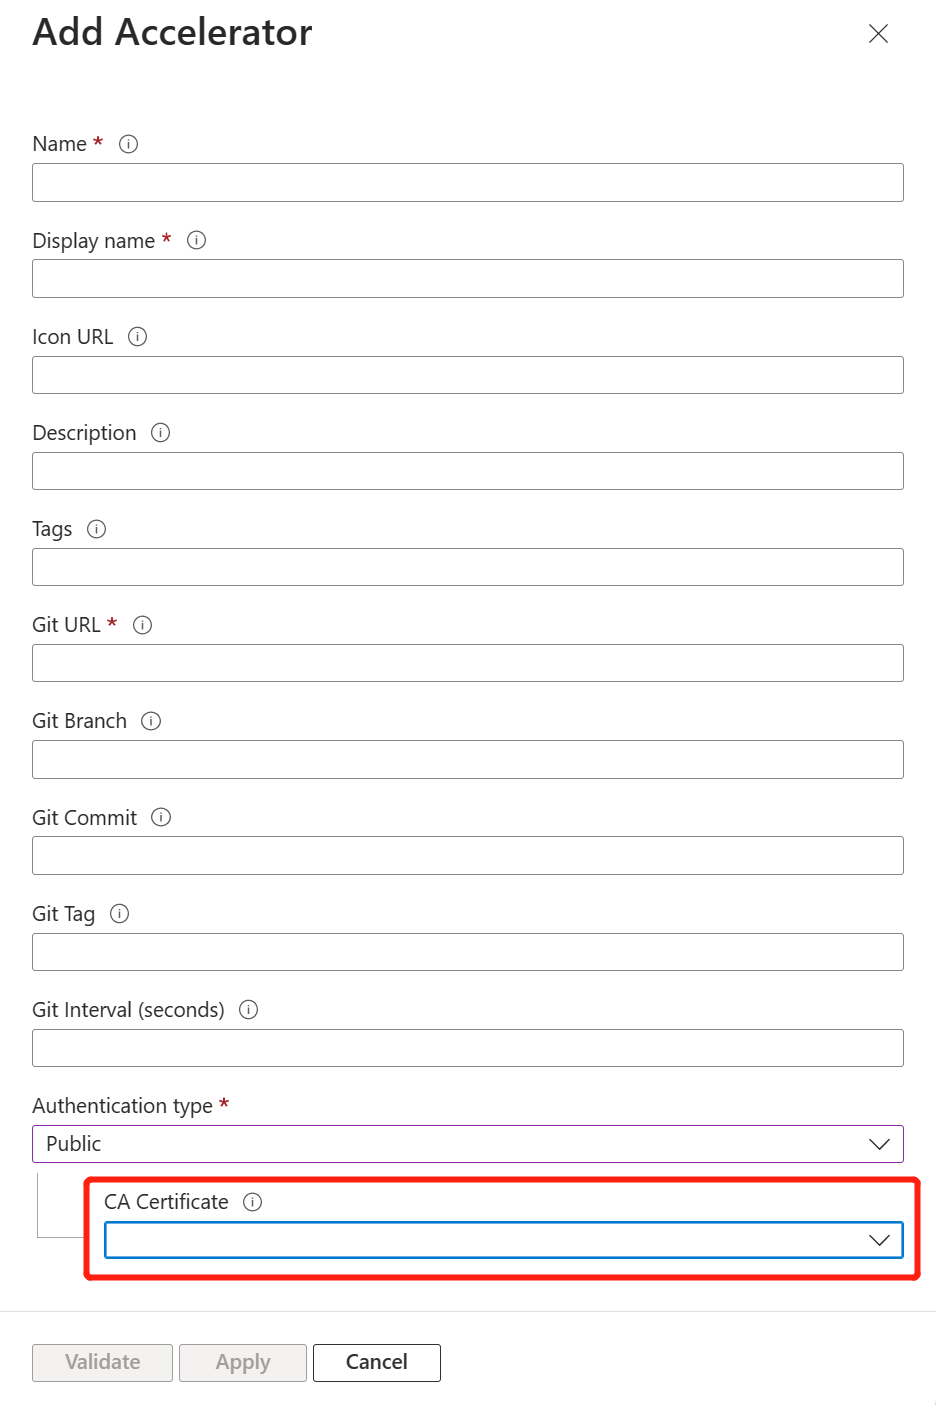
To create your own accelerator, open the Accelerators section and then select Add Accelerator under the Customized Accelerators section.
The following table describes the customizable accelerator fields:
| Portal | CLI | Description | Required/Optional |
|---|---|---|---|
| Name | name |
A unique name for the accelerator. The name can't change after you create it. | Required |
| Description | display-name |
A longer description of the accelerator. | Optional |
| Icon url | icon-url |
A URL for an image to represent the accelerator in the UI. | Optional |
| Tags | accelerator-tags |
An array of strings defining attributes of the accelerator that can be used in a search in the UI. | Optional |
| Git url | git-url |
The repository URL of the accelerator source Git repository. The URL can be an HTTP/S or SSH address. The scp-like syntax isn't supported for SSH addresses - for example, user@example.com:repository.git. Instead, the valid URL format is ssh://user@example.com:22/repository.git. |
Required |
| Git interval | git-interval-in-seconds |
The interval at which to check for repository updates. If not specified, the interval defaults to 10 minutes. There's also a refresh interval - currently 10 seconds - before accelerators can appear in the UI. There could be a 10-second delay before changes are reflected in the UI. | Optional |
| Git branch | git-branch |
The Git branch to check out and monitor for changes. You should specify only the Git branch, Git commit, or Git tag. | Optional |
| Git commit | git-commit |
The Git commit SHA to check out. You should specify only the Git branch, Git commit, or Git tag. | Optional |
| Git tag | git-tag |
The Git commit tag to check out. You should specify only the Git branch, Git commit, or Git tag. | Optional |
| Git sub path | git-sub-path |
The folder path inside the Git repository to consider as the root of the accelerator or fragment. | Optional |
| Authentication type | N/A |
The authentication type of the accelerator source repository. The type can be Public, Basic auth, or SSH. |
Required |
| User name | username |
The user name to access the accelerator source repository whose authentication type is Basic auth. |
Required when the authentication type is Basic auth. |
| Password/Personal access token | password |
The password to access the accelerator source repository whose authentication type is Basic auth. |
Required when the authentication type is Basic auth. |
| Private key | private-key |
The private key to access the accelerator source repository whose authentication type is SSH. Only OpenSSH private key is supported. |
Required when authentication type is SSH. |
| Host key | host-key |
The host key to access the accelerator source repository whose authentication type is SSH. |
Required when the authentication type is SSH. |
| Host key algorithm | host-key-algorithm |
The host key algorithm to access the accelerator source repository whose authentication type is SSH. Can be ecdsa-sha2-nistp256 or ssh-rsa. |
Required when authentication type is SSH. |
| CA certificate name | ca-cert-name |
The CA certificate name to access the accelerator source repository with self-signed certificate whose authentication type is Public or Basic auth. |
Required when a self-signed cert is used for the Git repo URL. |
| Type | type |
The type of customized accelerator. The type can be Accelerator or Fragment. The default value is Accelerator. |
Optional |
To view all published accelerators, see the App Accelerators section of the Developer Tools page. Select the App Accelerator URL to view the published accelerators in Dev Tools Portal:
To view the newly published accelerator, refresh Dev Tools Portal.
Note
It might take a few seconds for Dev Tools Portal to refresh the catalog and add an entry for your new accelerator. The refresh interval is configured as git-interval when you create the accelerator. After you change the accelerator, it also takes time to be reflected in Dev Tools Portal. The best practice is to change the git-interval to speed up for verification after you apply changes to the Git repo.
Reference a fragment in your own accelerators
Writing and maintaining accelerators can become repetitive and verbose as new accelerators are added. Some people create new projects by copying existing ones and making modifications, but this process can be tedious and error prone. To make the creation and maintenance of accelerators easier, Application Accelerator supports a feature named Composition that enables the reuse of parts of an accelerator, called fragments.
Use the following steps to reference a fragment in your accelerator:
Publish the new accelerator of type
Fragmentusing the Azure portal or the Azure CLI.To create a fragment accelerator, open the Accelerators section, select Add Accelerator under the Customized Accelerators section, and then select Fragment.
Change the accelerator.yaml file in your accelerator project. Use the
importsinstruction in theacceleratorsection and theInvokeFragmentinstruction in theenginesection to reference the fragment in the accelerator, as shown in the following example:accelerator: ... # options for the UI options: ... imports: - name: <fragment-accelerator-name> ... engine: chain: ... - merge: - include: [ "**" ] - type: InvokeFragment reference: <fragment-accelerator-name>Synchronize the change with the Dev Tools Portal.
To reflect the changes on the Dev Tools Portal more quickly, you can provide a value for the Git interval field of your customized accelerator. The Git interval value indicates how frequently the system checks for updates in the Git repository.
Synchronize the change with your customized accelerator on the Azure portal by using the Azure portal or the Azure CLI.
The following list shows the two ways you can sync changes:
- Create or update your customized accelerator.
- Open the Accelerators section, and then select Sync certificate.
For more information, see Use fragments in Application Accelerator in the VMware documentation.
Use accelerators to bootstrap a new project
Use the following steps to bootstrap a new project using accelerators:
On the Developer Tools page, select the App Accelerator URL to open the Dev Tools Portal.
On the Dev Tools Portal, select an accelerator.
Specify input options in the Configure accelerator section of the Generate Accelerators page.
Select EXPLORE FILE to view the project structure and source code.
Select Review and generate to review the specified parameters, and then select Generate accelerator.
You can then view or download the project as a zip file.
Configure accelerators with a self-signed certificate
When you set up a private Git repository and enable HTTPS with a self-signed certificate, you should configure the CA certificate name to the accelerator for client certificate verification from the accelerator to the Git repository.
Use the following steps to configure accelerators with a self-signed certificate:
- Import the certificates into Azure Spring Apps. For more information, see the Import a certificate section of Use TLS/SSL certificates in your application in Azure Spring Apps.
- Configure the certificate for the accelerator by using the Azure portal or the Azure CLI.
To configure a certificate for an accelerator, open the Accelerators section and then select Add Accelerator under the Customized Accelerators section. Then, select the certificate from the dropdown list.
Rotate certificates
As certificates expire, you need to rotate certificates in Spring Cloud Apps by using the following steps:
- Generate new certificates from a trusted CA.
- Import the certificates into Azure Spring Apps. For more information, see the Import a certificate section of Use TLS/SSL certificates in your application in Azure Spring Apps.
- Synchronize the certificates using the Azure portal or the Azure CLI.
The accelerators won't automatically use the latest certificate. You should sync one or all certificates by using the Azure portal or the Azure CLI.
To sync certificates for all accelerators, open the Accelerators section and then select Sync certificate, as shown in the following screenshot:
To sync a certificate for a single accelerator, open the Accelerators section and then select Sync certificate from the context menu of an accelerator, as shown in the following screenshot:
Manage App Accelerator in an existing Enterprise plan instance
You can enable App Accelerator under an existing Azure Spring Apps Enterprise plan instance using the Azure portal or the Azure CLI.
If a Dev tools public endpoint has already been exposed, you can enable App Accelerator, and then press Ctrl+F5 to deactivate the browser cache to view it on the Dev Tools Portal.
Use the following steps to enable App Accelerator under an existing Azure Spring Apps Enterprise plan instance using the Azure portal:
Navigate to your service resource, and then select Developer Tools.
Select Manage tools.
Select Enable App Accelerator, and then select Apply.
You can view whether App Accelerator is enabled or disabled on the Developer Tools page.
Use App Accelerator in VS Code
You can bootstrap your project from any accelerator of App Accelerator in an Azure Spring Apps Enterprise plan service instance in VS Code directly.
View the list of App Accelerators
Use the following steps to view the list of App Accelerators in an Azure Spring Apps Enterprise plan service instance:
In Visual Studio Code, open the Azure Spring Apps extension, and then sign in to your Azure account.
Expand the service instance that you want and right-click to select the service instance.
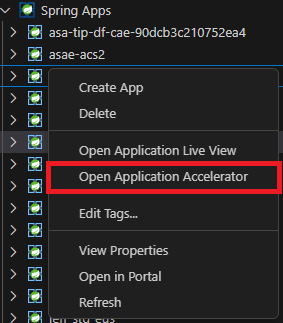
From the menu, select Open Application Accelerator to open the list of App Accelerators. The system prompts you to install the Tanzu Application Accelerator Visual Studio Code extension if it isn't installed.
Select any accelerator to bootstrap your project.
Note
When using the extension, if you experience any issues that you can't fix, log out of your account from the extension.
Troubleshoot App Accelerator issues
If you try to open App Accelerator for a service instance that hasn't enabled App Accelerator or exposed a public endpoint, you see the following error message: Application Accelerator of Spring Apps <instance-name> is not enabled or publically accessible.
To enable App Accelerator and expose public endpoints, use the following steps. For more information, see the Manage App Accelerator in an existing Enterprise plan instance section.
If you enabled single sign-on in the Dev Tools Portal, you see the following message when you access the extension:
The extension 'Tanzu App Accelerator' wants to sign in using VMware Tanzu.For more information, see the Configure Dev Tools Portal section of Configure Tanzu Dev Tools in the Azure Spring Apps Enterprise plan.Select Allow, select Open, and then select Open again to open the list of VS Code extensions.
Sometimes, you might get an error message similar to the following example: AADSTS50011: The redirect URI 'vscode://VMware.tanzu-app-accelerator' specified in the request does not match the redirect URIs configured for the application 'xxxxxxxx-xxxx-xxxx-xxxx-xxxxxxxxxxxx'. Make sure the redirect URI sent in the request matches one added to your application in the Azure portal. Navigate to https://aka.ms/redirectUriMismatchError to learn more about how to fix this.
To address this issue, add the redirect URI vscode://VMware.tanzu-app-accelerator to the relevant identity provider (IdP). In Microsoft Entra ID, go to the Authentication menu and add redirect URIs to mobile and desktop applications in the platform configurations.


