Tutorial: Create and manage a VPN gateway using the Azure portal
This tutorial helps you create and manage a virtual network gateway (VPN gateway) using the Azure portal. The VPN gateway is one part of the connection architecture that helps you securely access resources within a virtual network using VPN Gateway.

- The left side of the diagram shows the virtual network and the VPN gateway that you create by using the steps in this article.
- You can later add different types of connections, as shown on the right side of the diagram. For example, you can create site-to-site and point-to-site connections. To view different design architectures that you can build, see VPN gateway design.
If you want to learn more about the configuration settings used in this tutorial, see About VPN Gateway configuration settings. For more information about Azure VPN Gateway, see What is Azure VPN Gateway. These steps create an active-active mode zone-redundant gateway. If you want to create a Basic SKU gateway instead, see Create a Basic SKU VPN gateway.
In this tutorial, you learn how to:
- Create a virtual network.
- Create an active-active mode VPN gateway.
- View the gateway public IP address.
- Resize a VPN gateway (resize SKU).
- Reset a VPN gateway.
The steps in this article use the gateway SKU VpnGw2AZ, which is a SKU that supports Azure availability zones. Some regions don't support availability zones. If you want to deploy to a region that's different than the example values in this article, make sure availability zones are supported for that region. If availability zones aren't supported, use a non-AZ SKU instead. For more information, see Availability zone service and regional support. For more information about SKUs, see About gateway SKUs.
Prerequisites
You need an Azure account with an active subscription. If you don't have one, create one for free.
Create a virtual network
Create a virtual network using the following example values:
- Resource group: TestRG1
- Name: VNet1
- Region: (US) East US (or region of your choosing)
- IPv4 address space: 10.1.0.0/16
- Subnet name: Use the default name, or specify a name. Example: FrontEnd
- Subnet address space: 10.1.0.0/24
Sign in to the Azure portal.
In Search resources, service, and docs (G+/) at the top of the portal page, enter virtual network. Select Virtual network from the Marketplace search results to open the Virtual network page.
On the Virtual network page, select Create to open the Create virtual network page.
On the Basics tab, configure the virtual network settings for Project details and Instance details. You see a green check mark when the values you enter are validated. You can adjust the values shown in the example according to the settings that you require.
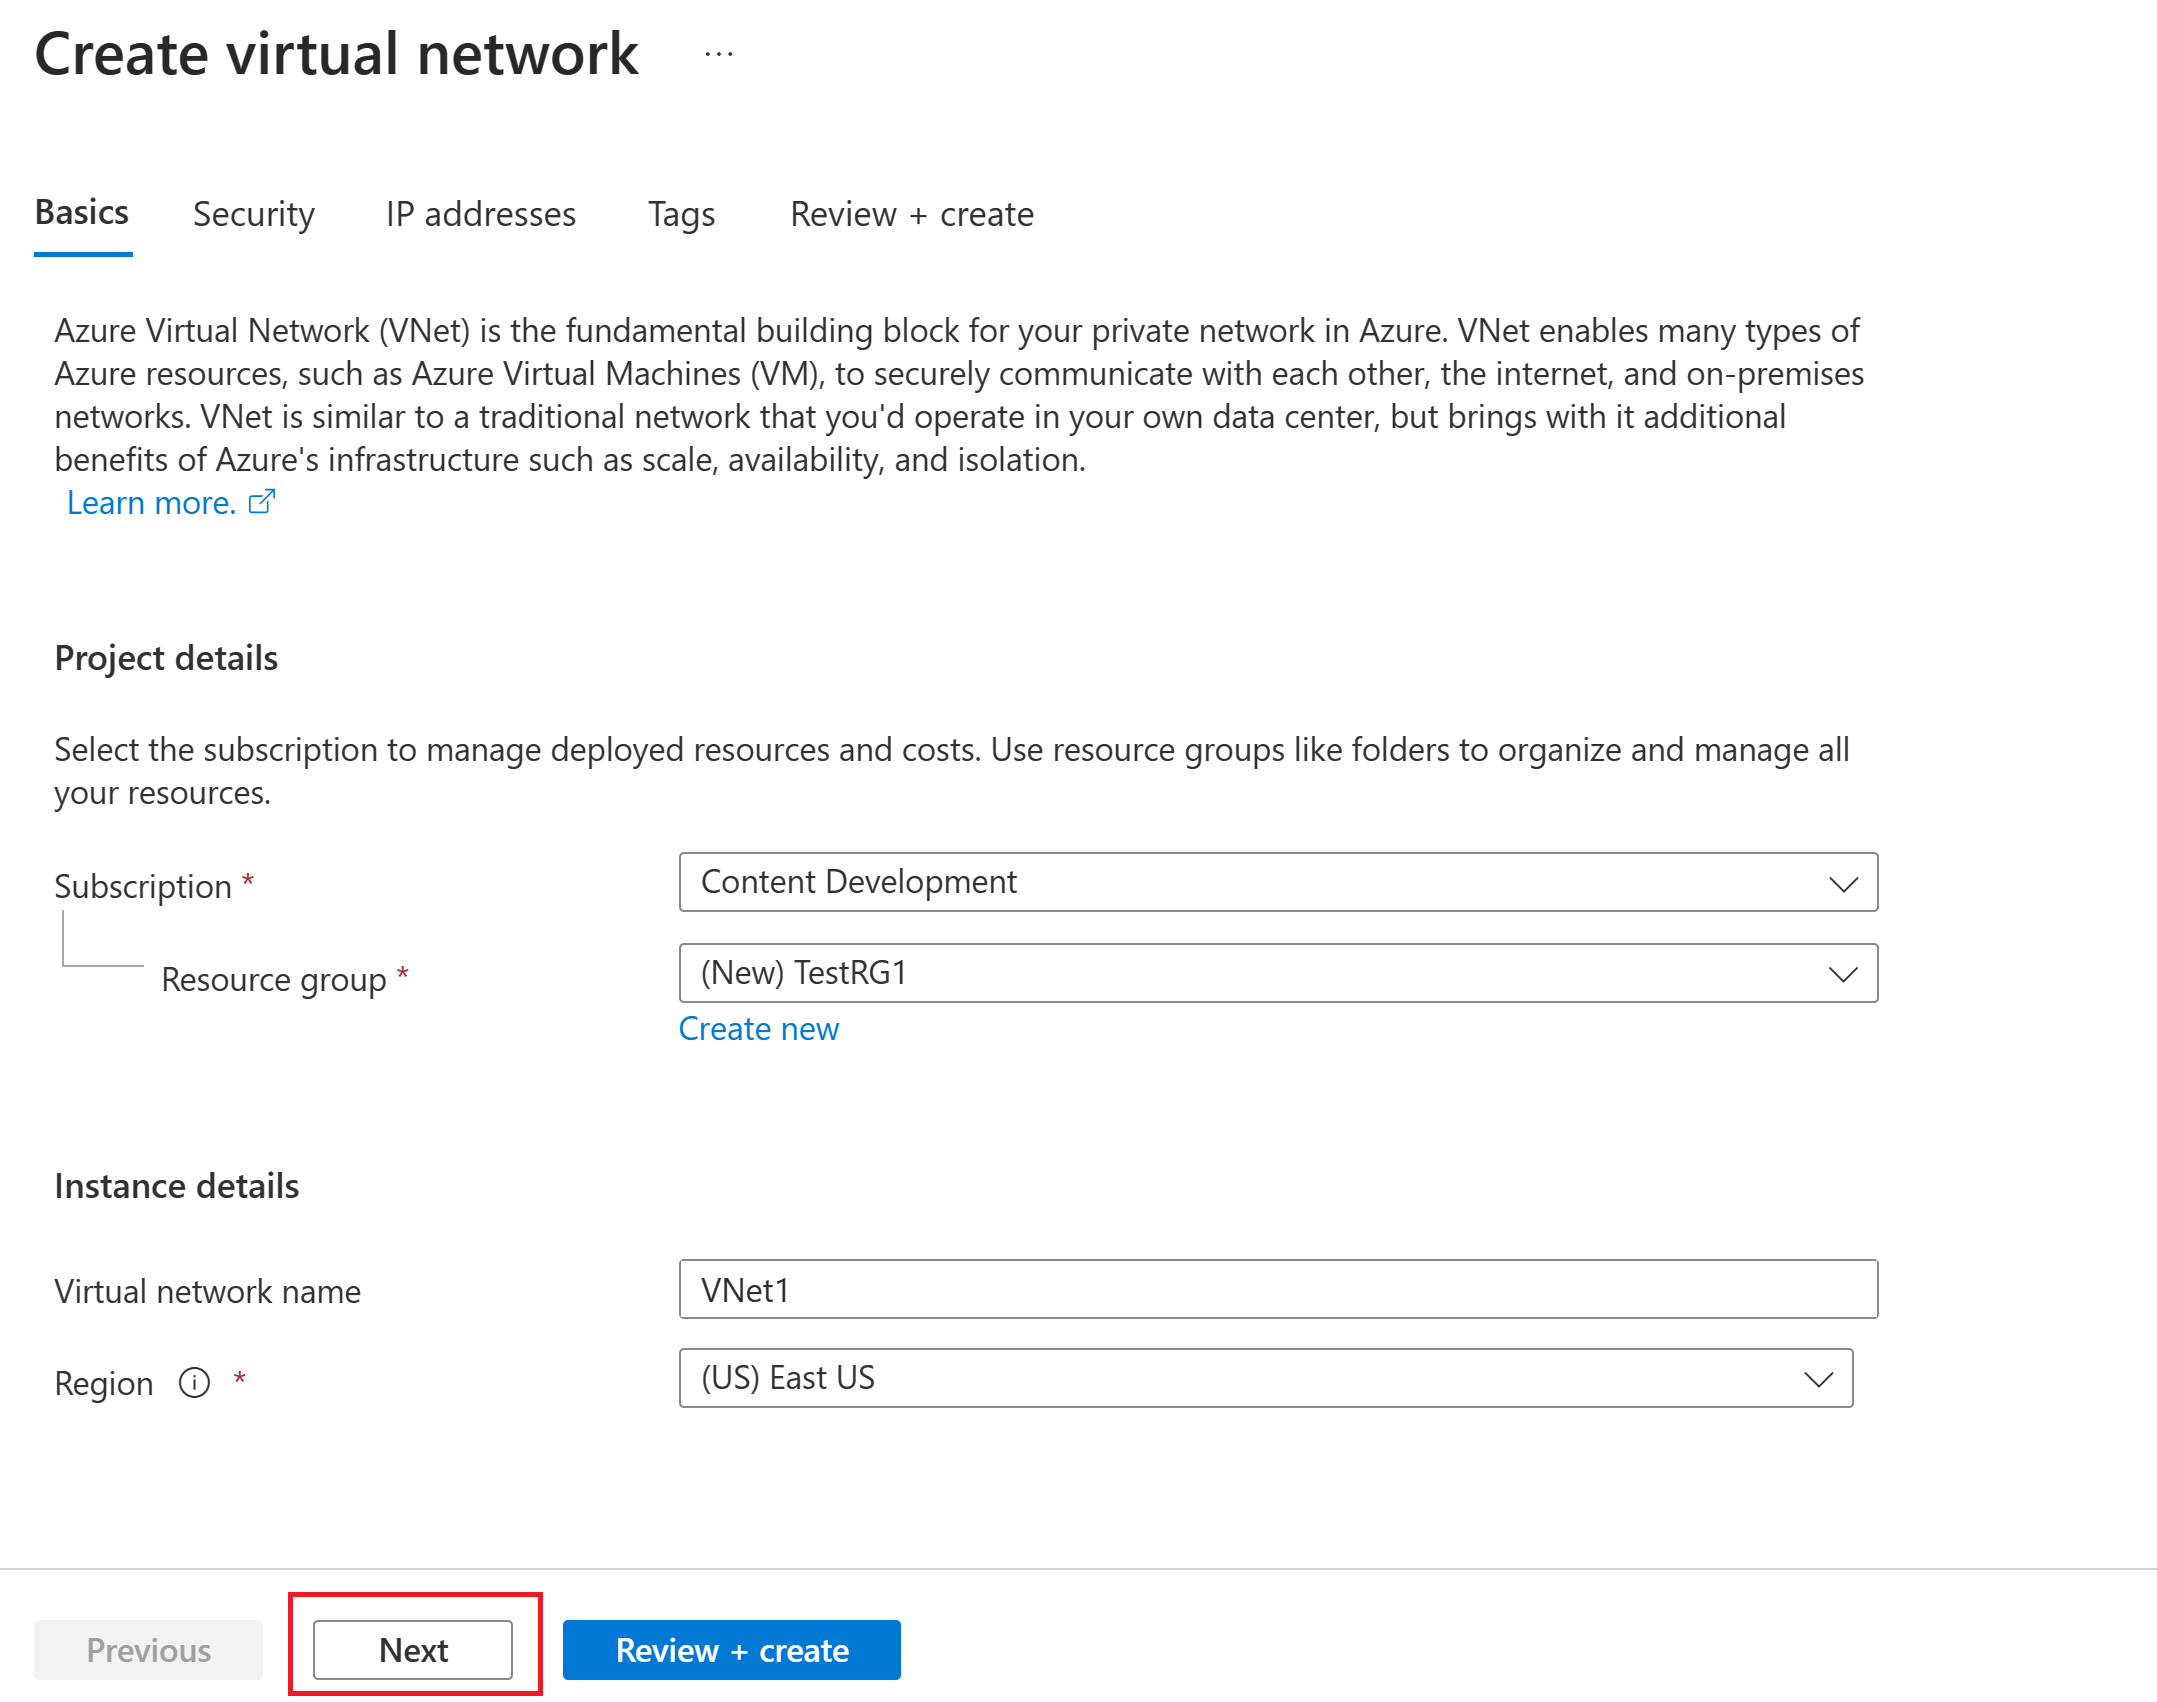
- Subscription: Verify that the subscription listed is the correct one. You can change subscriptions by using the dropdown box.
- Resource group: Select an existing resource group or select Create new to create a new one. For more information about resource groups, see Azure Resource Manager overview.
- Name: Enter the name for your virtual network.
- Region: Select the location for your virtual network. The location determines where the resources that you deploy to this virtual network will reside.
Select Next or Security to go to the Security tab. For this exercise, leave the default values for all the services on this page.
Select IP Addresses to go to the IP Addresses tab. On the IP Addresses tab, configure the settings.
IPv4 address space: By default, an address space is automatically created. You can select the address space and adjust it to reflect your own values. You can also add a different address space and remove the default that was automatically created. For example, you can specify the starting address as 10.1.0.0 and specify the address space size as /16. Then select Add to add that address space.
+ Add subnet: If you use the default address space, a default subnet is created automatically. If you change the address space, add a new subnet within that address space. Select + Add subnet to open the Add subnet window. Configure the following settings, and then select Add at the bottom of the page to add the values.
- Subnet name: You can use the default, or specify the name. Example: FrontEnd.
- Subnet address range: The address range for this subnet. Examples are 10.1.0.0 and /24.
Review the IP addresses page and remove any address spaces or subnets that you don't need.
Select Review + create to validate the virtual network settings.
After the settings are validated, select Create to create the virtual network.

After you create your virtual network, you can optionally configure Azure DDoS Protection. Protection is simple to enable on any new or existing virtual network, and it requires no application or resource changes. For more information about Azure DDoS Protection, see What is Azure DDoS Protection.
Create a gateway subnet
The virtual network gateway requires a specific subnet named GatewaySubnet. The gateway subnet is part of the IP address range for your virtual network and contains the IP addresses that the virtual network gateway resources and services use. Specify a gateway subnet that's /27 or larger.
- On the page for your virtual network, on the left pane, select Subnets to open the Subnets page.
- At the top of the page, select + Gateway subnet to open the Add subnet pane.
- The name is automatically entered as GatewaySubnet. Adjust the IP address range value, if necessary. An example is 10.1.255.0/27.
- Don't adjust the other values on the page. Select Save at the bottom of the page to save the subnet.
Important
Network security groups (NSGs) on the gateway subnet are not supported. Associating a network security group to this subnet might cause your virtual network gateway (VPN and ExpressRoute gateways) to stop functioning as expected. For more information about network security groups, see What is a network security group?
Create a VPN gateway
In this section, you create the virtual network gateway (VPN gateway) for your virtual network. Creating a gateway can often take 45 minutes or more, depending on the selected gateway SKU.
Create a gateway using the following values:
- Name: VNet1GW
- Gateway type: VPN
- SKU: VpnGw2AZ
- Generation: Generation 2
- Virtual network: VNet1
- Gateway subnet address range: 10.1.255.0/27
- Public IP address: Create new
- Public IP address name: VNet1GWpip1
- Public IP address SKU: Standard
- Assignment: Static
- Second Public IP address name: VNet1GWpip2
In Search resources, services, and docs (G+/), enter virtual network gateway. Locate Virtual network gateway in the Marketplace search results and select it to open the Create virtual network gateway page.
On the Basics tab, fill in the values for Project details and Instance details.
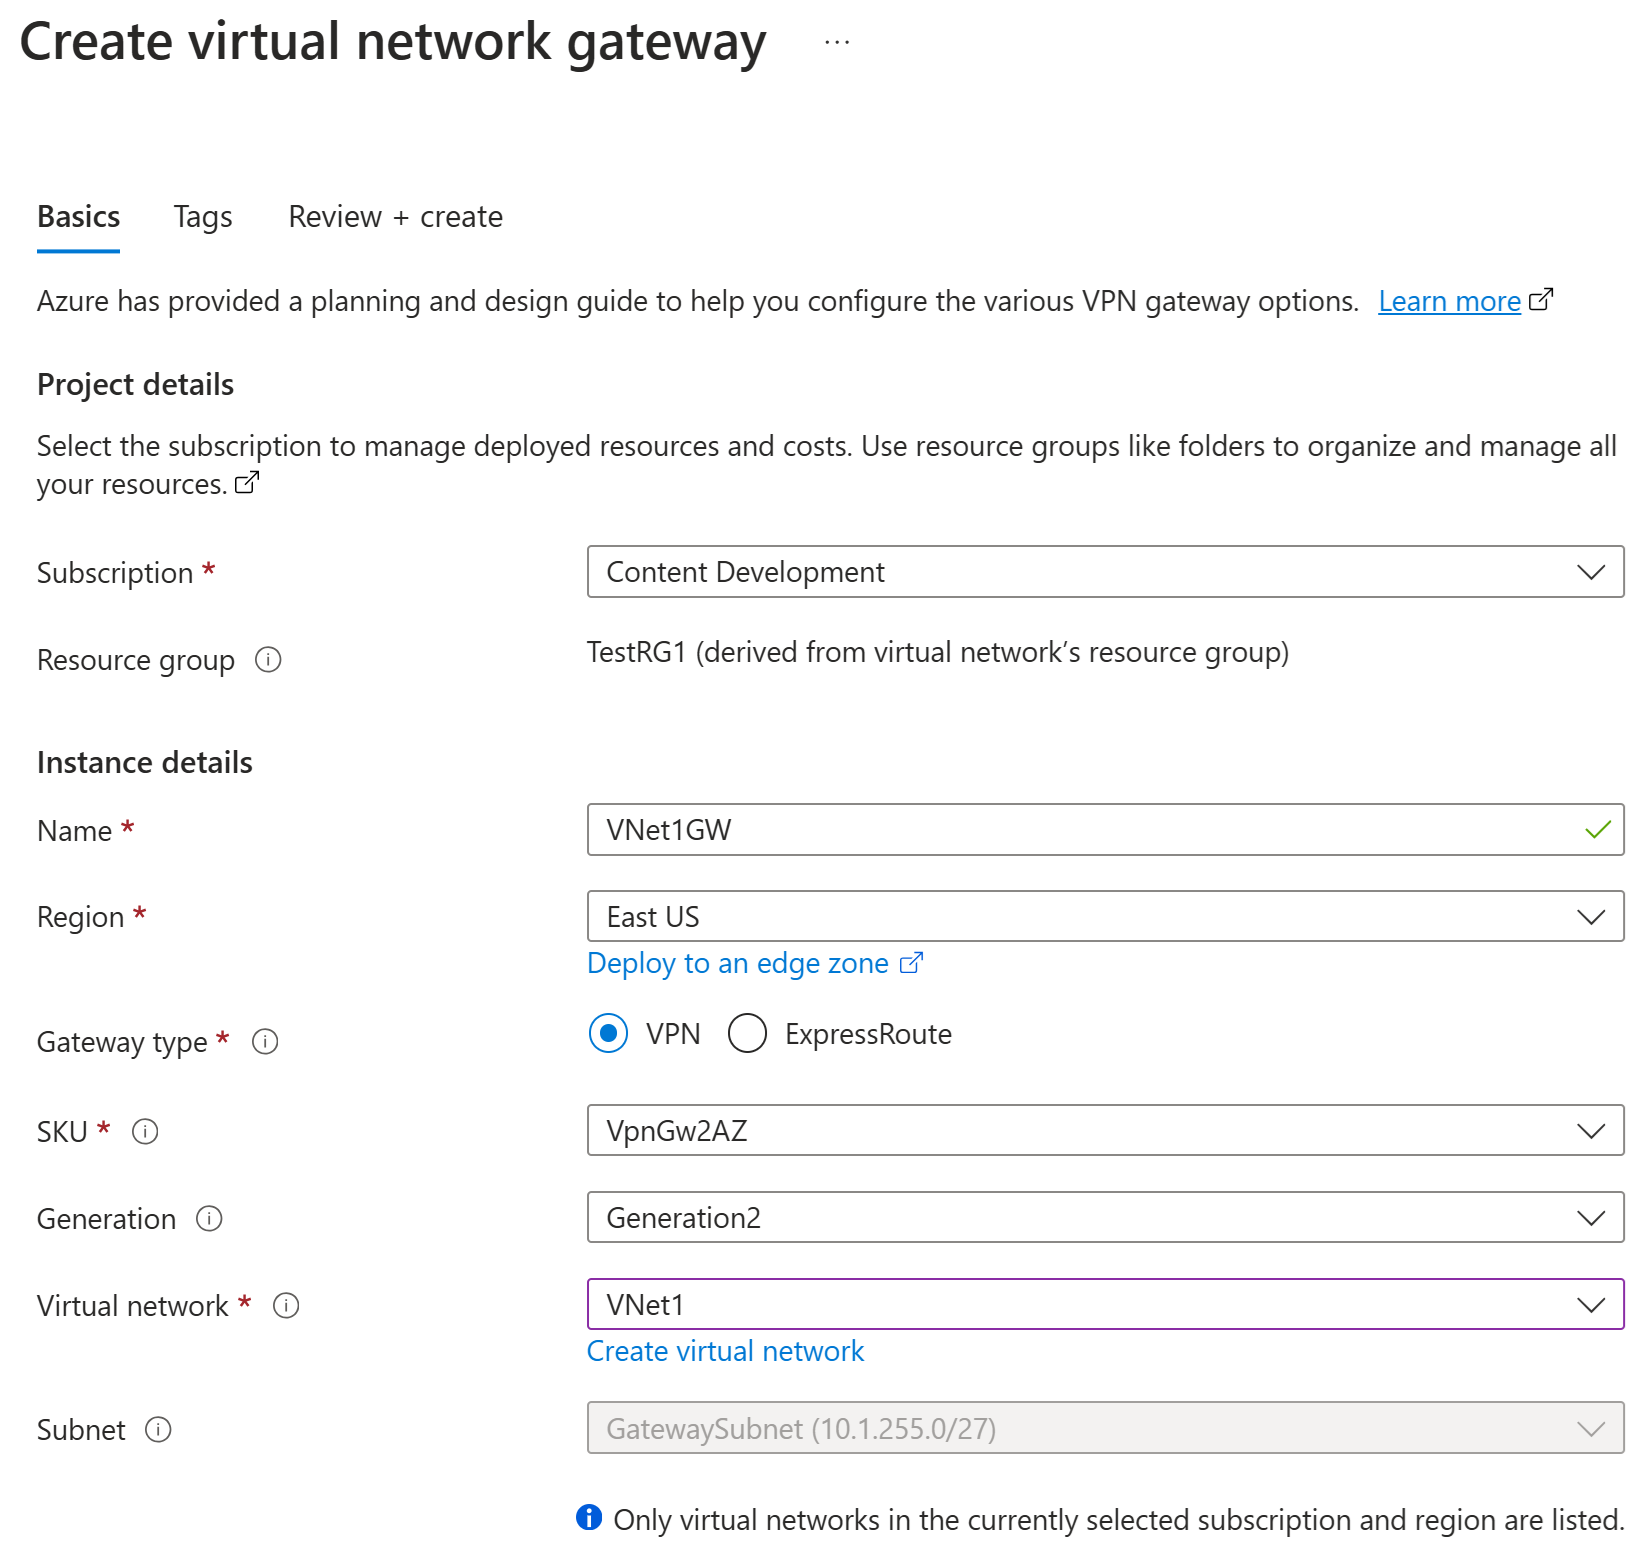
Subscription: Select the subscription you want to use from the dropdown list.
Resource group: This value is autofilled when you select your virtual network on this page.
Name: This is the name of the gateway object you're creating. This is different than the gateway subnet to which gateway resources will be deployed.
Region: Select the region in which you want to create this resource. The region for the gateway must be the same as the virtual network.
Gateway type: Select VPN. VPN gateways use the virtual network gateway type VPN.
SKU: From the dropdown list, select a gateway SKU that supports the features you want to use.
- We recommend that you select a SKU that ends in AZ when possible. AZ SKUs support availability zones.
- The Basic SKU isn't available in the portal. To configure a Basic SKU gateway, you must use PowerShell or CLI.
Generation: Select Generation2 from the dropdown.
Virtual network: From the dropdown list, select the virtual network to which you want to add this gateway. If you can't see the virtual network you want to use, make sure you selected the correct subscription and region in the previous settings.
Gateway subnet address range or Subnet: The gateway subnet is required to create a VPN gateway.
Currently, this field can show different settings options, depending on the virtual network address space and whether you already created a subnet named GatewaySubnet for your virtual network.
If you don't have a gateway subnet and you don't see the option to create one on this page, go back to your virtual network and create the gateway subnet. Then, return to this page and configure the VPN gateway.

Specify the values for Public IP address. These settings specify the public IP address objects that will be associated to the VPN gateway. A public IP address is assigned to each public IP address object when the VPN gateway is created. The only time the assigned public IP address changes is when the gateway is deleted and re-created. IP addresses don't change across resizing, resetting, or other internal maintenance/upgrades of your VPN gateway.
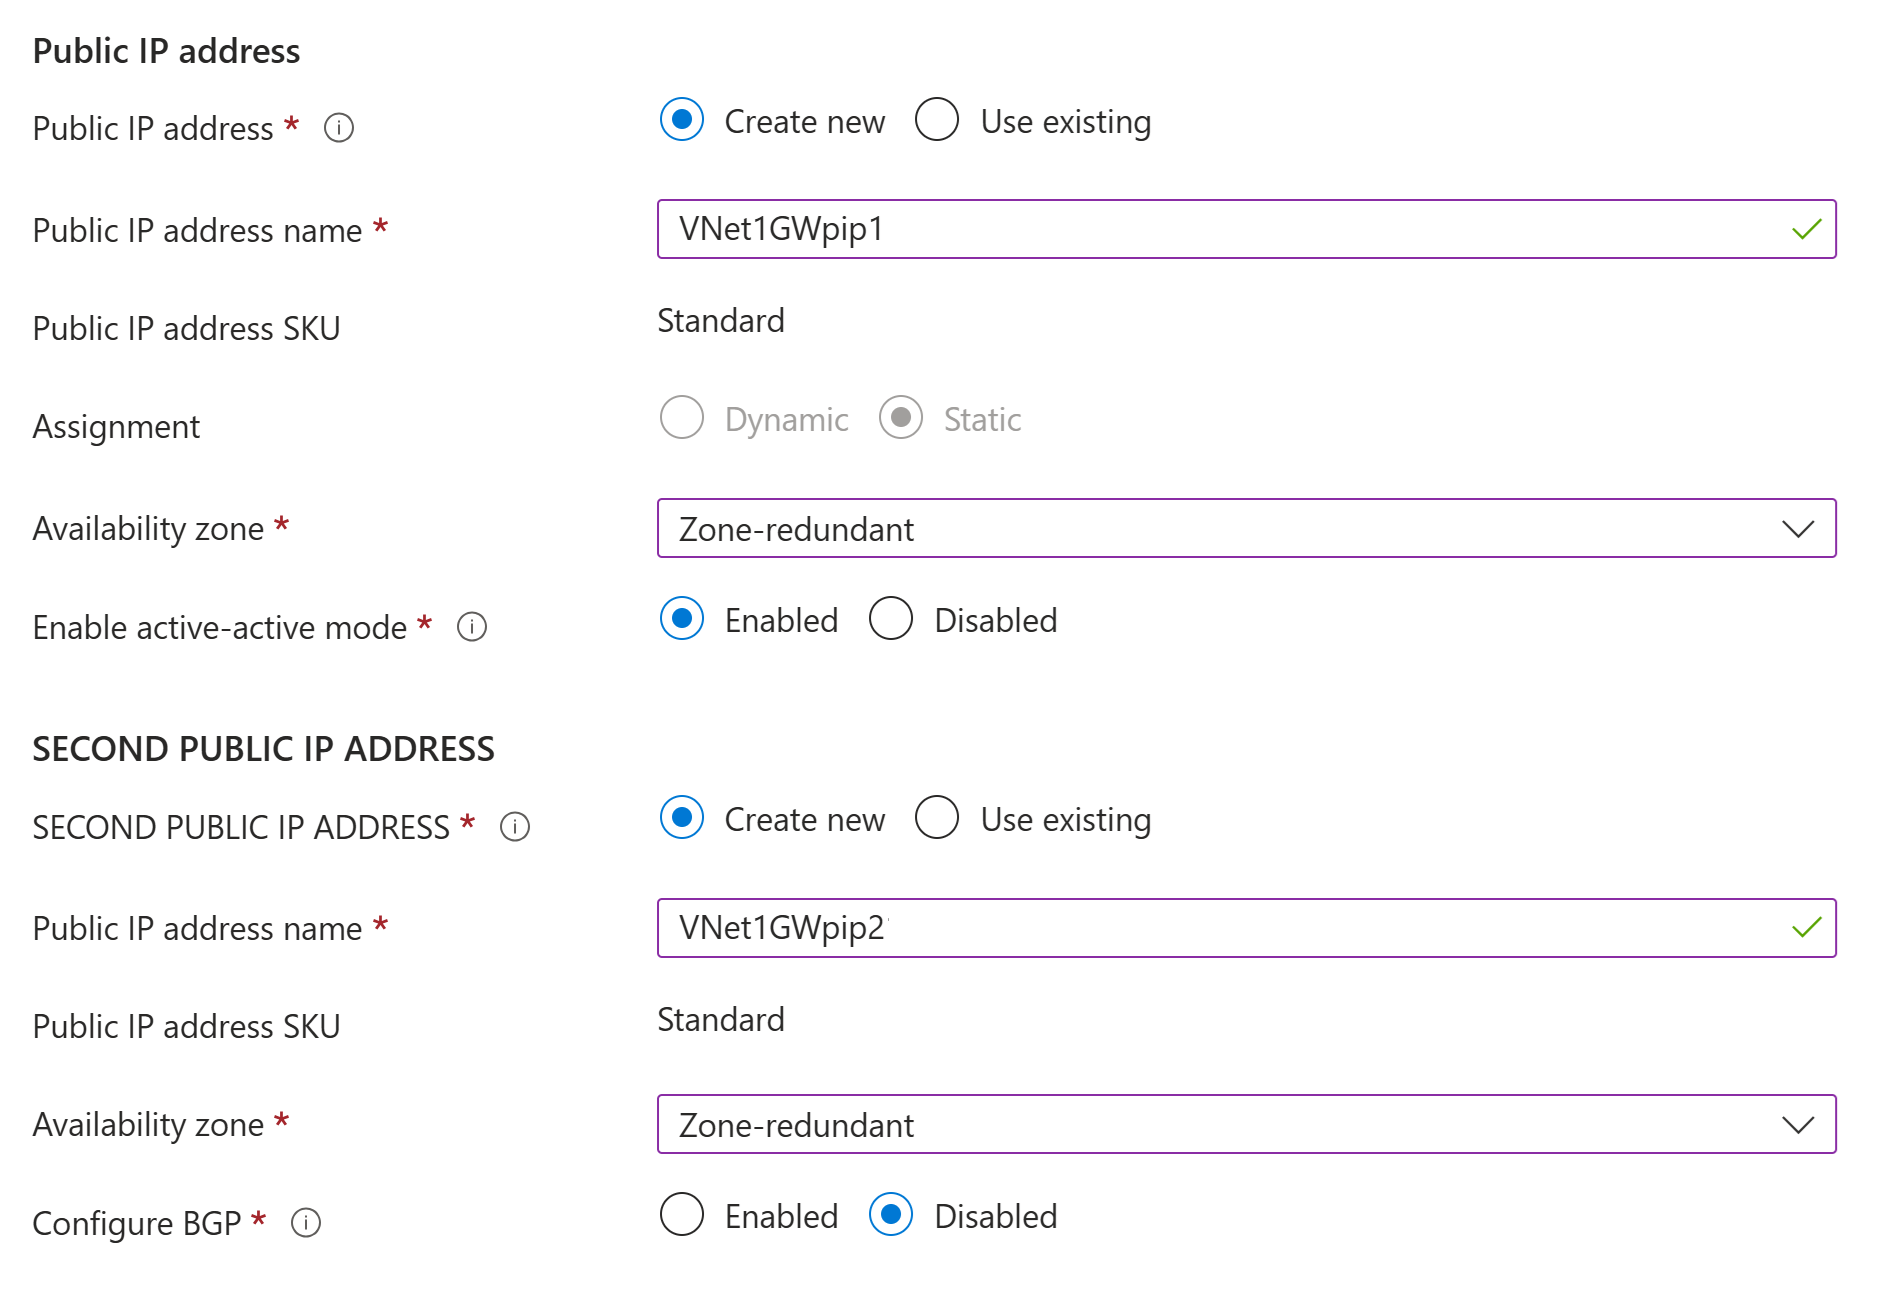
Public IP address type: If this option appears, select Standard.
Public IP address: Leave Create new selected.
Public IP address name: In the text box, enter a name for your public IP address instance.
Public IP address SKU: Setting is autoselected to Standard SKU.
Assignment: The assignment is typically autoselected and should be Static.
Availability zone: This setting is available for AZ gateway SKUs in regions that support availability zones. Select Zone-redundant, unless you know you want to specify a zone.
Enable active-active mode: We recommend that you select Enabled to take advantage of the benefits of an active-active mode gateway. If you plan to use this gateway for a site-to-site connection, take into consideration the following:
- Verify the active-active design that you want to use. Connections with your on-premises VPN device must be configured specifically to take advantage of active-active mode.
- Some VPN devices don't support active-active mode. If you're not sure, check with your VPN device vendor. If you're using a VPN device that doesn't support active-active mode, you can select Disabled for this setting.
Second public IP address: Select Create new. This is available only if you selected Enabled for the Enable active-active mode setting.
Public IP address name: In the text box, enter a name for your public IP address instance.
Public IP address SKU: Setting is autoselected to Standard SKU.
Availability zone: Select Zone-redundant, unless you know you want to specify a zone.
Configure BGP: Select Disabled unless your configuration specifically requires this setting. If you do require this setting, the default ASN is 65515, although this value can be changed.
Enable Key Vault Access: Select Disabled unless your configuration specifically requires this setting.
Select Review + create to run validation.
After validation passes, select Create to deploy the VPN gateway.

A gateway can take 45 minutes or more to fully create and deploy. You can see the deployment status on the Overview page for your gateway. After the gateway is created, you can view the IP address assigned to it by looking at the virtual network in the portal. The gateway appears as a connected device.
View public IP address
To view public IP addresses associated to your virtual network gateway, navigate to your gateway in the portal.
- On the portal page for your virtual network gateway, under Settings, open the Properties page.
- To view more information about the IP address object, click the associated IP address link.
Resize a gateway SKU
There are specific rules for resizing versus changing a gateway SKU. In this section, you resize the SKU. For more information, see Resize or change gateway SKUs.
The basic steps are:
- Go to the Configuration page for your virtual network gateway.
- On the right side of the page, select the dropdown arrow to show a list of available SKUs. Notice that the list only populates SKUs that you're able to use to resize your current SKU. If you don't see the SKU you want to use, instead of resizing, you have to change to a new SKU.
- Select the SKU from the dropdown list and save your changes.
Reset a gateway
Gateway resets behave differently, depending on your gateway configuration. For more information, see Reset a VPN gateway or a connection.
The basic steps are:
- In the portal, go to the virtual network gateway that you want to reset.
- On the Virtual network gateway page, in the left pane, scroll and locate Help -> Reset.
- On the Reset page, select Reset. After the command is issued, the current active instance of Azure VPN gateway is rebooted immediately. Resetting the gateway causes a gap in VPN connectivity and might limit future root cause analysis of the issue.
Clean up resources
If you're not going to continue to use this application or go to the next tutorial, delete these resources.
- Enter the name of your resource group in the Search box at the top of the portal and select it from the search results.
- Select Delete resource group.
- Enter your resource group for TYPE THE RESOURCE GROUP NAME and select Delete.
Next steps
After you create a VPN gateway, you can configure more gateway settings and connections. The following articles help you create a few of the most common configurations: