Distribuer appkontroll for betinget tilgang for alle nettapper som bruker Okta som identitetsleverandør (IdP)
Du kan konfigurere øktkontroller i Microsoft Defender for Cloud Apps slik at de fungerer med alle nettapper og andre ikke-Microsoft-IdP-er. Denne artikkelen beskriver hvordan du ruter appøkter fra Okta til Defender for Cloud Apps for øktkontroller i sanntid.
I denne artikkelen skal vi bruke Salesforce-appen som et eksempel på at en nettapp konfigureres til å bruke Defender for Cloud Apps øktkontroller.
Forutsetninger
Organisasjonen må ha følgende lisenser for å bruke appkontroll for betinget tilgang:
- En forhåndskonfigurert Okta-leier.
- Microsoft Defender for skyapper
En eksisterende okta-konfigurasjon for enkel pålogging for appen ved hjelp av SAML 2.0-godkjenningsprotokollen
Konfigurere øktkontroller for appen ved hjelp av Okta som IdP
Bruk følgende fremgangsmåte for å rute nettappøktene fra Okta til Defender for Cloud Apps.
Obs!
Du kan konfigurere appens SAML enkel påloggingsinformasjon fra Okta ved hjelp av en av følgende metoder:
- Alternativ 1: Laste opp appens SAML-metadatafil.
- Alternativ 2: Angi SAML-data manuelt.
I trinnene nedenfor bruker vi alternativ 2.
Trinn 1: Få appens innstillinger for enkel pålogging for SAML
Trinn 2: Konfigurere Defender for Cloud Apps med appens SAML-informasjon
Trinn 3: Opprett en ny okta egendefinert program- og app-konfigurasjon for enkel pålogging
Trinn 4: Konfigurere Defender for Cloud Apps med okta-appens informasjon
Trinn 5: Fullfør konfigurasjonen av det egendefinerte OKTA-programmet
Trinn 6: Få appendringene i Defender for Cloud Apps
Trinn 7: Fullfør appendringene
Trinn 8: Fullfør konfigurasjonen i Defender for Cloud Apps
Trinn 1: Få appens innstillinger for enkel pålogging for SAML
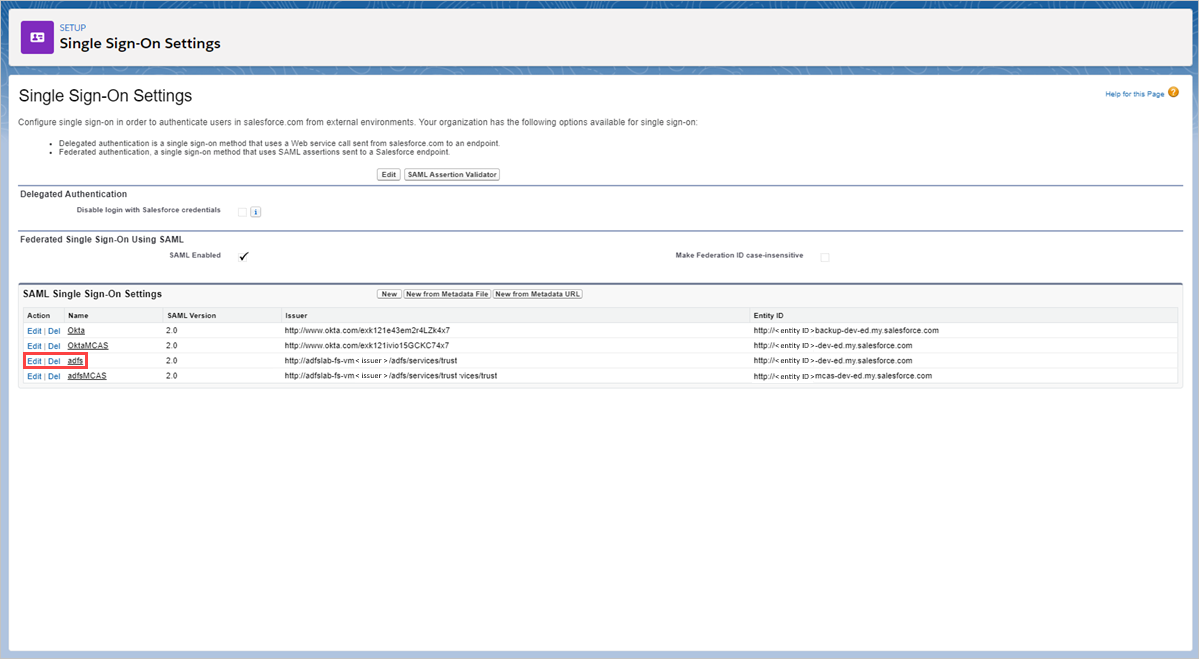
Bla til Innstillinger>>> for identitet forenkelt Sign-On Innstillinger i Salesforce.
Klikk på navnet på den eksisterende Okta-konfigurasjonen under Innstillinger for enkel Sign-On.

Noter nettadressen for Salesforce-pålogging på siden for enkel Sign-On-innstilling for SAML. Du trenger dette senere når du konfigurerer Defender for Cloud Apps.
Obs!
Hvis appen inneholder et SAML-sertifikat, laster du ned sertifikatfilen.

Trinn 2: Konfigurere Defender for Cloud Apps med appens SAML-informasjon
Velg Innstillinger i Microsoft Defender-portalen. Velg deretter Skyapper.
Velg appkontrollapper for betinget tilgang under Tilkoblede apper.
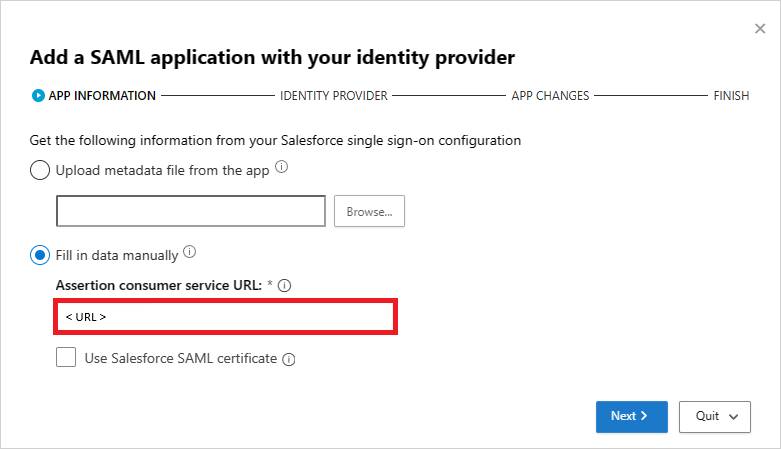
Velg +Legg til, og velg appen du vil distribuere, i popup-vinduet, og velg deretter Start veiviser.
Velg Fyll ut data manuelt på APPINFORMASJON-siden, angi nettadressen for Salesforce-pålogging som du noterte tidligere, i nettadressen for deklarasjonsforbrukertjenesten, og klikk deretter Neste.
Obs!
Hvis appen inneholder et SAML-sertifikat, velger du Bruk <app_name> SAML-sertifikat og laster opp sertifikatfilen.

Trinn 3: Opprett en ny okta egendefinert program- og appkonfigurasjon for enkel Sign-On
Obs!
Hvis du vil begrense nedetiden til sluttbrukeren og bevare den eksisterende fungerende konfigurasjonen, anbefaler vi at du oppretter et nytt egendefinert program og en konfigurasjon for enkel Sign-On. Der dette ikke er mulig, kan du hoppe over de relevante trinnene. Hvis for eksempel appen du konfigurerer, ikke støtter oppretting av flere enkelt Sign-On konfigurasjoner, hopper du over trinnet for oppretting av ny enkel pålogging.
Vis egenskapene for den eksisterende konfigurasjonen for appen under Programmer i Okta Admin-konsollen, og noter innstillingene.
Klikk Legg til program, og klikk deretter Opprett ny app. Bortsett fra målgruppe-URI-verdien (SP Entity ID) som må være et unikt navn, konfigurerer du det nye programmet ved hjelp av innstillingene du nevnte tidligere. Du trenger dette programmet senere når du konfigurerer Defender for Cloud Apps.
Gå til Programmer, vis den eksisterende Okta-konfigurasjonen, og velg Vis installasjonsinstruksjoner på Pålogging-fanen.

Noter url-adressen til identitetsleverandøren for enkel Sign-On , og last ned identitetsleverandørens signeringssertifikat (X.509). Du trenger dette senere.
Tilbake i Salesforce, på den eksisterende siden med enkel pålogging for Okta, noterer du alle innstillingene.
Opprett en ny konfigurasjon for enkel pålogging for SAML. Bortsett fra enhets-ID-verdien som må samsvare med det egendefinerte programmets målgruppe-URI (SP-enhets-ID), konfigurerer du enkel pålogging ved hjelp av innstillingene du nevnte tidligere. Du trenger dette senere når du konfigurerer Defender for Cloud Apps.
Når du har lagret det nye programmet, går du til Oppgave-siden og tilordnerFolk eller Grupper som krever tilgang til programmet.
Trinn 4: Konfigurere Defender for Cloud Apps med okta-appens informasjon
Klikk Neste på siden Defender for Cloud Apps IDENTITETSLEVERANDØR for å fortsette.
Velg Fyll ut data manuelt på neste side, gjør følgende, og klikk deretter Neste.
- Skriv inn nettadressen for Salesforce-pålogging som du noterte tidligere, for url-adressen for enkel påloggingstjeneste .
- Velg Last opp identitetsleverandørens SAML-sertifikat , og last opp sertifikatfilen du lastet ned tidligere.

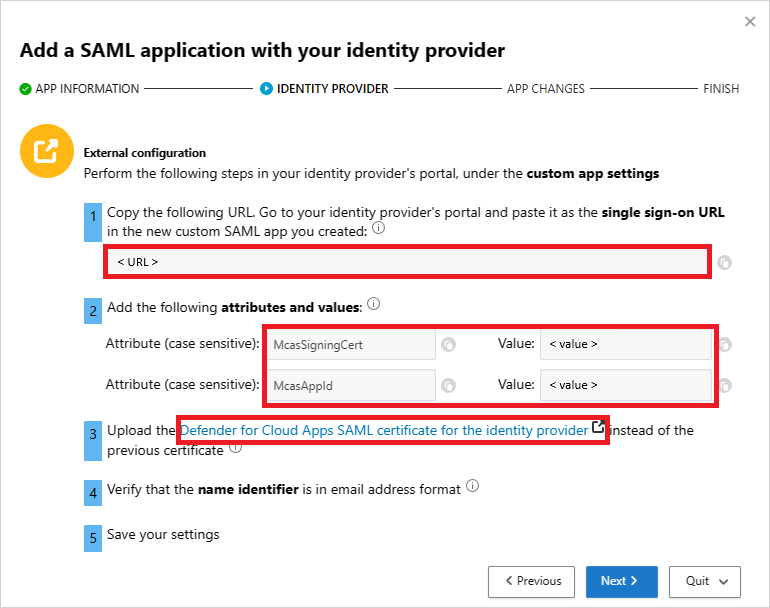
Noter følgende informasjon på neste side, og klikk deretter Neste. Du trenger informasjonen senere.
- Defender for Cloud Apps nettadresse for enkel pålogging
- Defender for Cloud Apps attributter og verdier
Obs!
Hvis du ser et alternativ for å laste opp Defender for Cloud Apps SAML-sertifikat for identitetsleverandøren, klikker du på klikket for å laste ned sertifikatfilen. Du trenger dette senere.

Trinn 5: Fullfør konfigurasjonen av det egendefinerte OKTA-programmet
Gå tilbake til Okta Admin-konsollen under Programmer, velg det egendefinerte programmet du opprettet tidligere, og klikk deretter Rediger under Generelle>SAML-innstillinger.

I feltet Enkel pålogging URL-adresse erstatter du nettadressen med den Defender for Cloud Apps nettadressen for enkel pålogging som du noterte tidligere, og deretter lagrer du innstillingene.
Velg Profil Redaktør under Katalog, velg det egendefinerte programmet du opprettet tidligere, og klikk deretter Profil. Legg til attributter ved hjelp av følgende informasjon.
Visningsnavn Variabelnavn Datatype Attributtype McasSigningCert McasSigningCert streng Skikk McasAppId McasAppId streng Skikk 
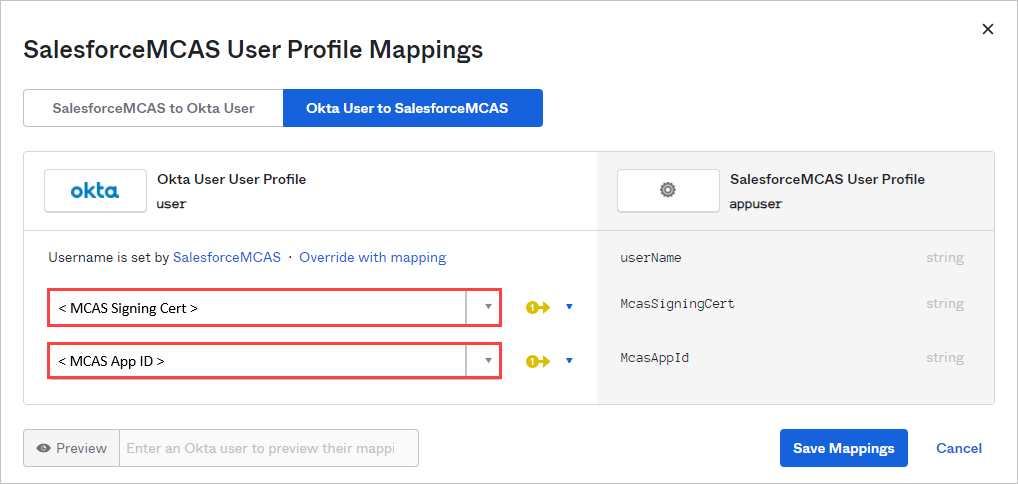
Gå tilbake til profilsiden Redaktør, velg det egendefinerte programmet du opprettet tidligere, klikk Tilordninger, og velg deretter Okta-bruker til {custom_app_name}. Tilordne Attributtene McasSigningCert og McasAppId til de Defender for Cloud Apps attributtverdiene du noterte tidligere.
Obs!
- Kontroller at du omslutter verdiene i doble anførselstegn (")
- Okta begrenser attributter til 1024 tegn. Hvis du vil redusere denne begrensningen, legger du til attributtene ved hjelp av Profil-Redaktør som beskrevet.

Lagre innstillingene.
Trinn 6: Få appendringene i Defender for Cloud Apps
Gjør følgende på siden Defender for Cloud Apps APPENDRINGER, men ikke klikk Fullfør. Du trenger informasjonen senere.
- Kopiere url-adressen for enkel pålogging for Defender for Cloud Apps SAML
- Last ned Defender for Cloud Apps SAML-sertifikatet

Trinn 7: Fullfør appendringene
Bla til Innstillinger for identitet>>> forenkel Sign-On Innstillinger i Salesforce, og gjør følgende:
[Anbefalt] Opprett en sikkerhetskopi av gjeldende innstillinger.
Erstatt feltverdien for url-adressen for pålogging for identitetsleverandør med url-adressen for enkel pålogging for Defender for Cloud Apps SAML som du noterte tidligere.
Last opp Defender for Cloud Apps SAML-sertifikatet du lastet ned tidligere.
Klikk på Lagre.
Obs!
- Når du har lagret innstillingene, rutes alle tilknyttede påloggingsforespørsler til denne appen gjennom appkontroll for betinget tilgang.
- SAML-sertifikatet for Defender for Cloud Apps er gyldig i ett år. Når det utløper, må et nytt sertifikat genereres.

Trinn 8: Fullfør konfigurasjonen i Defender for Cloud Apps
- Klikk Fullfør på siden Defender for Cloud Apps APPENDRINGER. Når du har fullført veiviseren, rutes alle tilknyttede påloggingsforespørsler til denne appen gjennom appkontroll for betinget tilgang.
Beslektet innhold
Hvis det oppstår problemer, er vi her for å hjelpe. Hvis du vil ha hjelp eller støtte for produktproblemet, kan du åpne en støtteforespørsel.