Merk
Tilgang til denne siden krever autorisasjon. Du kan prøve å logge på eller endre kataloger.
Tilgang til denne siden krever autorisasjon. Du kan prøve å endre kataloger.
Starting with .NET 6, the project template for new C# console apps generates the following code in the Program.cs file:
// See https://aka.ms/new-console-template for more information
Console.WriteLine("Hello, World!");
For .NET 5 and earlier versions, the console app template generates the following code:
using System;

namespace MyApp
{
    internal class Program
    {
        static void Main(string[] args)
        {
            Console.WriteLine("Hello World!");
        }
    }
}
In the preceding code, the actual namespace depends on the project name.
These two forms represent the same program. Both are valid in C#. When you use the newer version, you only need to write the body of the Main method. The compiler generates a Program class with an entry point method, and places all your top-level statements in that method. The name of the generated method isn't Main—it's an implementation detail that your code can't reference directly. You don't need to include the other program elements; the compiler generates them for you. For more information about the code the compiler generates when you use top-level statements, see top-level statements in the C# Guide's fundamentals section.
When working with tutorials that aren't updated to use .NET 6+ templates, use one of these two options:
- Use the new program style, adding new top-level statements as you add features.
- Convert the new program style to the older style, with a
Programclass and aMainmethod.
If you want to use the old templates, see Use the old program style later in this article.
Use the new program style
The features that make the new program simpler are top-level statements, global using directives, and implicit using directives.
The term top-level statements means the compiler generates the class and method elements for your main program. The compiler declares the generated class and entry point method in the global namespace. Look at the code for the new application and imagine that it contains the statements inside the Main method generated by earlier templates, but in the global namespace.
Add more statements to the program, just as you add statements to your Main method in the traditional style. Access args (command-line arguments), use await, and set the exit code. You can even add functions. The compiler creates them as local functions nested inside the generated entry point method. Local functions can't include any access modifiers (for example, public or protected).
Both top-level statements and implicit using directives simplify the code that makes up your application. To follow an existing tutorial, add any new statements to the Program.cs file generated by the template. Imagine that the statements you write are between the open and closing braces in the Main method in the instructions of the tutorial.
If you'd prefer the older format, copy the code from the second example in this article and continue the tutorial as before.
For more information about top-level statements, see the tutorial exploration on top-level statements.
Implicit using directives
The term implicit using directives means the compiler automatically adds a set of using directives based on the project type. For console applications, the following directives are implicitly included in the application:
using System;using System.IO;using System.Collections.Generic;using System.Linq;using System.Net.Http;using System.Threading;using System.Threading.Tasks;
Other application types include more namespaces that are common for those application types.
If you need using directives that aren't implicitly included, add them to the .cs file that contains top-level statements or to other .cs files. For using directives that you need in all of the .cs files in an application, use global using directives.
Disable implicit using directives
To remove this behavior and manually control all namespaces in your project, add <ImplicitUsings>disable</ImplicitUsings> to your project file in the <PropertyGroup> element, as shown in the following example:
<Project Sdk="Microsoft.NET.Sdk">

  <PropertyGroup>
    ...
    <ImplicitUsings>disable</ImplicitUsings>
  </PropertyGroup>

</Project>
Global using directives
A global using directive imports a namespace for your whole application instead of a single file. Add these global directives by including a <Using> item in the project file or adding the global using directive to a code file.
To remove a specific implicit using directive, add a <Using> item with a Remove attribute to your project file. For example, if the implicit using directives feature is turned on with <ImplicitUsings>enable</ImplicitUsings>, adding the following <Using> item removes the System.Net.Http namespace from those that are implicitly imported:
<ItemGroup>
  <Using Remove="System.Net.Http" />
</ItemGroup>
Use the old program style
Starting with .NET SDK 6.0.300, the console template has a --use-program-main option. Use it to create a console project that doesn't use top-level statements and has a Main method.
dotnet new console --use-program-main
The generated Program.cs is as follows:
namespace MyProject;

class Program
{
    static void Main(string[] args)
    {
        Console.WriteLine("Hello, World!");
    }
}
Use the old program style in Visual Studio
When you create a new project, the setup steps navigate to the Additional information setup page. On this page, select the Do not use top-level statements check box.
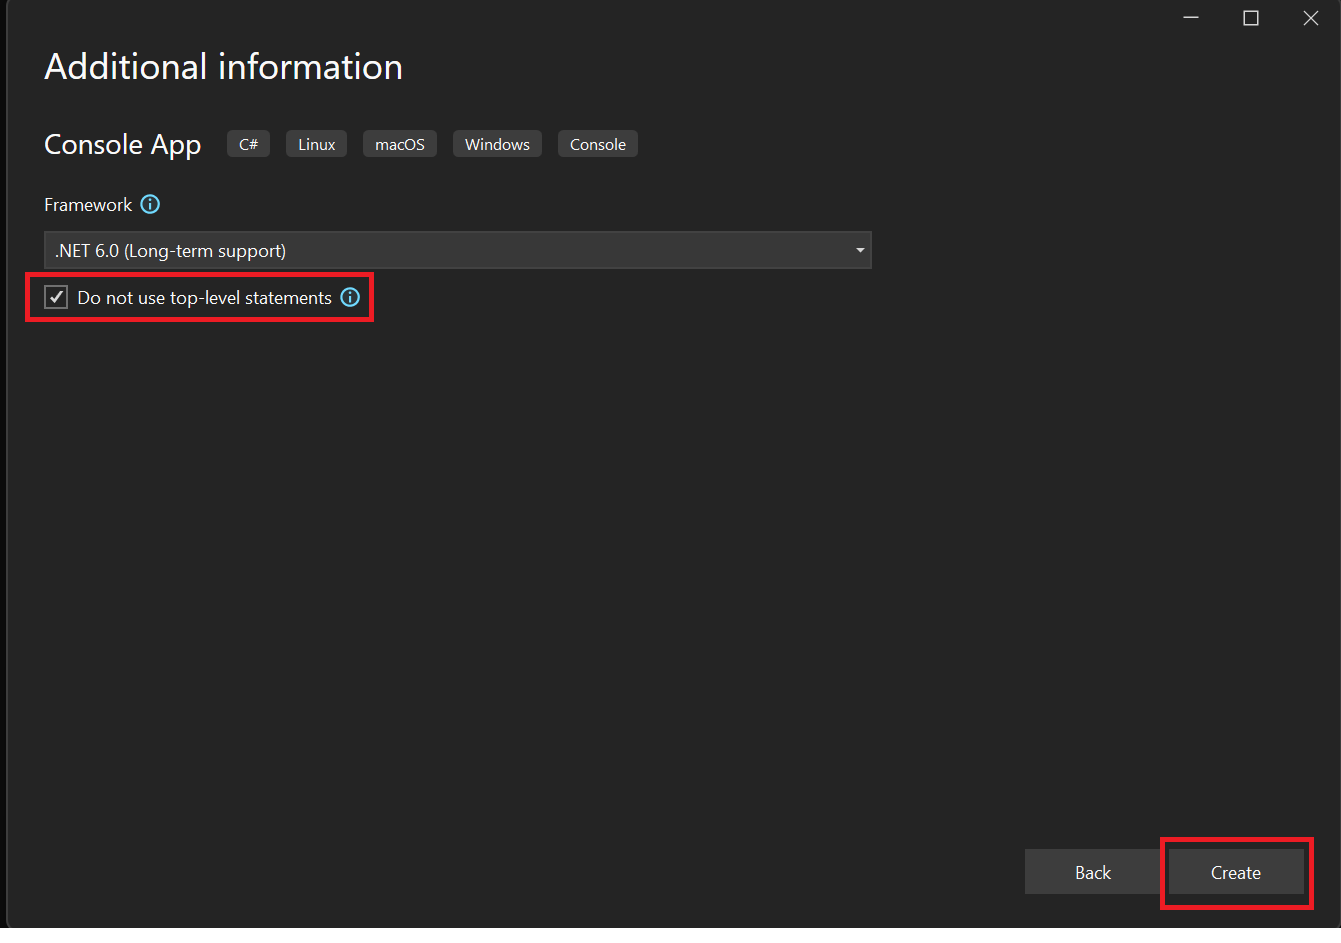
After your project is created, the
Program.cscontent is as follows:namespace MyProject; class Program { static void Main(string[] args) { Console.WriteLine("Hello, World!"); } }
Note
Visual Studio preserves the option value for the next time you create a project based on the same template. If you last created a Console App project with the Do not use top-level statements check box checked, that option is checked when you create the next Console App project.
The content of the Program.cs file might be different to match the code style defined in the global Visual Studio text editor settings or the EditorConfig file.
For more information, see Create portable, custom editor settings with EditorConfig and Options, Text Editor, C#, Advanced.
Samarbeid med oss på GitHub
Du finner kilden for dette innholdet på GitHub. Der du også kan opprette og se gjennom problemer og pull-forespørsler. Hvis du vil ha mer informasjon, kan du se vår bidragsyterveiledning.