Scenario: Conditional mail routing in Exchange Online
There might be times you need to route mail differently. These different routes depend on the recipient or sender of the mail, where it's being sent, the contents of the message, and so on. For example, if you have multiple sites around the world, you might want to route mails to a specific site. You can do this using connectors and mail flow rules (also known as transport rules).
When the steps below are completed, a mail flow rule will redirect messages addressed to users whose City property is set to New Orleans to the IP address specified by the connector from Office 365 to your organization's email server.
Step 1: Use the Exchange admin center to create the connector
The first thing we need to do is create a connector from Office 365 to your organization's email server. This connector will be used by the mail flow rule that we'll set up in Step 2. In this connector, you'll select where received messages originate from (such as a mailbox in your Microsoft 365 or Office 365 organization), the type of organization to which the messages will be sent (such as your on-premises servers), the security that should be applied to the connection, and name or IP address of the target server. If you want to learn more about how to create connectors, check out Configure mail flow using connectors.
The subsequent two procedures are for creating connectors from Office 365 to your organization's email server. These connectors are to be created in the Exchange admin center (EAC).
Navigate to Mail flow > Connectors. The Connectors screen appears.
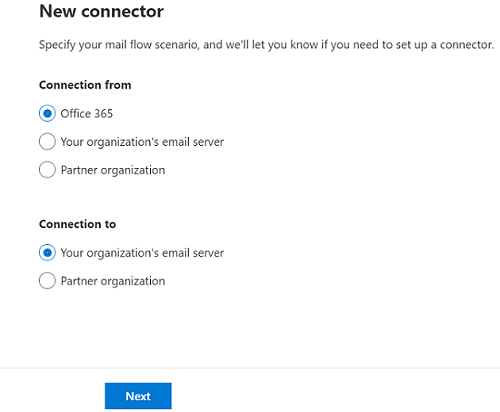
Click + Add a new connector. The New connector screen appears.
Under Connection from, choose Office 365.
Under Connection to, choose either Your organization's email server or Partner organization (if you want to connect to a server other than your organizations).

Click Next. The Connector name screen appears.
Provide a name for the connector and add a description.
Check the check box for Turn it on under What do you want to do after connector is saved?

Click Next. The Use of connector screen appears.
Choose Only when I have a transport rule set up that redirects messages to this connector.

Click Next. The Routing screen appears.
Enter one or more smart hosts in the text box. (These smart hosts are the ones to which Microsoft 365 or Office 365 will deliver email messages.)
Note
You must provide either the domain name or the IP address of the server.
- Click +. The smart host value is displayed under the text box.

Note
It is mandatory to click + after entering the smart host name to navigate to the next screen.
Click Next. The Security restrictions screen appears.
Check the check box for Always use Transport Layer Security (TLS) to secure the connection (recommended).

Click Next. The Validation email screen appears.
Enter an email address that is valid on the mailbox of your organization's email server.
Click +. The email address is displayed below the text box, indicating it is ready to be validated.
Click Validate. The validation process starts.
Once the validation process is completed, click Next. The Review connector screen appears.
Review the settings for the new connector and click Create connector. The connector is created.
Step 2: Use the EAC to create a mail flow rule
Now that we've created a connector, we need to create a mail flow rule that will send mail to it based on the criteria you define. There are many conditions you can select from to control when messages should be sent to the connector. In the following example, we are setting rule condition based on specific properties of the recipient.
To create a mail flow rule in EAC, perform the following steps:
In the EAC, navigate to Mail flow > Rules. Click
 Add a rule and choose Create a new rule....
In the New rule window, name the rule.
For Apply this rule if*, select The recipient... and has specific properties including any of these words. The Select user properties box appears. Under User property, choose City. City is an Active Directory attribute made available for use by the rule. Specify the name of the city, such as New Orleans. Click Add, and then click Save to close the Select user properties box.

Important
Check the accuracy of user attributes in Active Directory to ensure that the mail flow rule works as intended. > Note that changes made in the connector from Office 365 to your organization's email server take time to replicate.
For *Do the following..., choose Redirect the message to... and then specify the following connector. The select connector box appears. Choose the connector (from Office 365 to your organization's email server) that you created previously.
You can choose more properties for the rule, such as the test mode and when to activate the rule.
- To save the connector, click Save.