Merk
Tilgang til denne siden krever autorisasjon. Du kan prøve å logge på eller endre kataloger.
Tilgang til denne siden krever autorisasjon. Du kan prøve å endre kataloger.
A primary tool for developing Microsoft 365 apps and agents, including Office Add-ins, is Microsoft 365 Agents Toolkit.
Add-ins created with Agents Toolkit use the unified manifest for Microsoft 365.
Note
For information on clients and platforms that support Office Add-ins that use the unified manifest for Microsoft 365, see Office Add-ins with the unified app manifest for Microsoft 365.
Install the latest version of Agents Toolkit into Visual Studio Code as described in Install Microsoft 365 Agents Toolkit.
Important
You can create an Outlook add-in with the latest released version of Agents Toolkit. To create an add-in for Excel, PowerPoint, or Word, install the prerelease version as described in Install a prerelease version. The toolkit creates projects that use the unified manifest for Microsoft 365. Support for this manifest in Excel, PowerPoint, and Word is preview only.
Create an Office Add-in project
Open Visual Studio Code and select the Agents Toolkit icon in the Activity Bar.

Select Create a New App.
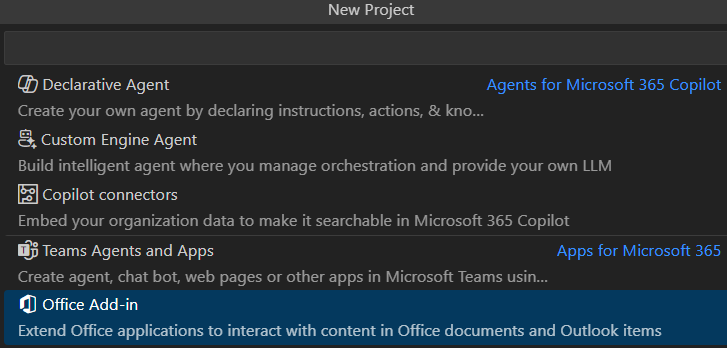
The New Project dropdown menu opens. The options listed will vary depending on your version of Agents Toolkit. Select Office Add-in.
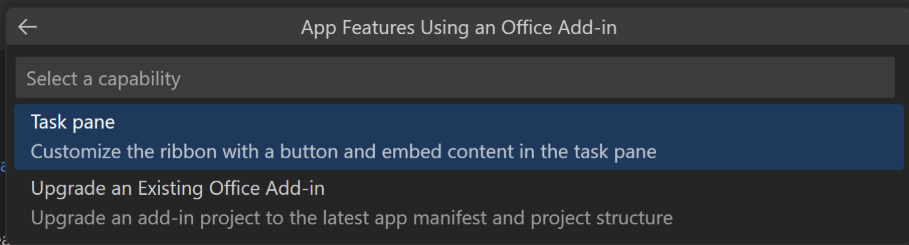
The App Features Using an Office Add-in dropdown menu opens. The options listed will vary depending on your version of Agents Toolkit. Select Task pane.
In the Workspace Folder dialog that opens, select the folder where you want to create the project.
Give a name to the project (with no spaces) when prompted. Agents Toolkit will create the project with basic files and scaffolding. It will then open the project in a second Visual Studio Code window. Close the original Visual Studio Code window.
Note
The project that's generated is configured to be installable on Excel, Outlook, PowerPoint, and Word. You can edit the manifest and source files as needed to change which Office applications are supported.
In the Visual Studio Code TERMINAL navigate to the root of the project and run
npm install.After the installation completes, verify that you can sideload your add-in from Visual Studio Code. The steps to sideload vary depending on the Office application on which you want to test the add-in.
Sideload in Excel, PowerPoint, or Word
Note
This section only applies if you are developing the add-in on a Windows computer.
Select View | Run in Visual Studio Code. In the RUN AND DEBUG dropdown menu, select one of these options:
- Excel Desktop (Edge Chromium)
- PowerPoint Desktop (Edge Chromium)
- Word Desktop (Edge Chromium)
Press F5. The project builds and a Node dev-server window opens. This process may take a couple of minutes. Eventually, the desktop version of the Office application you selected opens.
Note
If this is the first time that you have sideloaded an Office Add-in on your computer (or the first time in over a month), you may be prompted to delete an old certificate and/or to install a new one. Agree to both prompts.
A Contoso Add-in tab with two buttons will appear on the Home ribbon. Use one button to perform an action in the open Office document. Use the other to open the add-in's task pane.
Note
Regardless of which button you select, a WebView Stop On Load prompt appears. Select OK.
Tip
Sideloading in Office on Windows also makes the add-in available in Office on the web, so you can test it on that platform too. After this step is complete, minimize the Office on Windows application window and in a browser, navigate to
https://excel.cloud.microsoft/,https://word.cloud.microsoft/, orhttps://powerpoint.cloud.microsoft/, whichever is appropriate for the add-in you're testing. Open a new or existing document in the Office application on the web. The buttons should appear on the Home ribbon just as they do in Office on Windows.To stop debugging and uninstall the add-in, select Run | Stop Debugging in Visual Studio Code.
Note
If the preceding step seems to have no effect, uninstall the add-in by opening a TERMINAL in Visual Studio Code, and then running the command
npm run stop. Closing the server window doesn't reliably stop the server and closing the Office application doesn't reliably cause Office to unacquire the add-in.
Other ways to sideload
See Sideload Office Add-ins that use the unified manifest for Microsoft 365 for alternative ways to sideload an Excel, PowerPoint, or Word add-in, including through the app store in Teams.
Sideload in Outlook
Note
If your development computer is Windows, be sure that your Outlook client is classic Outlook for Windows, not new Outlook on Windows. There is currently a bug that prevents add-ins created with Agents Toolkit from properly sideloading in new Outlook for Windows or in Outlook on the web.
Ensure that your account in your Microsoft 365 developer tenancy is also an email account in desktop Outlook. If it isn't, follow the guidance in Add an email account to Outlook.
Close Outlook desktop.
In Visual Studio Code, open Agents Toolkit.
In the ACCOUNTS section, verify that you're signed into Microsoft 365.
Select View | Run in Visual Studio Code. In the RUN AND DEBUG dropdown menu, select the option, Outlook Desktop (Edge Chromium), and then press F5. The project builds and a Node dev-server window opens. This process may take a couple of minutes and then Outlook desktop will open.
Note
If this is the first time that you have sideloaded an Office Add-in on your computer (or the first time in over a month), you may be prompted to delete an old certificate and/or to install a new one. Agree to both prompts.
Open the Inbox of your Microsoft 365 account identity and open any message. A Contoso Add-in tab with two buttons will appear on the Home ribbon (or the Message ribbon, if you have opened the message in its own window).
Click the Show Taskpane button and a task pane opens. Click the Perform an action button and a small notification appears near the top of the message.
Note
Regardless of which button you select, a WebView Stop On Load prompt appears. Select OK.
To stop debugging and uninstall the add-in, select Run | Stop Debugging in Visual Studio Code.
Note
If the preceding step seems to have no effect, uninstall the add-in by opening a TERMINAL in Visual Studio Code, and then running the command
npm run stop. Closing the server window doesn't reliably stop the server and closing the Office application doesn't reliably cause Office to unacquire the add-in.
Develop your project
Now you can change and develop the project. In places where the guidance in the Office Add-ins documentation branches depending on what type of manifest is being used, be sure to follow the guidance for the unified manifest.
Samarbeid med oss på GitHub
Du finner kilden for dette innholdet på GitHub. Der du også kan opprette og se gjennom problemer og pull-forespørsler. Hvis du vil ha mer informasjon, kan du se vår bidragsyterveiledning.
Office Add-ins