Merk
Tilgang til denne siden krever autorisasjon. Du kan prøve å logge på eller endre kataloger.
Tilgang til denne siden krever autorisasjon. Du kan prøve å endre kataloger.
You can extend the options available within the workflow designer used in Microsoft Dataverse. Add these extensions by adding an assembly that contains a class that extends the CodeActivity class. These extensions are commonly called workflow assemblies or workflow activities.
You can use these custom extensions within the workflow designer, custom actions, and dialogs (deprecated).
Important
Whenever possible, first consider applying one of the several declarative options to define business logic. For more information, see Apply business logic in Dataverse.
Use workflow extensions when a declarative process doesn't meet your requirement.
When to create a workflow extension
If you don't find the functionality you require by using the default process activities, add custom activities so that they're available in the editor used to compose workflow, dialog, and action processes.
By default, these processes include a common set of activities you can perform, as shown in the following table:
| Activity | Workflow | Action | Dialog |
|---|---|---|---|
| Query Data | X | ||
| Assign Value | X | X | |
| Create Record | X | X | X |
| Update Record | X | X | X |
| Assign Record | X | X | X |
| Send Email | X | X | X |
| Start Child Workflow | X | X | X |
| Perform Action | X | X | |
| Link Child Dialog | X | ||
| Change Status | X | X | X |
| Stop Workflow | X | X | |
| Stop Dialog | X |
Use the Perform Action activity to execute any custom actions or the following system messages called Command Actions:
AddToQueue
AddUserToRecordTeam
RemoveUserFromRecordTeam
SetProcess
SetWordTemplate
If you have Dynamics 365 Sales or Service solutions, you can find other command actions depending on the solution:
ApplyRoutingRule
CalculateActualValue
CloseOpportunity
GetQuoteProductsFromOpportunity
GetSalesOrderProductsFromOpportunity
LockInvoicePricing
LockSalesOrderPricing
QualifyLead
RemoveUserFromRecordTeam
ResolveIncident
ResolveQuote
Revise
UnlockInvoicePricing
UnlockSalesOrderPricing
For more information, see:
- Configure workflow stages and steps
- Use Dataverse dialogs for guided processes
- Create a custom action
Technology used
Register an assembly built by using the .NET Framework Activity library that defines custom activities. These activities appear within the web application editor and are invoked when the process runs.
Custom workflow activities require creating a .NET Framework assembly that includes one or more classes derived from the abstract CodeActivity Class. This class provides the Execute(CodeActivityContext) Method that the Dataverse platform calls when the activity runs. Each class in your assembly defines a specific activity.
Workflow activities should define input and output parameters that the process designer can display. These parameters enable someone to pass data into the workflow activity and receive the processed output. When you write the class, add properties for these parameters and annotate them with .NET attributes to provide the metadata that Dataverse uses to expose your custom workflow activity with any parameters in the designer.
Create a custom workflow activity assembly
These steps describe how to create a custom workflow activity by using Visual Studio. For a complete step-by-step example, see Tutorial: Create workflow extension.
Create a Class Library project that targets .NET Framework.
Important
Use a build target of a supported .NET Framework.
Install the Microsoft.CrmSdk.Workflow NuGet package.
This package includes the Microsoft.CrmSdk.CoreAssemblies package.
(Optional) If you want to use early bound table classes, include them in the project.
For more information, see:
Add a public class. The name of the class should correspond with the action that the activity performs.
Add the following using directives.
using System.Activities;
using Microsoft.Xrm.Sdk;
using Microsoft.Xrm.Sdk.Workflow;
Add properties to the class to represent any input or output parameters. Use .NET attributes to provide the necessary metadata to expose these properties to the workflow process designer.
For more information, see Add parameters.
Make your class derive from the CodeActivity Class and implement the Execute(CodeActivityContext) Method that contains the operations your activity performs.
For more information, see Add your code to the Execute method.
Sign your assembly.
Build your assembly.
Register your assembly by using the Plug-in Registration tool. Set the
NameandWorkflowActivityGroupNameproperties to define the text that the workflow designer displays.For more information, see Register your assembly.
Test your workflow activity by invoking it from within a workflow, dialog, or action processes.
(Recommended) Add your workflow activity to a solution.
Add parameters
When you define parameters for your class, define them as InArgument<T>, OutArgument<T>, or InOutArgument<T> types. These types provide methods inherited from a common Argument Class to get or set the parameters. Your code uses these methods in the Execute method. For more information, see Add your code to the Execute method.
When your custom workflow activity uses input or output parameters, add the appropriate .NET attributes to the public class properties that define them. The process designer reads this data to define how the parameters can be set in the process designer.
You can use the following types of properties as input or output parameters:
Input and output parameters
To define the text to display for an input or output parameter in the process designer, use the following pattern with .NET Attributes:
[Input("Integer input")]
public InArgument<int> IntInput { get; set; }
or
[Output("Integer output")]
public OutArgument<int> IntOutput { get; set; }
A single property in your class can be both an input and output parameter by including both attributes:
[Input("Int input")]
[Output("Int output")]
public InOutArgument<int> IntParameter { get; set; }
Required values
To make an input parameter required when using the workflow activity in a process, use the [RequiredArgument] attribute.
Default values
When you pass a value as an input parameter or set an output parameter without defining the value, specify a default value. For example, the following code sets the default value for a bool property:
[Input("Bool input")]
[Default("True")]
public InArgument<bool> Bool { get; set; }
The format for the default value depends on the type of property. Examples are in the following table:
| Type | Example |
|---|---|
| bool | [Default("True")] |
| DateTime | [Default("2004-07-09T02:54:00Z")] |
| Decimal | [Default("23.45")] |
| Double | [Default("23.45")] |
| Money | [Default("23.45")] |
| EntityReference | [Default("3B036E3E-94F9-DE11-B508-00155DBA2902", "account")] |
| int | [Default("23")] |
| OptionSetValue | [Default("3")] |
| string | [Default("string default")] |
EntityReference parameters
When you define a property for an EntityReference parameter, use the ReferenceTarget attribute. This attribute establishes which type of table is permitted. For example:
[Input("EntityReference input")]
[Output("EntityReference output")]
[ReferenceTarget("account")]
public InOutArgument<EntityReference> AccountReference { get; set; }
OptionSetValue parameters
When you define a property for an OptionSetValue parameter, use the AttributeTarget attribute. This attribute defines which table and column contains the valid set of values for the parameter. For example:
[Input("Account IndustryCode value")]
[AttributeTarget("account", "industrycode")]
[Default("3")]
public InArgument<OptionSetValue> IndustryCode { get; set; }
Add your code to the Execute method
The logic you include in the CodeActivity.Execute(CodeActivityContext) Method defines what your workflow activity does.
Important
Write the code in the Execute method to be stateless. Don't use global or member variables to pass data from one invocation to the next.
For improved performance, Dataverse caches custom workflow activity instances. Because of this caching, the constructor isn't called for every invocation of the custom workflow activity. Also, multiple system threads can execute the custom workflow activity at the same time. Use only the information that's passed via the CodeActivityContext parameter to the Execute method.
Reference parameters
To reference parameters you define for your class, use the Argument.Get or Argument.Set(ActivityContext, Object) methods. These methods require the CodeActivityContext instance that's passed to the Execute method. The following example shows how to access the value of an input parameter and set the value of an output parameter.
using Microsoft.Xrm.Sdk.Workflow;
using System.Activities;

namespace SampleWorkflowActivity
{
  public class IncrementByTen : CodeActivity
  {
    [RequiredArgument]
    [Input("Decimal input")]
    public InArgument<decimal> DecInput { get; set; }

    [Output("Decimal output")]
    public OutArgument<decimal> DecOutput { get; set; }

    protected override void Execute(CodeActivityContext context)
    {
      decimal input = DecInput.Get(context);
      DecOutput.Set(context, input + 10);
    }
  }
}
Get contextual information
When your code requires contextual information, access it by using the CodeActivityContext.GetExtension<T> method with the IWorkflowContext interface. This object is derived from the IExecutionContext interface, which provides access to many read-only properties that describe the context of the operation. The IWorkflowContext provides similar contextual information specific to the executing workflow that uses your workflow assembly.
Use the following code in your Execute function to access the IWorkflowContext:
protected override void Execute(CodeActivityContext context)
{
 IWorkflowContext workflowContext = context.GetExtension<IWorkflowContext>();
...
Important
Don't include any logic dependencies based on the context information. When someone uses your custom workflow activity in a workflow, they should set all the relevant input parameters within the designer. The output value or behavior of the custom activity should always be determined solely by the input parameters so that there are no hidden factors that change the behavior. When someone uses the custom activity in the designer, the behavior should always be predictable.
Use the SDK for .NET
When you need to perform data operations by using the SDK for .NET, access it by using the CodeActivityContext.GetExtension<T> method with the IOrganizationServiceFactory interface. From there, use the CreateOrganizationService(Nullable<Guid>) method to access an instance of the service proxy that you can use to perform data operations. The IWorkflowContext.InitiatingUserId property can be used to determine the user context to use if you want the operation to be performed in the same context as the calling process.
Use the following code in your Execute function to get access to the Organization service:
protected override void Execute(CodeActivityContext context)
{
 IWorkflowContext workflowContext = context.GetExtension<IWorkflowContext>();
 IOrganizationServiceFactory serviceFactory = context.GetExtension<IOrganizationServiceFactory>();

 // Use the context service to create an instance of IOrganizationService.
 IOrganizationService service = serviceFactory.CreateOrganizationService(workflowContext.InitiatingUserId);
...
Register your assembly
Use the Plug-in Registration tool (PRT) to register assemblies that contain custom workflow activities. This tool is the same one you use to register plug-ins. For both plug-ins and custom workflow activities, you must register the assembly to upload it to the environment. However, you don't register steps for custom workflow activities.
For custom workflow activities, specify the following properties to control what the workflow process designer displays.
| Field | Description |
|---|---|
Description |
Not visible in the UI of the process designer, but it might be useful when generating documentation from data drawn from the PluginType table that stores this information. |
FriendlyName |
User-friendly name for the plug-in. |
Name |
The name of the menu represented. |
WorkflowActivityGroupName |
The name of the submenu added to the main menu in the Dataverse process designer. |
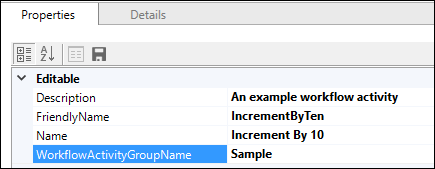
Note
These values aren't visible in the unmanaged solution when you test your workflow activity. However, when you export a managed solution that includes this workflow activity, these values are visible in the process designer.
Debug workflow activities
When you deploy custom workflow activities to Dataverse, you can capture profiles to replay for local debugging and use the tracing service to write information to a table.
The following example shows how to use the tracing service to write the message: Add your message.
protected override void Execute(CodeActivityContext context)
{
//Create the tracing service
ITracingService tracingService = context.GetExtension<ITracingService>();

//Use the tracing service
tracingService.Trace("{0} {1} {2}.", "Add", "your", "message");
...
For more information, see:
Add to solution
When you register assemblies by using the plug-in registration tool, you add them to the Default solution. Don't confuse this solution with the Common Data Service Default Solution. Because the Default solution contains all the unmanaged customizations applied to the environment, before you can distribute your custom workflow activity by using a solution, you must add it to an unmanaged solution. For example, you could add it to the Common Data Service Default Solution or any unmanaged solution you created.
Manage changes to custom workflow activities
You need to maintain the code for your custom workflow activities. Because code changes can include breaking changes, you need to manage this change. Use different steps to update or upgrade your custom workflow assemblies.
When you register an assembly containing custom workflow activities, the version of the assembly is included. The registration tool extracts this information by using reflection from the assembly. You can control the version number by using the AssemblyInfo.cs file in your Visual Studio project.
You find a section at the bottom that looks like this:
// Version information for an assembly consists of the following four values:
//
//      Major Version
//      Minor Version
//      Build Number
//      Revision
//
// You can specify all the values or you can default the Build and Revision Numbers
// by using the '*' as shown below:
//[assembly: AssemblyVersion("1.0.0.*")]
[assembly: AssemblyVersion("1.0.0.0")]
[assembly: AssemblyFileVersion("1.0.0.0")]
This version information is important because it allows you to apply updates to deployed assemblies or upgrade assemblies when you want to include new capabilities.
Update a custom workflow activity assembly
When you fix bugs or refactor code without making significant changes to public classes or method signatures, update the assembly so that all running processes automatically start using the new version of the assembly.
To update an assembly
- Change only the Build Number and Revision values in your
AssemblyInfo.csAssemblyVersionattribute. For example, change from1.0.0.0to1.0.10.5. - Use the Plug-in Registration tool to update the assembly. For more information, see Update an assembly.
Upgrade a custom workflow activity assembly
If you make changes that include significant changes to public classes or method signatures, such as changing the parameters, you break any currently running processes defined to use the original signatures. In this case, you must upgrade the assembly. This action creates a new custom workflow activity that exposes options to define which version to apply in the process designer. This versioning allows each process using this activity to be reconfigured to adapt to the changes included in the new assembly. After all processes using the original assembly are updated to use the upgraded assembly, you can de-register the older assembly.
To upgrade an assembly
Make sure the new assembly has the same
Name,PublicKeyToken, andCultureas the existing assembly.Change the Major Version and/or Minor Version values in your
AssemblyInfo.csAssemblyVersionattribute. For example, change from1.0.0.0to2.0.0.0.Use the Plug-in Registration tool to register the assembly as a new assembly. For more information, see Register an assembly.
For each process using the custom workflow activity, deactivate the process and edit the steps that use the custom workflow activity.
You find a Version selector in the process designer that you can use to choose which version of the assembly should be used.

When all processes are converted to use the new assembly, use the Plug-in Registration tool to unregister the assembly, so it is no longer available. For more information, see Unregister components.
Performance guidance
Performance considerations for your workflow extensions are the same as for ordinary plug-ins. For more information, see Analyze plug-in performance.
Unlike an ordinary plug-in, workflow extensions don't provide the opportunity to explicitly register your code for a specific step. You don't control whether the code in your workflow extension runs synchronously or asynchronously. Code that runs synchronously requires particular care because it directly impacts the application user's experience.
As reusable components, you can add workflow extensions to any workflow or custom action. You can configure the workflow as a real-time workflow, which means it runs synchronously. Custom actions are always synchronous, but they don't participate in a database transaction unless you set Enable rollback.
Important
When a workflow extension runs in a synchronous workflow or custom action, the time spent running the code directly affects the user's experience. For this reason, workflow extensions should require no more than two seconds to complete when used synchronously. If your extension requires more time than this, document this limitation and discourage use of the extension in synchronous workflows or custom actions.
Be aware that in a synchronous workflow or custom action that participates in the transaction, any error thrown by your workflow extension causes the entire transaction to roll back. This rollback is an expensive operation that can impact performance.
Use the value in the IWorkflowContext.WorkflowMode property to determine if the workflow is running synchronously.
Real-time workflow stages
When you use a workflow extension in a real-time (synchronous) workflow, the event execution pipeline invokes the extension at specific stages. The following table shows these stages. For more information, see Event execution pipeline.
| Message | Stage |
|---|---|
| Create | PostOperation |
| Delete | PreOperation |
| Update | PreOperation or PostOperation |
Use the value in the IWorkflowContext.StageName property to detect the stage.
For the Update operation, you can configure the stage by using the Before or After options in the workflow designer. For more information, see Using real-time workflows.
If your workflow extension depends on data passed in the execution context, the stage it runs in controls whether data is available in the IWorkflowContext.InputParameters and IWorkflowContext.OutputParameters.
Note
Don't include logic dependencies based on the InputParameters and OutputParameters. Workflow extensions should depend on the configured input and output parameters so that the person using the workflow extension can understand the expected behavior without having anything hidden from them.
Entity images for workflow extensions
You can't configure entity images for workflow extensions. You only register the assembly, and the workflow activity runs in the context of the workflow. Workflow extensions entity images are available by using the key values PreBusinessEntity and PostBusinessEntity respectively for the pre and post entity images. For more information, see Entity images.
See also
Best practices and guidance regarding plug-in and workflow development
Tutorial: Create workflow extension
Sample: Create a custom workflow activity
Sample: Update next birthday using a custom workflow activity
Sample: Calculate a credit score with a custom workflow activity