Create a DLP policy to protect documents with FCI or other properties
Microsoft Purview Data Loss Prevention (DLP) policies can use classification properties or item properties to identify sensitive items. For example you can use:
- Windows Server File Classification infrastructure (FCI) properties
- SharePoint document properties
- third-party system document properties

For example, your organization might use Windows Server FCI to identify items with personal data, such as social security numbers, and then classify those documents by setting the Personally Identifiable Information property to High, Moderate, Low, Public, or Not PII based on the type and number of occurrences of personal data found in each document.
In Microsoft 365, you can create a DLP policy that identifies documents that have that property set to specific values, such as High and Medium, and then takes an action such as blocking access to those files. The same policy can have another rule that takes a different action if the property is set to Low, such as sending an email notification. This way, DLP integrates with Windows Server FCI and can help protect Office documents uploaded or shared to Microsoft 365 from Windows Server-based file servers.
A DLP policy simply looks for a specific property name/value pair. Any document property can be used, as long as the property has a corresponding managed property for SharePoint search. For example, a SharePoint site collection might use a content type named Trip Report with a required field named Customer. Whenever a person creates a trip report, they must enter the customer name. This property name/value pair can also be used in a DLP policy—for example, if you want a rule that blocks access to the document for guests when the Customer field contains Contoso.
If you want to apply your DLP policy to content with specific Microsoft 365 labels, don't follow the steps here. Instead, refer to lCreate and Deploy data loss prevention policies.
Tip
Get started with Microsoft Copilot for Security to explore new ways to work smarter and faster using the power of AI. Learn more about Microsoft Copilot for Security in Microsoft Purview.
Before you create the DLP policy
Before you can use a Windows Server FCI property or other property in a DLP policy, you need to create a managed property in the SharePoint admin center. Here's why.
In SharePoint and OneDrive, the search index is built up by crawling the content on your sites. The crawler picks up content and metadata from the documents in the form of crawled properties. The search schema helps the crawler decide what content and metadata to pick up. (Examples of metadata are the author and the title of a document.) However, to get the content and metadata from the documents into the search index, the crawled properties must be mapped to managed properties. Only managed properties are kept in the index. For example, a crawled property related to author is mapped to a managed property related to author.
Note
Be sure to use a managed property name, not a crawled property name, when creating DLP rules using the ContentPropertyContainsWords condition. This is important because DLP uses the search crawler to identify and classify sensitive information on your sites, and then stores that sensitive information in a secure portion of the search index. When you upload a document to Office 365, SharePoint automatically creates crawled properties based on the document properties. However, to use an FCI or other property in a DLP policy, that crawled property needs to be mapped to a managed property so that the content with that property is kept in the index.
For more information on search and managed properties, see Manage the search schema in SharePoint Online.
Step 1: Upload a document with the needed property to Office 365
First, you need to upload a document with the property that you want to reference in your DLP policy. Microsoft 365 will detect the property and automatically create a crawled property from it. In the next step, you'll create a managed property, and then map the managed property to this crawled property.
Step 2: Create a managed property
Sign in to the Microsoft 365 admin center.
In the left navigation pane, choose Admin centers > SharePoint. You're now in the SharePoint admin center.
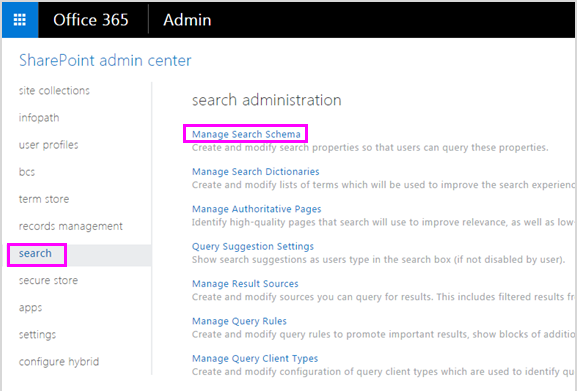
In the left navigation pane, choose search. On the search administration page, choose Manage Search Schema.

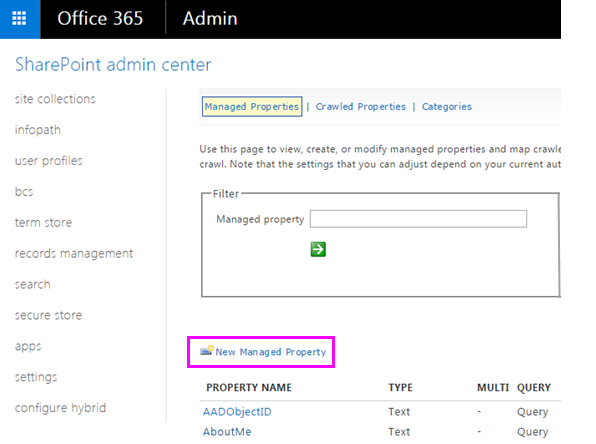
On the Managed Properties page > New Managed Property.

Enter a name and description for the property. This name is what will appear in your DLP policies.
For Type, choose Text.
Under Main characteristics, select Queryable and Retrievable.
Under Mappings to crawled properties choose Add a mapping.
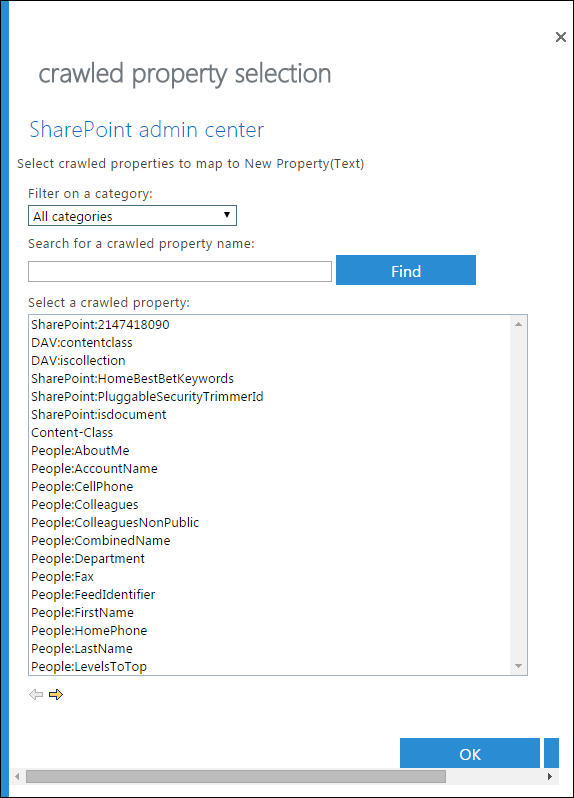
In the crawled property selection dialog box, find and select the crawled property that corresponds to the Windows Server FCI property or other property that you will use in your DLP policy, then choose OK.

At the bottom of the page choose OK.
Create a DLP policy that uses an FCI property or other property
In this example, an organization is using FCI on its Windows Server-based file servers; specifically, they're using the FCI classification property named Personally Identifiable Information with possible values of High, Moderate, Low, Public, and Not PII. Now they want to use their existing FCI classification in their DLP policies in Office 365.
To begin, they follow the steps above to create a managed property in SharePoint Online, which maps to the crawled property created automatically from the FCI property.
Next, they create a DLP policy with two rules that both use the condition Document properties contain any of these values:
FCI PII content - High, Moderate The first rule restricts access to the document if the FCI classification property Personally Identifiable Information equals High or Moderate and the document is shared with people outside the organization.
FCI PII content - Low The second rule sends a notification to the document owner if the FCI classification property Personally Identifiable Information equals Low and the document is shared with people outside the organization.
After you create the DLP policy
Completing the steps in the previous sections creates a DLP policy that will quickly detect content with that property, but only if that content is newly uploaded (so that the content's indexed), or if that content is old but just edited (so that the content's re-indexed).
To detect content with that property everywhere, you'll need to have your library, site, or site collection re-indexed, so that the DLP policy is aware of all the content with that property. In SharePoint, content is automatically crawled when content is edited. Specific SharePoint sites can't be manually re-indexed.
Caution
Re-indexing a site for DLP scenarios is not possible.
For more information, see Manually request crawling and re-indexing of a site, a library or a list.
Reindex a site (optional)
On the site, choose Settings (gear icon in upper right) > Site Settings.
Under Search, choose Search and offline availability > Reindex site.