Tutorial: Use Azure Blob Storage with SQL Server
Applies to:
SQL Server 2016 (13.x) and later versions
This tutorial helps you understand how to use the Azure Blob Storage for data files and backups in SQL Server 2016 and later versions.
SQL Server integration support for Azure Blob Storage began as a SQL Server 2012 Service Pack 1 CU2 enhancement, and was enhanced further with SQL Server 2014 and SQL Server 2016. For an overview of the functionality and benefits of using this feature, see SQL Server Data Files in Microsoft Azure.
This tutorial shows you how to work with SQL Server Data Files in Azure Blob Storage in multiple sections. Each section is focused on a specific task and the sections should be completed in sequence. First, you will learn how to create a new container in Blob Storage with a stored access policy and a shared access signature. Then, you will learn how to create a SQL Server credential to integrate SQL Server with Azure Blob Storage. Next, you will back up a database to Blob Storage and restore it to an Azure virtual machine. You will then use SQL Server file-snapshot transaction log backup to restore to a point in time and to a new database. Finally, the tutorial will demonstrate the use of meta data system stored procedures and functions to help you understand and work with file-snapshot backups.
Prerequisites
To complete this tutorial, you must be familiar with SQL Server backup and restore concepts and T-SQL syntax.
To use this tutorial, you need an Azure storage account, SQL Server Management Studio (SSMS), access to an instance of SQL Server on-premises, access to an Azure virtual machine (VM) running an instance of SQL Server 2016 or later version, and an AdventureWorks2022 database. Additionally, the account used to issue the BACKUP and RESTORE commands should be in the db_backupoperator database role with alter any credential permissions.
- Get a free Azure Account.
- Create an Azure storage account.
- Install SQL Server 2017 Developer Edition.
- Provision an Azure VM running SQL Server
- Install SQL Server Management Studio.
- Download AdventureWorks sample databases.
- Assign the user account to the role of db_backupoperator and grant alter any credential permissions.
Important
SQL Server does not support Azure Data Lake Storage, ensure that hierarchical namespace is not enabled on the storage account used for this tutorial.
1 - Create stored access policy and shared access storage
In this section, you will use an Azure PowerShell script to create a shared access signature on an Azure Blob Storage container using a stored access policy.
Note
This script is written using Azure PowerShell 5.0.10586.
A shared access signature is a URI that grants restricted access rights to containers, blobs, queues, or tables. A stored access policy provides an additional level of control over shared access signatures on the server side including revoking, expiring, or extending access. When using this new enhancement, you need to create a policy on a container with at least read, write, and list rights.
You can create a stored access policy and a shared access signature by using Azure PowerShell, the Azure Storage SDK, the Azure REST API, or a third-party utility. This tutorial demonstrates how to use an Azure PowerShell script to complete this task. The script uses the Resource Manager deployment model and creates the following new resources
- Resource group
- Storage account
- Azure Blob Storage container
- SAS policy
This script starts by declaring a number of variables to specify the names for the above resources and the names of the following required input values:
- A prefix name used in naming other resource objects
- Subscription name
- Data center location
The script completes by generating the appropriate CREATE CREDENTIAL statement that you will use in 2 - Create a SQL Server credential using a shared access signature. This statement is copied to your clipboard for you and is output to the console for you to see.
To create a policy on the container and generate a Shared Access Signature (SAS), follow these steps:
Open Window PowerShell or Windows PowerShell ISE (see version requirements above).
Edit and then execute the below script:
# Define global variables for the script
$prefixName = '<a prefix name>'  # used as the prefix for the name for various objects
$subscriptionID = '<your subscription ID>'   # the ID  of subscription name you will use
$locationName = '<a data center location>'  # the data center region you will use
$storageAccountName= $prefixName + 'storage' # the storage account name you will create or use
$containerName= $prefixName + 'container'  # the storage container name to which you will attach the SAS policy with its SAS token
$policyName = $prefixName + 'policy' # the name of the SAS policy

# Set a variable for the name of the resource group you will create or use
$resourceGroupName=$prefixName + 'rg'

# Add an authenticated Azure account for use in the session
Connect-AzAccount

# Set the tenant, subscription and environment for use in the rest of
Set-AzContext -SubscriptionId $subscriptionID

# Create a new resource group - comment out this line to use an existing resource group
New-AzResourceGroup -Name $resourceGroupName -Location $locationName

# Create a new Azure Resource Manager storage account - comment out this line to use an existing Azure Resource Manager storage account
New-AzStorageAccount -Name $storageAccountName -ResourceGroupName $resourceGroupName -Type Standard_RAGRS -Location $locationName

# Get the access keys for the Azure Resource Manager storage account
$accountKeys = Get-AzStorageAccountKey -ResourceGroupName $resourceGroupName -Name $storageAccountName

# Create a new storage account context using an Azure Resource Manager storage account
$storageContext = New-AzStorageContext -StorageAccountName $storageAccountName -StorageAccountKey $accountKeys[0].Value

# Creates a new container in Blob Storage
$container = New-AzStorageContainer -Context $storageContext -Name $containerName

# Sets up a Stored Access Policy and a Shared Access Signature for the new container
$policy = New-AzStorageContainerStoredAccessPolicy -Container $containerName -Policy $policyName -Context $storageContext -StartTime $(Get-Date).ToUniversalTime().AddMinutes(-5) -ExpiryTime $(Get-Date).ToUniversalTime().AddYears(10) -Permission rwld

# Gets the Shared Access Signature for the policy
$sas = New-AzStorageContainerSASToken -name $containerName -Policy $policyName -Context $storageContext
Write-Host 'Shared Access Signature= '$($sas.Substring(1))''

# Sets the variables for the new container you just created
$container = Get-AzStorageContainer -Context $storageContext -Name $containerName
$cbc = $container.CloudBlobContainer

# Outputs the Transact SQL to the clipboard and to the screen to create the credential using the Shared Access Signature
Write-Host 'Credential T-SQL'
$tSql = "CREATE CREDENTIAL [{0}] WITH IDENTITY='Shared Access Signature', SECRET='{1}'" -f $cbc.Uri,$sas.Substring(1)
$tSql | clip
Write-Host $tSql

# Once you're done with the tutorial, remove the resource group to clean up the resources.
# Remove-AzResourceGroup -Name $resourceGroupName
After the script completes, the CREATE CREDENTIAL statement will be in your clipboard for use in the next section.
2 - Create a SQL Server credential using a shared access signature
In this section, you will create a credential to store the security information that will be used by SQL Server to write to and read from the Azure Blob Storage container that you created in the previous step.
A SQL Server credential is an object that is used to store authentication information required to connect to a resource outside of SQL Server. The credential stores the URI path of the Azure Blob Storage container and the shared access signature for this container.
To create a SQL Server credential, follow these steps:
Launch SSMS.
Open a new query window and connect to the SQL Server instance of the database engine in your on-premises environment.
In the new query window, paste the CREATE CREDENTIAL statement with the shared access signature from section 1 and execute that script.
The script will look like the following code.
/* Example:
USE master
CREATE CREDENTIAL [https://msfttutorial.blob.core.windows.net/containername]
WITH IDENTITY='SHARED ACCESS SIGNATURE'
, SECRET = 'sharedaccesssignature'
GO */

USE master
CREATE CREDENTIAL [https://<mystorageaccountname>.blob.core.windows.net/<mystorageaccountcontainername>]
  -- this name must match the container path, start with https and must not contain a forward slash at the end
WITH IDENTITY='SHARED ACCESS SIGNATURE'
  -- this is a mandatory string and should not be changed
 , SECRET = 'sharedaccesssignature'
   -- this is the shared access signature key that you obtained in section 1.
GO
To see all available credentials, you can run the following statement in a query window connected to your instance:
SELECT * from sys.credentialsOpen a new query window and connect to the SQL Server instance of the database engine in your Azure virtual machine.
In the new query window, paste the CREATE CREDENTIAL statement with the shared access signature from section 1 and execute that script.
Repeat steps 5 and 6 for any additional SQL Server instances that you wish to have access to the container.
3 - Database BACKUP to URL
In this section, you will back up the AdventureWorks2022 database in your SQL Server instance to the container that you created in Section 1.
Note
If you wish to backup a SQL Server 2012 (11.x) SP1 CU2+ database or a SQL Server 2014 (12.x) database to this container, you can use the deprecated syntax documented here to backup to URL using the WITH CREDENTIAL syntax.
To back up a database to blob storage, follow these steps:
Launch SSMS.
Open a new query window and connect to the SQL Server instance in your Azure virtual machine.
Copy and paste the following Transact-SQL script into the query window. Modify the URL appropriately for your storage account name and the container that you specified in section 1 and then execute this script.
-- To permit log backups, before the full database backup, modify the database to use the full recovery model.
USE master;
ALTER DATABASE AdventureWorks2022
   SET RECOVERY FULL;

-- Back up the full AdventureWorks2022 database to the container that you created in section 1
BACKUP DATABASE AdventureWorks2022
   TO URL = 'https://<mystorageaccountname>.blob.core.windows.net/<mystorageaccountcontainername>/AdventureWorks2022_onprem.bak'
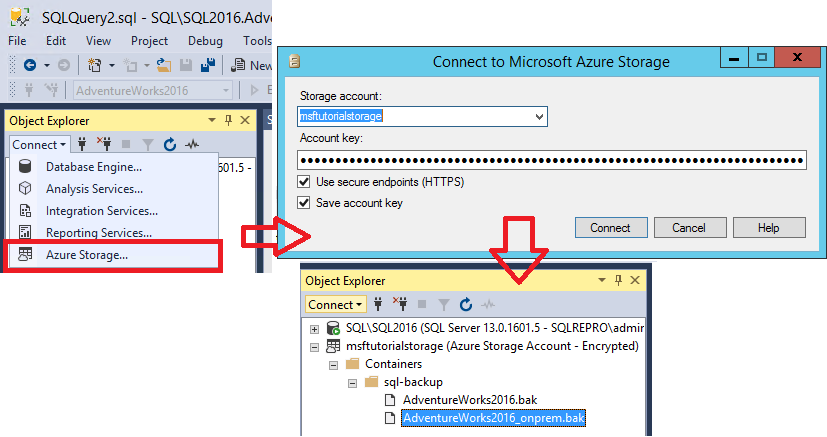
Open Object Explorer and connect to Azure storage using your storage account and account key.
- Expand Containers, expand the container that you created in section 1 and verify that the backup from step 3 above appears in this container.
4 - Restore database to virtual machine from URL
In this section, you will restore the AdventureWorks2022 database to your SQL Server instance in your Azure virtual machine.
Note
For the purposes of simplicity in this tutorial, we are using the same container for the data and log files that we used for the database backup. In a production environment, you would likely use multiple containers, and frequently multiple data files as well. You could also consider striping your backup across multiple blobs to increase backup performance when backing up a large database.
To restore the AdventureWorks2022 database from Azure Blob Storage to your SQL Server instance in your Azure virtual machine, follow these steps:
Launch SSMS.
Open a new query window and connect to the SQL Server instance of the database engine in your Azure virtual machine.
Copy and paste the following Transact-SQL script into the query window. Modify the URL appropriately for your storage account name and the container that you specified in section 1 and then execute this script.
-- Restore AdventureWorks2022 from URL to SQL Server instance using Azure Blob Storage for database files
RESTORE DATABASE AdventureWorks2022
   FROM URL = 'https://<mystorageaccountname>.blob.core.windows.net/<mystorageaccountcontainername>/AdventureWorks2022_onprem.bak'
   WITH
      MOVE 'AdventureWorks2022_data' to 'https://<mystorageaccountname>.blob.core.windows.net/<mystorageaccountcontainername>/AdventureWorks2022_Data.mdf'
     ,MOVE 'AdventureWorks2022_log' to 'https://<mystorageaccountname>.blob.core.windows.net/<mystorageaccountcontainername>/AdventureWorks2022_Log.ldf'
--, REPLACE
Open Object Explorer and connect to your Azure SQL Server instance.
In Object Explorer, expand the Databases node and verify that the
AdventureWorks2022database has been restored (refresh the node as necessary)- Right-click AdventureWorks2022, and select Properties.
- Select Files and verify that the paths for the two database files are URLs pointing to blobs in your Azure Blob Storage container (select Cancel when done).
] database on the Azure VM.](media/tutorial-use-azure-blob-storage-service-with-sql-server-2016/adventureworks-on-azure-vm.png?view=sql-server-ver16)
In Object Explorer, connect to Azure storage.
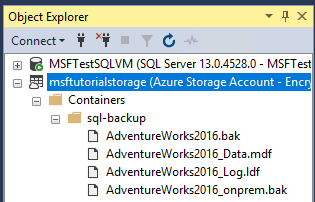
- Expand Containers, expand the container that you created in section 1 and verify that the
AdventureWorks2022_Data.mdfandAdventureWorks2022_Log.ldffrom step 3 above appears in this container, along with the backup file from section 3 (refresh the node as necessary).
- Expand Containers, expand the container that you created in section 1 and verify that the
5 - Backup database using file-snapshot backup
In this section, you will back up the AdventureWorks2022 database in your Azure virtual machine using file-snapshot backup to perform a nearly instantaneous backup using Azure snapshots. For more information on file-snapshot backups, see File-Snapshot Backups for Database Files in Azure
To back up the AdventureWorks2022 database using file-snapshot backup, follow these steps:
Launch SSMS.
Open a new query window and connect to the SQL Server instance of the database engine in your Azure virtual machine.
Copy, paste, and execute the following Transact-SQL script into the query window (do not close this query window - you will execute this script again in step 5. This system stored procedure enables you to view the existing file snapshot backups for each file that comprises a specified database. You will notice that there are no file snapshot backups for this database.
-- Verify that no file snapshot backups exist
SELECT * FROM sys.fn_db_backup_file_snapshots ('AdventureWorks2022');
Copy and paste the following Transact-SQL script into the query window. Modify the URL appropriately for your storage account name and the container that you specified in section 1 and then execute this script. Notice how quickly this backup occurs.
-- Backup the AdventureWorks2022 database with FILE_SNAPSHOT
BACKUP DATABASE AdventureWorks2022
   TO URL = 'https://<mystorageaccountname>.blob.core.windows.net/<mystorageaccountcontainername>/AdventureWorks2022_Azure.bak'
   WITH FILE_SNAPSHOT;
After verifying that the script in step 4 executed successfully, execute the following script again. Notice that the file-snapshot backup operation in step 4 generated file-snapshots of both the data and log file.
-- Verify that two file-snapshot backups exist
SELECT * FROM sys.fn_db_backup_file_snapshots ('AdventureWorks2022');
In Object Explorer, in your SQL Server instance in your Azure virtual machine, expand the Databases node and verify that the
AdventureWorks2022database has been restored to this instance (refresh the node as necessary).In Object Explorer, connect to Azure storage.
Expand Containers, expand the container that you created in section 1 and verify that the
AdventureWorks2022_Azure.bakfrom step 4 above appears in this container, along with the backup file from section 3 and the database files from section 4 (refresh the node as necessary).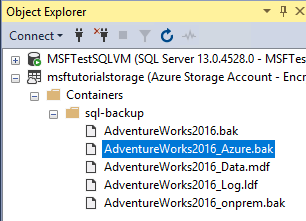
6 - Generate activity and backup log using file-snapshot backup
In this section, you will generate activity in the AdventureWorks2022 database and periodically create transaction log backups using file-snapshot backups. For more information on using file snapshot backups, see File-Snapshot Backups for Database Files in Azure.
To generate activity in the AdventureWorks2022 database and periodically create transaction log backups using file-snapshot backups, follow these steps:
Launch SSMS.
Open two new query windows and connect each to the SQL Server instance of the database engine in your Azure virtual machine.
Copy, paste, and execute the following Transact-SQL script into one of the query windows. Notice that the
Production.Locationtable has 14 rows before we add new rows in step 4.-- Verify row count at start SELECT COUNT (*) from AdventureWorks2022.Production.Location;Copy and paste the following two Transact-SQL scripts into the two separate query windows. Modify the URL appropriately for your storage account name and the container that you specified in section 1 and then execute these scripts simultaneously in separate query windows. These scripts will take about seven minutes to complete.
-- Insert 30,000 new rows into the Production.Location table in the AdventureWorks2022 database in batches of 75
DECLARE @count INT=1, @inner INT;
WHILE @count < 400
   BEGIN
      BEGIN TRAN;
         SET @inner =1;
            WHILE @inner <= 75
               BEGIN;
                  INSERT INTO AdventureWorks2022.Production.Location
                     (Name, CostRate, Availability, ModifiedDate)
                        VALUES (NEWID(), .5, 5.2, GETDATE());
                  SET @inner = @inner + 1;
               END;
      COMMIT;
   WAITFOR DELAY '00:00:01';
   SET @count = @count + 1;
   END;
SELECT COUNT (*) from AdventureWorks2022.Production.Location;
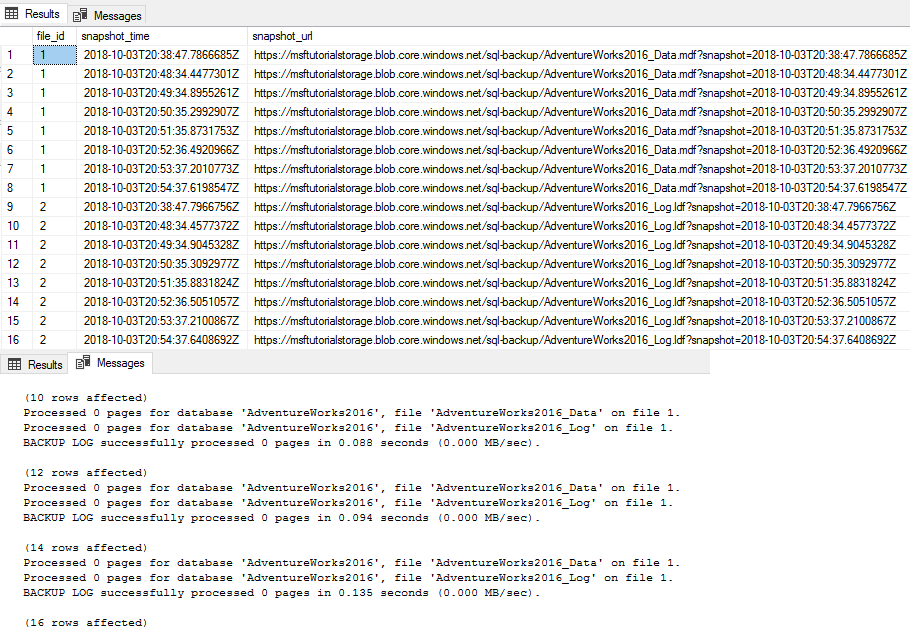
--take 7 transaction log backups with FILE_SNAPSHOT, one per minute, and include the row count and the execution time in the backup file name DECLARE @count INT=1, @device NVARCHAR(120), @numrows INT; WHILE @count <= 7 BEGIN SET @numrows = (SELECT COUNT (*) FROM AdventureWorks2022.Production.Location); SET @device = 'https://<mystorageaccountname>.blob.core.windows.net/<mystorageaccountcontainername>/tutorial-' + CONVERT (varchar(10),@numrows) + '-' + FORMAT(GETDATE(), 'yyyyMMddHHmmss') + '.bak'; BACKUP LOG AdventureWorks2022 TO URL = @device WITH FILE_SNAPSHOT; SELECT * from sys.fn_db_backup_file_snapshots ('AdventureWorks2022'); WAITFOR DELAY '00:1:00'; SET @count = @count + 1; END;Review the output of the first script and notice that final row count is now 29,939.

Review the output of the second script and notice that each time the BACKUP LOG statement is executed that two new file snapshots are created, one file snapshot of the log file and one file snapshot of the data file - for a total of two file snapshots for each database file. After the second script completes, notice that there are now a total of 16 file snapshots, 8 for each database file - one from the BACKUP DATABASE statement and one for each execution of the BACKUP LOG statement.
In Object Explorer, connect to Azure storage.
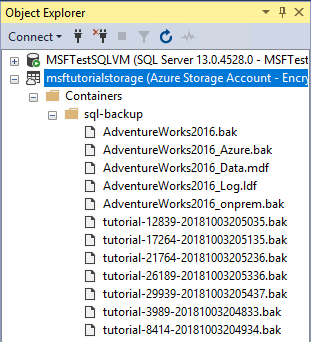
Expand Containers, expand the container that you created in section 1 and verify that seven new backup files appear, along with the data files from the previous sections (refresh the node as needed).
7 - Restore a database to a point in time
In this section, you will restore the AdventureWorks2022 database to a point in time between two of the transaction log backups.
With traditional backups, to accomplish point in time restore, you would need to use the full database backup, perhaps a differential backup, and all of the transaction log files up to and just past the point in time to which you wish to restore. With file-snapshot backups, you only need the two adjacent log backup files that provide the goal posts framing the time to which you wish to restore. You only need two log file snapshot backup sets because each log backup creates a file snapshot of each database file (each data file and the log file).
To restore a database to a specified point in time from file snapshot backup sets, follow these steps:
Launch SSMS.
Open a new query window and connect to the SQL Server instance of the database engine in your Azure virtual machine.
Copy, paste, and execute the following Transact-SQL script into the query window. Verify that the
Production.Locationtable has 29,939 rows before we restore it to a point in time when there are fewer rows in step 4.-- Verify row count at start SELECT COUNT (*) from AdventureWorks2022.Production.Location
Copy and paste the following Transact-SQL script into the query window. Select two adjacent log backup files and convert the file name into the date and time you will need for this script. Modify the URL appropriately for your storage account name and the container that you specified in section 1, provide the first and second backup file names, provide the STOPAT time in the format of "June 26, 2018 01:48 PM" and then execute this script. This script will take a few minutes to complete
-- restore and recover to a point in time between the times of two transaction log backups, and then verify the row count
ALTER DATABASE AdventureWorks2022 SET SINGLE_USER WITH ROLLBACK IMMEDIATE;
RESTORE DATABASE AdventureWorks2022
   FROM URL = 'https://<mystorageaccountname>.blob.core.windows.net/<mystorageaccountcontainername>/<firstbackupfile>.bak'
   WITH NORECOVERY,REPLACE;
RESTORE LOG AdventureWorks2022
   FROM URL = 'https://<mystorageaccountname>.blob.core.windows.net/<mystorageaccountcontainername>/<secondbackupfile>.bak'
   WITH RECOVERY, STOPAT = 'June 26, 2018 01:48 PM';
ALTER DATABASE AdventureWorks2022 set multi_user;
-- get new count
SELECT COUNT (*) FROM AdventureWorks2022.Production.Location ;
Review the output. Notice that after the restore the row count is 18,389, which is a row count number between log backup 5 and 6 (your row count will vary).

8 - Restore as new database from log backup
In this section, you will restore the AdventureWorks2022 database as a new database from a file-snapshot transaction log backup.
In this scenario, you are performing a restore to a SQL Server instance on a different virtual machine for the purposes of business analysis and reporting. Restoring to a different instance on a different virtual machine offloads the workload to a virtual machine dedicated and sized for this purpose, removing its resource requirements from the transactional system.
Restore from a transaction log backup with file-snapshot backup is very quick, substantially quicker than with traditional streaming backups. With traditional streaming backups, you would need to use the full database backup, perhaps a differential backup, and some or all of the transaction log backups (or a new full database backup). However, with file-snapshot log backups, you only need the most recent log backup (or any other log backup or any two adjacent log backups for point in time restore to a point between two log backup times). To be clear, you only need one log file-snapshot backup set because each file-snapshot log backup creates a file snapshot of each database file (each data file and the log file).
To restore a database to a new database from a transaction log backup using file snapshot backup, follow these steps:
Launch SSMS.
Open a new query window and connect to the SQL Server instance of the database engine in an Azure virtual machine.
Note
If this is a different Azure virtual machine than you have been using for the previous sections, make sure you have followed the steps in 2 - Create a SQL Server credential using a shared access signature. If you wish to restore to a different container, follow the steps in 1 - Create stored access policy and shared access storage for the new container.
Copy and paste the following Transact-SQL script into the query window. Select the log backup file you wish to use. Modify the URL appropriately for your storage account name and the container that you specified in section 1, provide the log backup file name and then execute this script.
-- restore as a new database from a transaction log backup file
RESTORE DATABASE AdventureWorks2022_EOM
    FROM URL = 'https://<mystorageaccountname>.blob.core.windows.net/<mystorageaccountcontainername>/<logbackupfile.bak>'
    WITH MOVE 'AdventureWorks2022_data' to 'https://<mystorageaccountname>.blob.core.windows.net/<mystorageaccountcontainername>/AdventureWorks2022_EOM_Data.mdf'
   , MOVE 'AdventureWorks2022_log' to 'https://<mystorageaccountname>.blob.core.windows.net/<mystorageaccountcontainername>/AdventureWorks2022_EOM_Log.ldf'
   , RECOVERY
--, REPLACE
Review the output to verify the restore was successful.
In Object Explorer, connect to Azure storage.
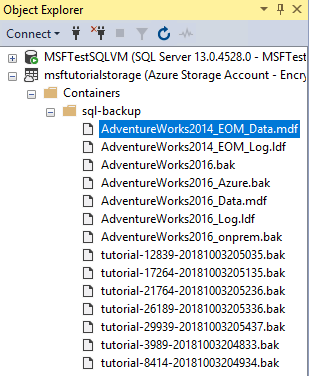
Expand Containers, expand the container that you created in section 1 (refresh if necessary) and verify that the new data and log files appear in the container, along with the blobs from the previous sections.
9 - Manage backup sets and file-snapshot backups
In this section, you will delete a backup set using the sp_delete_backup (Transact-SQL) system stored procedure. This system stored procedure deletes the backup file and the file snapshot on each database file associated with this backup set.
Note
If you attempt to delete a backup set by simply deleting the backup file from the Azure Blob Storage container, you will only delete the backup file itself - the associated file snapshots will remain. If you find yourself in this scenario, use the sys.fn_db_backup_file_snapshots (Transact-SQL) system function to identify the URL of the orphaned file snapshots and use the sp_delete_backup_file_snapshot (Transact-SQL) system stored procedure to delete each orphaned file snapshot. For more information, see File-Snapshot Backups for Database Files in Azure.
To delete a file-snapshot backup set, follow these steps:
Launch SSMS.
Open a new query window and connect to the SQL Server instance of the database engine in your Azure virtual machine (or to any SQL Server instance with permissions to read and write on this container).
Copy and paste the following Transact-SQL script into the query window. Select the log backup you wish to delete along with its associated file snapshots. Modify the URL appropriately for your storage account name and the container that you specified in section 1, provide the log backup file name and then execute this script.
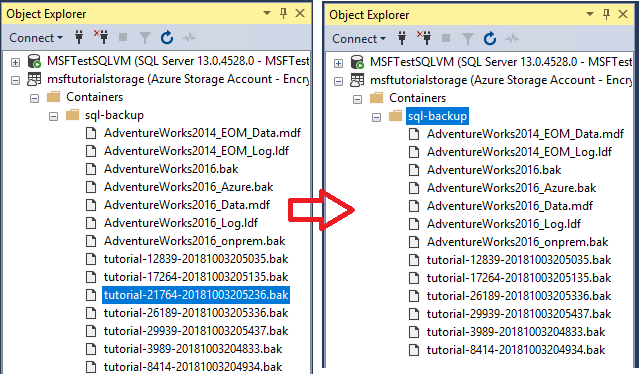
sys.sp_delete_backup 'https://<mystorageaccountname>.blob.core.windows.net/<mystorageaccountcontainername>/tutorial-21764-20181003205236.bak';In Object Explorer, connect to Azure storage.
Expand Containers, expand the container that you created in section 1 and verify that the backup file you used in step 3 no longer appears in this container (refresh the node as necessary).
Copy, paste, and execute the following Transact-SQL script into the query window to verify that two file snapshots have been deleted.
-- verify that two file snapshots have been removed
SELECT * from sys.fn_db_backup_file_snapshots ('AdventureWorks2022');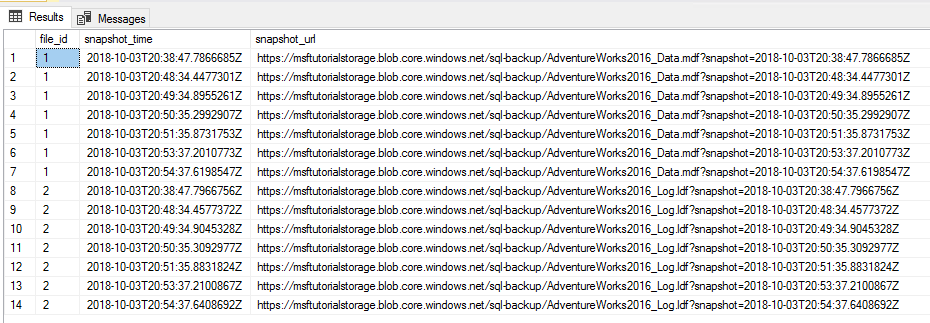
10 - Remove resources
Once you're done with this tutorial, and to conserve resources, be sure to delete the resource group created in this tutorial.
To delete the resource group, run the following PowerShell code:
# Define global variables for the script
$prefixName = '<prefix name>'  # should be the same as the beginning of the tutorial

# Set a variable for the name of the resource group you will create or use
$resourceGroupName=$prefixName + 'rg'

# Adds an authenticated Azure account for use in the session
Connect-AzAccount

# Set the tenant, subscription and environment for use in the rest of
Set-AzContext -SubscriptionId $subscriptionID

# Remove the resource group
Remove-AzResourceGroup -Name $resourceGroupName
Next steps
- SQL Server Data Files in Microsoft Azure
- File-Snapshot Backups for Database Files in Azure
- SQL Server Backup to URL
- Shared Access Signatures, Part 1: Understanding the SAS Model
- Create Container
- Set Container ACL
- Get Container ACL
- Credentials (Database Engine)
- CREATE CREDENTIAL (Transact-SQL)
- sys.credentials (Transact-SQL)
- sp_delete_backup (Transact-SQL)
- sys.fn_db_backup_file_snapshots (Transact-SQL)
- sp_delete_backup_file_snapshot (Transact-SQL)
- File-Snapshot Backups for Database Files in Azure