Note
Access to this page requires authorization. You can try signing in or changing directories.
Access to this page requires authorization. You can try changing directories.
This quickstart shows you how to quickly create a NuGet package from a .NET class library and publish it to nuget.org by using the .NET command-line interface, or dotnet CLI.
Prerequisites
The .NET SDK, which provides the dotnet command-line tool. Starting in Visual Studio 2017, the dotnet CLI automatically installs with any .NET or .NET Core related workloads.
A free account on nuget.org. Follow the instructions at Add a new individual account.
Create a class library project
You can use an existing .NET Class Library project for the code you want to package, or create a simple project as follows:
- Create a folder named AppLogger.
- Open a command prompt and switch to the AppLogger folder. All the dotnet CLI commands in this quickstart run on the current folder by default.
- Enter
dotnet new classlib, which creates a project with the current folder name.
For more information, see dotnet new.
Add package metadata to the project file
Every NuGet package has a manifest that describes the package's contents and dependencies. In the final package, the manifest is a .nuspec file, which uses the NuGet metadata properties you include in the project file.
Open the .csproj, .fsproj, or .vbproj project file, and add the following properties inside the existing <PropertyGroup> tag. Use your own values for name and company, and replace the package identifier with a unique value.
<PackageId>Contoso.08.28.22.001.Test</PackageId>
<Version>1.0.0</Version>
<Authors>your_name</Authors>
<Company>your_company</Company>
Important
The package identifier must be unique across nuget.org and other package sources. Publishing makes the package publicly visible, so if you use the example AppLogger library or other test library, use a unique name that includes Sample or Test.
You can add any optional properties described in NuGet metadata properties.
Note
For packages you build for public consumption, pay special attention to the PackageTags property. Tags help others find your package and understand what it does.
Run the pack command
To build a NuGet package or .nupkg file from the project, run the dotnet pack command, which also builds the project automatically.
dotnet pack
The output shows the path to the .nupkg file:
MSBuild version 17.3.0+92e077650 for .NET
  Determining projects to restore...
  Restored C:\Users\myname\source\repos\AppLogger\AppLogger.csproj (in 64 ms).
  AppLogger -> C:\Users\myname\source\repos\AppLogger\bin\Debug\net6.0\AppLogger.dll
  Successfully created package 'C:\Users\myname\source\repos\AppLogger\bin\Debug\Contoso.08.28.22.001.Test.1.0.0.nupkg'.
Automatically generate package on build
To automatically run dotnet pack whenever you run dotnet build, add the following line to your project file within <PropertyGroup>:
<GeneratePackageOnBuild>true</GeneratePackageOnBuild>
Publish the package
Publish your .nupkg file to nuget.org by using the dotnet nuget push command with an API key you get from nuget.org.
Note
Nuget.org scans all uploaded packages for viruses and rejects any packages that contain viruses. Nuget.org also scans all existing listed packages periodically.
Packages you publish to nuget.org are publicly visible to other developers unless you unlist them. To host packages privately, see Hosting your own NuGet feeds.
Get your API key
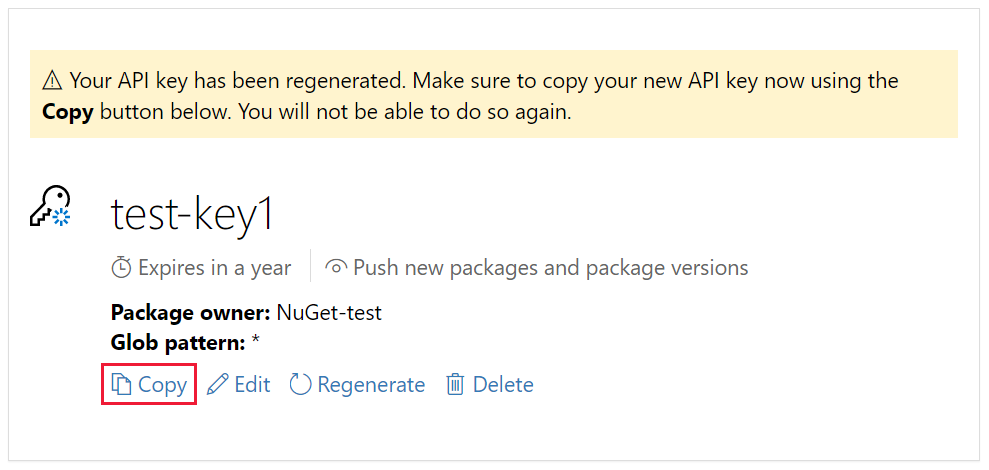
Sign in to your nuget.org account or create an account if you don't have one already.
In the upper-right corner, select your user name, and then select API Keys.
Select Create, and then enter a name for your key.
Under Select Scopes, select Push.
Under Select Packages, for Glob Pattern, enter an asterisk (*).
Select Create.
Select Copy to copy the new key.
Important
- Always keep your API key a secret. The API key is like a password that anyone can use to manage packages on your behalf. Delete or regenerate your API key if it's accidentally revealed.
- Save your key in a secure location, because you can't copy the key again later. If you return to the API key page, you need to regenerate the key to copy it. You can also remove the API key if you no longer want to push packages.
Scoping provides a way to create separate API keys for different purposes. Each key has an expiration time frame, and you can scope the key to specific packages or glob patterns. You also scope each key to specific operations: Push new packages and package versions, push only new package versions, or unlist.
Through scoping, you can create API keys for different people who manage packages for your organization so they have only the permissions they need.
For more information, see Scoped API keys.
Publish with dotnet nuget push
From the folder that contains the .nupkg file, run the following command. Replace <package-file> with the name of your .nupkg file, and replace <API-key> with your API key.
dotnet nuget push <package-file> --api-key <API-key> --source https://api.nuget.org/v3/index.json
The output shows the results of the publishing process:
Pushing <package-file> to 'https://www.nuget.org/api/v2/package'...
  PUT https://www.nuget.org/api/v2/package/
  Created https://www.nuget.org/api/v2/package/ 2891ms
Your package was pushed.
For more information, see dotnet nuget push.
Publish errors
When you run the push command, you sometimes encounter an error. For instance, you might get an error in the following situations:
- Your API key is invalid or expired.
- You try to publish a package that has an identifier that already exists on the host.
- You make changes to a published package, but you forget to update the version number before you try to publish it again.
The error message typically indicates the source of the problem.
For example, suppose the identifier Contoso.App.Logger.Test exists on nuget.org. If you try to publish a package with that identifier, you get the following error:
Response status code does not indicate success: 403 (The specified API key is invalid, has expired, or does not have permission to access the specified package.).
To address this situation, check the scope, expiration date, and value of your API key. If the key is valid, the error indicates that the package identifier already exists on the host. To overcome the problem, change the package identifier to be unique, rebuild the project, re-create the .nupkg file, and retry the push command.
Manage the published package
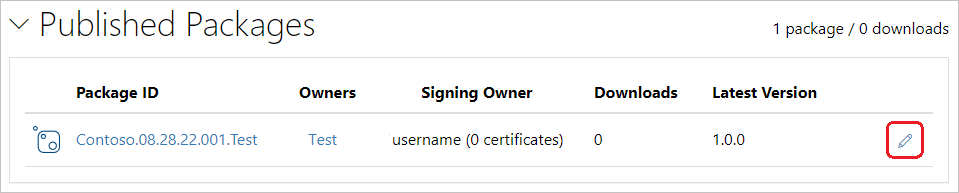
When your package is successfully published, you receive a confirmation email. To see the published package, go to nuget.org, select your user name in the upper-right corner, and then select Manage Packages.
Note
It might take a while for your package to be indexed and to appear in search results where others can find it. During that time, your package appears under Unlisted Packages, and the package page shows the following message:

Now that your NuGet package is published at nuget.org, other developers can use it in their projects.
If you create a package that isn't useful (such as this sample package from an empty class library), or if you don't want the package to be visible, you can unlist the package to hide it from search results:
After the package appears under Published Packages on the Manage Packages page, select the pencil icon next to the package listing.
On the next page, select Listing, clear the List in search results checkbox, and then select Save.
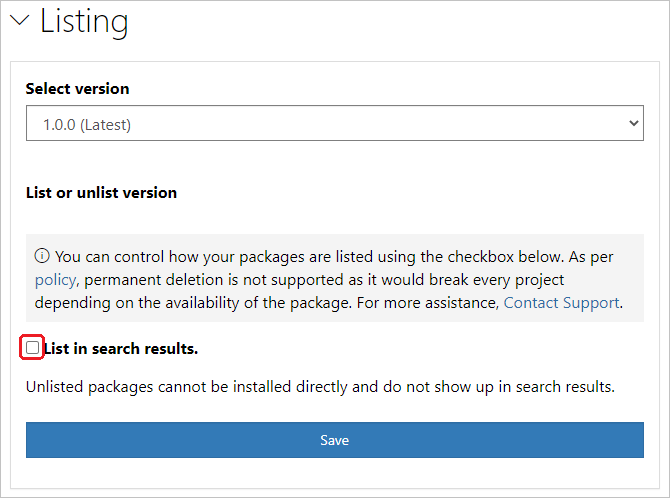
The package now appears under Unlisted Packages in Manage Packages and no longer appears in search results.
Note
To avoid your test package being live on nuget.org, you can push to the nuget.org test site at https://int.nugettest.org. Note that packages uploaded to int.nugettest.org might not be preserved.
Congratulations on creating and publishing your first NuGet package!
Related video
Find more NuGet videos on Channel 9 and YouTube.
Next steps
See more details about how to create packages with the dotnet CLI:
Get more information about creating and publishing NuGet packages: