Note
Access to this page requires authorization. You can try signing in or changing directories.
Access to this page requires authorization. You can try changing directories.
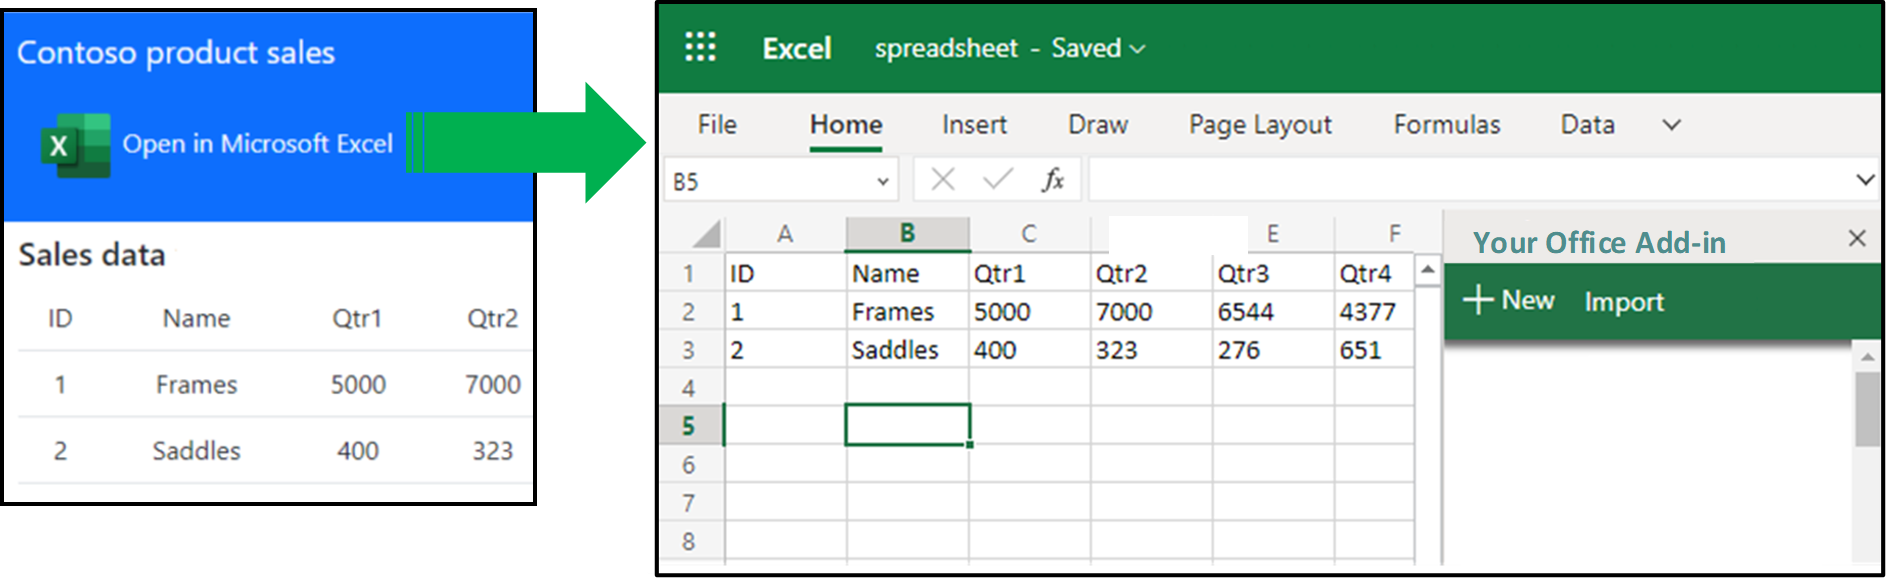
Microsoft partners with SaaS web applications know that their customers often want to open their data from a web page in an Excel spreadsheet. They use Excel to do analysis on the data, or other types of number crunching. Then they upload the data back to the web site.
Instead of multiple steps to export the data from the web site to a .csv file, import the .csv file into Excel, work with the data, then export it from Excel, and upload it back to the web site, you can simplify this process to one button click.
This article shows how to add an Excel button to your web site. When a customer chooses the button, it automatically creates a new spreadsheet with the requested data, uploads it to the customer's OneDrive, and opens it in Excel on a new browser tab. With one click the requested data is opened in Excel and formatted correctly. Additionally the pattern embeds your own Office Add-in inside the spreadsheet so that customers can still access your services from the context of Excel.
Microsoft partners who implemented this pattern have seen increased customer satisfaction. They've also seen a significant increase in engagement with their add-ins by embedding them in the Excel spreadsheet. If you have a web site for customers to work with data, consider implementing this pattern in your own solution.
Prerequisites
- Node.js version 16 or later.
- Visual Studio Code.
- A Microsoft 365 account. You can get one if you qualify for a Microsoft 365 E5 developer subscription through the Microsoft 365 Developer Program; for details, see the FAQ. Alternatively, you can sign up for a 1-month free trial or purchase a Microsoft 365 plan.
- At least a few files and folders stored on OneDrive for Business in your Microsoft 365 subscription.
Run the sample code
The sample code for this article is named Create an Excel workbook from a web site with an auto-open task pane. To run the sample, follow the instructions in the readme.
Solution architecture

The solution described in this article adds an Open in Microsoft Excel button to the web site and interacts with a Node.js server API and the Microsoft Graph API. The following sequence of events occurs when the user wants to open their data in a new Excel spreadsheet.
- The user selects the Open in Microsoft Excel button. The web page passes the data to an API endpoint on the Node.js server.
- The server uses the ExcelJS library to create a new Excel spreadsheet in memory. It populates the spreadsheet with the data and embeds your Office Add-in.
- The server returns the spreadsheet as a binary blob to the web page.
Important
The sample code is designed for development and demonstration purposes only. In a production environment, you must implement authentication and authorization for the
/api/create-spreadsheetendpoint to ensure only authorized users can generate spreadsheets. Without proper security measures, bad actors could exploit this endpoint to generate excessive spreadsheets, consume server resources, or access data inappropriately. - The web page calls the Microsoft Graph API to upload the spreadsheet to the user's OneDrive.
- Microsoft Graph returns the web url location of the new spreadsheet file.
- The web page opens a new browser tab to open the spreadsheet at the web url. The spreadsheet contains the data and your embedded add-in.
Key parts of the solution
The solution consists of a Node.js web application that serves both the client-side web pages and provides an API endpoint for creating spreadsheets. The following sections describe important concepts and implementation details for constructing the solution. A full reference implementation can be found in the sample code for additional implementation details.
Excel button and Fluent UI

You need a button on the web site that creates the Excel spreadsheet. A best practice is to use the Fluent UI to help your users transition between Microsoft products. Always use an Office icon to indicate which Office application the web page launches. For more information, see Office Brand Icons on the Fluent UI developer portal.
Sign in the user
The sample code uses authentication built from the Microsoft identity sample named Vanilla JavaScript single-page application using MSAL.js to authenticate users to call Microsoft Graph. The authentication code is integrated directly into the web application. For more information about writing code for authentication and authorization, see this sample. For a full list of identity samples for a wide range of platforms, see Microsoft identity platform code samples.
Create the spreadsheet with ExcelJS
The sample code uses the ExcelJS library to create the spreadsheet. ExcelJS is a JavaScript library that you can use to read, manipulate, and write Excel files. The Node.js server provides an API endpoint at /api/create-spreadsheet that constructs the spreadsheet in memory and returns it as a binary blob.
To embed an add-in, the sample uses JSZip and xml2js to manipulate the Office Open XML (OOXML) structure of the Excel file.
Caution
The sample's /api/create-spreadsheet endpoint doesn't include authentication or authorization. Before deploying to production, add security measures to verify the user's identity and ensure they have permission to generate spreadsheets with the requested data. Consider implementing:
- Token-based authentication, such as JWT tokens
- Session validation
- Rate limiting to prevent abuse
- Input validation and sanitization
Populate the spreadsheet with data
The /api/create-spreadsheet endpoint in the Node.js server accepts an HTTP POST request with a JSON body containing the row and column data. The server code iterates through all rows and columns and adds them to the worksheet using ExcelJS. The data format is a simple JSON structure with rows and columns, as defined in the sample's tableData.js file.
Embed your Office Add-in inside the spreadsheet
The sample embeds a custom add-in into the spreadsheet. Embedding Office Add-ins requires manipulating the Office Open XML (OOXML) structure of the Excel file. The sample's embedAddin function in server.js performs the following operations:
- Adds
webextension1.xmlwith the add-in reference. - Adds
taskpanes.xmlto configure task pane behavior. - Updates
[Content_Types].xmlto register the web extension parts. - Updates
workbook.xml.relsto link the taskpane configuration.
Important
The auto-open feature only works if the add-in is already installed (sideloaded or deployed) on the user's machine. If the user hasn't installed the add-in, the embedded reference is ignored. For security reasons, Office Add-ins can't force themselves to open without prior user interaction.
Configure auto-open behavior
The sample demonstrates the auto-open feature, which allows the task pane to automatically open when the user opens the workbook. However, this feature requires a specific workflow.
- First open: The user opens the downloaded file. The task pane doesn't auto-open yet.
- Manual activation: The user selects the Show Task Pane button on the ribbon.
- Enable auto-open: The user selects Set auto-open ON in the task pane.
- Save the file: The user saves and closes the file.
- Subsequent opens: The task pane now automatically opens when the user reopens the file.
Office.js controls the auto-open behavior by setting the document property Office.AutoShowTaskpaneWithDocument.
function setAutoOpenOn() {
    Office.context.document.settings.set(
        'Office.AutoShowTaskpaneWithDocument',
        true
    );
    Office.context.document.settings.saveAsync();
}
This workflow is standard Office Add-in behavior. For more information, see Automatically open a task pane with a document.
Upload the spreadsheet to OneDrive
When the spreadsheet is fully constructed, the server returns it as a binary blob to the web application. Then the web application uses the Microsoft Graph API to upload the spreadsheet to the user's OneDrive. The web application creates the file in the user's OneDrive root folder with a timestamped filename, but you can modify the code to use any folder and filename you prefer.
Security considerations for production deployment
Important
The sample code is for educational purposes and isn't production-ready. Before deploying this pattern to a production environment, implement comprehensive security measures.
Secure the API endpoint
The /api/create-spreadsheet endpoint acts as a critical security boundary. Without proper protection, malicious actors can:
- Generate unlimited spreadsheets, consuming server resources and storage.
- Access data they shouldn't have permission to view.
- Launch denial-of-service attacks against your server.
Required security measures:
Authentication: Verify the user's identity before processing any request. Use established authentication protocols such as:
- OAuth 2.0 tokens
- JSON Web Tokens (JWT)
- Session-based authentication with secure cookies
Authorization: Confirm the authenticated user has permission to access the specific data they're requesting. Implement:
- Role-based access control (RBAC)
- Data-level permissions checking
- Validation that the user owns or has access to the requested data
Input validation: Always validate and sanitize input data to prevent injection attacks and ensure data integrity.
Rate limiting: Implement rate limiting to prevent abuse and protect against denial-of-service attacks.
HTTPS: Always use HTTPS in production to encrypt data in transit.
CORS configuration: Configure Cross-Origin Resource Sharing (CORS) properly to allow only trusted domains.
Additional security best practices
- Regularly update all npm packages to address security vulnerabilities by using
npm audit. - Implement logging and monitoring to detect suspicious activity.
- Use environment variables for sensitive configuration (never hard-code secrets).
- Consider implementing Content Security Policy (CSP) headers.
- Validate file sizes and content to prevent oversized or malicious spreadsheets.
Additional considerations for your solution
Everyone’s solution is different in terms of technologies and approaches. The following considerations help you plan how to modify your solution to open documents and embed your Office Add-in.
Store data in the spreadsheet when your add-in starts
If you implement add-in embedding, you can store metadata in the spreadsheet for your add-in to access. Excel provides several ways to persist data within a workbook:
- Settings API: Use Excel.SettingCollection to store settings unique to your add-in and the workbook.
- Custom properties: Use Excel.DocumentProperties.custom to store key-value pairs in the workbook's metadata.
- Custom XML data: Use Excel.Workbook.customXmlParts to store structured XML data in the workbook.
Caution
Don't store sensitive information in settings or custom properties such as auth tokens or connection strings. Data stored in the spreadsheet isn't encrypted or protected.
For complete details on persisting data in Excel workbooks, see Persist add-in state and settings.
Use single sign-on
To simplify authentication, implement single sign-on in your add-in. This approach ensures the user doesn't need to sign in a second time to access your add-in. For more information, see Enable single sign-on for Office Add-ins.
See also
Collaborate with us on GitHub
The source for this content can be found on GitHub, where you can also create and review issues and pull requests. For more information, see our contributor guide.
Office Add-ins