Note
Access to this page requires authorization. You can try signing in or changing directories.
Access to this page requires authorization. You can try changing directories.
Actionable messages allow the user to take quick actions on an email message, and Outlook add-ins allow you to extend Outlook to add new features and interactions. Now, with the Action.InvokeAddInCommand action type, you can combine these two types of integrations to create more powerful and compelling experiences. For example, you could:
- Send a welcome message as an actionable email message to new users after they sign up for your service, with an action that allows them to quickly install and start using your add-in.
- Use an add-in for more complex actions (i.e. to present a form to the user), for scenarios where a simple action input would not suffice.
- Pre-populate UI elements in your add-in before presenting UI to the user.
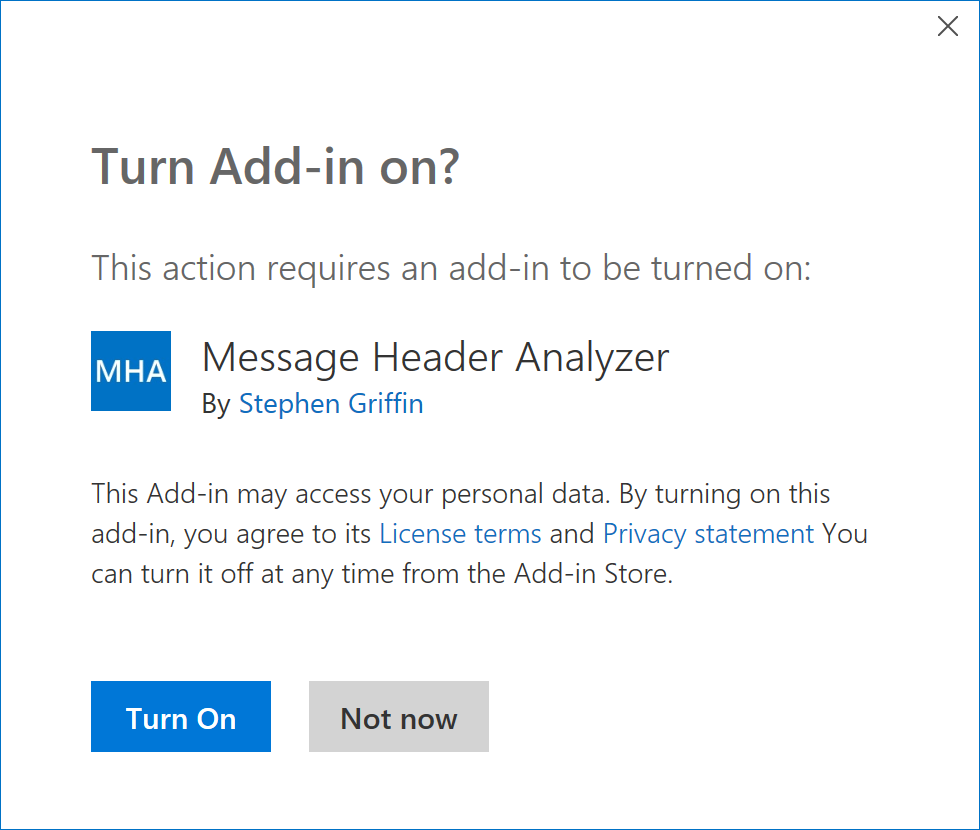
Action.InvokeAddInCommand actions can work with add-ins that are already installed by the user, or they can work with add-ins that are not installed. If the required add-in is not installed, the user is prompted to install the add-in with a single click.
Note
Single-click installation of the required add-in is only supported if the add-in is published in AppSource.
The following example shows the prompt users see if the add-in is not installed.
Invoking the add-in
Actionable messages invoke add-ins by specifying an Action.InvokeAddInCommand action in the message. This action specifies the add-in to invoke, along with the identifier of the add-in button that opens the appropriate task pane.
The required information is found in the add-in's manifest. Open the tab for the type of manifest that the add-in uses.
First, you'll need the add-in's identifier, which is specified in the "id" property.
{
  "$schema": "https://developer.microsoft.com/json-schemas/teams/v1.24/MicrosoftTeams.schema.json",
  "id": "527104a1-f1a5-475a-9199-7a968161c870",
  "version": "1.0.0",
  "manifestVersion": "1.24",

  -- other properties omitted --
}
For this add-in, the add-in identifier is 527104a1-f1a5-475a-9199-7a968161c870.
Next, you'll need the "control.id" value of the control object that defines the add-in button that opens the appropriate task pane. Keep in mind that the control object MUST:
- Be defined inside a ribbon object that includes
mailReadin its"ribbons.contexts"array. - Have its
"type"property set tobutton. - Contain an
"actionId"set to the same value as a the"actions.id"of an action object defined in the"extensions.runtimes"array.
The following shows the JSON for an extensions object that includes a control that opens a task pane.
{
  -- other properties omitted --

  "extensions": [
    {
      "runtimes": [
        {
          -- other properties omitted --

          "actions": [
            {
              -- other properties omitted --

              "id": "ShowTaskpane"
            }
          ]
        }
      ],
      "ribbons": [
        {
          "contexts": ["mailRead"],
          "tabs" [
            {
              "groups": [
                {
                  -- other properties omitted --

                  "controls" [
                    {
                      "id": "msgReadOpenPaneButton",
                      "type": "button",
                      "label": "Show Task Pane",
                      "icons": [ -- icons markup omitted -- ],
                      "supertip": {
                          "title": "Show Contoso Task Pane",
                          "description": "Opens the Contoso task pane."
                      },
                      "actionId": "ShowTaskPane"
                    }
                  ]
                }
              ]
            }
          ]
        }
      ]
    }
  ]
}
For this add-in button, the ID is msgReadOpenPaneButton.
With these two pieces of information, we can create a basic Action.InvokeAddInCommand action as follows:
{
  "type": "AdaptiveCard",
  "version": "1.0",
  "body": [
    {
      "type": "TextBlock",
      "text": "Invoking an add-in command from an Actionable Message card",
      "size": "large"
    }
  ],
  "actions": [
    {
      "type": "Action.InvokeAddInCommand",
      "title": "Invoke \"View Initialization Context\"",
      "addInId": "527104a1-f1a5-475a-9199-7a968161c870",
      "desktopCommandId": "showInitContext"
    }
  ]
}
Passing initialization data to the add-in
The Action.InvokeAddInCommand action can also provide additional context to the add-in, allowing the add-in to do more than just simply activate. For example, the action could provide initial values for a form, or provide information that allows the add-in to "deep link" to a specific item in your back-end service.
In order to pass initialization data, include an initializationContext property in the Action.InvokeAddInCommand action. There is no set schema for the initializationContext property, you can include any valid JSON object.
For example, to extend the sample action from above, we could modify the action as follows:
{
  "type": "AdaptiveCard",
  "version": "1.0",
  "body": [
    {
      "type": "TextBlock",
      "text": "Invoking an add-in command from an Actionable Message card",
      "size": "large"
    }
  ],
  "actions": [
    {
      "type": "Action.InvokeAddInCommand",
      "title": "Invoke \"View Initialization Context\"",
      "addInId": "527104a1-f1a5-475a-9199-7a968161c870",
      "desktopCommandId": "showInitContext",
      "initializationContext": {
        "property1": "Hello world",
        "property2": 5,
        "property3": true
      }
    }
  ]
}
Receiving initialization data in the add-in
If your action passes initialization data, the add-in must be prepared to receive it. Add-ins can retrieve initialization data by calling the Office.context.mailbox.item.getInitializationContextAsync method. This should be done whenever the task pane opens or loads a new message.
// Get the initialization context (if present).
Office.context.mailbox.item.getInitializationContextAsync((asyncResult) => {
  if (asyncResult.status === Office.AsyncResultStatus.Succeeded) {
    if (asyncResult.value.length > 0) {
      // The value is a string, parse to an object.
      const context = JSON.parse(asyncResult.value);
      // Do something with context.
    } else {
      // Empty context, treat as no context.
    }
  } else {
    // Handle the error.
  }
});