Note
Access to this page requires authorization. You can try signing in or changing directories.
Access to this page requires authorization. You can try changing directories.
[This article is prerelease documentation and is subject to change.]
The Copilot control is an AI assistant that you can add to your canvas apps. Copilot lets app users get insights about the data in your app through natural language conversations with an AI-powered copilot. Makers can add the control to any canvas app and choose which data provide answers.
Important
- This is a preview feature.
- Preview features aren't meant for production use and might have restricted functionality. These features are subject to supplemental terms of use, and are available before an official release so that customers can get early access and provide feedback.
Note
This feature is powered by Azure OpenAI Service.
Prerequisites
Ensure you meet the prerequisites and region availability in Copilot in Power Apps overview (preview).
Copilot doesn't work in environments that use a customer-managed key or Customer Lockbox.
Set up Copilot for your environment
To let app users, use the Copilot chat experience in a canvas app, a Power Platform admin enables Allow users to analyze data using an AI-powered chat experience in canvas and model-driven apps in the Power Platform admin center. Learn more in Manage feature settings.

Set up Copilot for your canvas app
To add a Copilot control to your canvas app, turn on Copilot component and Edit in Copilot Studio in the app settings in Power Apps.
Copilot component: Turns on the Copilot feature in your canvas app so you can add the Copilot control and connect it to a copilot.
Edit in Copilot Studio: Lets you customize the copilot using Copilot Studio. If you leave this option off, only the default copilot is available.
Open your canvas app for editing in Power Apps Studio. On the command bar, select Settings > Updates.
On the Preview tab, turn on the Copilot component and Edit in Copilot Studio settings.

Add the Copilot control to your canvas app
With your canvas app open for editing, and all settings configured:
In the app authoring menu, select Insert, then select Copilot (preview).
When prompted to add a data source to Copilot, select a Dataverse table as the data source.

Note
The Copilot control only supports Dataverse tables for the data source.
Customize the copilot using Copilot Studio
Copilot Studio is an app that lets you create and edit copilots for your apps. Define your copilot's articles, actions, and other features. For example, make your copilot respond to specific questions about your app's data or perform actions like opening a screen or sending an email.
Customize your newly connected copilot in Power Apps through the properties menu.
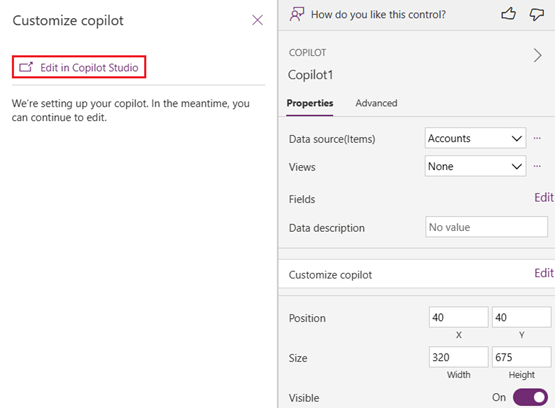
With the Copilot control on your canvas selected, select Edit next to the Customize copilot field in Properties.
If you don't have a copilot created already, select Create new copilot in the Customize Copilot pane. The Copilot control in Power Apps Studio doesn't support enabling an existing Copilot from Copilot Studio.
Copilot Studio opens in a new tab. Any changes you make in Copilot Studio appear in your connected copilot in your canvas app.

Learn more in Quickstart: Create and deploy a copilot.
Collect feedback from app users
Makers and app users provide feedback on copilot responses by selecting the Like (thumbs up) or Dislike (thumbs down) button for each response. Enter detailed feedback in the text box, and then select Submit.
Feedback goes to Microsoft to help improve the Copilot control.
Disallow feedback from app users
If you don't want your app users to provide feedback to Microsoft, turn off the feedback option.
Sign in to Power Apps, and select Tables from the left navigation pane.
Select the Organization table from the list.
In the Organization columns and data section, select the column headers list. The Show existing column popup appears.
Search for Allow users to provide feedback for App Copilot, and make sure the check box is unchecked.
Select Save.
